How to Replace Press Stud on Clothing: Step-by-Step Guide

How to Sew On a Press Stud: A Step-by-Step Guide

Are you tired of dealing with broken press studs on your favorite clothing items? Look no further! In this tutorial, we’ll show you how to sew on a press stud in a few easy steps. Whether you’re a seasoned DIY enthusiast or a beginner, this guide is perfect for anyone looking to repair their clothes and extend their lifespan.

Materials Needed

To get started, you’ll need a few basic materials. These include:

  • Two and a half feet of thread
  • A needle
  • A fabric pencil
  • The press stud you want to sew on

press stud and thread

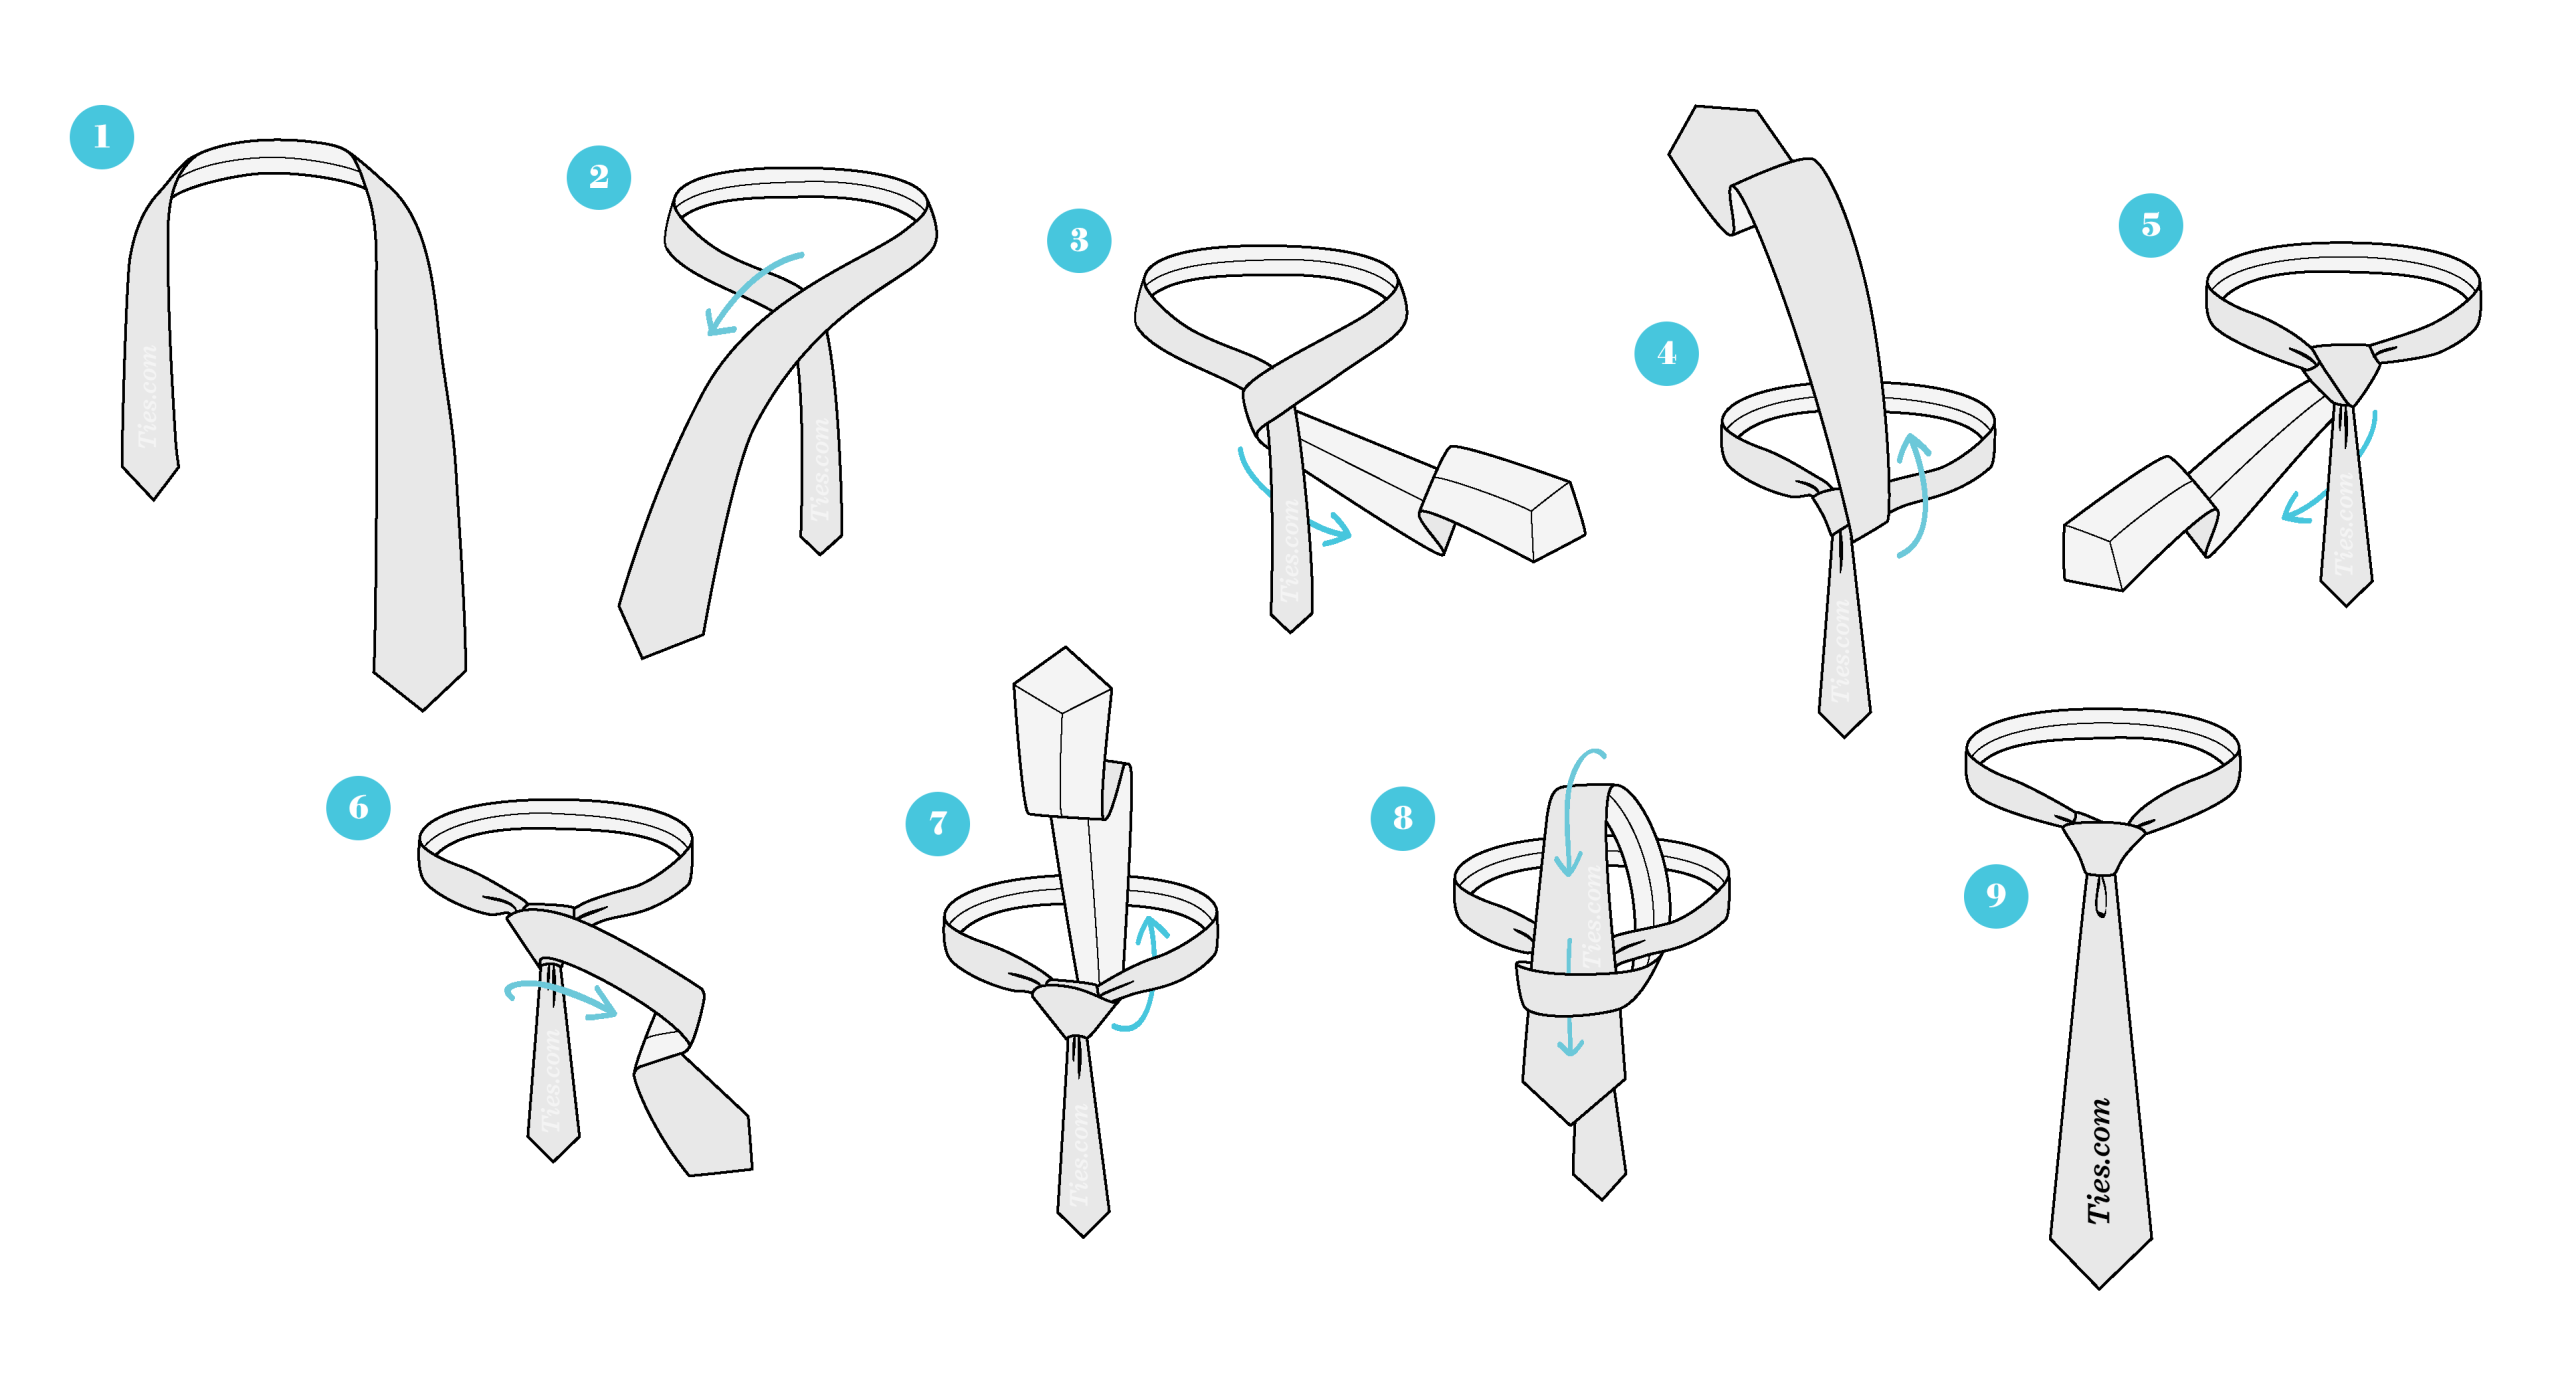
Step 1: Separate the Press Stud

The first step is to separate the press stud into two halves. You should have a ball and a socket. Make sure to keep them separate, as they will be sewn on different parts of the garment.

separated press stud

Step 2: Thread the Needle

Next, thread the needle with the thread. Move the needle to the middle of the thread, so both sides are equal lengths. Tie a knot at the end of the thread, and then tie a second knot over the first one. This will make the knot bigger and more secure.

threading the needle

Step 3: Mark the Fabric

Using a fabric pencil, mark the areas where you want to sew the press stud. Make sure the markings are aligned and evenly spaced. The ball should be sewn on the inner flap of the top piece, while the socket should be sewn on top of the bottom piece.

marking the fabric

Step 4: Sew the Press Stud

Hold down the press stud with your thumb, and poke the needle through only the first layer of the fabric, grabbing only a small bite of the fabric. Push the needle through the hole of the press stud and pull the thread all the way through. If your garment is not double-layered, the thread will show on the other side.

sewing the press stud

Step 5: Create a Sturdy Knot

Thread the needle through the fabric next to the first hole you made. Stop before pulling the needle all the way through, and create a small loop. Thread the needle through the loop and pull. This will create a sturdy knot along the outer rim of the press stud.

creating a sturdy knot

Step 6: Repeat the Process

Repeat steps 4 and 5 until you finish sewing through all four holes of the press stud. Make sure the knots made by the loops fall next to each other, not on top.

repeating the process

Step 7: Finish the Job

Once all the holes are sewn through, insert the needle through the thread of the hole you ended on. Pull the thread until you make a small loop. Insert the needle through the loop and pull all the way. Cut the excess thread, and your press stud is now completely sewn on!

finished press stud

How to Tie a Tie: Half Windsor Tutorial (Apparel N/A)

How to Tie a Tie: Half Windsor

Tying a tie can seem like a daunting task, but with a little practice, you’ll be a pro in no time. In this tutorial, we’ll show you how to tie a Half Windsor knot, a classic and stylish way to keep your tie in place.

Half Windsor knot

Step 1: Begin with the basics

Start by facing a mirror and standing up straight. Place the tie around your neck with the wide end on your right side and the narrow end on your left side. The tie should be hanging down about 12 inches below your neck.

Tie around neck

Step 2: Cross the wide end over the narrow end

Take the wide end of the tie and cross it over the narrow end, so that it forms an “X” shape. This is the starting point for the Half Windsor knot.

Crossing wide end over narrow end

Step 3: Loop the wide end around the narrow end

Take the wide end of the tie and pass it behind the narrow end. Then, bring it up and over the knot, so that it forms a loop.

Looping wide end around narrow end

Step 4: Pass the wide end through the loop

Take the wide end of the tie and pass it through the loop you just created in step 3.

Passing wide end through loop

Step 5: Tighten the knot

Take the wide end of the tie and pull it gently to tighten the knot. You should start to see the Half Windsor knot take shape.

Tightening the knot

Step 6: Adjust the knot

Adjust the knot so that it’s centered and the edges are even. You can also adjust the tightness of the knot to your liking.

Adjusting the knot

Step 7: Tuck the narrow end into the keeper loop

Take the narrow end of the tie and tuck it into the keeper loop. This will keep the tie in place and prevent it from coming undone.

Tucking narrow end into keeper loop

Step 8: Final adjustments

Make any final adjustments to the knot and tie. You should now have a perfectly tied Half Windsor knot.

Final adjustments

And that’s it! With a little practice, you’ll be tying a Half Windsor knot like a pro. If you’re having trouble, don’t worry – it takes a little time and patience to get the hang of it. If you’re still having trouble, consider scheduling a repair with Salvation Repair, where our expert technicians can help you with all your repair needs.

How to Tie a Tie: Prince Albert Knot Guide for Clothing Generic

How to Tie a Tie: Mastering the Prince Albert Knot

Ahoy there, dapper dressers! Are you ready to elevate your neckwear game? Today, we’ll dive into the art of tying the Prince Albert knot, a stylish and sophisticated choice that’s sure to turn heads. But before we jump into the tying, let’s ensure you’re dressed to impress. First things first, pop the collar of your shirt up like you mean it! It’s time to channel your inner gentleman.

How to tie the Prince Albert knot

Getting Started: The Setup

Grab your favorite tie and let’s wrap it around your neck. Arrange the narrow end on your left side, and the wider end on the right. Remember, the wider end will be your main player in this knotting game. As a general guideline, the narrow end should hang around belly button level or higher; adjust accordingly to suit your height. We’re looking for symmetry, after all!

Tying the Prince Albert Knot - Step 1

Let the Tying Begin!

Now comes the fun part. Cross the wide end over the narrow end, letting it rest to the left. Keep everything nice and flat, as twists will only ruin your swanky look. Next, tuck the wide end right under the narrow end so it points to the right. Don’t pull it too tight; we want just enough slack for some style!

Tying the Prince Albert Knot - Step 2

Twists, Turns, and More!

Here’s where it gets interesting: take that broad end and wrap it over the narrow side again, angled to the left. Let it breathe a little – one more loose wrap won’t hurt! Then, slide it under the narrow piece again, leading back to the right. We’re building layers here, so keep it loose yet controlled. You’re a tie-tying maestro in the making!

Tying the Prince Albert Knot - Step 3

Finishing Touches

Almost there! Pull the wide end through the neck loop, sending it straight up. Now, slide it down through the loops you created earlier (from your last two wraps). Feel that magic happen? It’s knot time! Gently pull on the wide end while pushing the knot upwards for a snug fit.

Tying the Prince Albert Knot - Step 4

Tuck and Style

Let’s tidy things up: tuck that narrow end through the keeper loop. If it’s a bit longer than expected, fret not! Simply tuck it between two buttons on your shirt. Voila! Now fold your collar back down over the knot you just expertly tied. Strut your stuff and revel in the compliments that are sure to follow!

Tying the Prince Albert Knot - Final Look

Final Thoughts

And there you have it! You’ve successfully tied the distinguished Prince Albert knot. Not only does this elegant style speak volumes about your sartorial savvy, but it also sets you apart at any gathering. Should your tie ever need a repair or you feel like you need to freshen up your wardrobe, don’t hesitate to check out Salvation Repair for our fantastic service options. Remember, when your ties or clothes need fixing, we have you covered – literally!

Tying the Prince Albert Knot - Style Check

Apple Iphone Voicemail Password Troubleshooting Tutorial

Troubleshooting ‘Incorrect Voicemail Password’ on iPhone: A Step-by-Step Guide

Is your iPhone voicemail password not working? Don’t worry, it’s a common issue that can be fixed with a few simple steps. In this article, we’ll walk you through the process of troubleshooting the ‘Incorrect Voicemail Password’ error on your iPhone. Before we begin, make sure to check your voicemail by following these steps:

1. Turn on airplane mode.

2. Go to Visual Voicemail.

3. Click Call Voicemail, a box will ask to turn off airplane, hit disable.

4. Listen to your voicemails.

Troubleshooting 'Incorrect Voicemail Password' on iPhone

Please note that all your voicemail settings will be erased during this process. So, if you have any important voicemails, make sure to save them before proceeding.

What You Will Need

An AT&T my account. If you don’t have one, you can sign up for free.

Step 1: Reset Your Voicemail Password

First, you need to reset your voicemail password. To do this, follow these steps:

1. Open the Phone app on your iPhone.

2. Tap on the Voicemail tab.

3. Tap on the “Greeting” option.

4. Tap on “Reset Voicemail Password”.

Reset Voicemail Password

Step 2: Update Your Voicemail Settings

After resetting your voicemail password, you need to update your voicemail settings. To do this, follow these steps:

1. Open the Phone app on your iPhone.

2. Tap on the Voicemail tab.

3. Tap on the “Settings” option.

4. Tap on “Voicemail Settings”.

5. Update your voicemail password and settings as desired.

Update Voicemail Settings

Step 3: Test Your Voicemail

Finally, test your voicemail to make sure it’s working correctly. To do this, follow these steps:

1. Open the Phone app on your iPhone.

2. Tap on the Voicemail tab.

3. Tap on the “Call Voicemail” option.

4. Enter your new voicemail password.

5. Listen to your voicemails.

Test Your Voicemail

That’s it! By following these steps, you should be able to troubleshoot the ‘Incorrect Voicemail Password’ error on your iPhone. If you’re still having issues, you may want to contact your carrier or visit a authorized repair center like Salvation Repair for further assistance. At Salvation Repair, we offer a limited lifetime guarantee on all parts and labor, and you can schedule a repair at https://salvationrepair.com/repair.

How to Reset Voicemail Password on iPhone Tutorial

Troubleshooting ‘Incorrect Voicemail Password’ on iPhone

Are you tired of getting the “Incorrect Voicemail Password” error on your iPhone? Don’t worry, we’ve got you covered! In this tutorial, we’ll walk you through the steps to fix this issue and get your voicemail up and running in no time.

Troubleshooting 'Incorrect Voicemail Password' on iPhone

Step 1: Check Your Voicemail Settings

Before we dive into the troubleshooting process, let’s make sure your voicemail settings are correct. To do this, follow these steps:

  1. Turn on Airplane Mode on your iPhone.
  2. Go to Visual Voicemail.
  3. Click on “Call Voicemail”. A box will ask you to turn off Airplane Mode, hit “Disable”.
  4. Listen to your voicemails.

Checking Voicemail Settings

Step 2: Reset Your Voicemail Password

If the above steps don’t work, it’s time to reset your voicemail password. To do this, you’ll need to create an AT&T my account. If you don’t have one, you can sign up for free.

Once you have an AT&T my account, follow these steps:

  1. Go to the AT&T website and log in to your account.
  2. Click on “My Account” and then “Voicemail”.
  3. Click on “Reset Voicemail Password”.
  4. Enter your new password and confirm it.

Resetting Voicemail Password

Step 3: Contact Salvation Repair for Further Assistance

If none of the above steps work, it’s time to contact a professional for further assistance. At Salvation Repair, we offer a limited lifetime guarantee on all parts and labor. Our expert technicians can help you troubleshoot and fix any issues with your iPhone’s voicemail.

Contact us today to schedule a repair and get your voicemail up and running in no time! Schedule a repair

Salvation Repair Logo

How to Fix Apple iPhone Touch Screen Issues Guide

iPhone Touch Screen Not Working: A Comprehensive Guide to Fixing the Issue

When your iPhone’s touch screen stops working, it can be a frustrating and disorienting experience. Whether you’re typing out a text message, browsing the web, or playing your favorite game, a non-responsive touch screen can bring your entire experience to a grinding halt. But fear not, dear iPhone user! With this comprehensive guide, you’ll be well on your way to diagnosing and fixing the issue, and getting back to enjoying your device in no time.

iPhone Touch Screen Not Working

Before we dive into the fix, it’s essential to understand the possible causes of a non-responsive touch screen. In most cases, the issue is related to software glitches, display problems, or physical damage to the touch screen itself. In this tutorial, we’ll cover the most common causes and provide step-by-step instructions on how to troubleshoot and fix the issue.

Troubleshooting iPhone Touch Screen Issues

Step 1: Force Restart

A force restart is a simple yet effective way to troubleshoot touch screen issues. To do this, press and hold the Sleep/Wake button and the Home button simultaneously for at least 10 seconds, until you see the Apple logo appear on the screen.

Force Restart iPhone

Step 2: Check for Software Issues

If a force restart doesn’t resolve the issue, it’s possible that a software glitch is causing the problem. Try restarting your iPhone in Recovery Mode, which can help refresh the device’s operating system and fix any software-related issues.

Restart iPhone in Recovery Mode

Step 3: Inspect the Touch Screen

In some cases, physical damage to the touch screen can cause it to malfunction. Inspect the screen for any signs of cracks, scratches, or other damage. If you notice any damage, it may be necessary to replace the touch screen or seek professional repair.

Inspect iPhone Touch Screen for Damage

Step 4: Clean the Touch Screen

Fingerprints, dirt, and other debris can accumulate on the touch screen and cause it to malfunction. Clean the screen gently with a soft cloth and a mild cleaning solution to remove any dirt or debris.

screen.png” alt=”Clean iPhone Touch Screen” />

Step 5: Replace the Touch Screen

If none of the above steps resolve the issue, it may be necessary to replace the touch screen. This can be a more involved process, but it’s often the most effective way to fix the problem. At Salvation Repair, we offer a limited lifetime guarantee on all parts and labor, so you can trust that your iPhone will be in good hands.

Schedule a repair

By following these steps, you should be able to diagnose and fix the issue with your iPhone’s touch screen. Remember to always backup your data regularly and to seek professional help if you’re not comfortable with DIY repairs. At Salvation Repair, we’re committed to providing the highest-quality repair services and a limited lifetime guarantee on all parts and labor.

Salvation Repair

We hope this tutorial has been helpful in resolving the issue with your iPhone’s touch screen. If you have any further questions or concerns, please don’t hesitate to reach out to us at [insert contact information].

Contact Salvation Repair

Troubleshooting Apple Iphone Voicemail Password

Troubleshooting ‘Incorrect Voicemail Password’ on iPhone

Having trouble accessing your voicemail on your iPhone? Don’t worry, we’ve got you covered! In this tutorial, we’ll walk you through the steps to troubleshoot and fix the ‘Incorrect Voicemail Password’ issue on your iPhone.

Troubleshooting 'Incorrect Voicemail Password' on iPhone

What’s Causing the Issue?

The ‘Incorrect Voicemail Password’ error usually occurs after upgrading to iOS 4. This issue can be frustrating, but don’t worry, it’s easy to fix. Before we dive into the solution, let’s first understand what’s causing the problem.

iPhone Voicemail Troubleshooting

Step 1: Turn On Airplane Mode

Turn on Airplane Mode on your iPhone. This will help you access your voicemail without any network interference.

Reset Voicemail Password on iPhone

Step 2: Access Visual Voicemail

Go to the Phone app and tap on the “Voicemail” tab. You’ll see a prompt asking you to enter your voicemail password. Tap “Call Voicemail” and then hit “Disable” when prompted to turn off Airplane Mode.

iPhone Voicemail Not Working

Step 3: Reset Your Voicemail Password

Now, you’ll need to reset your voicemail password. To do this, you’ll need to sign in to your AT&T account. If you don’t have an account, you can sign up for one.

Fix Voicemail Password on iPhone

Step 4: Verify Your Voicemail Settings

Once you’ve reset your voicemail password, go back to the Phone app and access your voicemail. You should now be able to access your voicemails without any issues.

Voicemail Not Working on iPhone

Conclusion

That’s it! By following these simple steps, you should be able to troubleshoot and fix the ‘Incorrect Voicemail Password’ issue on your iPhone. If you’re still having trouble, feel free to schedule a repair with us at Salvation Repair. We offer a limited lifetime guarantee on all parts and labor, and our expert technicians will be happy to help you resolve the issue.

Troubleshooting Incorrect Voicemail Password On Apple Iphone

Troubleshooting ‘Incorrect Voicemail Password’ on Apple iPhone

Are you having trouble accessing your voicemail on your Apple iPhone? Don’t worry, we’ve got you covered! In this tutorial, we’ll walk you through the steps to troubleshoot and fix the ‘Incorrect Voicemail Password’ issue on your iPhone.

Troubleshooting 'Incorrect Voicemail Password' on iPhone

Please note that all your voicemail settings will be erased during this process. To avoid losing your voicemails, please follow these steps:

Step 1: Turn on Airplane Mode

Go to your iPhone’s Settings and turn on Airplane Mode. This will disable your phone’s ability to connect to the internet and make calls.

Turning on Airplane Mode on iPhone

Step 2: Access Visual Voicemail

Open the Phone app on your iPhone and tap on the Voicemail tab. Then, tap on the “Call Voicemail” button.

Accessing Visual Voicemail on iPhone

Step 3: Disable Airplane Mode and Listen to Voicemails

A box will appear asking you to turn off Airplane Mode. Tap on “Disable” to turn it off. Then, listen to your voicemails to make sure they are working properly.

Disabling Airplane Mode and listening to voicemails on iPhone

What you will need:

That’s it! If you’re still having trouble, you can always contact Salvation Repair for assistance. We offer free postage for mail-in repairs and on-site mobile repairs at your location for local customers in Mississippi. Our team of experts will be happy to help you fix your iPhone and get you back up and running in no time.

Remember, at Salvation Repair, we offer a limited lifetime guarantee on all parts and labor. You can schedule a repair with us by visiting our website at https://salvationrepair.com/repair.

How to Replace iPhone Phone Voicemail Password Guide

Troubleshooting ‘Incorrect Voicemail Password’ on iPhone

Are you tired of getting the ‘Incorrect Voicemail Password’ error on your iPhone? Don’t worry, we’ve got you covered. In this tutorial, we’ll walk you through the steps to fix this issue and get your voicemail up and running in no time.

iPhone voicemail troubleshooting

Before we begin, please note that all your voicemail settings will be erased during this process. So, if you have any important voicemails, make sure to check them before proceeding.

Step 1: Check Your Voicemail Settings

First, let’s check your voicemail settings to see if there’s an issue with your password. To do this, follow these steps:

1. Turn on airplane mode on your iPhone.

2. Go to Visual Voicemail.

3. Click on Call Voicemail. A box will ask you to turn off airplane mode, but hit disable instead.

4. Listen to your voicemails to see if you can access them.

iPhone voicemail not working

Step 2: Reset Your Voicemail Password

If you’re still having trouble accessing your voicemail, it’s time to reset your password. To do this, you’ll need to sign in to your AT&T account. If you don’t have an account, you can sign up for one on the AT&T website.

Once you’re signed in, follow these steps:

1. Go to the AT&T website and sign in to your account.

2. Click on the “My Account” tab.

3. Select “Voicemail” from the dropdown menu.

4. Click on “Reset Voicemail Password.”

5. Enter your new password and confirm it.

Reset Voicemail Password on iPhone

Step 3: Test Your Voicemail

Now that you’ve reset your voicemail password, it’s time to test it out. Follow these steps:

1. Turn off airplane mode on your iPhone.

2. Go to Visual Voicemail.

3. Click on Call Voicemail.

4. Enter your new password and see if you can access your voicemails.

Fix Voicemail Not Working On iPhone

If you’re still having trouble, don’t worry. You can always contact Salvation Repair for help. We offer a limited lifetime guarantee on all parts and labor, and our expert technicians can fix your iPhone in no time. Schedule a repair today at https://salvationrepair.com/repair.

Voicemail not working on iPhone

How to Replace Parts: Canon EOS 20D Repair Tutorial

Repair Tutorial: Fixing Your Canon EOS 20D

The Canon EOS 20D is a popular DSLR camera that has been widely used by photographers for its high-quality image capture capabilities. However, like any electronic device, it can be prone to malfunctions and require repair. In this tutorial, we will guide you through the process of repairing your Canon EOS 20D.

Canon EOS 20D Repair Tutorial

The first step in repairing your Canon EOS 20D is to disassemble the camera. Start by pulling up on both sides of the eyepiece cap. It should come off with little pressure.

Canon EOS 20D Repair Tutorial

Next, remove the two screws hidden under the viewfinder eyepiece cap. Then, peel off the rubber grip on the back by grasping one of the corners and pulling it away from the camera body.

Canon EOS 20D Repair Tutorial

Once the rubber grip is removed, a hidden screw is revealed. Remove both screws from the rear of the camera. Then, remove the two indicated screws from the bottom of the camera.

Canon EOS 20D Repair Tutorial

When lifting the panel, make sure not to lift it too high, since you’ll run the risk of tearing the cable, or damaging the connector on the board. Flip the lock on the flex cable connector up with a spudger.

Canon EOS 20D Repair Tutorial

The front panel should pop off, now that the cable has been disconnected. When reassembling the device, make sure to insert the left side of the front panel first, since it has a small lip that needs to fit under the left part of the camera case.

Canon EOS 20D Repair Tutorial

Disconnect all the indicated connectors by opening their latches. Remove the flex cable that connects the logic board to the secondary control board.

Canon EOS 20D Repair Tutorial

Pull the small green connector out of its socket. Be careful when removing it, as it is possible to tear the tiny wires running into the connector.

Canon EOS 20D Repair Tutorial

Disconnect the two hidden connectors under the top connector indicated in pink. Disconnect the third hidden connector.

Canon EOS 20D Repair Tutorial

Remove the three screws from the edges of the board. Flip the board up and out so that the ground connection can be unscrewed.

Step 1

open the phone

opening a phone

🍪
Have a cookie! This site uses cookies to enhance your experience. Opt-Out Options.