Samsung Galaxy S21 Ultra NFC Antenna & Charging Coil Assembly Replacement

Duration: 45 minutes
Steps: 13 Steps

Ready to swap out that damaged NFC antenna and charging coil assembly on your Samsung Galaxy S21 Ultra? This guide walks you through the process, specifically for the SM-G998B/DS (international) model. Keep in mind, some models have an extra antenna cable tucked into the midframe edge. When reassembling, don’t forget to replace the adhesive seals—skipping this step might let your device work fine but could compromise its water resistance. You’ll want fresh adhesive to secure those components back in place. If you need a hand, you can always schedule a repair.

Step 1

– Grab your iOpener and give the back cover a spa day—let it sit for a solid three minutes. This helps soften up the adhesive, making your next moves a whole lot easier.

Tools Used
  1. iOpenerSamsung Galaxy S21 Ultra NFC Antenna & Charging Coil Assembly Replacement
  2. Heat GunSamsung Galaxy S21 Ultra NFC Antenna & Charging Coil Assembly Replacement

Step 2

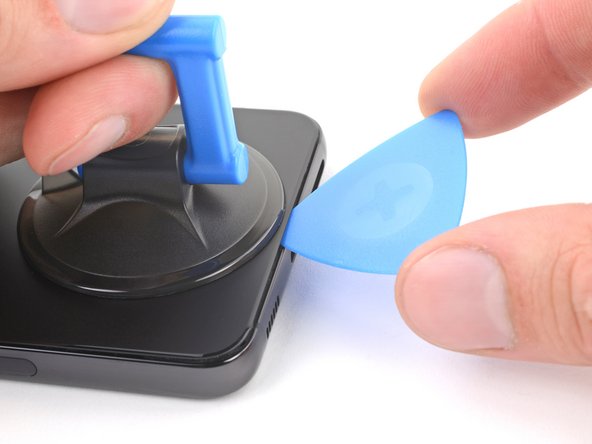
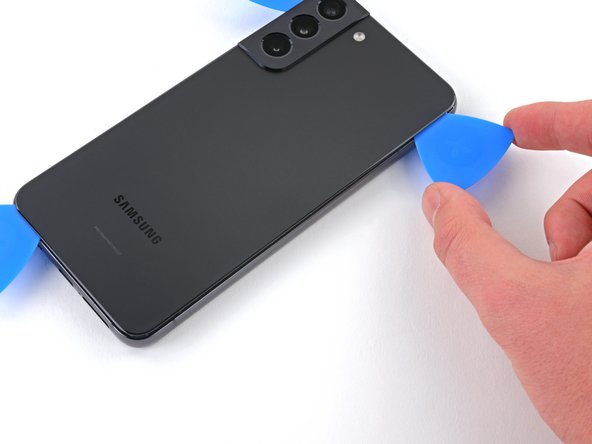
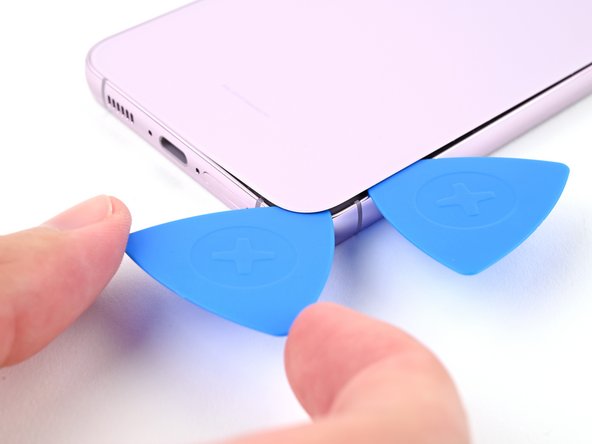
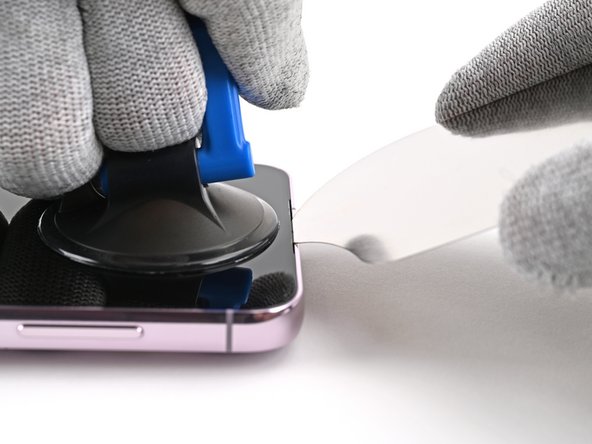
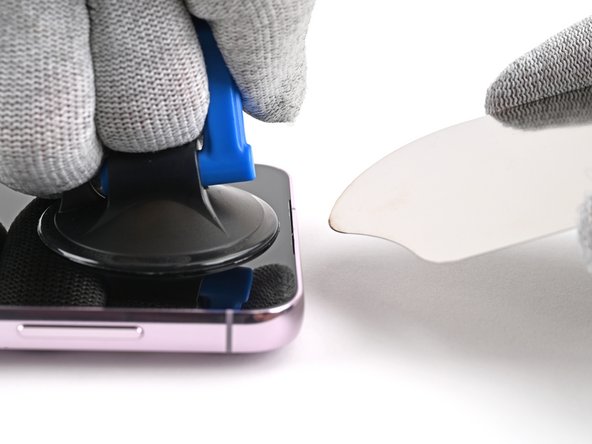
– Stick a suction handle on the lower edge of the back cover—get it nice and close to the edge.

– Give the suction handle a gentle pull to crack open a tiny gap between the back cover and the frame. It’s like opening a stubborn pickle jar, but cooler.

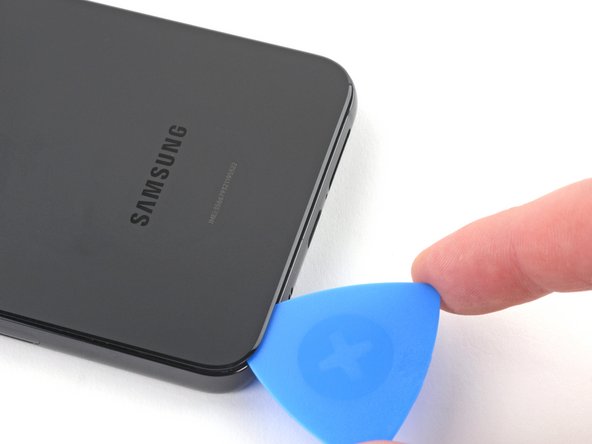
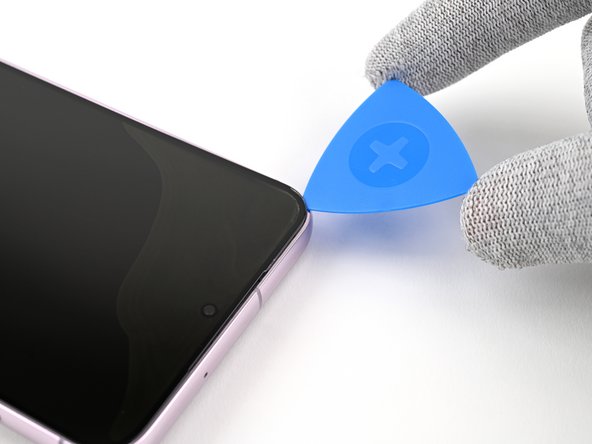
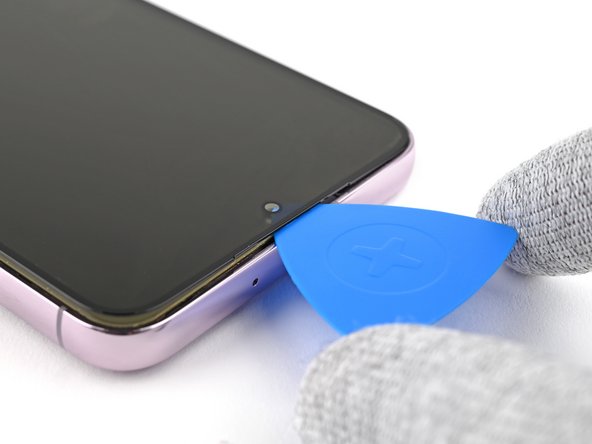
– Slide an opening pick into that gap you just made. Smooth moves.

– Work the pick over to the bottom left corner to slice through the sticky adhesive—think of it as cutting through digital glue.

– Keep the pick chilling right there so the adhesive doesn’t sneak back together.

Tools Used
  1. iOpenerSamsung Galaxy S21 Ultra NFC Antenna & Charging Coil Assembly Replacement
  2. Suction HandleSamsung Galaxy S21 Ultra NFC Antenna & Charging Coil Assembly Replacement

Step 3

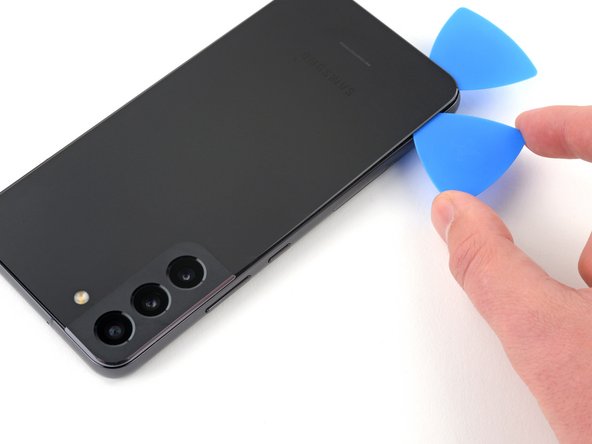
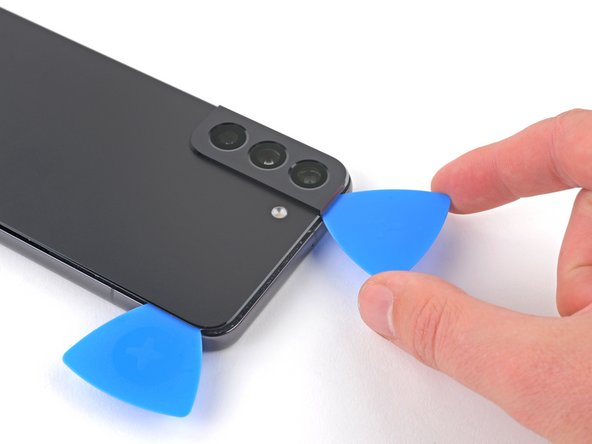
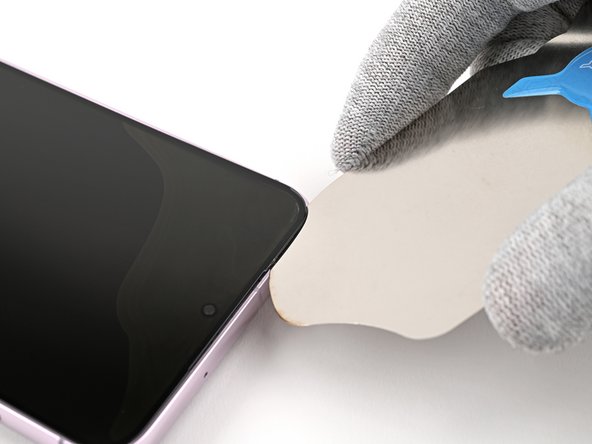
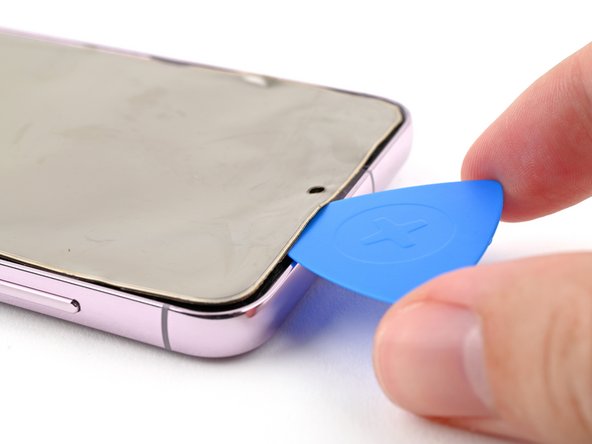
– Slide another pick in at the phone’s bottom edge—think of it as giving your phone a gentle high-five.

– Swipe that pick down to the bottom-right corner to sweet-talk the glue into letting go.

– Let the picks chill there for a sec so the adhesive doesn’t try to sneak back together.

Step 4

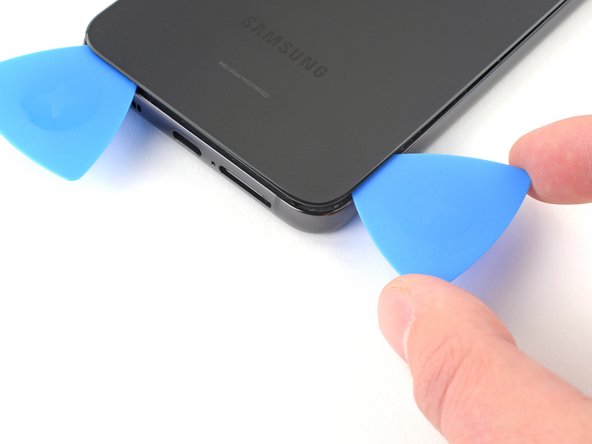
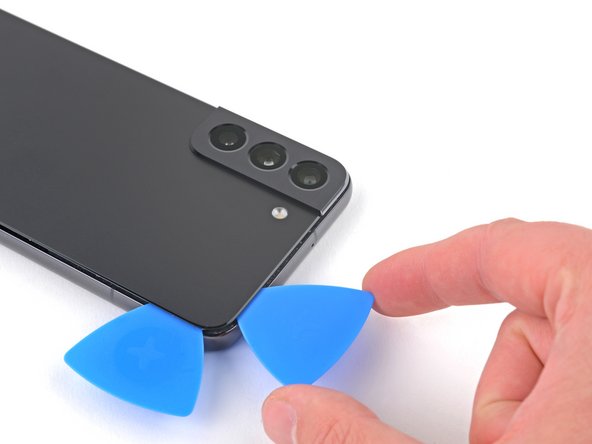
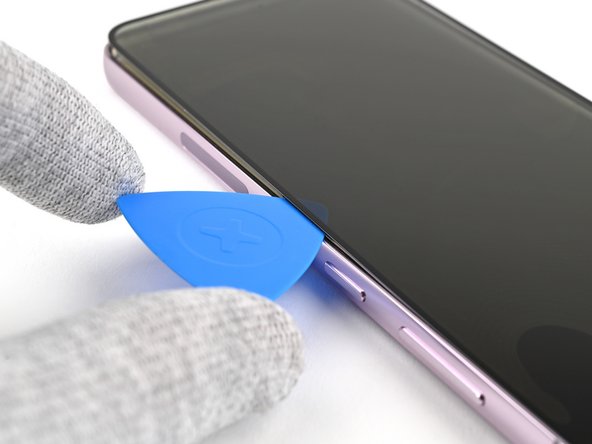
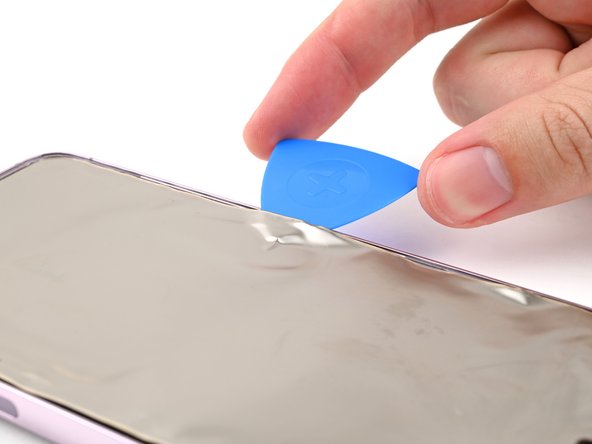
– Pop a third opening pick into the bottom right corner of your phone—like you’re dealing cards, but for repairs.

– Glide that pick up the right edge to slice through the sticky adhesive. Smooth moves only.

– Leave the pick chilling in the top right corner, so the adhesive doesn’t get any bright ideas about resealing.

Tools Used
  1. iOpenerSamsung Galaxy S21 Ultra NFC Antenna & Charging Coil Assembly Replacement

Step 5

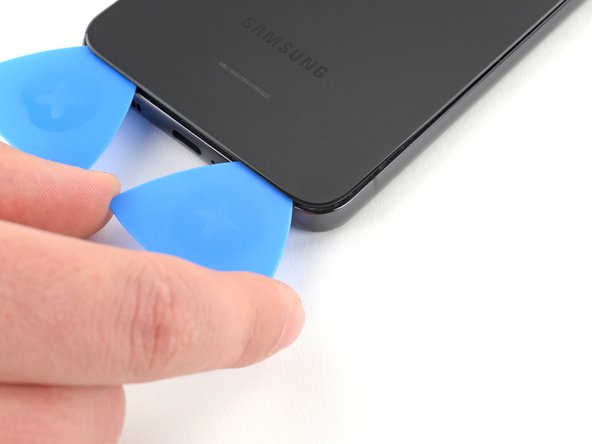
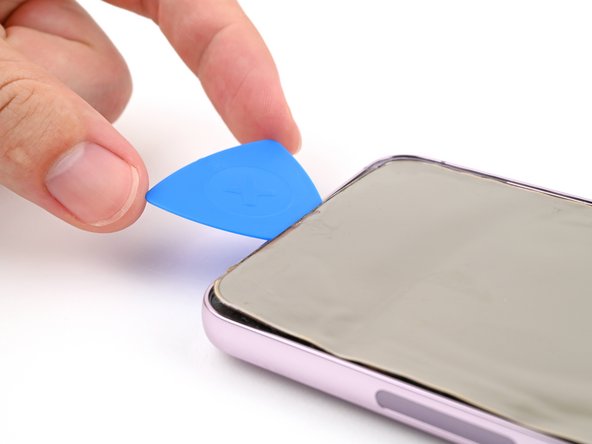
– Pop a fourth pick under the top right corner of your phone—like you’re sneaking it into a card game.

– Glide that pick along the top edge to slice through the sticky stuff holding things together.

– Leave your pick chilling in the top left corner so the adhesive doesn’t get any ideas about sticking again.

Step 6

– Slip in a fifth opening pick just beneath the top left corner to get things started.

– Gently glide the opening pick along the left edge of the back cover to cut through the remaining adhesive, making your way around the perimeter.
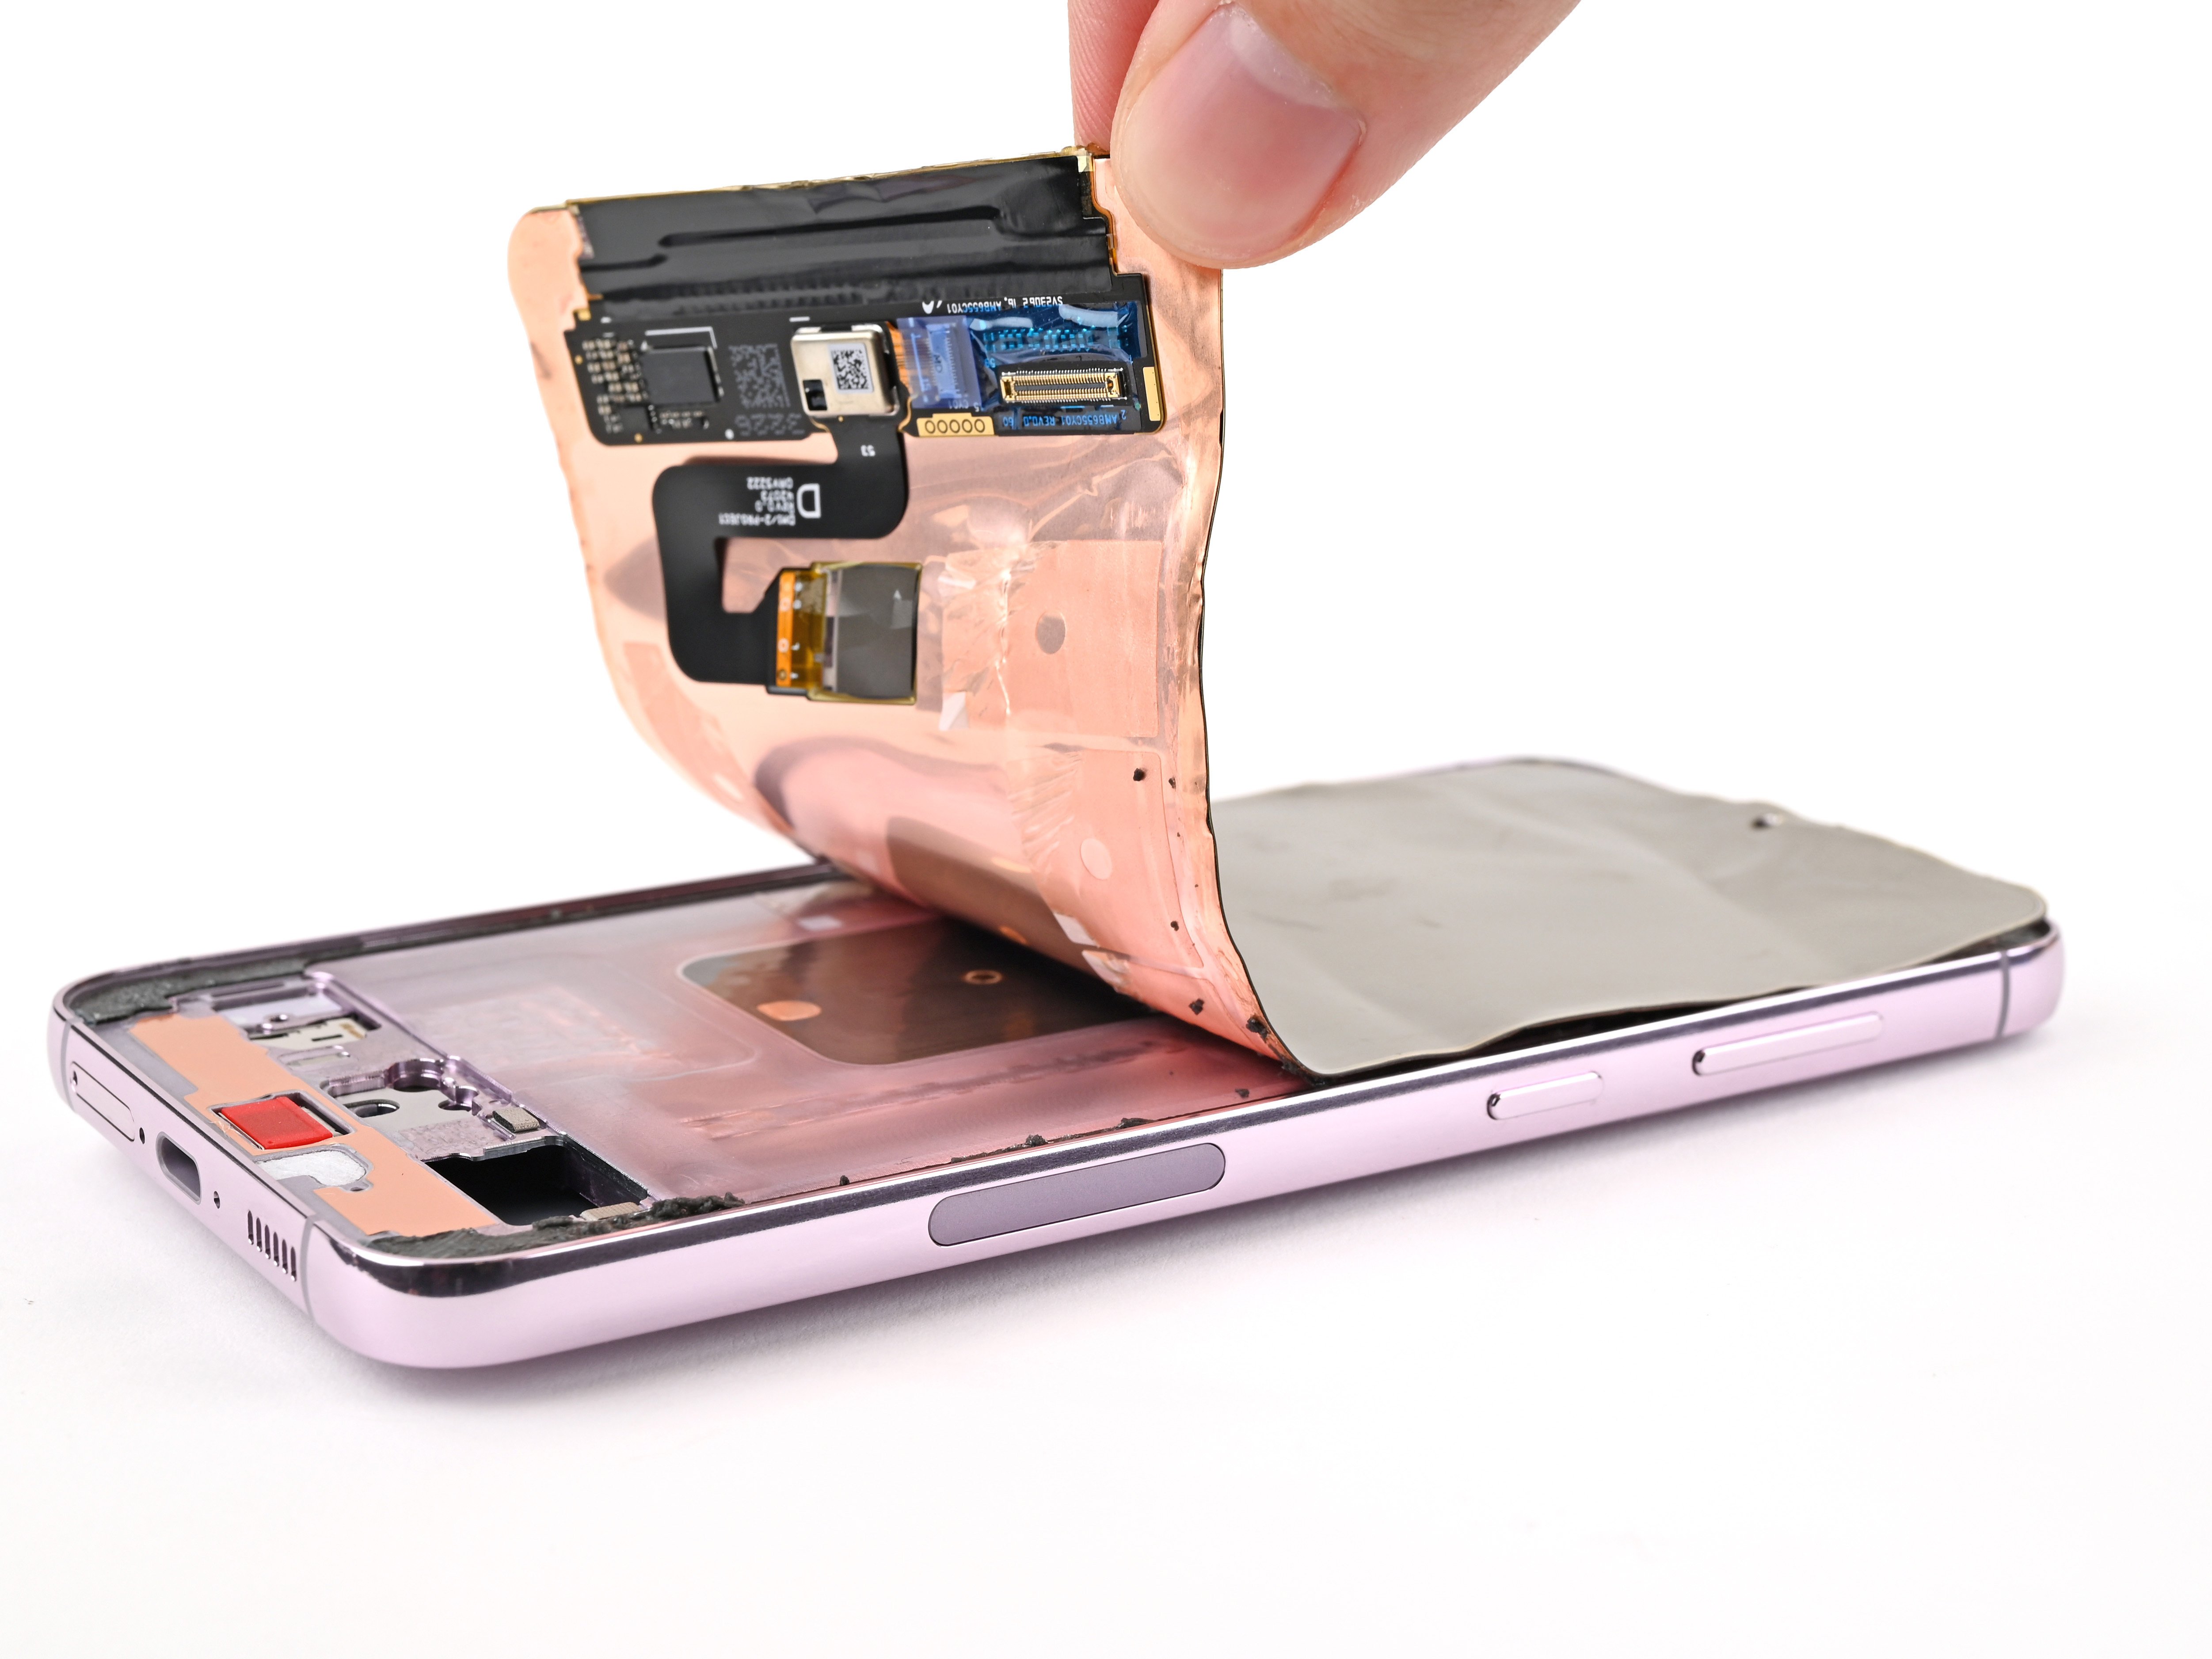
Step 7

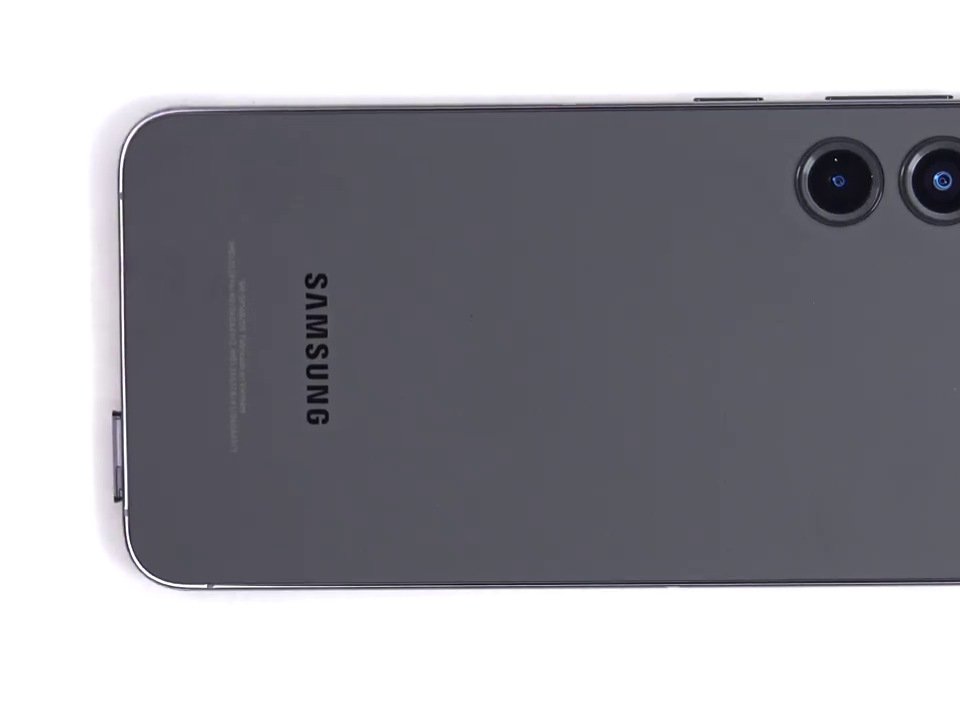
– Pop off the back cover—nice and easy.

– When you’re putting things back together:

– Take a moment to power up your phone and make sure everything’s working before you lock it down. Don’t forget to shut it off again before the next step.

– Clear out any leftover sticky bits with tweezers or your fingers.

– Grab some isopropyl alcohol (over 90%) and wipe away any stubborn adhesive.

– Got custom-cut adhesives? Check out Salvation Repair’s guide for the lowdown.

– Rocking double-sided tape? Salvation Repair’s guide has your back.

Step 8

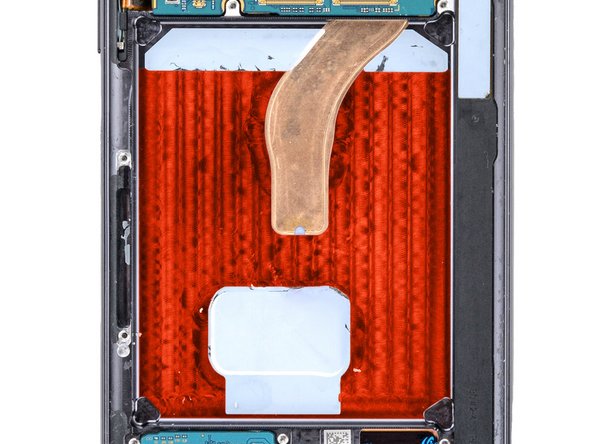
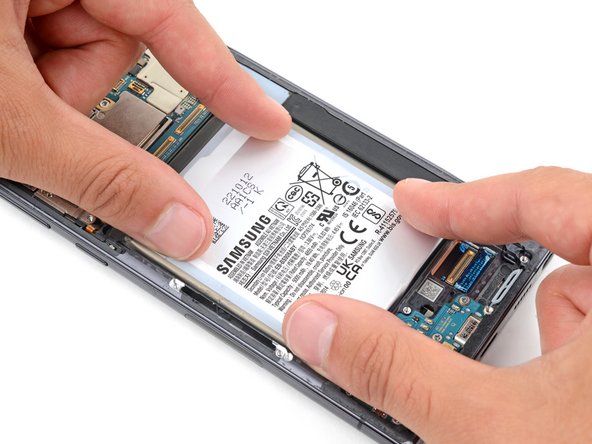
– Slide an opening pick under the left bottom corner of the NFC antenna and charging coil assembly. Be gentle, and don’t worry, you’ve got this!

– Carefully glide the opening pick along the bottom left edge of the assembly to separate it from the battery. It’s like peeling a banana—easy does it!

Step 9

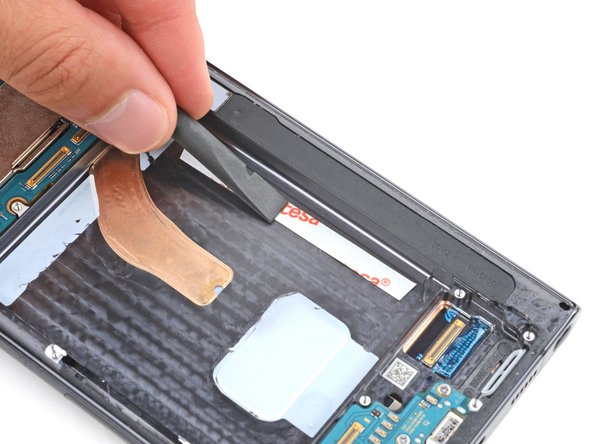
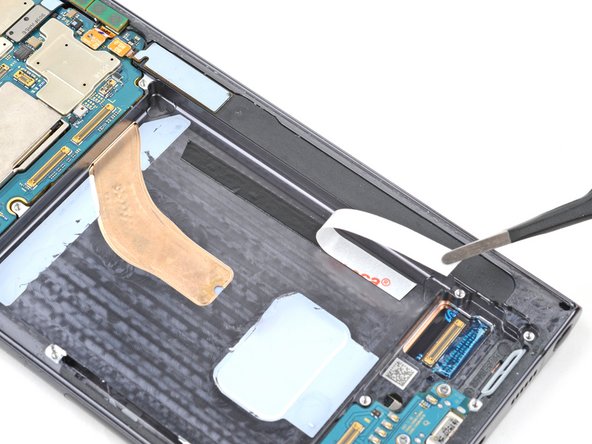
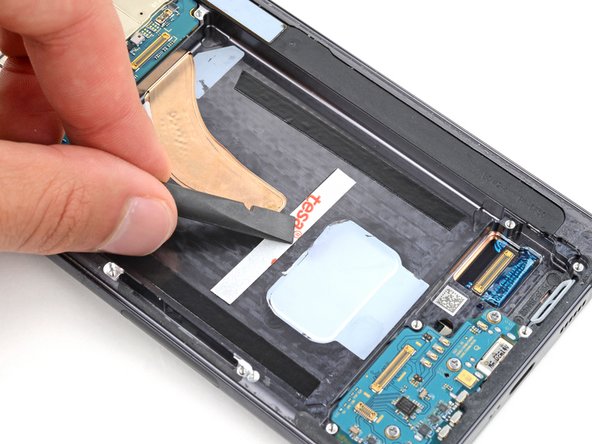
– Start by sliding an opening pick under the lower end of the NFC antenna and charging coil assembly. You’re on your way!

– Now, gently glide that pick along the bottom of the assembly to gently pry it away from the loudspeaker. You’re doing great!

Step 10

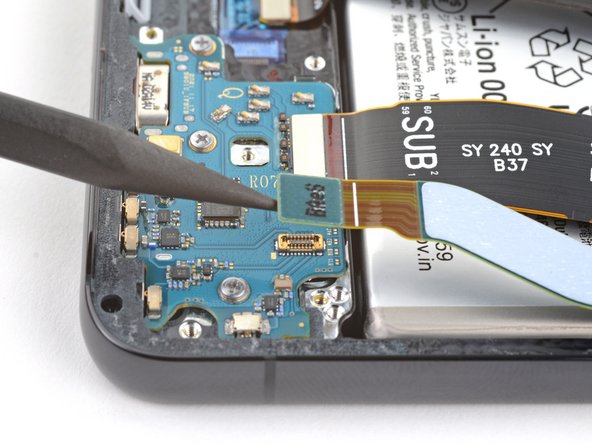
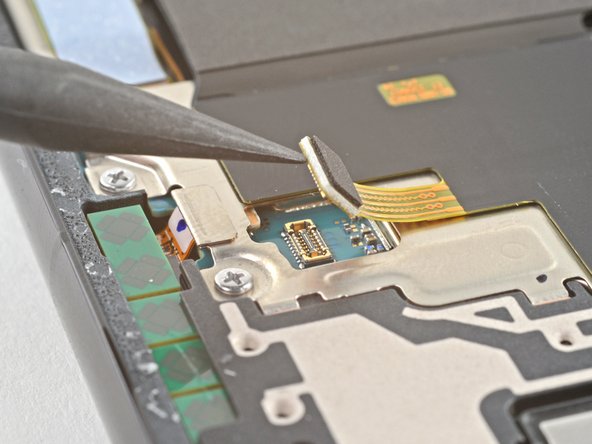
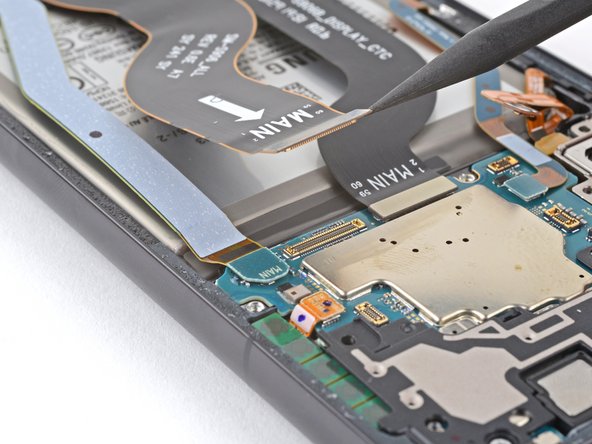
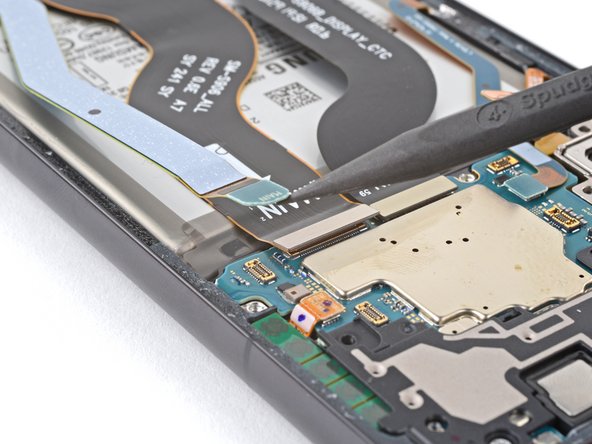
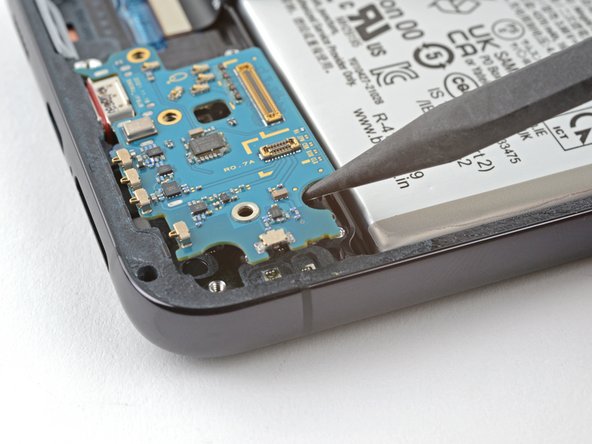
– Grab your spudger and gently pop the charging coil connector up from its socket. It’s like unplugging a tiny friend—just give it a careful lift!

Tools Used
  1. SpudgerSamsung Galaxy S21 Ultra NFC Antenna & Charging Coil Assembly Replacement

Step 11

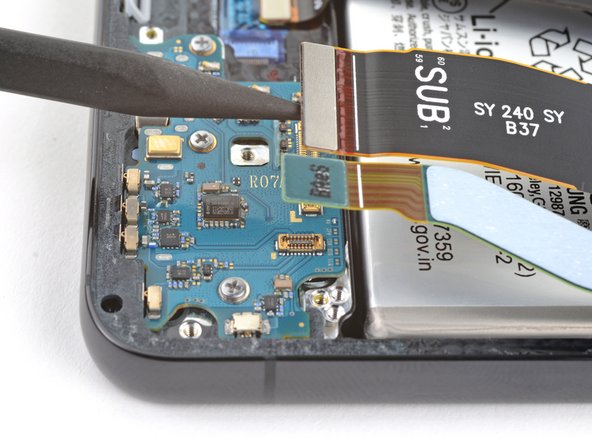
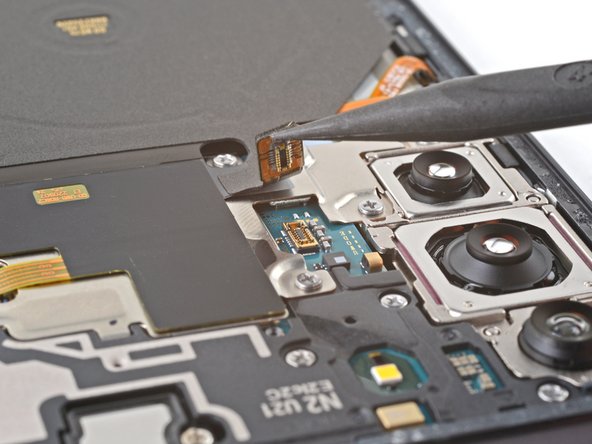
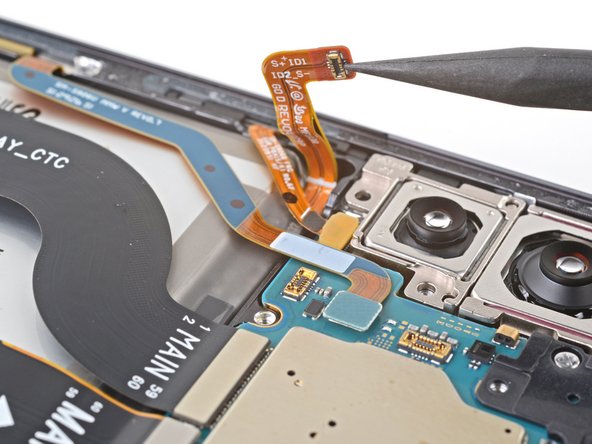
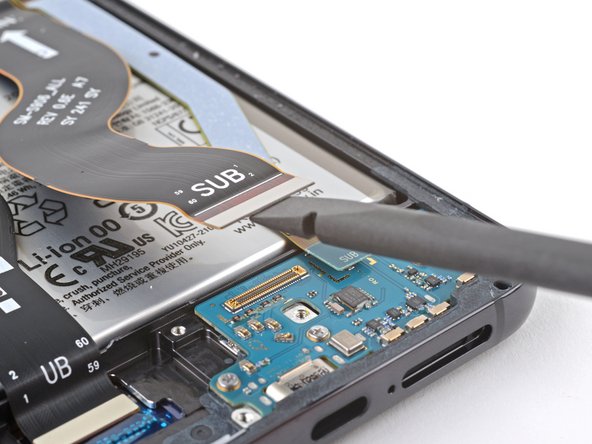
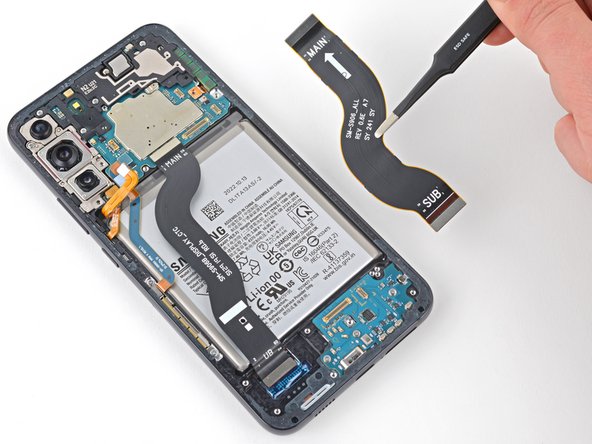
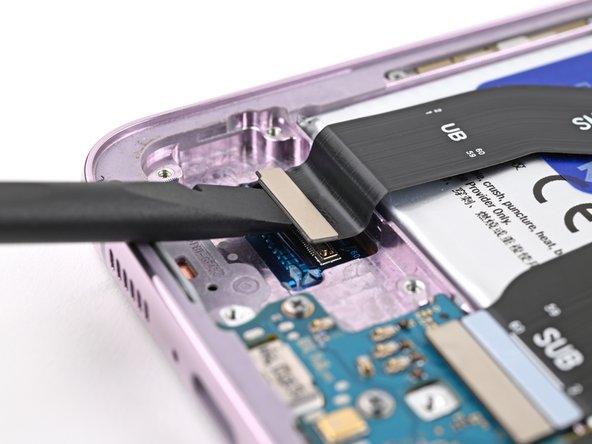
– Grab your trusty spudger and gently pop the NFC antenna connector straight up out of its socket. Easy does it!

Tools Used
  1. SpudgerSamsung Galaxy S21 Ultra NFC Antenna & Charging Coil Assembly Replacement

Step 12

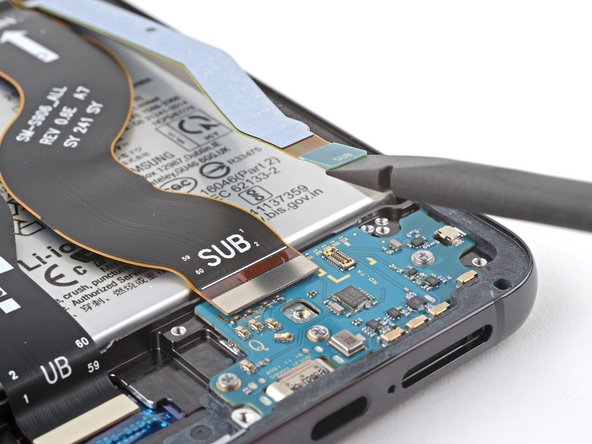
– Grab your Phillips screwdriver and take out the five screws (they’re 3.9 mm long) holding the NFC antenna and charging coil assembly in place.
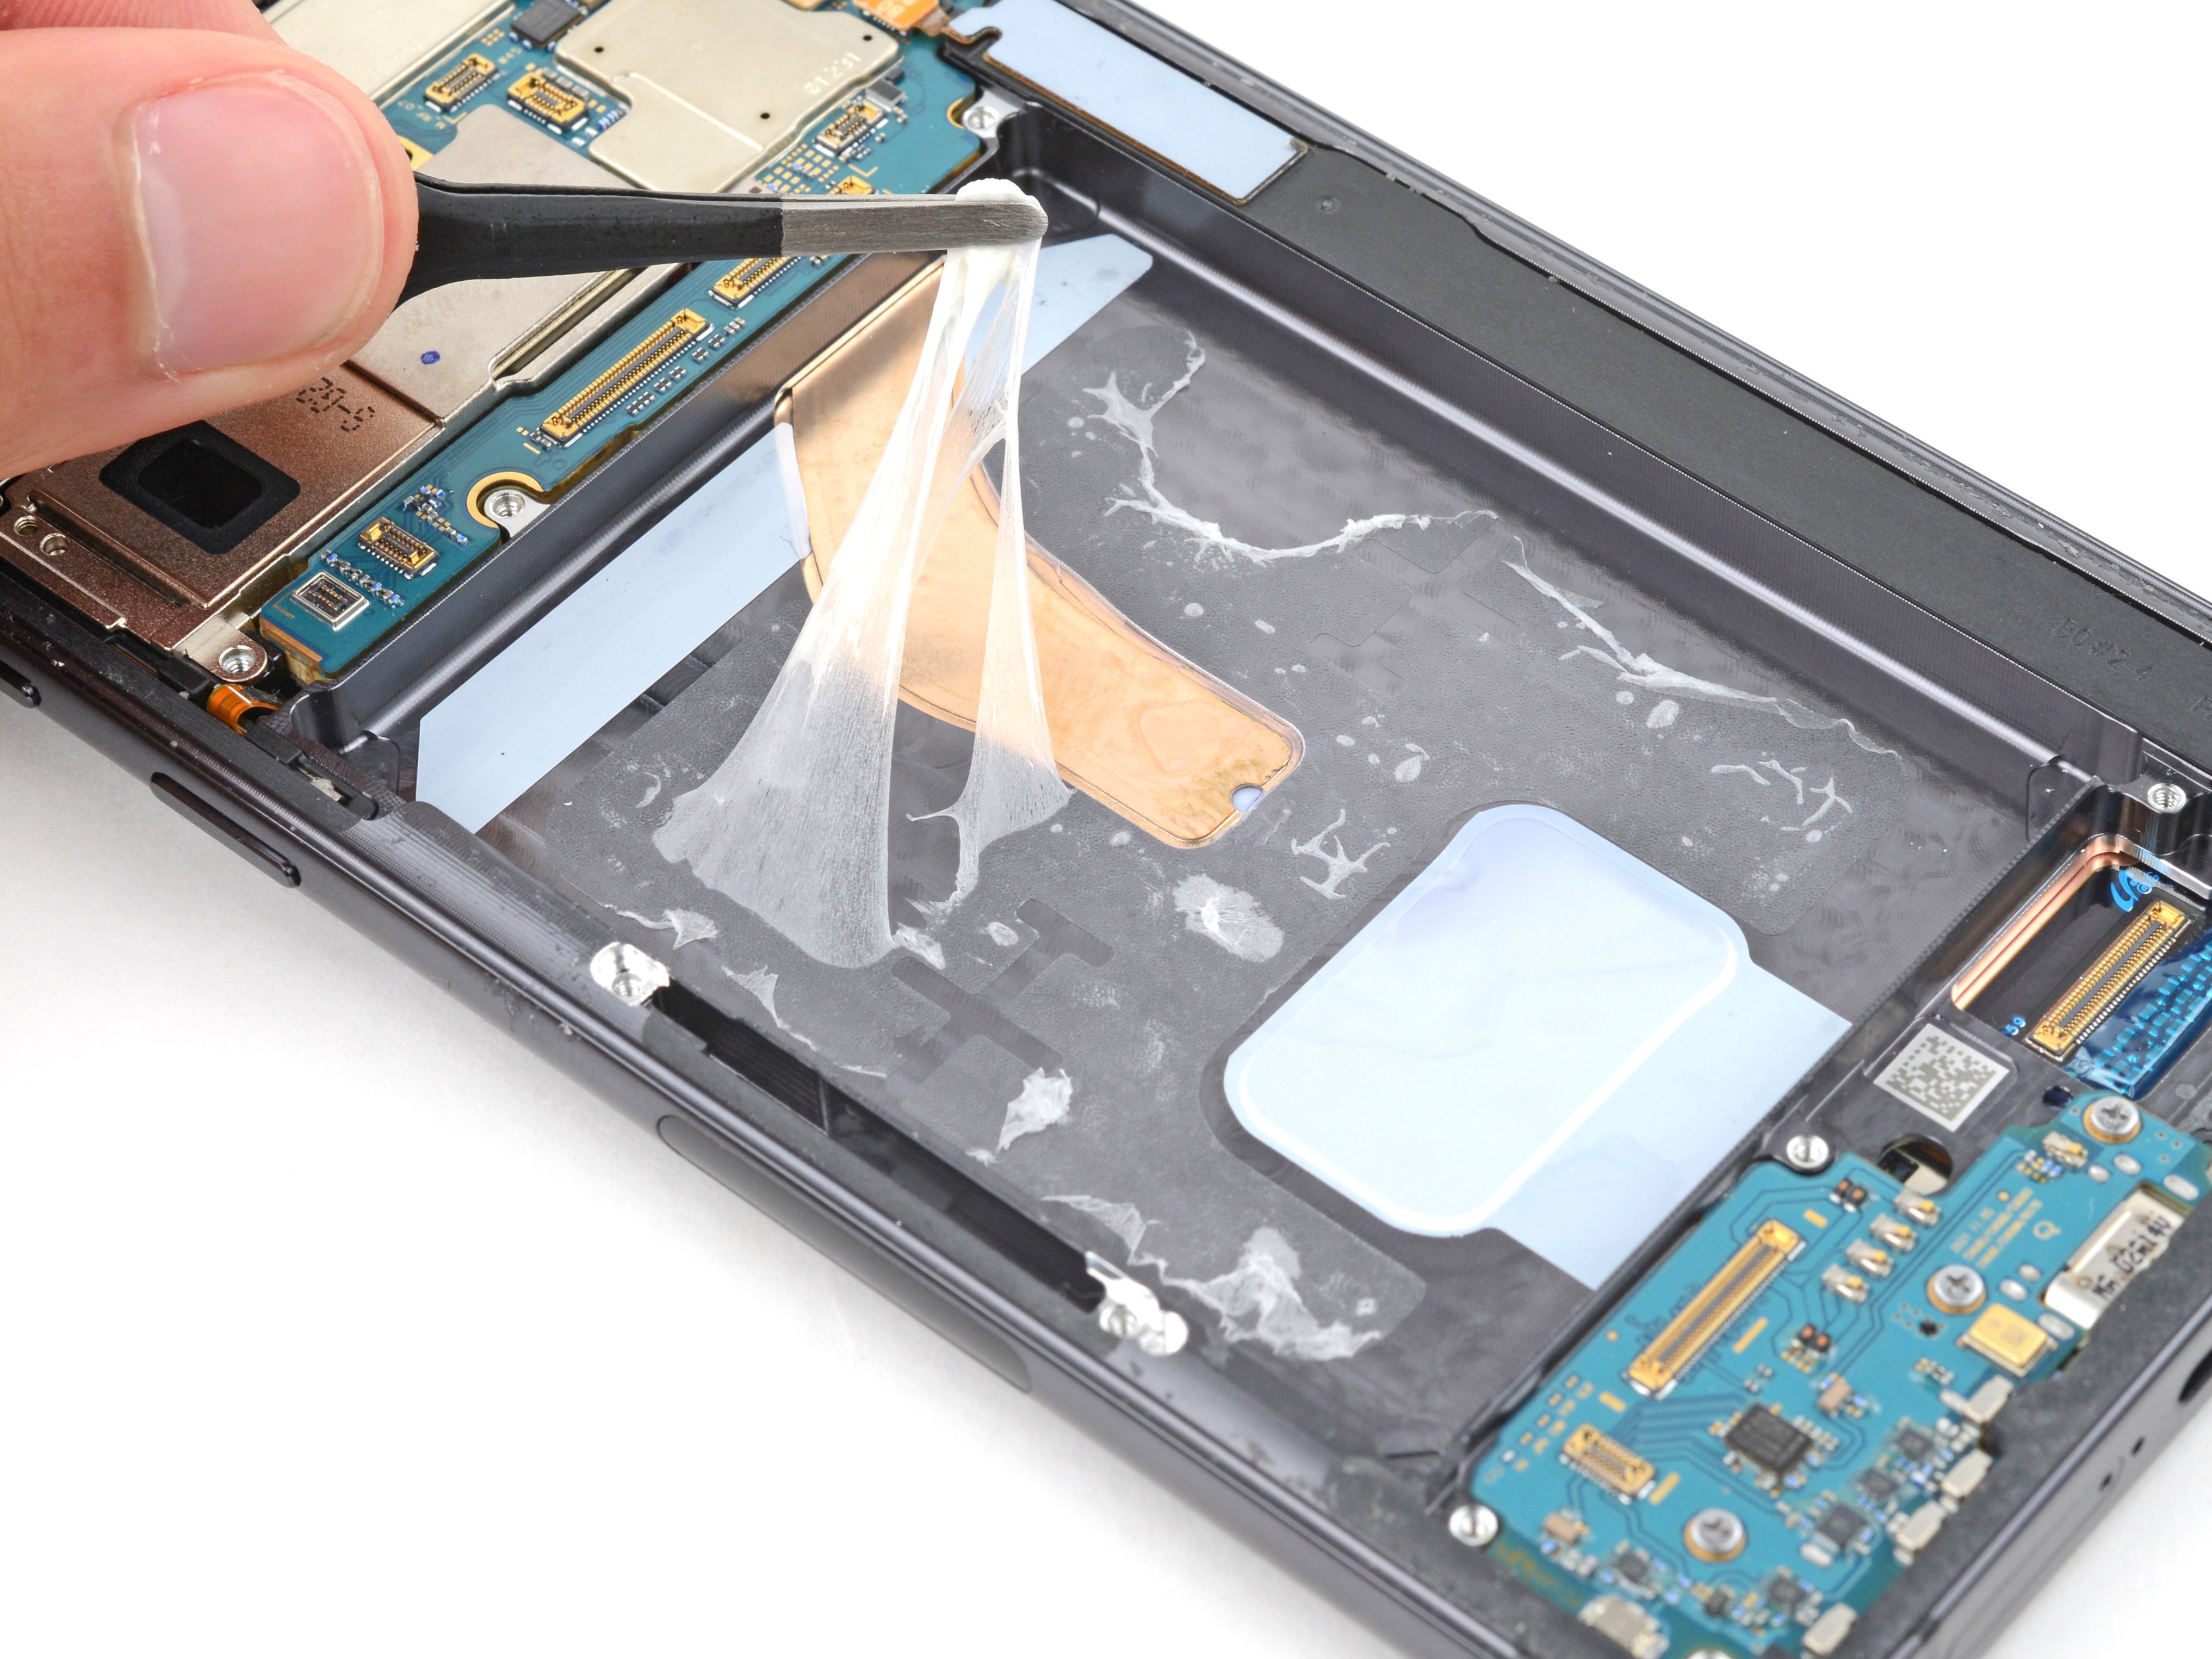
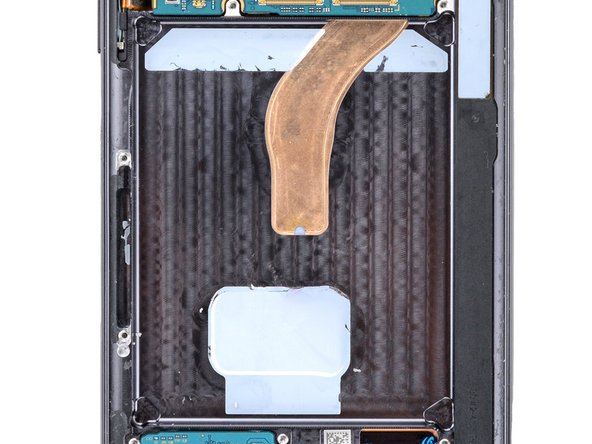
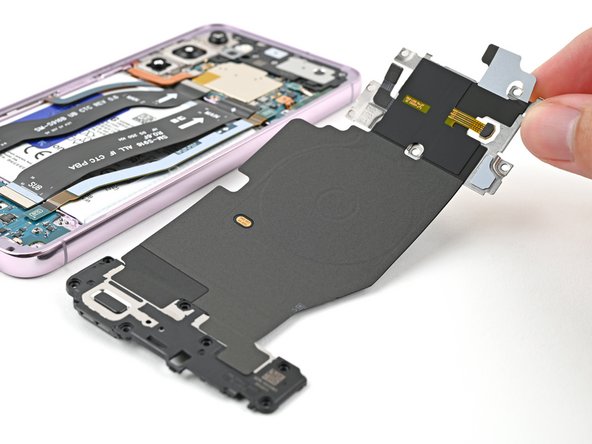
Step 13

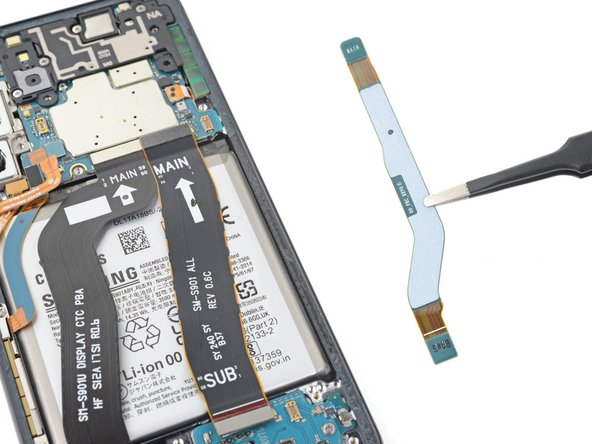
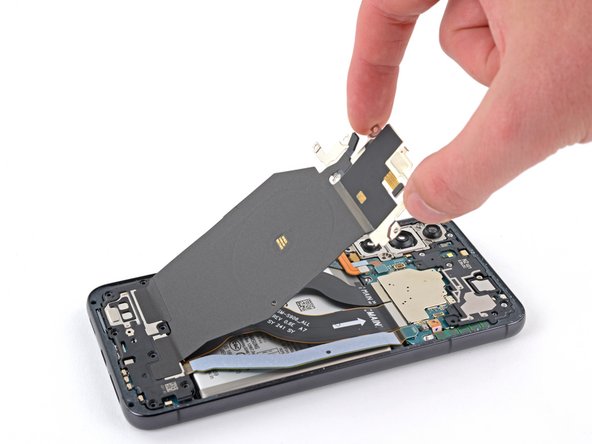
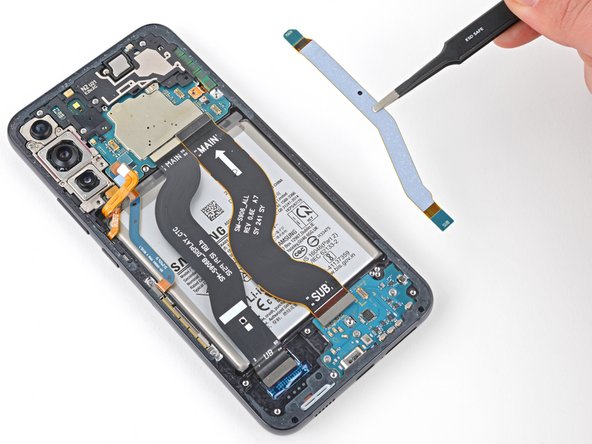
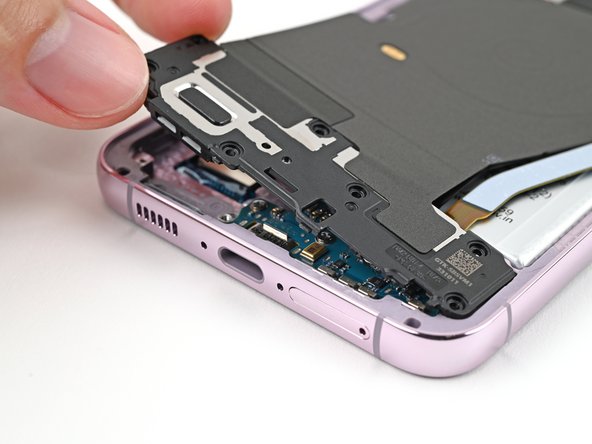
– Gently grab the NFC antenna and charging coil assembly using tweezers or your fingers, and lift it out like you’re picking the last cookie from the jar.

Success!
If you can, power up your device and give your repair a test run before you add that new adhesive and seal it all up tight!
Make sure to compare your shiny new replacement part with the original—don’t forget, you might need to swap over some components or peel off those pesky adhesive backings from the new part before you get it installed.
To put your device back together, just retrace your steps in reverse order. Easy peasy!
Once you’re done, follow this guide to test your repair and see how well you did.
Got some e-waste? Be a hero and take it to an R2 or e-Stewards certified recycler.
If things didn’t go as smoothly as you hoped, no worries! Give some basic troubleshooting a shot, or feel free to reach out to our Answers community for a helping hand.
And remember, if you ever find yourself in a tricky situation, you can always schedule a repair.

Samsung Galaxy S21 Ultra Loudspeaker Replacement

Duration: 45 minutes
Steps: 17 Steps

Ready to swap out the loudspeaker on your Samsung Galaxy S21 Ultra? This guide has you covered for the SM-G998B/DS (international) model. Heads up: some other versions might sport an extra antenna cable along the midframe edge—so watch for that bonus feature. If you skip replacing the adhesive seals when putting things back together, your phone will work just fine, but don’t expect it to keep out water like it used to. Grab fresh adhesive to stick everything back in place during reassembly. When things get tricky, you can always schedule a repair.

Step 1

– Grab your iOpener, heat it up, and let it chill on the back cover for a solid three minutes. That adhesive doesn’t stand a chance!

Tools Used
  1. iOpenerSamsung Galaxy S21 Ultra Loudspeaker Replacement
  2. Heat GunSamsung Galaxy S21 Ultra Loudspeaker Replacement

Step 2

– Grab a suction handle and stick it to the bottom edge of the back cover, right up against the edge for the best grip.

– Gently pull on the suction handle to lift the back cover just enough to create a tiny gap between it and the frame.

– Slide an opening pick into that little gap you just made.

– Carefully glide the opening pick down to the bottom left corner to cut through the adhesive.

– Keep that opening pick in place to stop the adhesive from sealing back up.

Tools Used
  1. iOpenerSamsung Galaxy S21 Ultra Loudspeaker Replacement
  2. Suction HandleSamsung Galaxy S21 Ultra Loudspeaker Replacement

Step 3

– Grab a second opening pick and slide it into the bottom edge of your phone.

– Wiggle that opening pick over to the bottom right corner for a smooth adhesive slice!

– Keep those opening picks in place so the adhesive doesn’t get all clingy again!

Step 4

– Pop in a third opening pick at the bottom right corner of your phone.

– Gently slide that pick along the right edge to cut through the adhesive like a pro.

– Keep the opening pick in the top right corner to make sure the adhesive doesn’t seal back up on you.

Tools Used
  1. iOpenerSamsung Galaxy S21 Ultra Loudspeaker Replacement

Step 5

– Pop a fourth opening pick under the top right corner of your phone—like you’re playing a game of pick-up sticks with tech.

– Slide that pick gently along the top edge to cut through the sticky adhesive jungle.

– Let the pick chill in the top left corner. That’s your safeguard against the glue trying to make a comeback.

Step 6

– Slide the fifth pick under the top-left corner—think of it as scooting into the last seat at the lunch table.

– Glide that pick down the left edge like you’re slicing birthday cake, cutting through any clingy adhesive that’s still hanging on.

Step 7

– Start by removing the back cover. When you’re ready to put everything back together, take a moment to power on your device and check all functions—it’s easier to catch any issues now than after sealing it up. Make sure to shut it down completely before moving forward. Use tweezers or your fingers to gently clear away any leftover adhesive chunks. Then, grab some high-concentration (over 90%) isopropyl alcohol and wipe away any remaining adhesive residue—this will help ensure a clean surface for reassembly. If you’re using custom-cut adhesives, follow this guide. Prefer double-sided tape? No problem—just follow this guide for the best results.

Step 8

– Slide an opening pick gently under the lower left corner of the NFC antenna and charging coil assembly.

– Carefully glide the pick along the bottom left edge to detach it from the battery.

Step 9

– Slide a pick gently under the bottom edge of the NFC antenna and charging coil assembly. Then, carefully guide it along the bottom to loosen and separate the assembly from the loudspeaker. If you need help, you can always schedule a repair.

Step 10

– Grab your trusty spudger and gently pop the charging coil connector straight up out of its socket. Easy does it, like opening a stubborn pickle jar but with way less mess!

Tools Used
  1. SpudgerSamsung Galaxy S21 Ultra Loudspeaker Replacement

Step 11

– Grab your spudger and gently pop the NFC antenna connector straight up from its socket—like you’re unplugging a tiny headphone jack.

Tools Used
  1. SpudgerSamsung Galaxy S21 Ultra Loudspeaker Replacement

Step 12

– Grab your trusty Phillips screwdriver and let’s get to work! Remove those five 3.9 mm-long screws that are holding the NFC antenna and charging coil assembly in place. You’ve got this!

Step 13

– Time to get a little delicate! Use a pair of tweezers or your fingers to carefully pluck out the NFC antenna and charging coil assembly. Take your time and be gentle, we don’t want any accidents!

Step 14

– Grab your trusty spudger and gently wiggle it in to disconnect the battery cable. Just pry that connector straight up from its cozy little socket, and you’ll be on your way!

Tools Used
  1. SpudgerSamsung Galaxy S21 Ultra Loudspeaker Replacement

Step 15

– Grab your trusty Phillips screwdriver and get ready to unleash your skills! Carefully remove the four screws, each measuring 3.9 mm, that are holding the loudspeaker assembly in place. You’ve got this!

Step 16

– Slide a spudger into the little gap between the top edge of the loudspeaker assembly and the midframe. It’s like giving it a gentle nudge!

– With your trusty spudger, carefully lift the loudspeaker assembly by tilting it downwards. You’re doing great!

Tools Used
  1. SpudgerSamsung Galaxy S21 Ultra Loudspeaker Replacement

Step 17

– Power up your device for a quick test drive before sealing things up—better safe than sticky!

– Compare your new part with the old one. You might need to peel off some adhesive backings or move a few bits and pieces over.

– Ready to reassemble? Just reverse these steps and you’re golden.

– Want to make sure everything’s working? Check out our repair testing guide for a victory lap.

– Done with old parts? Drop your e-waste off at a certified recycler—Mother Earth will thank you.

– If things went sideways, try some basic troubleshooting or get advice from our Answers community.

– Still stuck? You can always schedule a repair for backup.

Success!

How to Remove the Interconnect Cables in the Samsung Galaxy S21 Ultra

Duration: 45 minutes
Steps: 21 Steps

Ready to swap out those interconnect cables on your Samsung Galaxy S21 Ultra? This guide walks you through the process step by step. The instructions are based on the SM-G998B/DS (international) version, but if you’re rocking a different model, just keep an eye out for an extra antenna cable along the left edge of the midframe. Follow along and give your phone a fresh connection!

Step 1

– Grab your trusty iOpener, warm it up, and let it chill on the back cover for a solid three minutes. This gives the sticky stuff underneath a chance to loosen up and make your next moves way easier.

Tools Used
  1. iOpenerHow to Remove the Interconnect Cables in the Samsung Galaxy S21 Ultra
  2. Heat GunHow to Remove the Interconnect Cables in the Samsung Galaxy S21 Ultra

Step 2

– Stick a suction cup near the bottom edge of the back cover, as close to the edge as possible. Gently pull on the suction cup to lift the back cover slightly away from the frame, creating a small gap. Carefully insert an opening pick into that gap. Glide the pick down to the bottom left corner to slice through the adhesive. Leave the pick in place to keep the adhesive from sticking back together. If you need help, you can always schedule a repair.

Tools Used
  1. iOpenerHow to Remove the Interconnect Cables in the Samsung Galaxy S21 Ultra
  2. Suction HandleHow to Remove the Interconnect Cables in the Samsung Galaxy S21 Ultra

Step 3

– Pop a second opening pick down at the bottom edge of your phone.

– Glide that pick over to the bottom right corner and slice through the sticky stuff holding things together.

– Keep those picks in place so the adhesive doesn’t sneak back and ruin your progress.

Step 4

– Start by inserting a third opening pick at the bottom right corner of your phone to get things started.

– Gently slide the opening pick along the right edge of your device to carefully cut through the adhesive holding it together.

– Keep the opening pick in place at the top right corner to prevent the adhesive from sticking back together as you work.

Tools Used
  1. iOpenerHow to Remove the Interconnect Cables in the Samsung Galaxy S21 Ultra

Step 5

– Pop in a fourth opening pick right underneath that top right corner of your phone.

– Gently glide the pick along the top edge to neatly slice through the adhesive like butter.

– Keep that opening pick snug in the top left corner to make sure the adhesive doesn’t want to rejoin the party.

Step 6

– Grab a fifth opening pick and slide it right under the top left corner like you’re sneaking a snack!

– Now, gently glide that pick along the left edge of the back cover to slice through the last bits of adhesive. You’ve got this!

Step 7

– Let’s get started by removing the back cover. Easy does it!

– When you’re putting everything back together, remember to power on your device and test all its functions before sealing it up. Don’t forget to power it back down before moving on.

– Now’s a great time to get rid of any adhesive chunks that might be stuck on there. Just use a pair of tweezers or your fingers to gently remove them.

– Next, grab some high-concentration isopropyl alcohol (we’re talking over 90% here) and use it to wipe away any remaining adhesive residue.

– If you’re using custom-cut adhesives, be sure to follow the guide for applying them correctly.

– And if you’re using double-sided tape, don’t worry – we’ve got a guide for that too.

Step 8

– Slip an opening pick under the lower left corner of the NFC antenna and charging coil assembly—just like sliding a spatula under a stubborn pancake.

– Gently glide the pick along the bottom left edge to loosen the assembly from the battery. Slow and steady wins the race—no need to rush!

Step 9

– Slide an opening pick under the bottom edge of the NFC antenna and charging coil assembly. You’re doing great!

– Gently glide the opening pick along the bottom of the assembly to detach it from the loudspeaker. Keep it smooth and steady!

Step 10

– Grab your trusty spudger and gently pop the charging coil out by lifting the connector straight up from its cozy socket. You’ve got this!

Tools Used
  1. SpudgerHow to Remove the Interconnect Cables in the Samsung Galaxy S21 Ultra

Step 11

– Grab your trusty spudger and gently work your magic to disconnect the NFC antenna. Just pry that connector straight up from its cozy socket, and you’ll be all set!

Tools Used
  1. SpudgerHow to Remove the Interconnect Cables in the Samsung Galaxy S21 Ultra

Step 12

– Grab your trusty Phillips screwdriver and get ready to rock! It’s time to unscrew those five 3.9 mm-long screws that are holding the NFC antenna and charging coil assembly in place. You’ve got this!

Step 13

– Grab a trusty pair of tweezers or just use your fingers to gently lift out the NFC antenna and charging coil assembly. You’ve got this!

Step 14

– Grab a spudger and gently pry the battery connector straight up from its socket to disconnect it. Take your time—patience is key here. If you need a hand, you can always schedule a repair.

Tools Used
  1. SpudgerHow to Remove the Interconnect Cables in the Samsung Galaxy S21 Ultra

Step 15

– Grab your trusty Phillips screwdriver and get ready to tackle those four 3.9 mm-long screws that are holding the loudspeaker assembly in place. Let’s do this!

Step 16

– Slip a spudger into the space between the top of the loudspeaker assembly and the midframe.

– Now, gently work your spudger under the loudspeaker assembly and nudge it upwards by tilting it downward.

Tools Used
  1. SpudgerHow to Remove the Interconnect Cables in the Samsung Galaxy S21 Ultra

Step 17

– Take out the loudspeaker assembly.

– When you’re putting things back together, slap on some fresh adhesive after cleaning the spots with isopropyl alcohol (over 90%).

Step 18

– Grab your trusty spudger and gently wiggle it in to disconnect that display flex cable! Just pry the connector straight up from its socket and voilà, you’re one step closer to victory!

Tools Used
  1. SpudgerHow to Remove the Interconnect Cables in the Samsung Galaxy S21 Ultra

Step 19

– Grab your trusty spudger and gently pop the main and interconnect flex cables off the motherboard by lifting their connectors straight up from the sockets.

Tools Used
  1. SpudgerHow to Remove the Interconnect Cables in the Samsung Galaxy S21 Ultra

Step 20

– Grab your trusty spudger and gently nudge the interconnect flex cable off the daughterboard by prying its bottom connector straight up from its cozy socket.

– Now, using your fingers or a pair of tweezers, delicately lift away the interconnect flex cable. You’ve got this!

Tools Used
  1. SpudgerHow to Remove the Interconnect Cables in the Samsung Galaxy S21 Ultra

Step 21

– If you can, power up your device and give your repair a quick test before sealing everything up with new adhesive.

– Make sure to compare your replacement part with the original—don’t forget to transfer any leftover components or peel off those pesky adhesive backings before you dive into the installation.

– Reassembling your device? Just retrace your steps from the instructions in reverse order.

– Once your repair is complete, follow this guide to ensure everything is functioning smoothly.

– Got some e-waste? Don’t just toss it—take it to an R2 or e-Stewards certified recycler.

– Things not going as smoothly as you hoped? No worries! Give some basic troubleshooting a shot, or feel free to reach out to our Answers community for a helping hand.

Tools Used
  1. SpudgerHow to Remove the Interconnect Cables in the Samsung Galaxy S21 Ultra

Success!

Samsung Galaxy S22 USB-C Port and Charging Board Replacement

Duration: 45 minutes
Steps: 24 Steps

Ready to swap out the USB-C port and charging board on your Samsung Galaxy S22? First things first—let that battery drain all the way before you crack it open. Nobody wants a surprise thermal fireworks show. If your battery’s looking puffier than a marshmallow, take extra care. After you patch things up, water resistance depends on how well you stick that adhesive back in place, but heads-up: your device won’t have its official IP rating anymore.

Step 1

– Grab a SIM eject tool, a handy bit, or even a straightened paper clip and insert it into the SIM card tray hole located on the bottom edge of your phone.

– Give that SIM eject tool a little push into the tray hole to pop out the SIM card tray.

– Carefully pull out the SIM card tray. You’ve got this!

Step 2

– Warm up that iOpener and give it a cozy spot on the bottom edge of the back cover for a solid two minutes. It’s like giving your device a little spa treatment!

Tools Used
  1. iOpenerSamsung Galaxy S22 USB-C Port and Charging Board Replacement
  2. Heat GunSamsung Galaxy S22 USB-C Port and Charging Board Replacement

Step 3

– While waiting for the adhesive to loosen up, keep this in mind: there’s glue holding the back cover in place all around the edges of the frame.

Step 4

– Stick a suction cup near the bottom edge of the back cover—get it as close to the bottom as you can. Ready to pull?

– Hold onto the suction handle and give it a firm, steady tug to create a small gap between the cover and the frame. No wimping out now!

– Slide an opening pick into that gap to start prying it apart. Keep at it, and if you need a hand, you can always schedule a repair.

Tools Used
  1. iOpenerSamsung Galaxy S22 USB-C Port and Charging Board Replacement
  2. Suction HandleSamsung Galaxy S22 USB-C Port and Charging Board Replacement

Step 5

– Gently slide the pick back and forth along the bottom edge to cut through the adhesive like a pro.

– Once you’ve made some progress, leave the pick snugly in the bottom left corner to keep that adhesive from making a comeback.

Step 6

– Warm up the left edge of the back cover with a heated iOpener for two minutes. Let the heat work its magic before moving on.

Tools Used
  1. iOpenerSamsung Galaxy S22 USB-C Port and Charging Board Replacement

Step 7

– Pop in a second opening pick at the bottom left corner like a pro.

– Gently slide that pick down to the bottom of the camera bezel to slice through the left adhesive like butter.

– Keep the pick in place to stop that adhesive from trying to reseal and make your life difficult.

Step 8

– Warm up an iOpener and press it against the right edge of the back cover for two minutes. Give it a little love and let that heat work its magic!

Tools Used
  1. iOpenerSamsung Galaxy S22 USB-C Port and Charging Board Replacement

Step 9

– Pop in a third opening pick at the bottom right corner to get things started.

– Gently slide that pick up to the top right corner to cut through the adhesive like a pro.

– Keep the pick in the top right corner to stop the adhesive from sticking back together—smooth sailing from here.

Step 10

– Warm up that iOpener and give it a cozy hug on the top edge of the back cover for a solid two minutes.

Tools Used
  1. iOpenerSamsung Galaxy S22 USB-C Port and Charging Board Replacement

Step 11

– Wedge an opening pick into the gap at the top right edge—don’t be shy, it’s built for this.

– Glide the pick along the top edge and curve around the top left corner, slicing through any stubborn adhesive in your way.

Step 12

– First things first, let’s get that back cover off! Grab it and carefully remove it.

– Now, as you put everything back together:

– Here’s a pro tip: this is the perfect moment to power up your device and check if everything’s working like a charm before sealing it up tight. Just remember to shut your phone down completely before diving back into the work.

– Got some pesky adhesive chunks hanging around? Use tweezers or your fingers to remove them. If it’s being stubborn, a little heat can work wonders to help separate it.

– When it’s time to add new adhesive, make sure to follow this guide!

Step 13

– Grab your spudger and use its sharp tip to carefully lift and disconnect the wireless charging coil from the motherboard. Take your time and don’t rush!

Tools Used
  1. SpudgerSamsung Galaxy S22 USB-C Port and Charging Board Replacement

Step 14

– Grab your trusty Phillips driver and give those six little 3.5 mm screws on the wireless charging coil a gentle twist—think of it as freeing the coil from its tiny jail.

Step 15

– Grab your Phillips screwdriver and unscrew all seven 3.5 mm screws holding the loudspeaker in place.

Step 16

– Gently slide the pointed end of your spudger into the upper left corner of the loudspeaker, right where it meets the frame.

– Give it a little pry to unclip that loudspeaker from the frame and set it free!

– When putting everything back together, remember to give the perimeter of the loudspeaker a nice press to snap those clips back in place.

Tools Used
  1. SpudgerSamsung Galaxy S22 USB-C Port and Charging Board Replacement

Step 17

– Carefully lift out the wireless charging coil and the loudspeaker from the frame. If you need a hand with this, you can always schedule a repair.

Step 18

– Grab the pointed end of your spudger and gently pry up to disconnect the battery press connector. Keep it smooth and steady—no rush needed, just a friendly nudge to free that connection. If you need a hand, you can always schedule a repair.

Tools Used
  1. SpudgerSamsung Galaxy S22 USB-C Port and Charging Board Replacement

Step 19

– Grab the spudger and gently pop those two interconnect cables off the motherboard—think of it as giving them a little nudge to let go.

Tools Used
  1. SpudgerSamsung Galaxy S22 USB-C Port and Charging Board Replacement

Step 20

– Grab your spudger’s pointed end and gently pry up those interconnect cables from the charging board. Disconnect both cables carefully—you’re on your way to a smooth repair. If you need help along the way, you can always schedule a repair.

Tools Used
  1. SpudgerSamsung Galaxy S22 USB-C Port and Charging Board Replacement

Step 21

– Gently lift and pull out the two interconnect cables from the frame. Don’t worry, they’re not shy—they just need a little nudge.

– When you’re putting things back together, make sure the cables are facing the right way: ‘main’ ends at the top, ‘sub’ ends down at the bottom. It’s like giving them VIP seating.

Step 22

– Grab your Phillips screwdriver and loosen those three 3.5 mm screws holding the charging board in place. Easy peasy! If you hit any snags, remember you can always schedule a repair with Salvation Repair to get professional help.

Step 23

– Take the pointy end of your spudger and slide it in between the top right corner of the charging board and the frame. Give it a gentle nudge.

– Lift the charging board out of its spot until you can grab it with your fingers—like picking up a cookie off a plate.

Tools Used
  1. SpudgerSamsung Galaxy S22 USB-C Port and Charging Board Replacement

Step 24

– Ready to put things back together? Just retrace your steps, swapping ‘remove’ for ‘reattach’ and you’ll be good to go.

– Recycling old parts? Drop them off at an R2 or e-Stewards certified recycler to keep things eco-friendly.

– If you hit a snag, swing by our Answers community for some troubleshooting wisdom. And if you need a hand, you can always schedule a repair.

Success!
To wrap up your repair, simply follow these steps in reverse and do the opposite of what you did before – think ‘put back’ instead of ‘take out’!
Don’t forget to responsibly recycle your e-waste with a reputable recycler, like one certified by R2 or e-Stewards.
If things didn’t quite go as planned, don’t worry! You can always schedule a repair with Salvation Repair or check out our troubleshooting resources for some extra help.

Samsung Galaxy S22 Plus USB-C Port and Charging Board Replacement

Duration: 45 minutes
Steps: 25 Steps

Get ready to dive in and swap out that USB-C port and charging board in your Samsung Galaxy S22+ like a pro! Before you start, make sure to fully drain your battery. This little precaution helps prevent any sizzling surprises if the battery gets a bit bumpy during the repair. And hey, if your battery’s looking a little puffed up, take the right safety measures. Just a heads up: keeping your device water-resistant post-repair will depend on how well you seal things back up, and you might notice your IP (Ingress Protection) rating won’t be quite the same afterward. Let’s get those hands busy!

Step 1

– Grab your trusty SIM eject tool, a paperclip you’ve straightened, or any small object that fits into the SIM card tray hole on the bottom edge of your phone.

– Gently push the tool into the hole to pop out the SIM card tray. You’ll feel a little resistance, then it’ll give way.

– Carefully remove the SIM card tray and set it aside. Now you’re one step closer!

Step 2

– Grab your iOpener, warm it up, and let it chill on the bottom edge of the back cover for about three minutes. This helps soften up the adhesive and makes your next move way smoother.

Tools Used
  1. Heat GunSamsung Galaxy S22 Plus USB-C Port and Charging Board Replacement
  2. iOpenerSamsung Galaxy S22 Plus USB-C Port and Charging Board Replacement

Step 3

– Grab a suction handle and stick it to the bottom edge of the back cover, getting as close to the edge as you can.

– Give the back cover a gentle lift with the suction handle to create a small opening between the back cover and the frame.

– Slide an opening pick into that little gap you just made.

Tools Used
  1. iOpenerSamsung Galaxy S22 Plus USB-C Port and Charging Board Replacement
  2. Suction HandleSamsung Galaxy S22 Plus USB-C Port and Charging Board Replacement

Step 4

– Pull off the suction handle—nice and easy.

– Glide the opening pick along the bottom edge to cut through the sticky stuff holding it together.

– Keep that pick chilling in the bottom left corner so the adhesive doesn’t get any funny ideas about sticking itself back down.

Tools Used
  1. iOpenerSamsung Galaxy S22 Plus USB-C Port and Charging Board Replacement
  2. Suction HandleSamsung Galaxy S22 Plus USB-C Port and Charging Board Replacement

Step 5

– Let’s get this repair started! Apply the heated iOpener to the left edge of the phone for 3 minutes to loosen the adhesive – it’s like a warm hug for your phone.

– If the iOpener needs a little pick-me-up, reheat it for 30 seconds to get it back in action.

Tools Used
  1. iOpenerSamsung Galaxy S22 Plus USB-C Port and Charging Board Replacement

Step 6

– Pop in a second pick near the bottom left corner to get things started.

– Gently slide that pick along the left edge to cut through the adhesive.

– Keep the pick in place near the top left corner so the adhesive doesn’t stick back together.

Step 7

– Place your warmed-up iOpener along the right edge of the phone for about 3 minutes to give that stubborn adhesive a little spa treatment.

– If your iOpener has cooled off, pop it back in for a 30-second heat-up—keep things toasty!

Tools Used
  1. iOpenerSamsung Galaxy S22 Plus USB-C Port and Charging Board Replacement

Step 8

– Now it’s time to bring in the reinforcements – insert a third opening pick into the gap you created along the bottom edge to help things along.

– Gently slide the opening pick around the bottom right corner of the back cover to slice through the adhesive, you’re making great progress!

Step 9

– Keep sliding the opening pick up the right edge of the back cover to cut through that stubborn adhesive.

– Park the opening pick near the top right corner—it’s your friendly barrier to keep the adhesive from sneakily sticking itself back together.

Step 10

– Warm up your iOpener gently and press it against the top edge of the phone for about 3 minutes to loosen up that stubborn adhesive. If it cools down and isn’t quite doing the trick, just pop it back in the microwave for 30 seconds to get it nice and flexible. If you need a hand, you can always schedule a repair.

Tools Used
  1. iOpenerSamsung Galaxy S22 Plus USB-C Port and Charging Board Replacement

Step 11

– Now it’s time to get this device opened up! Slide the opening pick across the top edge, starting from the top left corner, to loosen the remaining adhesive and make progress on your repair.

Step 12

– Pop off that back cover like it’s a lid on a soda can!

– Now, as you put everything back together:

– This is a perfect moment to fire up your phone and check all the features before you seal it up tight. Just remember to switch it off completely before diving back into the repair!

– Got some stubborn adhesive bits hanging around? Use tweezers or your fingers to remove them. If they’re being particularly clingy, a little heat will do the trick.

– Using custom-cut adhesives? Check out this guide for the lowdown.

– If you’re all about that double-sided tape life, this guide has your back.

Step 13

– Grab your spudger and use the pointy end to gently pop the charging coil’s connector off the motherboard. Easy does it—just a little lift and it’s free!

Tools Used
  1. SpudgerSamsung Galaxy S22 Plus USB-C Port and Charging Board Replacement

Step 14

– Grab your trusty spudger and gently use the pointed end to lift up and disconnect that NFC antenna cable from the motherboard. You’ve got this!

Tools Used
  1. SpudgerSamsung Galaxy S22 Plus USB-C Port and Charging Board Replacement

Step 15

– Grab your Phillips screwdriver and take out the six 3.5 mm screws holding down the charging coil.

Step 16

– Grab your Phillips screwdriver and take out the seven 3.5 mm screws that are holding the loudspeaker in place.

Step 17

– Slide your spudger between the left side of the loudspeaker and the frame—like you’re breaking up a tiny dance party.

– Lift gently to pop those clips loose and free the loudspeaker.

– When putting things back together, just press the loudspeaker into the frame until you hear those satisfying clicks.

Tools Used
  1. SpudgerSamsung Galaxy S22 Plus USB-C Port and Charging Board Replacement

Step 18

– Carefully take out the charging coil and NFC antenna assembly, like you’re uncovering a hidden treasure!

Step 19

– Grab your spudger and gently lift up to disconnect that battery’s press connector. You’ve got this!

Tools Used
  1. SpudgerSamsung Galaxy S22 Plus USB-C Port and Charging Board Replacement

Step 20

– Grab your trusty spudger and gently pop up the main interconnect cable to free it from the motherboard—like giving it a little nudge to let go.

– Now, repeat the move for the secondary interconnect cable. Lift it away with your spudger and watch it separate, easy-peasy!

Tools Used
  1. SpudgerSamsung Galaxy S22 Plus USB-C Port and Charging Board Replacement

Step 21

– Grab your trusty spudger and gently nudge the primary interconnect cable away from the charging board. It’s like giving it a little high five!

– Now, with that same spudger, carefully pry up and disconnect the secondary interconnect cable from the charging board. You’re on a roll!

Tools Used
  1. SpudgerSamsung Galaxy S22 Plus USB-C Port and Charging Board Replacement

Step 22

– Grab those tweezers or use your trusty fingers to gently pull away the interconnect cables.

– When you’re putting everything back together, double-check that each cable marked MAIN is snugly connected to the motherboard, while the ones labeled SUB are hooked up to the charging board. You’ve got this!

Step 23

– Grab your trusty Phillips screwdriver and gently twist out those three 3.4 mm screws holding the charging board in place. You’ve got this!

Step 24

– Gently slide the pointed end of a spudger between the top right edge of the charging board and the frame. You’re almost there!

– Carefully pry up to lift the charging board just enough so you can reach it with your fingers. You’ve got this!

Tools Used
  1. SpudgerSamsung Galaxy S22 Plus USB-C Port and Charging Board Replacement

Step 25

– Time to put everything back together—just work backwards through these steps.

– Got old parts? Drop them off at an R2 or e-Stewards certified recycler and keep things green.

– If things didn’t go quite right, try a little troubleshooting magic or swing by our Answers community. Still stuck? You can always schedule a repair with us!

Success!
Put your device back together by reversing these steps—like rewinding a techy magic trick.
Have old parts? Give them a new life at an R2 or e-Stewards certified recycler.
If things went sideways, try some classic troubleshooting. Still stuck? Our Answers community is ready to help, or you can always schedule a repair.

Samsung Galaxy S22 Plus Back Cover Replacement

Duration: 45 minutes
Steps: 11 Steps

Get ready to give your Samsung Galaxy S22+ a brand new look by replacing the back cover. Keep in mind that while you’ll be able to restore some water resistance, your device won’t be able to keep its IP rating. But don’t worry, with this step-by-step guide from Salvation Repair, you’ll be able to do it like a pro. If you need help, you can always schedule a repair

Step 1

– Grab your trusty iOpener and give it a warm hug against the bottom edge of the back cover for three minutes. This little trick will help loosen up that stubborn adhesive hiding underneath.

Tools Used
  1. iOpenerSamsung Galaxy S22 Plus Back Cover Replacement
  2. Heat GunSamsung Galaxy S22 Plus Back Cover Replacement

Step 2

– Pop a suction handle onto the bottom edge of the back cover—get it as close to the edge as you can.

– Give the suction handle a gentle lift to crack open a tiny gap between the back cover and the frame.

– Slide an opening pick into that new gap like a pro.

Tools Used
  1. iOpenerSamsung Galaxy S22 Plus Back Cover Replacement
  2. Suction HandleSamsung Galaxy S22 Plus Back Cover Replacement

Step 3

– Let’s get started! Remove the suction handle to begin the process.

– Now, take your opening pick and slide it along the bottom edge. This will help you slice through the adhesive and make the repair process smoother.

– Great job so far! Leave the opening pick inserted near the bottom left corner. This will prevent the adhesive from resealing, making it easier to continue with the repair.

Tools Used
  1. iOpenerSamsung Galaxy S22 Plus Back Cover Replacement
  2. Suction HandleSamsung Galaxy S22 Plus Back Cover Replacement

Step 4

– Place the warmed-up iOpener along the left edge of your phone for three minutes—give that sticky glue a chance to chill out.

– If the iOpener cools off, toss it back in for a quick 30-second heat session.

Tools Used
  1. iOpenerSamsung Galaxy S22 Plus Back Cover Replacement

Step 5

– Pop in a second opening pick near the bottom left corner to get things started.

– Gently slide that pick along the left edge to cut through the adhesive — keep it moving smoothly.

– Leave the pick in place near the top left corner so the adhesive doesn’t stick back together. If you need a hand, you can always schedule a repair.

Step 6

– Warm up your trusty iOpener and give the right edge of your phone a cozy 3-minute hug to help loosen that stubborn adhesive.

– If your iOpener starts to cool off, just give it another 30 seconds in the heat to keep the good vibes flowing.

Tools Used
  1. iOpenerSamsung Galaxy S22 Plus Back Cover Replacement

Step 7

– Slide your third pick into the gap you just opened along the bottom edge—think of it as giving the glue a gentle high-five.

– Now glide that same pick around the lower-right corner; the adhesive will wave the white flag in no time.

Step 8

– Glide the opening pick along the right edge of the back cover to slice through the sticky stuff holding it in place.

– Leave the pick chilling near the top right corner so the adhesive doesn’t get any ideas about sticking back together.

Step 9

– Warm up your iOpener by heating it up, then gently press it against the top edge of the phone for about 3 minutes to loosen up that stubborn adhesive. If it cools down too much, just give it a quick 30-second reheat and keep going. Need a hand? You can always schedule a repair with Salvation Repair.

Tools Used
  1. iOpenerSamsung Galaxy S22 Plus Back Cover Replacement

Step 10

– Glide your pick along the top-left corner like you’re icing a cake, slicing through the last bits of stickiness and setting the top edge free.

Step 11

– Start by removing the back cover of your device. When you’re ready to put everything back together, it’s a good idea to power on your device temporarily and test all functions before sealing it up tight. Make sure to turn it off completely before you proceed. Use tweezers or your fingers to gently lift away any stubborn adhesive chunks—apply some heat if they’re really sticking. If you’re working with custom-cut adhesives, follow the specific guide provided. For double-sided tape, use the recommended technique to peel it off cleanly. If you need help at any point, you can always schedule a repair.

Success!
Take a moment to compare your shiny new replacement part with the original one—don’t forget to swap over any leftover components and peel off those adhesive backings from the new part before you dive in!
To put your device back together, just rewind and follow these steps in reverse order.
Got some old tech lying around? Make sure to drop it off at an R2 or e-Stewards certified recycler.
If things didn’t go as smoothly as you hoped, no worries! Give some basic troubleshooting a shot, or feel free to reach out to our community for a helping hand.

How to Install a New Battery in Your Samsung Galaxy S22 Ultra

Duration: 45 minutes
Steps: 6 Steps

Get ready to give your Samsung Galaxy S22 Ultra a fresh start with a brand new battery! Before diving in, make sure you’ve tackled the battery removal part of the adventure. Let’s get this show on the road!

Step 1

– Grab those tweezers or use your fingers to lift off any big chunks of sticky leftovers from the frame.

– Drop a few dabs of super strong isopropyl alcohol (90% or higher) onto the stubborn adhesive bits.

– Scrape away every last bit of glue with the flat end of your spudger—be thorough, your device deserves it!

Tools Used
  1. SpudgerHow to Install a New Battery in Your Samsung Galaxy S22 Ultra

Step 2

– Get a few drops of super-strong isopropyl alcohol (90% or higher) on any leftover adhesive stuck to the frame, then swipe it away with a microfiber or lint-free cloth. Your frame will thank you!

Step 3

– Cut strips of sturdy double-sided tape to the right length so they fit snugly on the exposed metal frame in the battery cavity.

Step 4

– Stick a strip of tape onto the frame—nice and straight.

– Grab your spudger and press down along the whole strip to lock it in place. Really give it a good press!

– Take your tweezers and peel off the liner from the tape strip. Easy does it.

Tools Used
  1. SpudgerHow to Install a New Battery in Your Samsung Galaxy S22 Ultra

Step 5

– Keep the momentum going by repeating the last step to stick down those remaining strips of tape. Once you’ve got them all in place, you’re almost done! If you need a hand, remember you can always schedule a repair.

Step 6

– To keep your device running smoothly, don’t forget to calibrate that shiny new battery after your repair is all wrapped up!

– Got some old tech? Give it a second life by taking it to an R2 or e-Stewards certified recycler.

– If things didn’t go quite as planned, no worries! A little bit of basic troubleshooting might do the trick, or feel free to reach out to our Answers community for a helping hand.

Success!
To keep your device running like a champ, don’t forget to calibrate that shiny new battery once you’re done with the repair.
Got some e-waste? Show it some love by taking it to an R2 or e-Stewards certified recycler.
Things didn’t go quite as you hoped? No worries! Try some basic troubleshooting or reach out to our Answers community for a little extra support.

Samsung Galaxy S22 Ultra Chip ID

Duration: 45 minutes
Steps: 8 Steps

Here’s the Chip ID for your Samsung Galaxy S22 Ultra. If you’re curious about what makes this phone tick, check out our Samsung Galaxy S22 teardowns for all the good stuff. Dive in and let’s get under the hood!

Step 1

– IC Identification Pt. 1:

– Let’s take a peek inside! First up: the Qualcomm SM8450 Snapdragon 8 Gen 1 Octa-Core Processor, tucked neatly beneath a Samsung K3LK7K70BM-BGCP 8 GB LPDDR5 RAM—these two are the brain and memory of your device.

– Next, the Samsung KLUDG4UHDC-B0E1 128 GB NAND Flash (UFS 3.1) stores all your stuff—photos, apps, memes, you name it.

– Spot the Wacom WEZ02 Digitizer Controller—this little guy makes your touchscreen super responsive.

– Maxim MAX77705C Power Management keeps everything juiced up and running smooth.

– Renesas P9320S Wireless Power Transceiver means no more cable chaos for charging.

– NXP Semiconductor PCA9468 Battery Charger handles the battery, making sure it’s powered up and ready for action.

– Cirrus Logic CS35L40 Audio Amplifier blasts your tunes loud and clear.

Step 2

– Alright, tech wizards! Let’s dive into the heart of this device and identify those crucial components. Here’s what we need to keep an eye on:

– 1. Cirrus Logic CS40L26 Haptic Driver – It’s all about that delightful feedback!

– 2. Qualcomm PMR735A Power Management – Keeping the energy flowing smoothly.

– 3. Qualcomm PM3003 Power Management – Another powerhouse for optimal performance.

– 4. Diodes Incorporated AP7340D-30FS4-7 150 mA / 3.0 V LDO Regulator – Regulating power like a champ.

– 5. Diodes Incorporated AP7340D-33FS4-7 150 mA / 3.3 V LDO Regulator – Because consistency is key!

– 6. Knowles MEMS Microphone – Ensuring your voice is heard loud and clear.

– 7. Qualcomm PMK8450 ? Clock Generator – Keeping everything in sync and on time.

– Now that we’ve got our list, let’s tackle this repair with confidence! Remember, if things get tricky, you can always schedule a repair.

Step 3

– Let’s take a look at some key chips you’ll encounter: the Qualcomm SDR735 RF Transceiver, the Qualcomm SMR546 RF Transceiver, the NXP Semiconductor SN220U NFC Controller with Secure Element, the NXP SR100T Ultra-Wideband SoC, the BGU8103 GPS/GLONASS/Galileo/BeiDou Low Noise Amplifier from NXP, and the Qualcomm QET5100 Envelope Tracker. These components are like the phone’s secret agents—knowing their names and roles helps keep the repair on track. If things get tricky or you need a hand, you can always schedule a repair.

Step 4

– IC Identification pt. 4 (sensors):

– Meet your Austria Microelectronics sensor: it’s the ultimate multitasker, handling light, color, gestures, and proximity like a champ.

– Say hello to the STMicroelectronics 6-axis accelerometer and gyroscope—this little chip keeps track of every twist and turn your device makes.

Step 5

– Step into the world of power management with IC Identification pt. 1!

– First up, we’ve got the Qualcomm PM8350 Power Management – it’s got your back!

– Next in line is the Qualcomm PM8350C Power Management, ready to keep the juice flowing!

– Then, we meet the Qualcomm PM8450 Power Management, another reliable partner in this journey.

– Check out the Samsung S2MPB02 Power Management, working hard behind the scenes!

– Don’t forget about the Samsung S2MPBA3 Power Management – it’s always up for the challenge!

– Get ready for crystal-clear audio with the Cirrus Logic CS35L40 Audio Amplifier!

– Last but not least, we can’t overlook the Goertek MEMS Microphone – it’s time to make your voice heard!

Step 6

– Step up your component detective skills:

– Time to spot the Vishay DG2730—it’s a 2-Port DPDT Analog Switch, not just an alphabet soup!

Step 7

– Alright, let’s get into the chip game! First up, identify that IC with some confidence—know your chips, know your stuff. We’re talking about the Broadcom BCM4389 for Wi-Fi 6E & Bluetooth 5.0, the Broadcom AFEM-9146 front-end module, Skyworks SKY58083-11 front-end module, Qualcomm QPM6815 front-end module, and the Qualcomm QDM3572 antenna switch. Don’t forget the Qorvo 2389 and 5389 RF power amplifiers—they’re probably lurking nearby. When you’re ready, carefully locate and test each component, making sure you’re familiar with their placements. If you hit a snag or want a pro to handle the tricky bits, you can always schedule a repair with Salvation Repair for some expert assistance.

Step 8

– IC Identification pt. 4 (Sensors):

– Introducing the AKM Semiconductor 3-Axis Electronic Compass – your device’s navigator extraordinaire!

– And don’t forget the STMicroelectronics Pressure Sensor, keeping things balanced and accurate.

Success!

Galaxy S23+ Teardown

Duration: 45 minutes
Steps: 9 Steps

Step 1

– Pop out the SIM tray with a SIM eject tool and take out the SIM card if it’s hanging out in there.

Step 2

– Grab your trusty opening pick and a suction handle! Gently slice through the sneaky adhesive holding that rear glass in place, and then lift it off with care.

Step 3

– Pop out those 20 tiny #00 Phillips screws—think of it as a satisfying mini treasure hunt. Keep them in a little dish so none escape!

Step 4

– Pop out those two connectors that hook up the wireless charging to the motherboard, and then lift the wireless charging pad outta there.

Step 5

– Let’s get started – carefully disconnect those 5 connectors to begin the process.

– Now it’s time to remove the speaker, easy does it!

Step 6

– Disconnect the front camera connector and give it a little space to breathe.

Step 7

– Start by gently prying up the motherboard with an opening pick—think of it as giving your device a gentle lift-off.

– Capture the 12 MP Ultrawide camera—it’s the wide-angle superstar of the setup.

– Next up, the 50 MP wide camera with Optical Image Stabilization—your main shooter with steady shots.

– Followed by the 10 MP telephoto lens camera, also with OIS—zoom in with confidence.

– Beneath it all, you’ll find the RAM nestled right next to the CPU—powering your device’s brain.

– And don’t forget the secondary microphone and flash light—small but mighty components that keep everything running smoothly.

Step 8

– Grab your trusty opening pick and gently pry that speaker assembly away.

– Carefully disconnect those three connectors, they’re just waiting to be unplugged!

– Time to get your screwdriver out! Unscrew the three Phillips #00 screws holding the charging board in place, then lift it out like a pro.

Step 9

– Grab that handy tab and gently pull to release the battery.

Success!

Samsung Galaxy S23 Plus Screen Replacement

Duration: 45 minutes
Steps: 32 Steps

Ready to give your Samsung Galaxy S23+ a fresh look? This guide walks you through swapping out your screen—just the screen itself. If your new part comes already attached to a frame, check out the other guide for that setup. Heads up: your old screen won’t survive this operation, so don’t use these steps if you’re hoping to save it. As for water resistance, it’s all about how precisely you lay down the new adhesive, but keep in mind your device won’t keep its official IP rating after the repair.

Step 1

– First, ditch the cables—unplug anything hanging off your phone so it doesn’t get the leash treatment.

– Next, press-and-hold the side key and volume-down button until the power menu pops up, then tap “Power off.” Your phone’s taking a quick nap—no lullaby needed.

Step 2

– Warm up your iOpener and give the right edge of the back cover a nice cozy treatment for about two minutes—this helps loosen up that stubborn adhesive so you can get to work.

Step 3

– Grab a suction cup and stick it near the middle of the right edge of the back cover. Keep it close to the edge for a better grip.

– Pull up on the suction cup firmly and steadily to create a small gap between the back cover and the frame. No sudden yanks—steady wins the race.

– Once there’s a gap, slide an opening pick into the space to gently pry it open. Take your time and work around the edges as needed.

Tools Used
  1. iOpenerSamsung Galaxy S23 Plus Screen Replacement
  2. Suction HandleSamsung Galaxy S23 Plus Screen Replacement

Step 4

– Now it’s time to get this device opened up! Slide the pick back and forth along the right edge to loosen the adhesive and start separating the parts.

– Great job so far! Leave the pick inserted near the bottom right corner to keep the adhesive from resealing, making the rest of the repair process easier.

Step 5

– Lay a heated iOpener on the bottom edge of the back cover and hold it there for about two minutes. This helps loosen up the adhesive, making the cover easier to remove later. If you need help, you can always schedule a repair.

Tools Used
  1. iOpenerSamsung Galaxy S23 Plus Screen Replacement

Step 6

– Slide a second pick into the bottom right corner.

– Gently twist the opening pick around the bottom right corner to break the adhesive seal.

Step 7

– Gently glide that opening pick to the bottom left corner and watch the adhesive separate like magic.

– Now, just leave the pick nestled in the corner to keep that sticky stuff from pulling a fast one on you!

Step 8

– Warm up your trusty iOpener and give the left edge of the back cover a cozy two-minute hug.

Tools Used
  1. iOpenerSamsung Galaxy S23 Plus Screen Replacement

Step 9

– Swing that opening pick around the bottom left corner to loosen up the sticky stuff.

Step 10

– Start by slipping a third pick into the bottom left corner to get things moving.

– Gently slide your pick up toward the top left corner to loosen the adhesive’s grip.

– Keep that pick in the top left corner to stop the adhesive from sealing back up.

Step 11

– Warm up your trusty iOpener and give it a cozy two-minute cuddle on the top edge of the back cover. It’s like giving your device a little spa treatment!

Tools Used
  1. iOpenerSamsung Galaxy S23 Plus Screen Replacement

Step 12

– Slide a fourth opening pick in at the top left corner to get things started.

– Gently wiggle it around that corner to loosen the adhesive and make separation easier.

Step 13

– Glide your opening pick up to the top right corner—time to break up that adhesive party.

– Let the pick chill in the corner to keep the adhesive from closing back up on you.

Step 14

– Align the opening pick’s tip with the flash cutout. It’s a good start!

– Gently slide the pick under the top edge of the back cover. Keep going until you feel it catch on the adhesive. You’re getting there!

– Continue sliding the pick towards the bottom, and you’ll feel the adhesive fully separate from the back cover. Almost done—keep it smooth!

Step 15

– Start by removing the back cover to get to the internals. During reassembly, it’s a good idea to power on your device temporarily to check that everything’s working before sealing it back up. Make sure to shut it down completely before moving forward. To get rid of stubborn adhesive, use a pair of tweezers or your fingers—applying a bit of heat and some 90% (or higher) isopropyl alcohol can make the job easier. If you’re working with custom-cut adhesives, follow this guide for the best results. For double-sided tape, stick to this guide to ensure a clean removal.

Step 16

– Grab your spudger and gently pry up the wireless charging coil press connector from the motherboard. When it’s time to reconnect, carefully align the press connectors and press down on one side until you hear a click, then do the same on the other side. Avoid pressing in the middle to prevent bending the pins and causing damage. If you need a hand or run into trouble, you can always schedule a repair.

Tools Used
  1. SpudgerSamsung Galaxy S23 Plus Screen Replacement

Step 17

– Grab a spudger and gently pry up to disconnect the NFC antenna press connector. Easy does it—just lift it away carefully to avoid any damage. If you need extra help, remember you can always schedule a repair.

Tools Used
  1. SpudgerSamsung Galaxy S23 Plus Screen Replacement

Step 18

– Grab your Phillips screwdriver and get ready to remove a total of thirteen 3.5 mm screws—these secure the wireless charging coil and the loudspeaker. First, unscrew the six screws holding the wireless charging coil in place, then tackle the seven screws fastening the loudspeaker. Take your time and keep track of where each screw goes. If you need a hand, you can always schedule a repair to get professional help.

Step 19

– Slide that trusty spudger into the little notch at the top left corner of the loudspeaker. You’ve got this!

– Gently pry it up to unclip the loudspeaker from the frame. Easy peasy!

Tools Used
  1. SpudgerSamsung Galaxy S23 Plus Screen Replacement

Step 20

– Gently lift the loudspeaker away from the frame using your fingers—think of it as lifting a book off a shelf, but with less gravity. Once it’s free, you can set it aside.

– Next, carefully remove the wireless charging coil and the loudspeaker from the frame, giving everything a gentle tug—no need to rush, patience pays off.

– During reassembly, press around the edges of the loudspeaker to clip it back into place on the frame. A firm, even press will help everything snap in nicely. If you need a hand, you can always schedule a repair for extra help.

Step 21

– Gently use the tip of your spudger to lift and disconnect the battery press connector. You’ve got this!

Tools Used
  1. SpudgerSamsung Galaxy S23 Plus Screen Replacement

Step 22

– Let’s get that display cable press connector disconnected! Use your trusty spudger to carefully pry it up from the back of the screen.

Tools Used
  1. SpudgerSamsung Galaxy S23 Plus Screen Replacement

Step 23

– Time to put everything back together – place the back cover on the frame to keep your phone’s battery and internals safe from harm.

– Now, flip your phone over so the screen is facing up – you’re making great progress!

Step 24

– Handle metal tools like the iFlex carefully—grab them by the handles, not the edges, since they can be pretty sharp. Safety first!

– Watch out for shattered glass—when removing the front glass, it might break into tiny shards that could fly around your workspace. Wearing gloves and safety glasses is a smart move to keep yourself protected.

Step 25

– Grab your hair dryer or heat gun and warm up the top edge of the screen until it’s almost too hot for your fingers to hang out.

Tools Used
  1. Heat GunSamsung Galaxy S23 Plus Screen Replacement
  2. Hair DryerSamsung Galaxy S23 Plus Screen Replacement

Step 26

– Start by sticking a suction cup right at the top center of the screen—get as close to the edge as you can for a good grip.

– Gently insert the iFlex at a downward angle into the gap between the top edge of the front glass and the frame, right at the earpiece speaker area.

– Pull on the suction cup with steady, confident force while carefully lowering the iFlex underneath the glass. It’s normal for some of the front glass to loosen up—that’s part of the process.

Tools Used
  1. Suction HandleSamsung Galaxy S23 Plus Screen Replacement

Step 27

– Twist the bendy iFlex around a top corner of the glass like you’re unlocking a secret level—just enough to pop the glue loose and slide in your trusty pick.

Step 28

– Take your opening pick and gently glide it around the edges of the front glass to break free the adhesive holding it to the frame. A little patience here goes a long way!

Step 29

– Gently lift the front glass away from the frame and set it aside. Keep it safe so it doesn’t crack or get scratched. If you hit a snag or need a hand, you can always schedule a repair with Salvation Repair.

Step 30

– Slip an opening pick under the edge of the screen panel to get things started.

Tools Used
  1. Heat GunSamsung Galaxy S23 Plus Screen Replacement
  2. Hair DryerSamsung Galaxy S23 Plus Screen Replacement

Step 31

– Gently glide your opening pick around the edge of the screen panel to break free the adhesive holding it to the frame. Keep it smooth and steady, and soon you’ll be on your way to a successful repair!

Step 32

– Before installing your new part, take a moment to compare it with the original. Don’t forget to transfer any leftover components and peel off any adhesive backings on the new part.

– To put everything back together, simply work backwards through the steps you followed earlier.

– Got some e-waste? Make sure to drop it off at an R2 or e-Stewards certified recycler.

– If things didn’t go quite as expected, no worries! Try a bit of basic troubleshooting, or head over to our Samsung Galaxy S23+ Answers Community for some extra help.

– Need some extra hands? Don’t hesitate to schedule a repair if you’re stuck!

Success!
Double-check your new part against the old one. If anything’s missing—like rubber gaskets or sticky bits—transfer them over and peel off any adhesive covers before popping it in.
To put your device back together, just reverse these steps. No time travel required.
When it’s time to say goodbye to old parts, drop them off with an R2 or e-Stewards certified recycler—Mother Earth sends her thanks.
Things didn’t go smoothly? Try some simple troubleshooting, or swing by our Samsung Galaxy S23+ Answers Community for help. If you’d rather let the pros handle it, you can always schedule a repair.

🍪
Have a cookie! This site uses cookies to enhance your experience. Opt-Out Options.