Apple Watch Series 5 Teardown

Duration: 45 minutes
Steps: 9 Steps

Curious about what’s actually different in the Apple Watch Series 5? On the outside, it’s almost a twin to the Series 4—same look, same feel, same classic tick. But what’s hiding inside? Let’s crack it open and see what’s been updated with a quick teardown! If you love tracking every little tech tweak, you’ll want to follow along on Instagram, Facebook, Twitter, or sign up for our newsletter.

Step 1

– Let’s take a quick peek at the Series 5 compared to last year’s model. Spoiler alert: there’s not a ton of difference! Grab your spudgers because we’re about to dig deep for the juicy details. Here’s what we’ve uncovered:

– LTPO OLED Retina display with Force Touch, designed for that always-on experience.

– Custom-designed Apple 64-bit dual-core S5 SiP (System in Package) for smooth sailing.

– Heart rate sensor and ECG to keep you on top of your health game.

– Available in GPS-only or with optional LTE, plus it includes a compass and ground elevation features.

– Water-resistant up to 50 meters so you can take it for a swim!

Tools Used
  1. SpudgerApple Watch Series 5 Teardown

Step 2

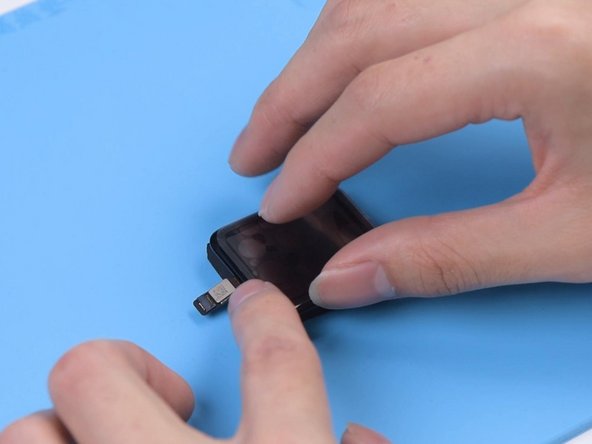
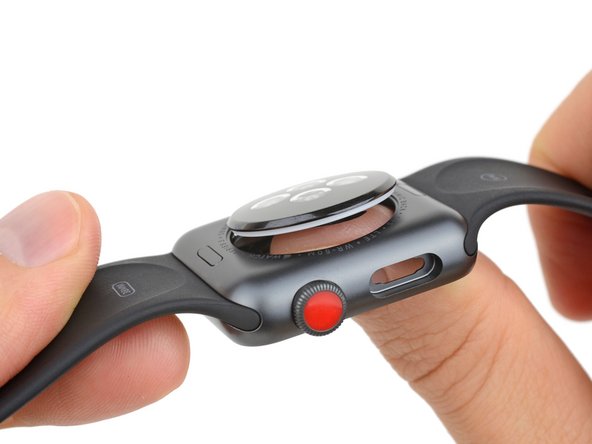
– Check out the model number: A2157 means you’re definitely holding a new Apple Watch.

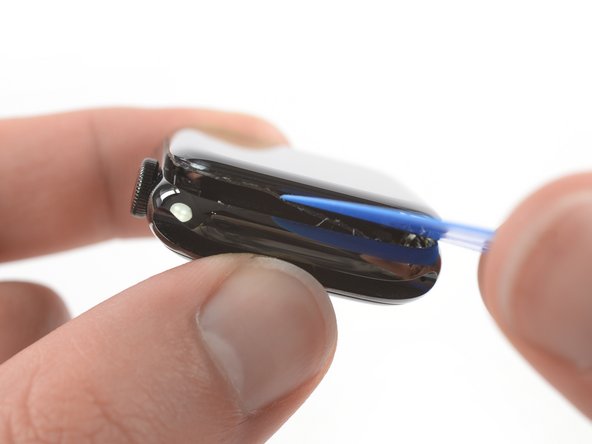
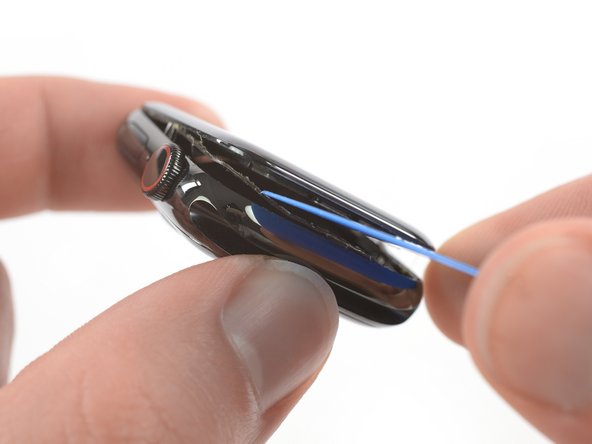
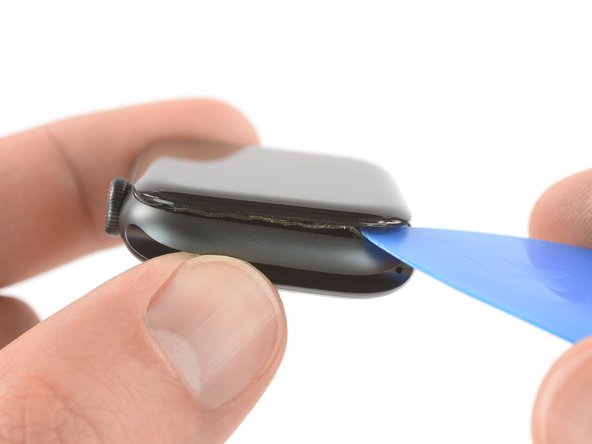
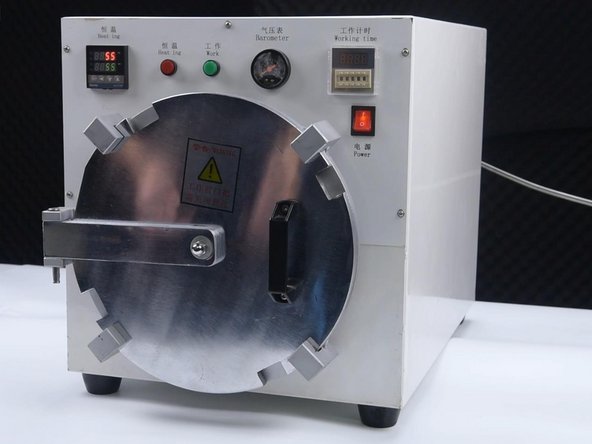
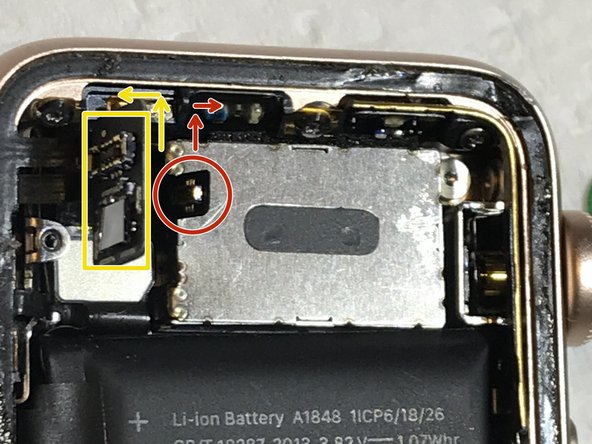
– Opening the display takes the usual heat-and-slice technique, but this one’s sealed up a bit tighter than you might expect.

– Look for the Force Touch gasket connector hanging out in its usual spot behind the display cables, right where it moved in the last version.

Step 3

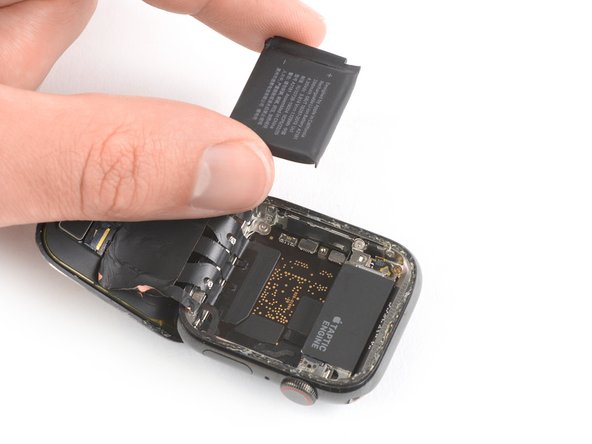
– To disconnect the power, we first need to tackle that stubborn glued-down battery. Don’t worry, we’ve got this (but we might make a silly face while doing it).

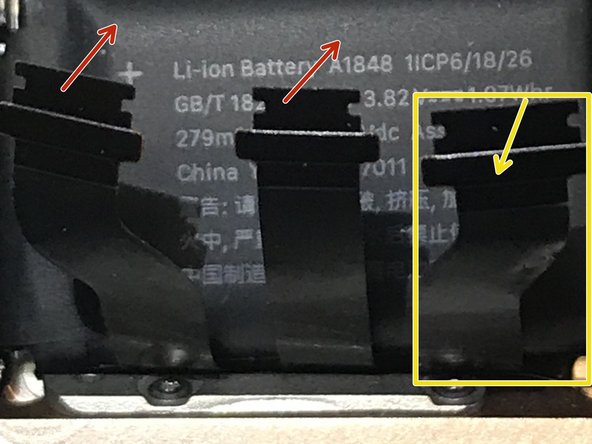
– This year’s battery is labeled A2181 and has an energy capacity of 1.129 Wh (296 mAh at 3.814 V).

– This gives us a tiny 1.44% boost compared to last year’s 1.113 Wh battery. Remember, those battery improvements didn’t spark the move to the 18-hour always-on display—there’s something else at play!

Step 4

– Teardown Update: We took a closer look at the compact 40 mm Apple Watch Series 5 and discovered a surprising new battery design that gives it a 10% capacity boost! It’s a bit of a mystery why the 44 mm version didn’t get this upgrade, but you can dive into all the juicy details over here.

Step 5

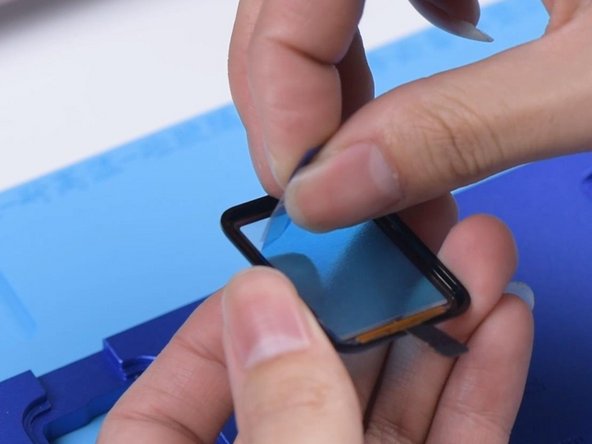
– The new LTPO display on the Series 5 (left) looks pretty much like last year’s Series 4 display (right)—both are packing that LTPO tech. But Apple has been busy making some behind-the-scenes tweaks.

– The LTE antenna connector is chilling in its usual spot, but thanks to a new form factor, these displays aren’t going to swap places anytime soon.

– Screen size and resolution haven’t budged: you’re still looking at 368 × 448 pixels on the 44 mm version, covering a tidy 977 sq mm.

Step 6

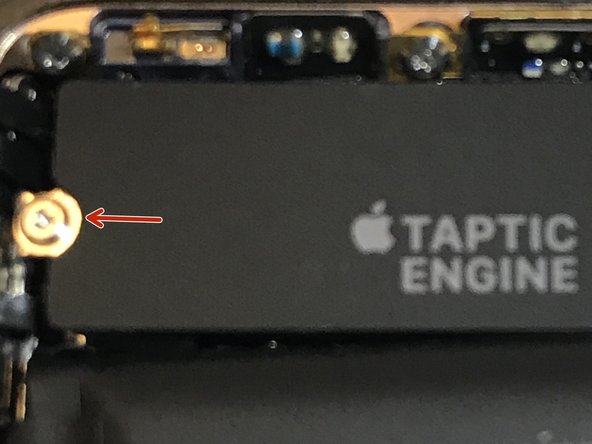
– Gently pry the Taptic Engine away from its snug spot near the antenna connector, and let’s take a closer look for comparison!

– At first glance, they might seem pretty similar—but look closely! The connectors have been revamped, which means these parts won’t play nice with last year’s models.

Step 7

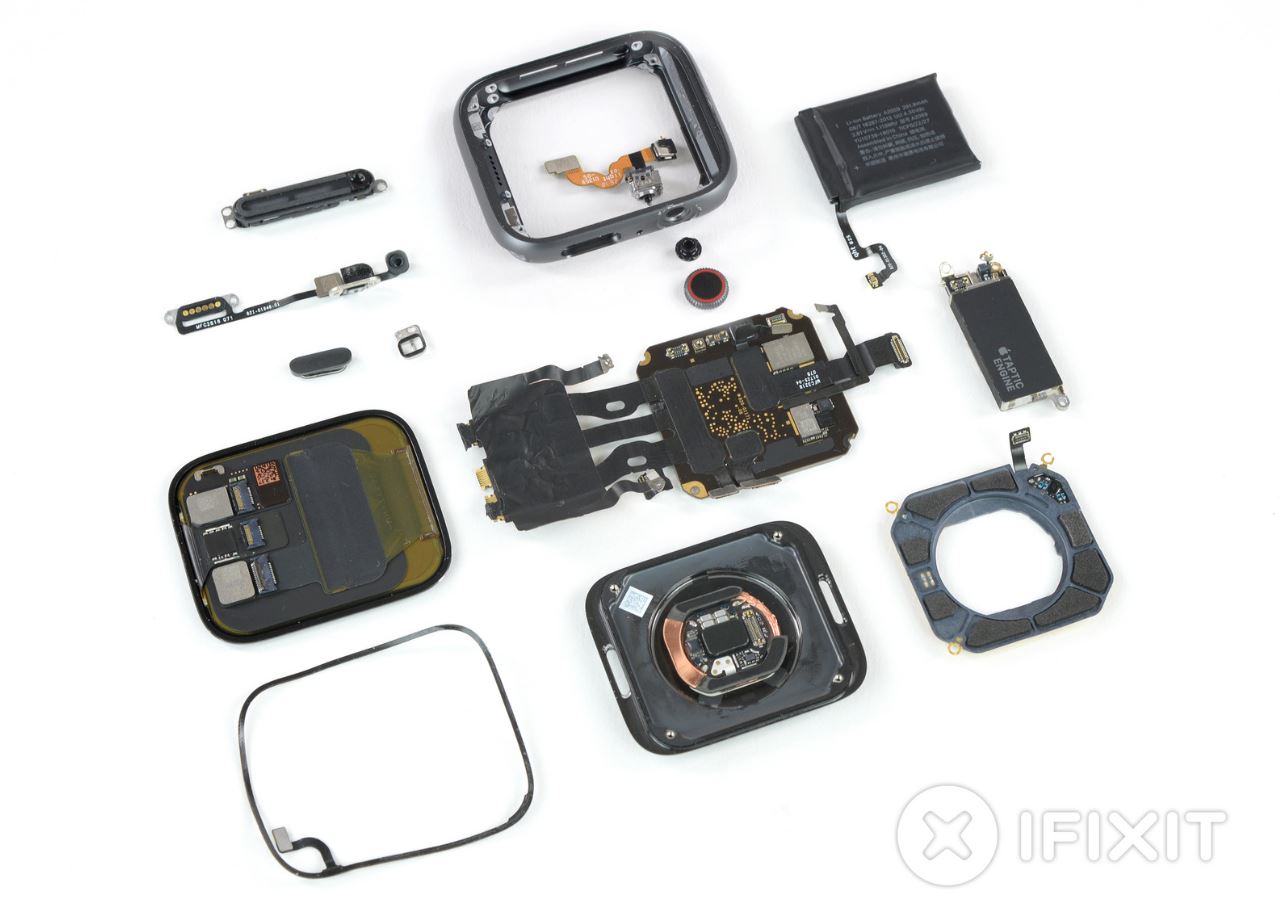
– Once you’ve taken out enough screws, the rest of the watch slips right out the bottom—just like we saw with the Series 4.

– Now, let’s turn our attention to the star of the show: the S5.

– The digital crown, microphone, and side button are still hanging on to the frame for now…

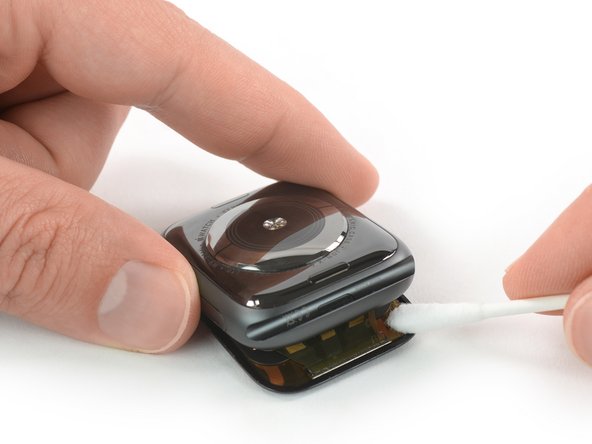
– …while the heart rate sensor, ECG hardware, and charging coil all tag along with the bottom plate.

Step 8

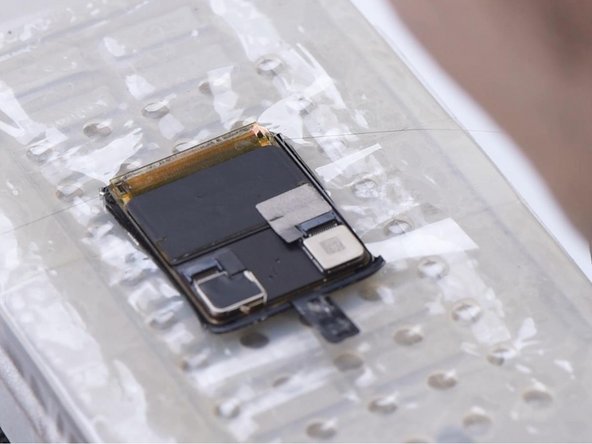
– Here comes the brain of this device, the shiny new— or maybe not? —S5 system-in-package.

– While it boasts a fresh compass and double the onboard storage—32 GB instead of 16—most of the integrated circuits are still sealed under a tough layer of resin, keeping them out of our reach. But for the few chips we can see, here’s what we’ve got:

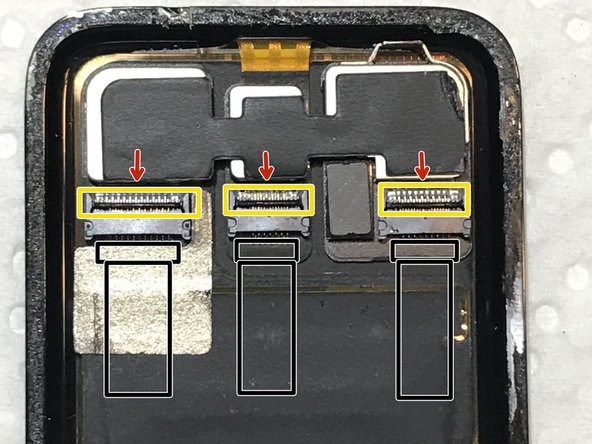
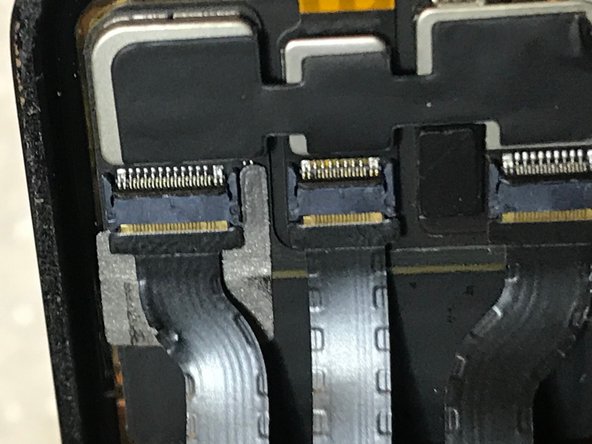
– Comparing the attached display flex cables with those from the Series 4, we notice that the middle plug has gained 4 pins and the bottom one has added 2. Without knowing what they do, it looks like we can’t swap them out.

– Skyworks 229-15 465371 1918 MX, likely the front-end module

– 16 CJ

– YY NCJ 7NE (probably the acceleration + gyro sensor)

– API 924 920

Step 9

– And that’s our stopping point! This year’s always-on display is a fantastic upgrade in functionality, though it’s subtly hidden behind some intriguing changes in the physical parts.

– We’re sticking with the same solid construction and familiar-looking components, along with the same impressive engineering, all wrapped up in a slightly tricky-to-open package. Plus, there’s a quirky new battery design that currently only perks up the smaller version of the watch.

– So, what does all this mean for repairability?

Success!

Apple Watch Series 5 Battery Replacement

Duration: 45 minutes
Steps: 13 Steps

Ready to give your Apple Watch Series 5 a new lease on life with a fresh battery? This guide walks you through swapping out the battery—cellular/LTE and GPS-only versions are pretty much the same. If your battery looks a bit puffy, take it slow and be careful. For extra safety, run your battery down below 25% before you start. That way, if anything goes sideways, you’ll have peace of mind. Heads up: opening the watch could put the force touch gasket at risk, and if it gets damaged or the cable is cut, you’ll need to swap it out as well. Don’t forget some new adhesive for putting everything back together. If you ever feel in over your head, you can always schedule a repair with us at Salvation Repair.

Step 1

– Before diving into the repair, make sure to take your watch off the charger and shut it down to keep things safe and smooth.

– If your touchscreen is acting up and you can’t turn off the watch normally, no worries—use this alternate method to power it down and get ready to fix it.

Step 2

– Since the gap between the screen and watch body is super slim, you’ll need a sharp blade to get in there. Before you start, check out these tips and warnings so you don’t run into trouble.

Step 3

– Grab an iOpener, or get creative with a hair dryer or heat gun, and gently warm up the face of the watch to help loosen that stubborn display adhesive.

– Keep the heat pad or tool on the watch for at least two minutes to really warm up the screen and soften the glue holding it in place—this makes the next steps way easier.

Tools Used
  1. iOpenerApple Watch Series 5 Battery Replacement

Step 4

– Slip the tip of your curved blade into the small gap between the screen and the outer shell. Start on the short side near the digital crown.

– Press the blade straight down into the gap with a bit of oomph.

– Once the blade is in, give it a gentle twist to pop the display open just a bit.

Step 5

– Start by creating a small opening with the curved blade, then take it out and slip the thinner edge of an opening tool into that gap.

– Gently push the opening tool into the space, using your thumb as a pivot point to lift the display just a bit more. If you need a hand, remember you can always schedule a repair.

Step 6

– Looks like the force touch sensor might be giving a little too much love to the display frame rather than the watch’s body. No worries! Just slide an opening pick under the display and gently coax the Force Touch gasket away from the display.

– Now, take that pick and glide it around the display like a pro to break up the adhesive keeping the Force Touch gasket and display together. You’re doing great!

Step 7

– Gently pry the display open – think of it as opening a book, and be careful not to apply too much pressure.

Step 8

– Gently lift the screen to create enough room to reach the battery.

– Slip an opening pick between the battery and the Taptic Engine to loosen it up.

Step 9

– Gently glide that opening pick along the battery’s edge to loosen up the adhesive.

– With a steady hand, apply consistent pressure to carefully lift the battery, making sure to separate it from the sticky stuff holding it to the mainboard.

Tools Used
  1. iOpenerApple Watch Series 5 Battery Replacement

Step 10

– Gently tilt the battery up to about a 75-degree angle—think of it like giving your battery a little stretch.

– Take out the tiny 1.1 mm Y000 screw. Don’t lose it; it’s a sneaky one!

Step 11

– Grab a trusty pair of tweezers and gently lift away the metal plate covering the battery connector. Just a light touch does the trick—no need to force it. If you want a pro to handle the tricky bits, you can always schedule a repair.

Tools Used
  1. TweezersApple Watch Series 5 Battery Replacement

Step 12

– Grab the flat end of your trusty spudger and gently lift up to disconnect that battery flex cable like a pro!

Tools Used
  1. SpudgerApple Watch Series 5 Battery Replacement

Step 13

– If you can, power up your device and give your repair a test drive before sealing things up with adhesive.

– Make sure to secure that new battery with pre-cut adhesive or some trusty double-sided tape. Place the adhesive where the old stuff used to be, not directly on the battery. Give that new battery a good press to make it snug!

– Time to put your device back together! Just follow these steps in reverse. Don’t forget to clean the areas with isopropyl alcohol (>90%) and apply fresh adhesive where needed.

– For the best performance, calibrate your newly installed battery once you’re all done.

– Got some e-waste? Be a hero and take it to an R2 or e-Stewards certified recycler.

– If things didn’t go quite as planned, don’t sweat it! Try some basic troubleshooting, or if you’re stuck, feel free to reach out for help from our community.

Success!
If you can, power up your device and give your repair a test run before you seal everything up with fresh adhesive.
Lock in that new battery using pre-cut adhesive or some trusty double-sided tape. Just a tip: apply the new adhesive in the spots where the old stuff was, not directly on the battery. Give that battery a good press to make sure it’s snug as a bug!
To put your device back together, just retrace your steps in reverse. Remember to clean those areas with some isopropyl alcohol (>90%) and add fresh adhesive where needed.
For top-notch performance, don’t forget to calibrate your newly installed battery after wrapping up this guide.
Got some e-waste? Make sure to take it to an R2 or e-Stewards certified recycler.
If things didn’t go as smoothly as you hoped, don’t sweat it! Try some basic troubleshooting or reach out to our Answers community for some extra support.

Opening Procedure

Duration: 45 minutes
Steps: 7 Steps

Ready to dive into your Apple Watch Series 4? Let’s get that display open for repairs. Heads up: the Force Touch gasket is a bit of a diva and can get damaged during opening. If it comes apart or the cable gets snipped, you’ll need a new one. And don’t forget the replacement adhesive for putting everything back together once you’re done.

Step 1

– First things first—take your watch off the charger and shut it down before you dive in.

– If your touchscreen is out of commission and won’t let you power off, there’s an alternate way to turn off your watch.

Step 2

– Now it’s time to get this repair started! To separate the screen from the watch body, you’ll need a sharp blade – the gap is super thin, so be careful. Before you dive in, take a minute to read the following warnings and make sure you’re prepared.

Step 3

– Grab your iOpener (or your trusty hair dryer or heat gun) and give the watch face a gentle warm-up to loosen that stubborn display glue.

– Let the heat party continue— park the iOpener on the watch for a solid two minutes so the screen gets nice and cozy and the adhesive waves the white flag.

Tools Used
  1. iOpenerOpening Procedure

Step 4

– Slip the edge of your curved blade into the slim gap between the screen and the case. Start on the short side by the digital crown.

– Give it a little push—straight down—so the blade slides into the gap.

– With the blade in place, gently twist it to nudge the display open just a bit.

Step 5

– After you’ve created a little opening with your trusty curved blade, go ahead and take it out. Now, slide the thinner edge of your opening tool into that gap.

– Gently press the opening tool further into the gap, and use your thumb to help lift the display just a bit more. You’re doing great!

Step 6

– Since the Force Touch sensor might stick to the display frame rather than the watch’s body, gently insert an opening pick under the display and carefully pry the Force Touch gasket away from the screen. Then, slide the pick around the display to carefully separate the adhesive holding the Force Touch gasket from the display itself.

Step 7

– Now, to put Humpty Dumpty back together again, just retrace your steps and do it in reverse!

– Once you’re done, don’t forget to give your old gadgets a proper send-off by taking them to an R2 or e-Stewards certified recycler.

– If things didn’t go quite as smoothly as you hoped, don’t sweat it! Swing by our Answers community for some troubleshooting tips and tricks. And remember, if you ever feel stuck, you can always schedule a repair to get back on track.

Tools Used
  1. TweezersOpening Procedure

Success!
Put everything back together by working through these steps in reverse—like hitting rewind on your repair adventure.
When it’s time to say goodbye to any parts, make sure they land at a certified R2 or e-Stewards recycler.
Ran into a repair roadblock? Our Answers community is packed with tips and troubleshooting help. Still stuck? You can always schedule a repair for extra backup.

Apple Watch Series 4 Teardown

Duration: 45 minutes
Steps: 15 Steps

Get ready to uncover the secrets of the latest Apple Watch! We’re talking trainer, doctor, guardian, and more – all in one sleek device. Let’s dive into this teardown and find out what makes it so lovable. For your daily dose of repair and teardown fun, follow us for regular updates: two to three Instagram posts a day, Facebook at lunch, a weekly newsletter, and the occasional tweet to satisfy your cravings.

Step 1

– Ready to give your Apple Watch a boost? First, get comfortable and gather your tools—nothing fancy, just the essentials. Carefully lift the display from the body, taking care not to damage the delicate forces inside. The Retina OLED display with Force Touch is a beauty, so handle it gently. If you need a hand or run into a tricky part, remember, you can always schedule a repair. Once you’ve got it open, you’ll see the custom-designed Apple 64-bit dual-core S4 SiP, along with the optional LTE and built-in GPS/GLONASS/Galileo/QZSS, NFC, Wi-Fi, and Bluetooth 5.0 modules—these are the brains and connectivity champs. Don’t forget the upgraded sensors—accelerometer, gyroscope, heart sensors, microphone, speaker, barometric altimeter, and ambient light sensor—that keep your watch smart and responsive. If water’s trying to be a party crasher, no worries—it’s rated to resist up to 50 meters. And with WatchOS 5, your device is all set to stay current and perform smoothly. Proceed step-by-step, and if you hit a snag, help is just a click away.

Step 2

– Let’s take a closer look at these black squares – they may seem similar at first glance, but our experts at Salvation Repair have used X-rays to reveal some pretty significant differences on the inside.

– Right off the bat, our subject (on the left) has some notable differences from the Series 3 (on the right) – check out the brand new optical sensor on the back, surrounded by a shiny new electrode.

– Some other key differences from the older 42 mm version include rounded corners that give it a more modern squircle look, and a side button that’s now flush with the case.

– When viewed from the side, the Series 4 is noticeably slimmer than the Series 3 – a whole 0.7 mm thinner, to be exact. However, it’s actually a bit thicker than the original.

– It looks like a lot of that slimming down is thanks to the new display. If you’re not feeling confident in your repair skills, don’t worry – you can always schedule a repair with our expert technicians at Salvation Repair.

Step 3

– Let’s take a closer look at the sleek, all-ceramic-and-sapphire-crystal back details:

– Inside one of the wrist band slots, you’ll find a new model number, A2008—and in the other, the serial number, plus a small air vent hole for pressure equalization. Pretty cool, right?

– Time to get familiar with your Watch – check out the Series 4 features!

– Now, let’s run through the impressive list of features, including water resistance up to 50 meters. Nice!

– Take a peek at the optical sensor, conveniently located right in the middle this time.

– And check out that big ring-shaped electrical sensor—that’s a new addition!

Step 4

– Swing the iOpener back and forth to gently warm up and loosen the adhesive—your wristbands might sink in, but that’s just part of the process. Say, ‘Hey Siri, turn on DND,’ to keep distractions at bay while you work. Carefully slide your blade under the edge of the shiny display—no need to rush, just stay steady and gentle to avoid any cracks. This method has been tried and true a few times now, though we’re still figuring out how much water resistance gets restored afterward. Once the cables are safely disconnected—you’ll see the familiar trio of connectors—we can take a closer look at the display to assess what’s next.

Tools Used
  1. iOpenerApple Watch Series 4 Teardown

Step 5

– Now that the screen is free, you can really appreciate those sleek new curves. The display packs in more pixels and stretches out to those smooth, rounded corners—think of it as the smartwatch’s answer to the iPhone X’s style.

– Flip it over and you’ll spot three chip packages: two are locked up tight, and the third is hiding its secrets under a shiny metal shield.

– The 44 mm version’s display now takes up a roomy 977 sq mm, up from the 740 sq mm on the older 42 mm Series 3. That’s a lot more screen for your buck.

– And for the 40 mm model, the display covers 759 sq mm, compared to just 563 sq mm on the previous 38 mm model. More screen, more fun!

Step 6

– On our way to the battery, we run into the tri-point screws—looks like Apple’s got a new favorite, and pentalobe is old news.

– We think we’ve disconnected the battery, but surprise! The battery’s still holding on, thanks to its flex cable. So, what did we just unplug?

– The battery flex cable has moved since the Series 3 days—it’s now tucked underneath the battery and above the main board. Once you disconnect that, you’re good to go. Time to pop the battery out!

– Whatever that first connector was, it probably wasn’t too crucial… right?

Step 7

– Here’s the built-in battery that’s keeping your Watch going—no winding necessary!

– Now, time to crunch the numbers on volume. A 0.7 mm thinner body but 2 mm taller? Let’s do some quick math…

– …And it looks like that’s just enough to power the battery for a solid 18 hours of runtime!

– Or it could be 1.12 Wh, depending on which part of the battery you’re measuring from.

– In any case, that’s a drop of about 17% in capacity compared to the 1.34 Wh battery of the 42 mm Series 3 (though still more than the 1.07 Wh of the 38 mm model from our latest teardown).

Step 8

– After navigating the battery connector’s tricky placement, we’re ready to tackle the Force Touch gasket’s new location.

– The flex connector has moved to the opposite corner and now features stacked twin cables, making it a more streamlined process.

– The Taptic engine looks similar to what we’ve seen before, but with a slightly more compact design. Let’s take a closer look to understand how it works.

Step 9

– Meet the Taptic Engine—the gadget in charge of all the buzz and shakes. It’s officially called an electromagnetic oscillating linear actuator, but that sounds way less cool.

– This version is sleeker than its ancestors, trading bulk for extra length. Think long and lean, rather than short and stocky.

– Not every phone on the block uses this setup, especially if it’s running Android.

Step 10

– Next, carefully remove the new noisemaker—it’s claimed to be 50% louder, possibly making it a bit more challenging, but hey, progress! Now that the microphone has shifted closer to the digital crown, the speaker has some extra room to boost its volume. A silicone gasket keeps the speaker sealed, helping it push out water and keep things dry, just like last year’s version. Update: Turns out there’s a tiny tunnel from the air vent we saw in Step 3, passing through the chassis right into the sensor’s path. That means it probably doesn’t need extra help from the speaker grille, but it’s still likely that the barometer benefits from it. If you need help, you can always schedule a repair.

Step 11

– Now we’re down to the main event: the custom Apple S4 system-in-package.

– Great news—the S4 is just held in with screws, so it lifts out nice and easy. This is a big upgrade from the super-sticky SiPs Apple used to use.

– True to form, the package is wrapped in a tough resin shell, so it keeps most of its inner workings a mystery. But at least the radio frequency parts are still somewhat visible:

– Avago AFEM-8087 (most likely the front-end module)

– OU JQ

– YY MEH ECE (pretty sure this is a Bosch part—probably the upgraded accelerometer + gyro combo)

– Avago E827 I2033 0836

– ST Microelectronics ST33G1M2 32-bit MCU with ARM SecurCore SC300—this is the same eSIM chip you’ll find in the previous Apple Watch and the iPhone XS line.

Step 12

– Let’s dive in and take a closer look. As we attempt to remove the heart sensor array, the entire bottom part comes off. It turns out that accessing the device through the bottom case is indeed a viable option.

– We’ve spotted a magnet in the middle, which is used to hold the device in place on the charger, as well as the charging coil itself and some new silicon components.

– Under the S4 package, we’ve found a neat array of black pads. These might be used for heat dissipation, or perhaps they’re just there to keep things comfortable and stress-free.

– The model numbers we’ve found are A88 AY10 and 18206 00D5.

– If you’re feeling stuck or need some extra help, don’t worry – our team at Salvation Repair is here to assist you. You can always schedule a repair if you need a hand.

Step 13

– This shiny little donut isn’t just a snack—it’s probably a sleek antenna, skipping the old-school brackets and gaskets you might remember from the past.

– And here’s the star of the show: new electrical heart sensors (ECG) that work alongside the optical ones, giving your device a full picture of your heart’s rhythm.

– These electrodes pick up tiny electrical signals as your heart beats, and the device processes that info to analyze your heart’s activity.

Step 14

– Time to explore that second electrode—the shiny new digital crown. We’ll remove some parts and quickly uncover the interesting bits. Grab your magnifying glass — we’re diving into micro-land. Inside, the golden cylinder shows tiny micro scratches, which help an optical encoder (the little black box on the ribbon cable) keep track of its rotation. The springy bracket behind the cylinder likely carries the electrical signal from your finger through to the watch, completing the ECG circuit. And that tiny switch behind the spring acts as the mechanical button for the crown. Plus, there’s a gasket on the outside of the crown shaft to keep out dust and water. If you need help, you can always schedule a repair.

Step 15

– The first Apple Watch was a game-changer at launch, but let’s be real, the updates have been pretty minor each year—until now.

– If this watch isn’t getting your heart racing, maybe it’s time for an epic double iPhone teardown?

– A huge shoutout to Creative Electron for their support! Now, there’s just one thing left. Let’s get that drumroll going…

– Unlike the first Watch, which was a bit of a glue-fest, the Series 4 is designed with a lot more thought behind it.

– Apple enthusiast John Gruber likened this to the design leap we saw with the iPhone 4, and we might even stretch it to call it an iPhone 5: a device that really knows what it wants and aims to look just as sleek inside as it does outside.

Success!

Apple Watch Series 4 Screen Replacement

Duration: 45 minutes
Steps: 24 Steps

Time to swap out that cracked or flickering display on your Apple Watch Series 4! Before diving in, make sure your watch is running watchOS 5 or newer, and your iPhone is on iOS 12 or later—this keeps pairing smooth sailing after the fix. Heads up: messing with the display could impact Apple Pay, so it’s a good idea to remove your Apple Pay info beforehand and re-enter it once the new screen is in place. This guide is tailored for the standard GPS-only model, but if you’ve got the cellular/LTE version, the process is pretty similar. If you need a pro’s touch, you can always schedule a repair to get it done right.

Step 1

– First things first, take your watch off the charger and power it down. Trust us, it’s much easier to work with when it’s off!

– If your touchscreen is busted and won’t let you turn the watch off, no worries! We’ve got you covered with a quick alternate method to power it down. You’ll be back in action in no time.

Step 2

– Since the space between the screen and the watch body is super tight, you’ll want to grab a sharp blade to help you out. Make sure to check out the following warnings before diving in!

Step 3

– Grab an iOpener, hair dryer, or heat gun—whatever’s handy—and warm up the front of the watch to help loosen up that stubborn display adhesive.

– Let the heat sit on the watch for at least two minutes so the screen gets nice and toasty, making the adhesive easier to handle.

Tools Used
  1. iOpenerApple Watch Series 4 Screen Replacement

Step 4

– Grab your curved blade and slide its edge into the slim gap between the display and the outer case. Start on the short side, right by the digital crown.

– Push the blade straight down into the gap with some steady pressure.

– Once the blade is in, give it a gentle twist to pop the display open just a bit.

Step 5

– After you’ve created a little opening with the curved blade, set it aside and slide the thinner edge of your trusty opening tool into that gap.

– Gently nudge the opening tool deeper into the gap, using your thumb as a lever to lift the display just a smidge more.

Step 6

– Uh-oh! It seems like the Force Touch sensor might be playing peekaboo and sticking to the display frame instead of the watch’s body. No worries! Just slide an opening pick under the display and gently coax that Force Touch gasket away from the display.

– Now, take that pick for a little stroll around the display, helping to free up the adhesive that’s keeping the Force Touch gasket stuck. You’re doing great!

Step 7

– Tilt the display open to about a 45° angle, then grab some tweezers and peel off that sticky adhesive between the screen and the Force Touch gasket.

– Guide the adhesive around and behind the display cables to free it completely. Since you’ll be swapping it out anyway, don’t be shy about cutting it if that makes things easier.

– When putting your watch back together, be sure to revisit this step and follow up with the Resealing Procedure.

Tools Used
  1. TweezersApple Watch Series 4 Screen Replacement

Step 8

– Gently bend the screen back just enough to give yourself some wiggle room to pop out the battery.

– Slide an opening pick between the battery and the Taptic Engine with a smooth motion.

Step 9

– Glide the opening pick along the battery’s edge to start loosening that sticky adhesive.

– Keep a steady hand and gently lift the battery, working it free from the glue that’s holding it to the system board.

Tools Used
  1. iOpenerApple Watch Series 4 Screen Replacement

Step 10

– Gently lift that battery like it’s a precious treasure, angling it at a cool 75°.

– Grab your trusty tweezers and peel off that black sticker from the metal plate covering the battery connector like a pro!

Tools Used
  1. TweezersApple Watch Series 4 Screen Replacement

Step 11

– Unscrew the Y000 screw (1.2 mm in length) and set it aside—time to show that screw who’s boss!

Step 12

– Grab a pair of tweezers and gently lift out the metal plate that’s hiding the battery connector. Easy does it—this step clears the way for what’s next. If you need a hand, you can always schedule a repair.

Tools Used
  1. TweezersApple Watch Series 4 Screen Replacement

Step 13

– Grab that trusty spudger and use its pointed end to gently lift and disconnect the battery flex cable. You’ve got this!

Tools Used
  1. SpudgerApple Watch Series 4 Screen Replacement

Step 14

– First, let’s get that battery out of there. Gently remove it and set it aside.

– Before placing your new battery, peel off the protective liner to reveal the sticky adhesive. This will help it stick in place just right.

Step 15

– Dab a bit of high-percentage isopropyl alcohol (99% or higher) onto a Q-tip and gently apply it to the black adhesive foil. Let it chill there for about two minutes to loosen up the stickiness.

– If you’re not feeling the alcohol method, you can warm things up by placing a heated iOpener on top of the screen for at least two minutes. This will help soften the adhesive and make your next steps way easier.

Tools Used
  1. iOpenerApple Watch Series 4 Screen Replacement

Step 16

– Grab a pair of tweezers and gently peel back the tape that’s covering the three display cable connectors. Take your time—patience is key here! If you need a hand, you can always schedule a repair.

Tools Used
  1. TweezersApple Watch Series 4 Screen Replacement

Step 17

– Grab a trusty pair of tweezers and gently lift open those three ZIF connectors located at the back of the screen. You’ve got this!

Tools Used
  1. TweezersApple Watch Series 4 Screen Replacement

Step 18

– Grab your blunt nose tweezers and gently lift up the edges of the black foil that’s sticking the cable to the back of the screen. Go slow—no need to rush greatness!

Tools Used
  1. TweezersApple Watch Series 4 Screen Replacement

Step 19

– Gently raise the watch body and slide a spudger under the display flex cable to free up any stubborn adhesive still hanging on.

Tools Used
  1. SpudgerApple Watch Series 4 Screen Replacement

Step 20

– Gently wiggle those display flex cables out of their ZIF connectors—don’t rush, they like to take their time.

– Now, split the watch assembly and the screen. Look at that! You’re making it look easy.

Step 21

– Here’s how to lay down fresh adhesive before putting your watch back together.

– Moisten a Q-tip with a bit of high-grade isopropyl alcohol (over 99%), or grab a cleaning pad, and gently wipe away any stubborn leftover adhesive from the top of the Force Touch gasket.

Step 22

– Grab your tweezers and gently peel the blue-film replacement adhesive off the backing paper.

Tools Used
  1. TweezersApple Watch Series 4 Screen Replacement

Step 23

– Grab that replacement adhesive and hold it at a fun angle to slide it over the display cable with ease!

– Next, place the replacement adhesive right on top of the Force Touch gasket like a pro.

Step 24

– To put your Apple Watch Series 4 back together, just reverse the steps above and reconnect the screen and battery.

– When you’re ready to say goodbye to any old parts, drop them off at an R2 or e-Stewards certified recycler.

– Stuck? Something not working quite right? Head over to our Answers community for some troubleshooting magic—or if you hit a wall, you can always schedule a repair.

Tools Used
  1. SpudgerApple Watch Series 4 Screen Replacement

Success!
Put your Apple Watch Series 4 back together by reversing these steps to pop the screen and battery back in place.
Got old parts? Drop your e-waste off at an R2 or e-Stewards certified recycler.
Ran into a snag? Our Answers community has your back with troubleshooting tips. If you need a hand, you can always schedule a repair.

Apple Watch Series 4 Force Touch Gasket Replacement

Duration: 45 minutes
Steps: 28 Steps

Ready to swap out the Force Touch gasket on your Apple Watch Series 4? Start by removing the display—it’s the easiest way. If you’re feeling bold and steady-handed, you *can* get the gasket out with the screen still on, but take it slow. Before you dive in, make sure your watch is running watchOS 5 or later and your iPhone is updated to iOS 12 or above. This helps dodge any odd pairing issues when you’re done. Heads up: changing the display might mess with Apple Pay, so it’s smart to remove your card info before you begin, then add it back after the fix. These steps are shown on the GPS-only model, but the LTE version is pretty much the same.

Step 1

– Alright, before diving into the repair fun, make sure to unplug your watch from the charger and turn it off. We want to keep things safe and sound!

– If your touchscreen is acting up and won’t let you power down the watch, no worries! Just follow this alternate method to get it turned off.

Step 2

– Since the gap between the screen and watch body is super slim, you’ll need a sharp blade to carefully pry them apart. Make sure to read the following warnings before you get started—it’s all about safety and success.

Step 3

– Grab your trusty iOpener (or if you’re feeling crafty, a hair dryer or heat gun will do the trick) and give the face of the watch a nice warm hug to loosen up that display adhesive.

– Let the iOpener chill on the watch for at least two minutes to ensure the screen gets all toasty and the adhesive gets nice and soft, ready for action!

Tools Used
  1. iOpenerApple Watch Series 4 Force Touch Gasket Replacement

Step 4

– Gently slot the edge of a curved tool into the narrow gap between the display and the outer shell. Start at the short side closest to the digital crown—think of it as the entry point.

– Apply steady, firm pressure straight down into that gap—no need to go all Hulk on it, just consistent pressure.

– Once the tool is in place, tilt it slightly to give the display a gentle pry open. Keep it smooth and controlled to start loosening things up.

Step 5

– First, use that curved blade to pry open a small gap – you got this! Once you’ve made some progress, carefully remove the blade and swap in the thinner edge of an opening tool to keep things moving.

– Now it’s time to gently push the opening tool into the gap, using your thumb as a pivot to carefully lift the display open a bit farther. Take your time and don’t force it – you’re making great progress!

Step 6

– Sometimes, the Force Touch sensor likes to hang out with the display frame instead of its usual spot on the watch body. No worries! Just grab an opening pick and gently slide it underneath the display to free that Force Touch gasket from its clingy relationship with the display.

– Now, take that pick and glide it around the display, gently separating the adhesive that holds the Force Touch gasket in place. You’re doing great!

Step 7

– Tilt the display open to about a 45° angle. Grab your trusty tweezers and gently peel away the adhesive that’s hanging out between the display and the Force Touch gasket.

– Work the adhesive around and behind the display cables until it’s totally free. If it’s being stubborn, go ahead and cut it—no need to worry, you’ll be swapping it out for fresh adhesive anyway.

– When you’re putting your watch back together, don’t forget to stop here and follow the Resealing Procedure to keep everything snug and sealed.

Tools Used
  1. TweezersApple Watch Series 4 Force Touch Gasket Replacement

Step 8

– Gently bend the screen back until you’ve got enough room to wiggle that battery out.

– Slide an opening pick between the battery and the Taptic Engine to get things moving.

Step 9

– Gently work the opening pick along the edge of the battery to break down the adhesive – you got this!

– Apply steady, consistent pressure to carefully pry the battery away from the system board, loosening it from the adhesive securing it in place. Take your time and be patient, it’s almost free!

Tools Used
  1. iOpenerApple Watch Series 4 Force Touch Gasket Replacement

Step 10

– Gently lift the battery, angling it up at about 75 degrees – just like a little salute to your device!.

– Grab a pair of tweezers and peel back the black sticker from the metal plate that’s guarding the battery connector. It’s like taking off the blanket from a cozy couch!

Tools Used
  1. TweezersApple Watch Series 4 Force Touch Gasket Replacement

Step 11

– Grab that tiny Y000 screw (it’s about 1.2 mm long) and gently remove it to keep things rolling.

Step 12

– Grab your tweezers and carefully lift off the metal plate covering the battery connector.

Tools Used
  1. TweezersApple Watch Series 4 Force Touch Gasket Replacement

Step 13

– Time to get this repair started! Use the pointed end of a spudger to carefully pry up and disconnect the battery flex cable.

Tools Used
  1. SpudgerApple Watch Series 4 Force Touch Gasket Replacement

Step 14

– First things first, let’s pop that battery out! It’s like giving your device a little breather.

– Before you place your shiny new battery in, don’t forget to peel off the protective liner to reveal the adhesive. It’s the little things that make a big difference!

Step 15

– Dab a little overachieving isopropyl alcohol (99% or higher) onto a Q-tip and pat it onto the black adhesive foil. Give it about two minutes to work its magic on that sticky stuff.

– Or, if you’re feeling cozy, warm up a heated iOpener and lay it on the screen for at least two minutes. The heat will help loosen up the adhesive so things come apart much easier.

Tools Used
  1. iOpenerApple Watch Series 4 Force Touch Gasket Replacement

Step 16

– Gently grab a pair of tweezers and carefully peel away the tape that’s hiding the three display cable connectors. Take your time—slow and steady wins the race here. If you need a hand, you can always schedule a repair.

Tools Used
  1. TweezersApple Watch Series 4 Force Touch Gasket Replacement

Step 17

– Grab a trusty pair of tweezers and gently nudge open those three ZIF connectors on the back of the screen. You’ve got this!

Tools Used
  1. TweezersApple Watch Series 4 Force Touch Gasket Replacement

Step 18

– Grab a pair of blunt-nose tweezers and gently lift the edges of the black foil tape holding the cable to the back of the screen. Take your time—peeling it up smoothly will keep things tidy and safe. If you need a hand, you can always schedule a repair.

Tools Used
  1. TweezersApple Watch Series 4 Force Touch Gasket Replacement

Step 19

– Gently lift the watch body and carefully slide a spudger beneath the display flex cable to loosen up any stubborn adhesive holding it in place.

Tools Used
  1. SpudgerApple Watch Series 4 Force Touch Gasket Replacement

Step 20

– Gently slide the display flex cables out of their ZIF connectors – take it slow, no need to rush!

– Carefully detach the watch assembly from the screen – like peeling apart a sandwich, but with more precision.

Step 21

– Take out the Y000 screw (1.2 mm long). Just a quick twist and it’s out!

Step 22

– Grab your tweezers and gently lift off the metal plate that’s hanging out over the Force Touch gasket connector.

Tools Used
  1. TweezersApple Watch Series 4 Force Touch Gasket Replacement

Step 23

– Grab your trusty spudger and use its sharp end to gently nudge the Force Touch gasket connector out of its cozy little socket. You’ve got this!

Tools Used
  1. SpudgerApple Watch Series 4 Force Touch Gasket Replacement

Step 24

– Set a heated iOpener over the Force Touch connector to soften up that stubborn adhesive. Keep the heat on for at least two minutes to give it a good chance to loosen. If you need help, you can always schedule a repair.

Tools Used
  1. iOpenerApple Watch Series 4 Force Touch Gasket Replacement

Step 25

– Grab your tweezers and gently pluck out the grumpy old Force Touch gasket—it’s time for it to retire!

Tools Used
  1. TweezersApple Watch Series 4 Force Touch Gasket Replacement

Step 26

– Grab a Q-tip or a cleaning pad and give it a dip in some high isopropyl alcohol (more than 99% is ideal). With a gentle touch, wipe away any sticky adhesive remnants from the Force Touch gasket on both the case and the screen. You’re doing great!

Step 27

– Grab your trusty tweezers and lift the new Force Touch gasket off its clear backing film—just make sure both protective foils are still on the gasket as you do it.

– Now, peel away the protective foil from the bottom side of the Force Touch gasket (that’s the side with the Force Touch connector facing you).

Tools Used
  1. TweezersApple Watch Series 4 Force Touch Gasket Replacement

Step 28

– Ready to put your Apple Watch Series 4 back together? Just follow these steps in reverse to reconnect that screen and battery like a pro!

– Got some e-waste? Don’t toss it! Take it to a certified recycler like R2 or e-Stewards and give it a second chance.

– If things didn’t go as smoothly as you hoped, no worries! Our community at Answers is here to help you troubleshoot any hiccups along the way. And remember, if you need extra hands, you can always schedule a repair.

Tools Used
  1. SpudgerApple Watch Series 4 Force Touch Gasket Replacement

Success!
Ready to put your Apple Watch Series 4 back together? Just follow the steps in reverse to reattach the screen and battery, and you’ll be good to go.
Got some e-waste? Don’t toss it – take it to an R2 or e-Stewards certified recycler for proper disposal.
Things didn’t go as planned? No worries! Check out our Answers community for troubleshooting tips, or if you’re stuck, feel free to schedule a repair.

Apple Watch Series 4 Battery Replacement

Duration: 45 minutes
Steps: 19 Steps

Ready to swap out that tired or dead battery in your Apple Watch Series 4? This guide walks you through the process on the standard GPS-only model—cellular versions aren’t much different. For safety’s sake, it’s best to drain your battery below 25% before diving in. This helps prevent any thermal mishaps if the battery gets nicked. Got a swollen battery? Take extra precautions. During opening, you might damage the force touch gasket—if that happens, you’ll want to replace it along with the display. When reassembling, don’t forget to get some fresh adhesive to hold everything in place. If you hit any snags, you can always schedule a repair with Salvation Repair.

Step 1

– Before you dive in, unplug your watch from the charger and turn it off for a smooth start.

– If a shattered touchscreen is getting in your way and you can’t power down the usual way, try this alternative shutdown trick.

Step 2

– Since the gap between the screen and the watch body is super slim, you’ll need a sharp blade to carefully separate the two. Make sure to read the following warnings before you get started—this step requires a steady hand and caution to avoid damage.

Step 3

– Grab your trusty iOpener (or if you’re feeling crafty, a hair dryer or heat gun work just as well) and warm up the front of the watch to get that adhesive a little less clingy.

– Place the iOpener on the watch for at least two minutes—let that heat work its magic and make the screen nice and toasty, so the adhesive is ready to let go.

Tools Used
  1. iOpenerApple Watch Series 4 Battery Replacement

Step 4

– Hook the edge of a curved pry tool into the narrow gap between the display and the outer shell. Start from the short side near the digital crown for best leverage.

– Press down firmly and straight into the gap to get some initial separation.

– Once the tool’s in, gently tilt it to nudge the display open just a bit more. Keep it gentle so you don’t cause any cracks.

Step 5

– Once you’ve created a small opening with the curved blade, swap out the blade for the thinner edge of an opening tool. Then, gently insert the tool into the gap, using your thumb as a lever to lift the display just a bit more. If you need help, you can always schedule a repair.

Step 6

– Sometimes the Force Touch sensor likes to play hide and seek by sticking to the display frame instead of the watch’s body. No worries! Just slide an opening pick under the display and gently coax the Force Touch gasket away from the display.

– Now, take that pick and give it a little dance around the display to break free the adhesive that’s holding the Force Touch gasket tight. You’re doing great!

Step 7

– Tilt the display open to about a 45° angle and grab your tweezers—time to carefully peel away that sticky adhesive between the screen and the Force Touch gasket.

– Work the adhesive around and behind the display cables until you’ve got it all off. If it’s being stubborn, feel free to cut it—you’re going to swap it out anyway.

– When you’re putting everything back together, don’t forget to pause here and follow the Resealing Procedure.

Tools Used
  1. TweezersApple Watch Series 4 Battery Replacement

Step 8

– Fold the screen back gently until you’ve got enough room to safely remove the battery. Take your time, you got this!

– Now it’s time to get a little tricky – slide an opening pick between the battery and the Taptic Engine. Be careful, but don’t worry if it takes a little maneuvering!

Step 9

– Glide the opening pick along the battery’s edge to break up the sticky stuff holding it down.

– Keep steady, gentle pressure as you carefully lift the battery, working it free from the adhesive underneath.

Tools Used
  1. iOpenerApple Watch Series 4 Battery Replacement

Step 10

– Time to get this battery out – carefully lift it up and tilt it to a 75° angle, easy does it!

– Now, use a pair of tweezers to gently peel off the black sticker covering the metal plate that shields the battery connector. You got this!

Tools Used
  1. TweezersApple Watch Series 4 Battery Replacement

Step 11

– Time to give that Y000 screw (1.2 mm in length) the ol’ heave-ho! Remove it with care and you’re one step closer to your repair victory!

Step 12

– Grab your tweezers and gently lift off the metal plate that’s hanging out over the battery connector.

Tools Used
  1. TweezersApple Watch Series 4 Battery Replacement

Step 13

– Time to get this repair started! Use the pointed end of a spudger to carefully pry up and disconnect the battery flex cable. Remember to take your time and be gentle to avoid any damage.

Tools Used
  1. SpudgerApple Watch Series 4 Battery Replacement

Step 14

– Pop that battery out. It’s time for a change!

– Before you place the new battery, peel off the protective liner so the adhesive can do its thing. Then, carefully set the new battery in its spot.

Step 15

– Get ready to tackle the resealing process with these handy steps! First up, we need some replacement adhesive.

– Grab a Q-tip or a cleaning pad and dab it in some high isopropyl alcohol (over 99% works best). Now, gently wipe away any leftover adhesive lingering on the Force Touch gasket. You’re doing great!

Step 16

– Turn your Apple Watch upside down so the display is resting flat and you can easily lift the case.

– Gently peel off any leftover adhesive from the back of the display to keep things neat and tidy.

Step 17

– Time to get this repair started! Use a pair of tweezers to carefully peel the replacement adhesive with the blue protective film off the backing paper. If you need help, you can always schedule a repair

Tools Used
  1. TweezersApple Watch Series 4 Battery Replacement

Step 18

– Hold the new adhesive at a diagonal and carefully slide it over the display, keeping it nice and even.

– Place the adhesive right on top of the Force Touch gasket to make sure it sticks just right.

– Gently tilt the display forward a bit to line up the adhesive with the frame — it’s all about that perfect fit.

Step 19

– Ready to put your Apple Watch Series 4 back together? Just follow these steps in reverse to snap that battery back in place.

– Want your new battery to be at its best? Give it a good initial charge: top it off to 100% and keep it juiced for at least 2 extra hours. Use your watch until it calls it quits from low battery, then plug it back in without interruptions until it hits 100% again.

– Time to do your part for Mother Earth! Take your e-waste to an R2 or e-Stewards certified recycler.

– Things not going quite as smoothly as you expected? No worries! Swing by our Answers community for some troubleshooting vibes. If you’re feeling stuck, don’t hesitate to schedule a repair!

Tools Used
  1. SpudgerApple Watch Series 4 Battery Replacement

Success!
To wrap things up, reassemble your Apple Watch Series 4 by following these steps in reverse – easy peasy!
For a battery that’s working at its best, give it a little calibration love: charge it to 100%, then keep charging for at least 2 more hours. After that, use your device until it runs out of juice, and finally, charge it up to 100% without any interruptions.
Now that you’re done, don’t forget to responsibly recycle your e-waste with an R2 or e-Stewards certified recycler.
If things didn’t quite go as planned, don’t worry! You can always schedule a repair with Salvation Repair or check out our troubleshooting community for some helpful tips.

Apple Watch Series 3 Glass Replacement

Duration: 45 minutes
Steps: 11 Steps

Apple Watches are everywhere these days, and with that popularity comes a growing need for screen and battery fixes. Thing is, those display assemblies aren’t cheap! So, if you’re looking to save a little cash, we’ll walk you through swapping out just the glass on your Apple Watch Series 3. It’s easier on your wallet, and you’ll be back to tracking steps in no time.

Step 1

– Start by giving the screen a quick check—make sure the touch, display, and Force Touch all respond and look good.

– Power down the watch, then gently work a razor blade around the edges to lift the screen. Go slow and steady; no need for any superhero moves here.

Step 2

– Carefully peel off the tape that’s hugging those display flex cables using your trusty tweezers. Remember, we want to keep those cables safe and sound while you do this! Once they’re free, go ahead and disconnect the flex cables with confidence.

Step 3

– Alright, let’s carefully detach the connector of the touch flex cable.

– Next up, place the screen on the Heating Platform set to 120℃ for a cozy 30 seconds.

– Once it’s warmed up, gently peel off the tape with tweezers and lift the connector with care.

Step 4

– First up, grab the Cutting Machine and let’s slice that glass! Make sure to cut both sides so we can thread the cutting wire through. Take it slow and steady, safety first!

– Now, we can see that one side of the glass has been successfully cut, but oops, the bottom has taken a bit of a hit too.

– Next, it’s time to tackle the other side. And don’t forget to give those corners a nice polish at the end!

Step 5

– Let’s get started! Tape the screen to secure it, then place it on the Heating Platform and turn on the suction – it’s time to get this repair underway!

– Now it’s time to separate the glass using Cutting Wire. Gently pull the wire and you’ll be amazed at how easily the glass comes apart – you’re doing great!

Step 6

– Grab your Electric Adhesive Removing Tool and wave goodbye to that OCA adhesive! Give the OLED a good clean using N-hexane—make it sparkle.

– Pop the OLED back in for a quick test. Since the touch panel’s chilling on the side for now, just check the display. If the screen looks sharp, give the OLED one last clean with N-hexane and you’re good to go!

Step 7

– Smooth the OCA adhesive onto the OLED using the Laminating Roller, then pop the OLED into the Bubble Removing Machine for a 3-minute chill session.

– Next, take out the OLED and give it a quick 5-second shine under the UV Lamp to set the OCA glue.

Step 8

– Grab that Easy Tear Sticker and gently stick one corner of the OLED. Time to peel away the OCA protective film and reveal the magic!

– Next up, let’s attach the OLED to the Laminating Mold. Stick a corner of the digitizer down and peel off the OCA protective film like a pro!

Step 9

– Get that digitizer lined up just right with the OLED – it’s like a match made in tech heaven!

– Carefully remove the screen and place it on the Laminating Sponge. Next, slide it into the Laminating Machine and hit ‘LCD laminate start’. You’ve got this!

Step 10

– First, remove the screen and check for bubbles—if they’re still hanging around, pop it back into the Bubble Removing Machine for a quick ten-minute spin, and those pesky bubbles should vanish. Next, place the screen into the UV Lamp for a couple of minutes to ensure everything’s sealed up tight. Finally, reconnect the screen to test—if the display and touch are working smoothly, you’re all set! If you want a hand with any of this, you can always schedule a repair.

Step 11

– Time to get that screen back in place! Stick the adhesive strip around the frame, then peel off the backing like you’re unwrapping a little present.

– Plug in the screen connector and fire up the watch. If everything lights up and works smoothly, you’re all set! If you run into trouble, you can always schedule a repair.

Success!

Apple Watch Series 3 Teardown

Duration: 45 minutes
Steps: 12 Steps

The Apple Watch Series 3 steps up its game with built-in phone call features—spy movie style, but real. Ever wondered what happens when Apple fits a phone into a watch? We’re about to find out, one step at a time. Ready for the latest tech adventure? Let’s check out the ins and outs of this tiny communicator!

Step 1

– Curious about what powers your Apple Watch? Let’s take a peek under the hood:

– Bright and responsive OLED Retina display with Force Touch for those smooth swipes.

– Runs on Apple’s custom S3 SiP (System in Package)—the brains of the operation.

– Optional LTE and UMTS connectivity, built-in GPS/GLONASS, NFC, Wi-Fi (2.4 GHz), and Bluetooth 4.2—stay connected wherever you go.

– Loaded with sensors: accelerometer, gyroscope, heart rate monitor, microphone, speaker, barometric altimeter, and ambient light sensor.

– Water resistant up to 50 meters—splash, swim, or sweat without worry.

– Powered by WatchOS 4 for all those cool features and updates.

Step 2

– Before we dive in, grab your imaginary X-ray specs for a little sneak peek!

– Although the general setup remains similar to the original Apple Watch we explored back in 2015, it seems there might be a couple of bonus solder pads hiding under the speaker (check the top right of this image).

Step 3

– Let’s take a moment to peek at the back and ensure we snagged the right watch.

– Ah yes, here it is—the Apple Watch Series 3! It’s the crème de la crème of Apple wrist gadgets, delivering top-notch computing power and style for the next 51 weeks.

– Right by that sneaky diagnostic port, we’ve identified our shiny new model number: A1889.

Step 4

– Time to get this watch open! Since its shape hasn’t changed, we’re betting our usual opening moves still work like a charm.

– Step one: heat gently and slice carefully. Take your time—slow and steady wins the race. Keep your eyes on the prize, even if that hypnotic red dot keeps staring you down.

– Aside from that signature red dot, this feels almost like opening a Series 2 again. It’s a familiar sight, and with patience, it’ll come apart just fine.

Step 5

– With the cables released from their ZIF connectors, we’re ready to check out the display.

– On paper, the display specs match the Series 2—except for one cool upgrade: it now doubles as a multifrequency (LTE?) antenna.

– This year’s display is missing an IC compared to last year. Guess it didn’t make the cut.

– Analog Devices 343S00092 is handling the touch controls.

– NXP Semiconductor PN80V keeps the NFC magic alive.

– Texas Instruments TPS36372 likely manages display power.

– There’s an empty solder pad—maybe for a 20211CP TD1628A? Who knows!

Step 6

– Just like before, a tiny tri-point screw is still blocking your way—one of those 64 little surprises we’ve prepared for. Next up, the top third of the watch is labeled ‘Taptic Engine,’ which is mostly accurate, but that label also hides a bracket guarding the battery connector you’re after. Now’s the time to carefully peel away the power pack and see what’s really powering this watch all day long. If you need a hand along the way, you can always schedule a repair.

Step 7

– Even though iPhone batteries are slimming down, the Apple Watch battery has gotten a subtle upgrade:

– We’re excited to see how Apple squeezed in a bigger battery, plus the extra parts for cellular—antennas, radios, power amps, SIM card, you name it—all without changing the watch’s look.

– The Series 3 comes with a battery labeled A1848, which holds 1.07 Whr (that’s 279 mAh at 3.82 V).

– That’s about a 4% bump from the 1.03 Whr battery in Series 2—which, for reference, was already a massive 32% bigger than the original Apple Watch’s 0.78 Whr cell.

Step 8

– Looking good so far! Let’s gently remove the trusty Force Touch sensor/gasket, which is sporting the same Analog Devices AD7149 capacitance sensor controller we spotted in the Series 2.

– Next up on our parts adventure, we carefully lift out the Taptic Engine, which seems to be sticking around just like the good old days.

– And voilà! Out comes the antenna array, featuring what we think is the GPS antenna. Keep it up!

Step 9

– Keep it going as we gently take out the self-emptying speaker, which is cleverly designed to blast away any water after your watch has enjoyed a swim.

– After a rather familiar Series 2 experience, we finally stumble upon something fresh—a brand new cluster of RF chips that are definitely in charge of the shiny LTE features.

– In a fun twist, the air vent hole next to the microphone has now welcomed a new guest that appears to be a barometric pressure sensor.

– Let’s get this board out of there!

Step 10

– Hey there! Ready to dive into this tech adventure? Let’s check out the stars of our show:

– ST Microelectronics ST33G1M2: A slick 32-bit MCU rocking the ARM SecurCore SC300.

– Meet the Avago AFEM-8057: Your trusty Wi-Fi front-end module!

– Say hello to the Skyworks SKY78109-12: The power amplifier that’s got your back.

– We’ve got the FY LEE C7P: A combo of Bosch gyro + accelerometer, STMicroelectronics pressure sensor, and a mysterious MEMS microphone.

– And don’t forget the FF1A02: Probably the envelope module you didn’t know you needed!

– Last but not least, the USI 339M00035: Your go-to RF transceiver module.

Step 11

– Alright, time to tackle the back cover! It’s snugly fitted over a teflon-like O-ring, but with a little thumbs-up and a solid push, you can send it off to its next adventure.

– The material has been upgraded across all watch models to a sleek ceramic, bidding farewell to the old Ion-X and Sapphire styles.

– Inside, you’ll find the PPG sensor array working hard to keep tabs on your heart rate.

– Plus, the wireless charging coil got a little makeover to play nice with most Qi wireless chargers.

– And just when you thought it was all settled, the new barometric altimeter has taken up residence next to the microphone—so where’s the air vent hiding? Surprise! It’s right here, cozying up next to the diagnostic port.

– It would have been neat to see some updates from the Series 2, especially after some feedback on accuracy in earlier models. But when it comes to wearables, the Apple Watch still stands out as the best of the bunch.

Step 12

– Here’s the magic behind the scenes!

– A huge shoutout to the team for dedicating some weekend hours to lend a hand!

– And once more, a big thank you to the folks who brought the X(-ray) to the party!

Success!

Apple Watch Series 3 LTE Screen and Force Touch Gasket Replacement

Duration: 45 minutes
Steps: 9 Steps

Ready to jump into the world of tiny tech repairs? I got my hands on an Apple Watch and decided to give it a go after checking out a couple of videos and some detailed teardowns. Here’s how it all went down, so you’re set up for your own adventure.

Step 1

– Get your workspace ready—paper towels make a surprisingly great base for this kind of project.

– Tilt the watch until the crack catches the light, so you can really see that sneaky hairline break.

– Pop off the two watch bands by pressing the release button and sliding each strap out. Take note of which strap belongs on top and which goes on the bottom, so they don’t get swapped.

Step 2

– Grab your heat gun or the trusty iOpener tool and warm up the top of that watch! I recommend using the heat gun on a low setting, holding it 8-12 inches away, and gently waving it back and forth over the watch for about 60 seconds until the watch face feels nice and toasty.

– Remember, no need to go overboard with the heat – 60 seconds is just right! And just a friendly reminder: steer clear of any flammable materials while you’re heating things up.

– Inspired by some great screen repair tutorials, I used a feeler gauge to slide down a bit and then gently horizontally to sneak under the edge of the OLED screen assembly.

– Starting from the side opposite the digital crown, take it slow and steady! Slide or roll that feeler gauge around the edge of the screen to loosen the adhesive. Once you’ve tackled one side, you can slip a pick in there to keep it open.

– Keep working your way around the screen until you’ve made it all the way around. Just a quick tip: don’t go too deep with the feeler gauge – stick to the edges!

Tools Used
  1. Feeler GaugeApple Watch Series 3 LTE Screen and Force Touch Gasket Replacement
  2. Heat GunApple Watch Series 3 LTE Screen and Force Touch Gasket Replacement

Step 3

– Gently lift the display screen and you’ll discover it’s being held in place by three fragile ribbon cables. Feel free to fold the screen up to get a better look at these cables.

– The ribbon cable is secured to the connectors with a uniquely shaped piece of tape. Carefully peel that tape away from both the connectors and the ribbon cable, and place it on some waxed paper for safekeeping.

– I found it handy to sandwich the ribbon cable tape in waxed paper and keep a little weight on it until I was ready to put it back to use. If I had thought ahead, I would have just grabbed some replacement tape for a few bucks.

– Each cable is snugly held in a ZIF connector. You’ll notice a small clip that lifts up and forward. Grab a spudger and gently slide it between the clip and the module, then carefully pop that clip up.

– With the ZIF clips open, gently pull each ribbon cable out from its connector and set the display screen aside for now.

Tools Used
  1. SpudgerApple Watch Series 3 LTE Screen and Force Touch Gasket Replacement

Step 4

– Let’s take a closer look at the gasket and see if it got damaged when we opened up the screen.

– The gasket seems a bit rough around the edges, so it’s a good idea to remove it and take a closer look – it’s better to be safe than sorry.

Step 5

– First up, there’s a sneaky little Tri-Wing Y000 screw (that’s just 0.6 mm!) holding down an adhesive label on top of the Taptic Engine. This label is not just for show; it’s hiding the connector for the Force Touch Gasket. So, unscrew that and gently peel off the label. Don’t worry if it’s a bit stubborn – a little elbow grease will do the trick!

– Next, you’ll find a shiny gold connector perched on the force touch sensor module. Give it a gentle pop and lift that sensor module up. Easy peasy!

– Now, grab your tweezers and start pulling up the force touch sensor gasket. Begin on one side and carefully work your way around the watch until it lifts out. If you find yourself in a bind, remember, you can always schedule a repair!

Tools Used
  1. TweezersApple Watch Series 3 LTE Screen and Force Touch Gasket Replacement

Step 6

– Grab a bit of alcohol, some q-tips or a paper towel, and your trusty tweezers. Let’s get that pesky adhesive residue off where the gasket used to chill.

– Once you’ve tidied up the gasket area, without peeling off those protective sheets just yet, place the gasket over the watch’s perimeter to check how it fits. It’s like a little dress rehearsal!

– The force touch gasket comes in a super handy removable plastic holder, making it easy to handle.

– Feeling good about the fit? Time to peel off the adhesive protective sheet from the underside, align the gasket with the watch, and gently set it down. You’ve got this!

– Give a little love by pressing down around the edges of the gasket where it sits in its groove. This helps the adhesive bond like a champ.

– Now, carefully remove the plastic holder from the gasket. Just a heads up, the upper adhesive protective sheet is still on, so no worries there!

Tools Used
  1. TweezersApple Watch Series 3 LTE Screen and Force Touch Gasket Replacement

Step 7

– Gently place the force touch gasket module into its cozy spot, which will be snuggly covered by the Taptic Engine label/cover.

– Reconnect that shiny gold connector back onto the force touch gasket module—it’s like a little puzzle piece fitting right back in!

– Now, let’s cover that taptic engine module with the label/cover, ensuring it fits perfectly over the force touch sensor module. You’re doing great!

Step 8

– Take a good look at the new screen assembly to make sure it’s the same size and has all the right parts, just like the original one.

– Using a spudger or tweezers, gently pop open the three ZIF connector clips to make room for the ribbon cables to slide in and stay secure.

– Here’s a little trick I found useful: cut two strips of Scotch tape and use them to temporarily hold two of the three ribbon cables up to the taptic engine, leaving only one cable connected at a time.

– Line up the ribbon cable and carefully insert it into its connector. Then, grab a spudger or tweezers to gently press down on each edge to nudge the connector forward and lock the cable into place. Close the ZIF latch by pulling it back toward the top of the connector.

– For some reason, the first cable slid in smoothly, but the middle and third cables? Not so much. I actually closed up the watch only to find the touch feature wasn’t working, so I had to pop it open again and reseat the cables.

– Once the first cable is in place, peel off the Scotch tape from the middle cable and repeat the process to seat it correctly, then close the ZIF latch. Finally, remove the last piece of tape and carefully insert the final cable into its connector, locking it into place with the ZIF latch.

Tools Used
  1. TweezersApple Watch Series 3 LTE Screen and Force Touch Gasket Replacement
  2. SpudgerApple Watch Series 3 LTE Screen and Force Touch Gasket Replacement

Step 9

– Ready to put it all back together? Just work your way through the steps in reverse, and you’ll be set. If things get a little too wild, you can always schedule a repair.

Success!
To put everything back together, just work through the steps in reverse. If things get tricky, you can always schedule a repair and let us handle it!

🍪
Have a cookie! This site uses cookies to enhance your experience. Opt-Out Options.