How to Remove a SIM from Samsung Galaxy S7, if inserted without tray

Duration: 45 minutes
Steps: 5 Steps

Think of this as the professional way to handle a stubborn SIM card. Instead of jamming something in and prying aggressively—which can lead to damage—this method is longer, but way safer and more reliable. Coming from a tech who’s been in the game at Samsung, especially here in Canada, I can tell you this approach is the gold standard for proper SIM extraction. It might take a little more time, but it’s the kind of careful, confident move that gets the job done without risking harm to the device. If you’re feeling unsure or need a hand, you can always schedule a repair for some extra peace of mind.

Step 1

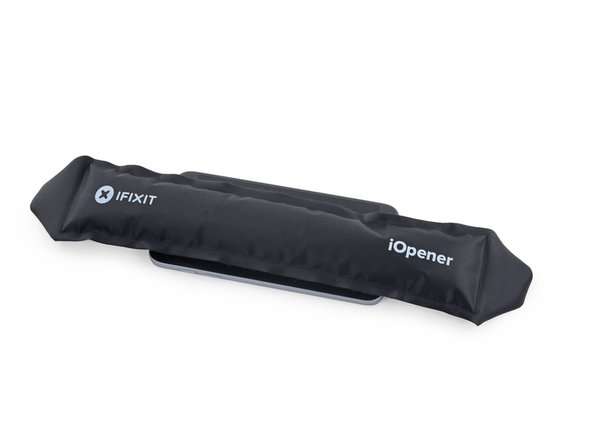
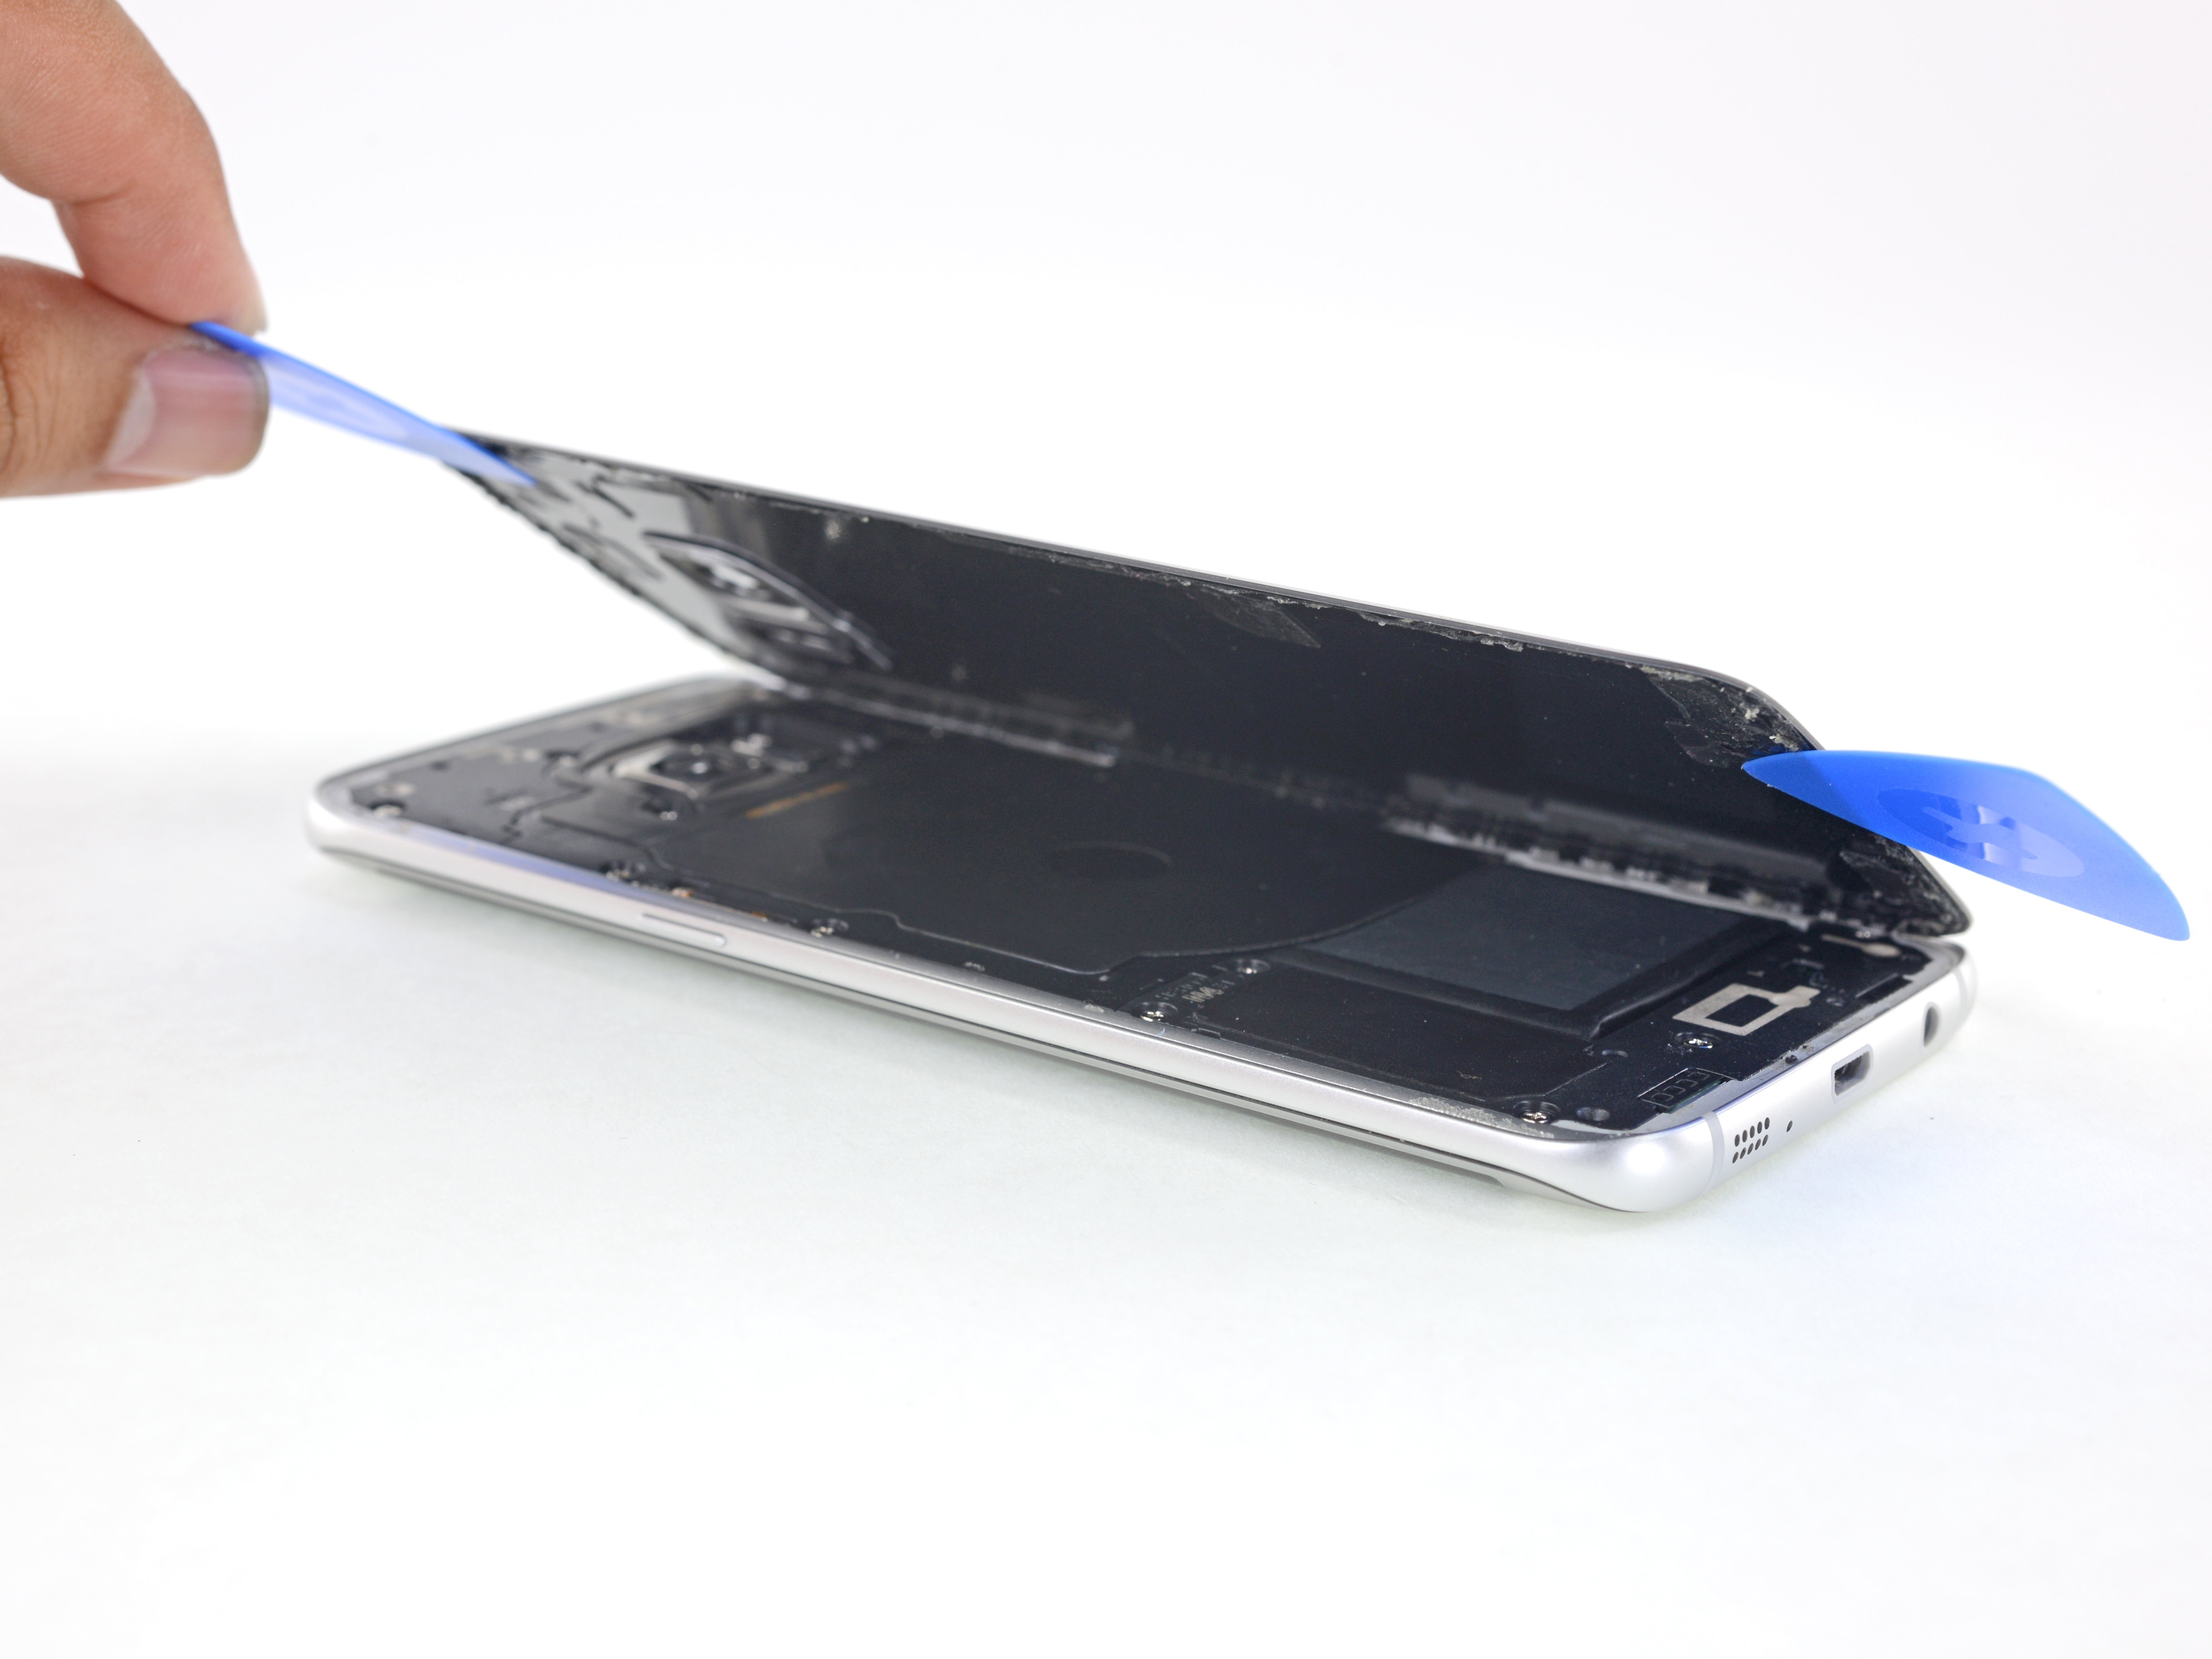
– Crank your hot air gun up to about 250°C—think of it as melting the adhesive, not a summer BBQ. (I stick with 250 for a good balance.)

– Gently heat all four edges of the back glass until they’re nice and warm—this softens things up for the next step.

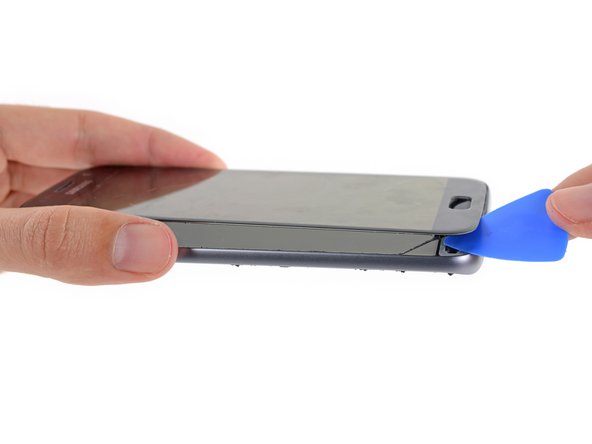
– Use a trusty suction cup to lift upward pressure on the glass—when it’s warm enough, it’ll start to loosen and lift more easily.

– Apply some Ethyl Alcohol (99%) along the seam—this helps break down that stubborn adhesive and makes everything slide apart smoothly.

Step 2

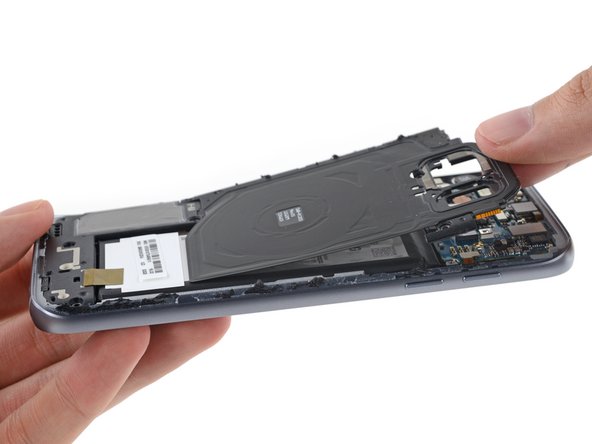
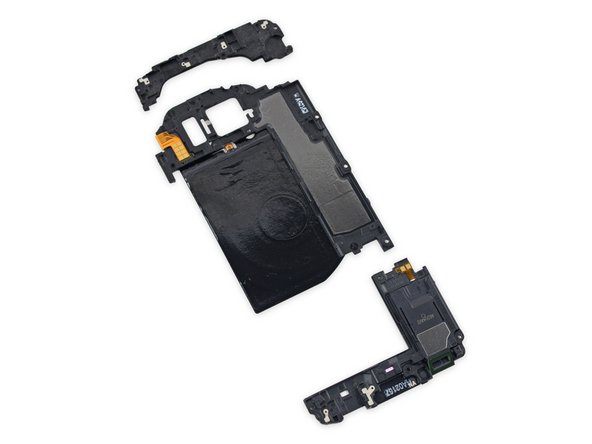
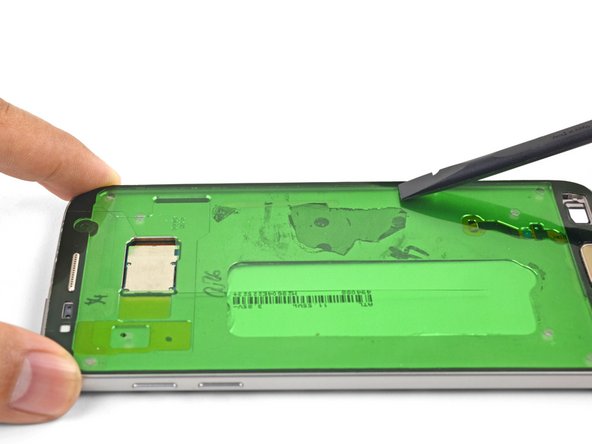
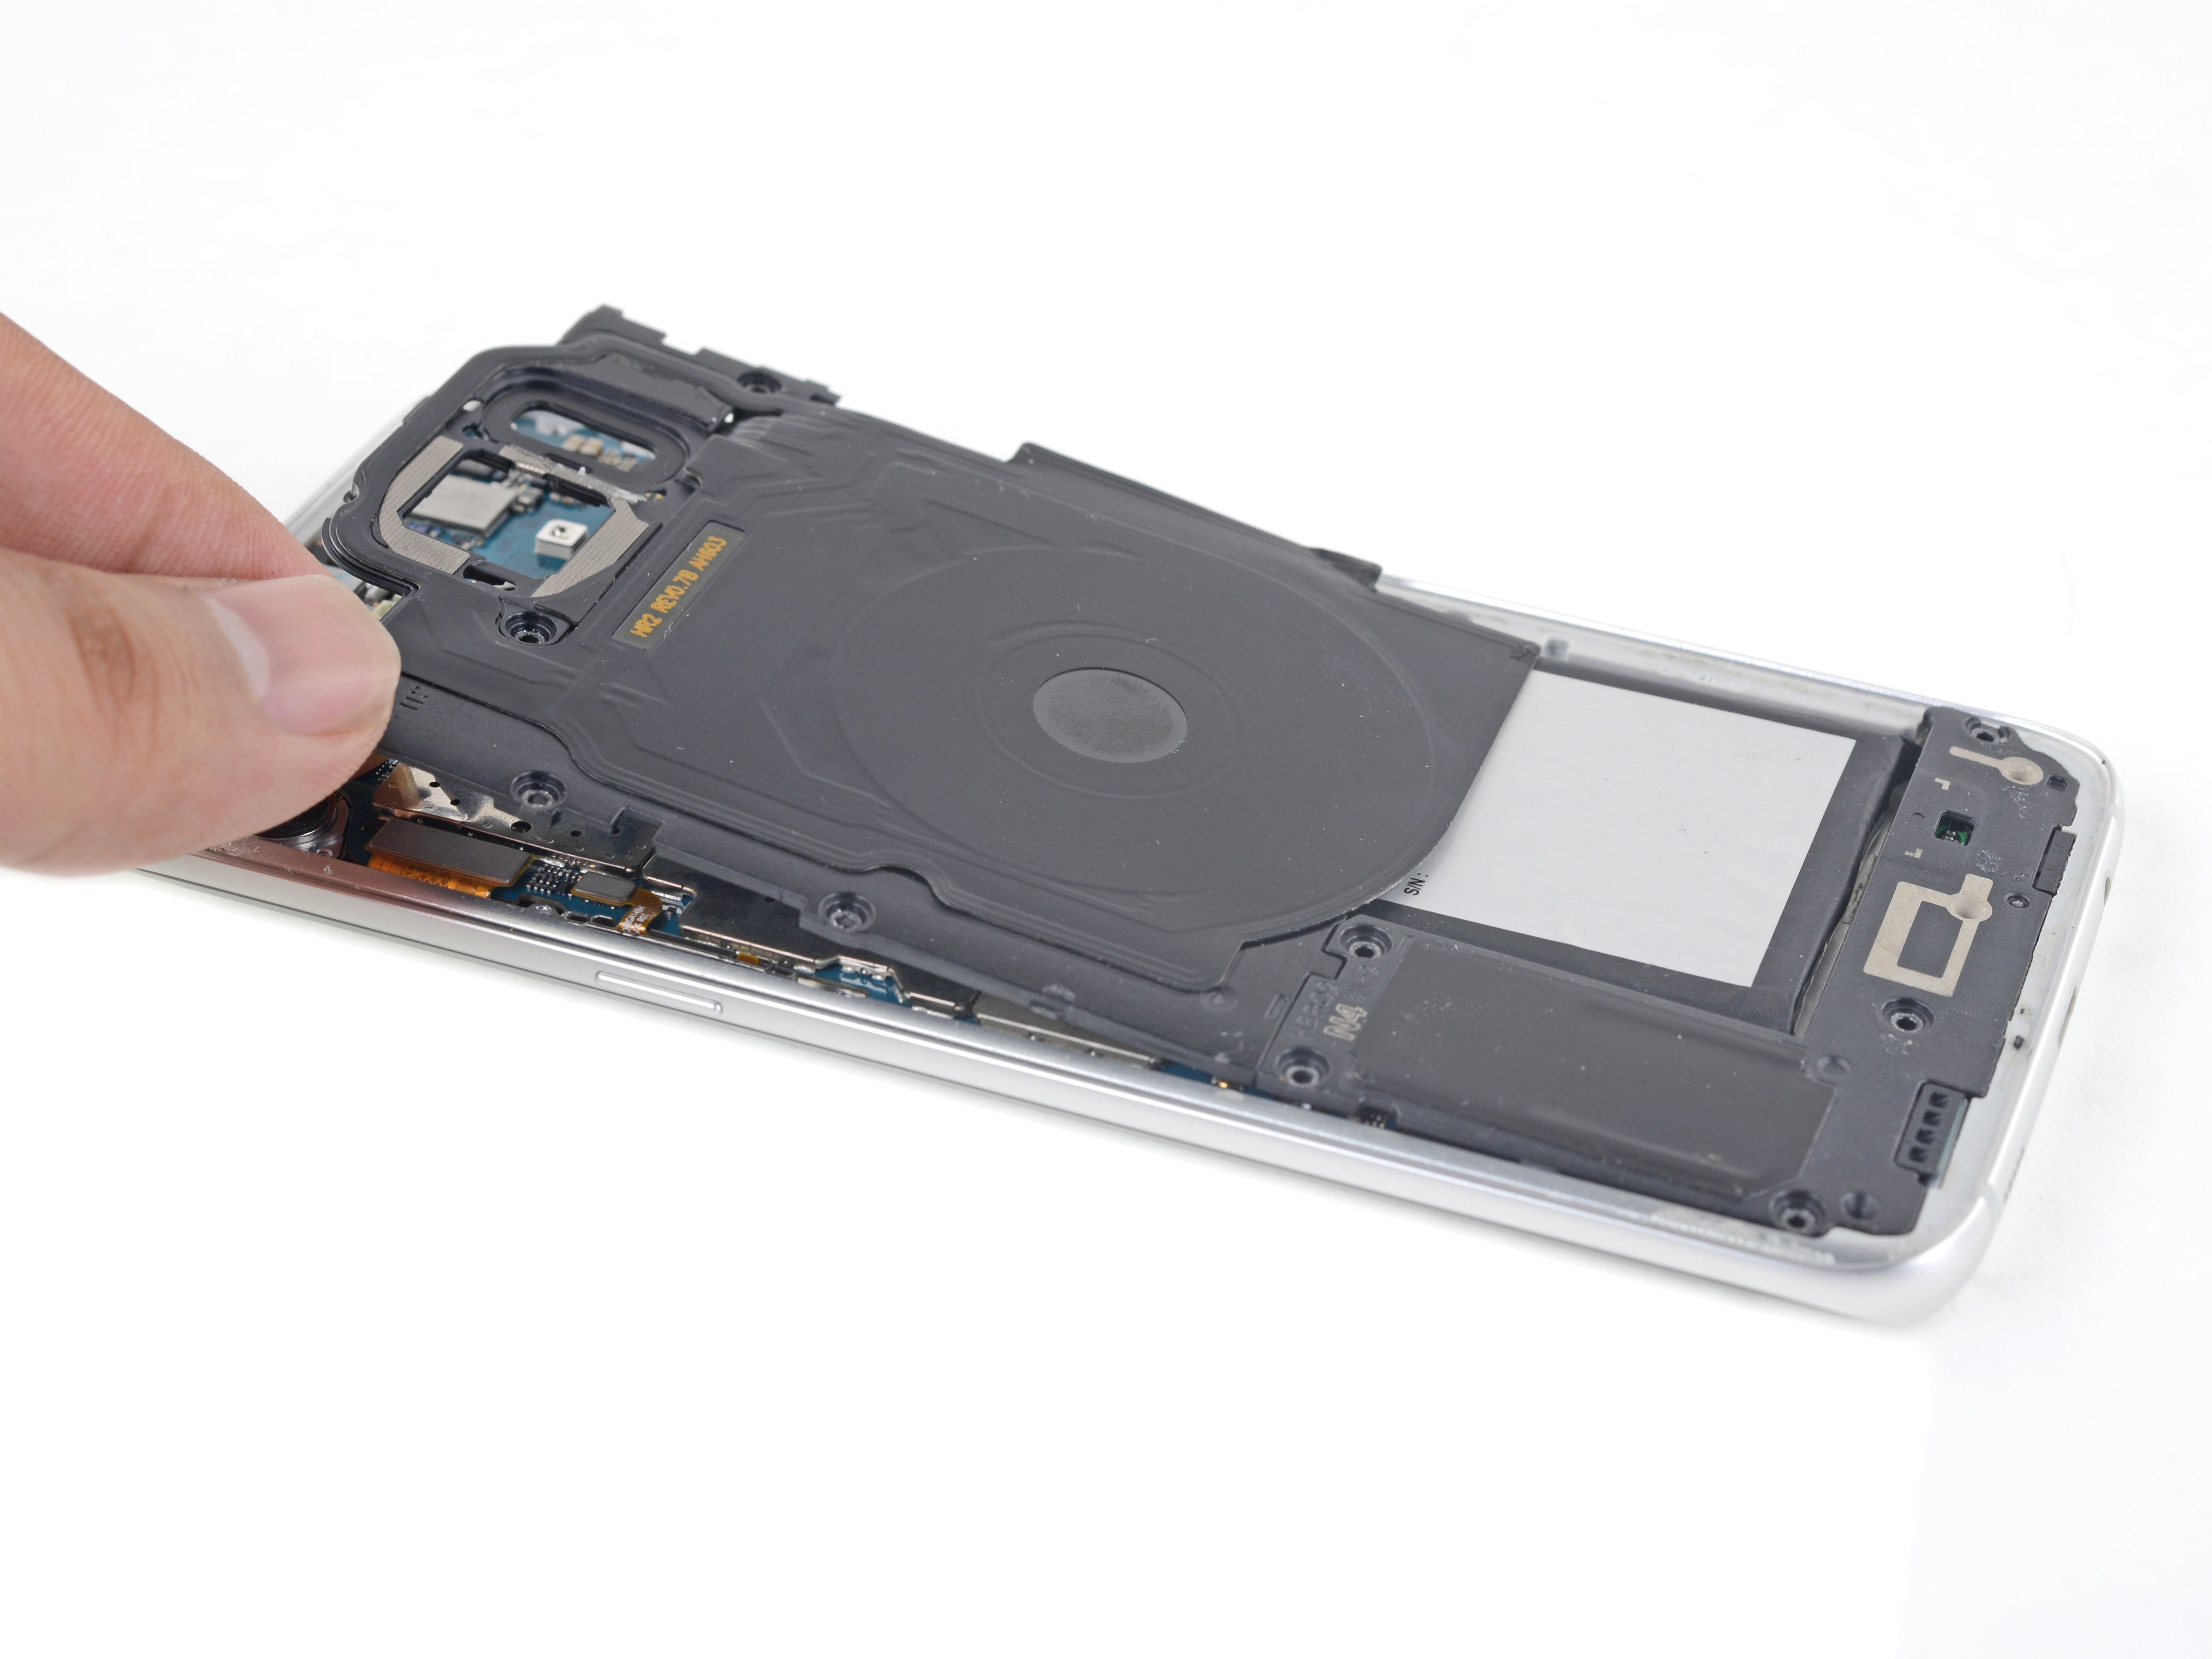
– First things first, let’s get that back glass out of the way! Once it’s off, start tackling the screws on those three housing panels.

– After you’ve conquered the screws, you’ll find those panels are snug in the frame. A gentle nudge with a spudger or pick will help pop them out smoothly.

– With the three panels removed, you’ll have full reign over the motherboard! Time to dive in and see what magic you can work.

Tools Used
  1. SpudgerHow to Remove a SIM from Samsung Galaxy S7, if inserted without tray

Step 3

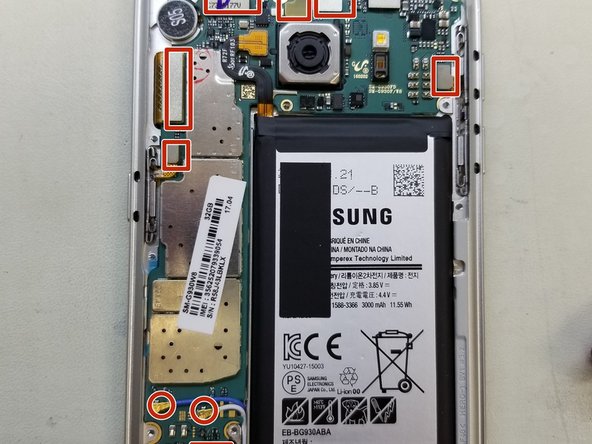
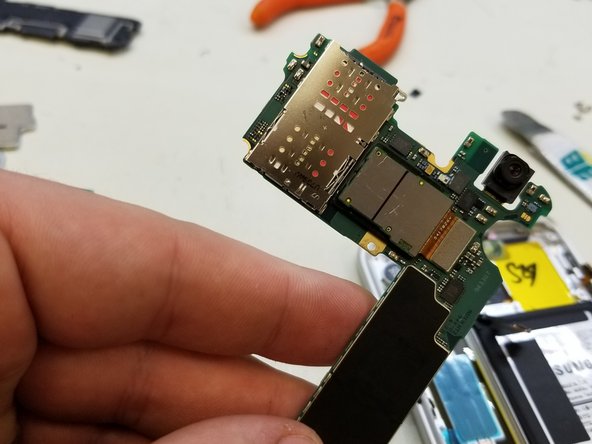
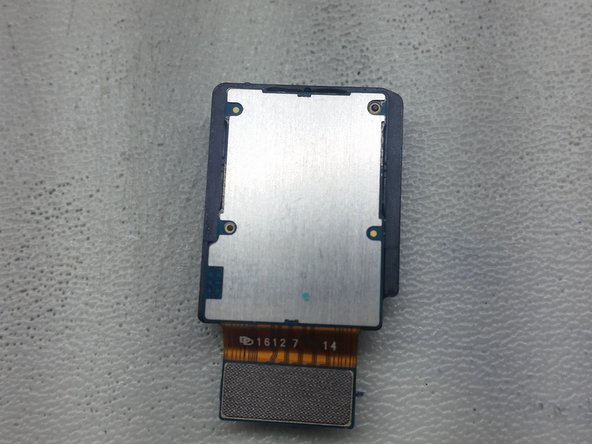
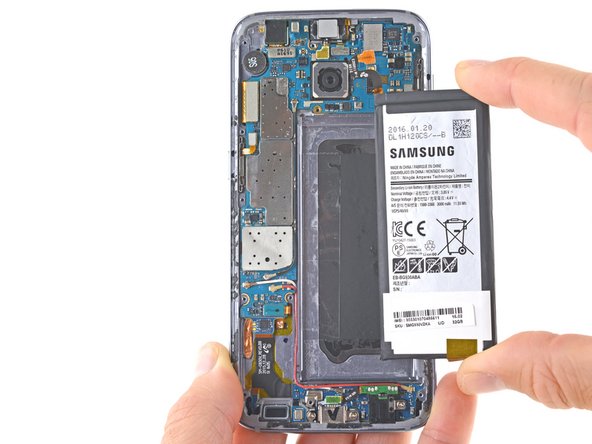
– The SIM tray is on the opposite side of the motherboard. A little twist and turn to get there!

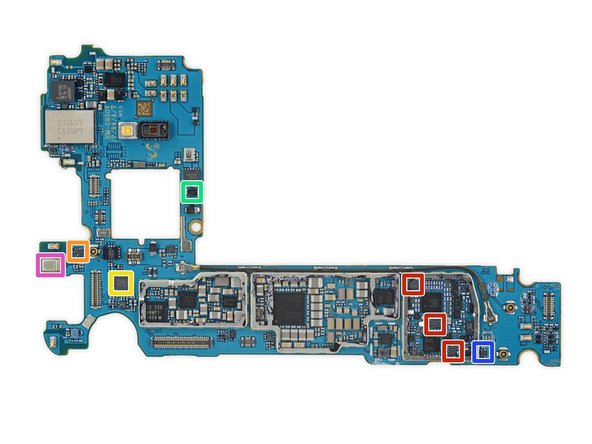
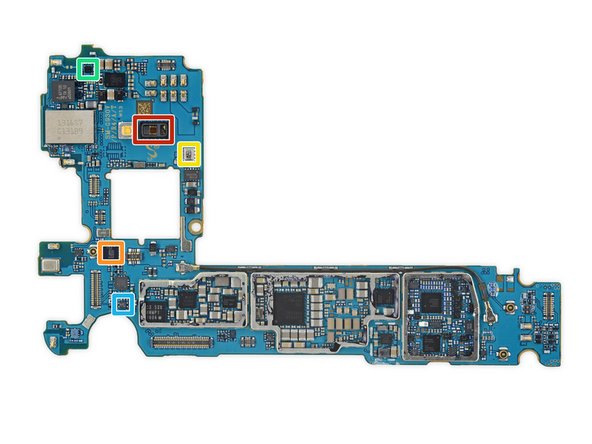
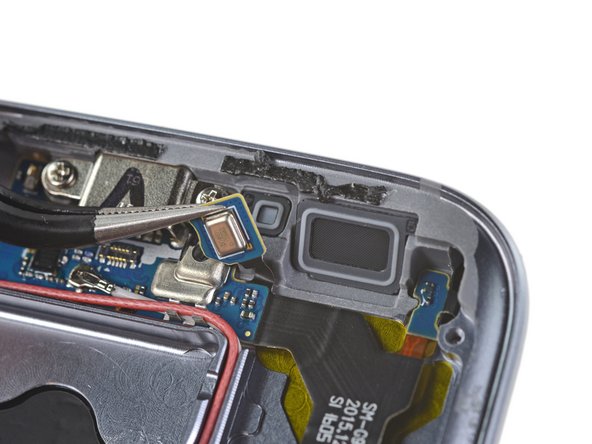
– To access it, gently disconnect all the cables attached to the board (this includes Camera, Screen, Power Button, Network Coaxials, Fingerprint Sensor, Earspeaker, Proximity/Light Sensors, and Volume Buttons). Take it slow, you got this!

– When lifting the board, be mindful to lift from the top. The charge port’s down at the bottom, so don’t forget to disconnect the charge flex as you lift the board out. Easy does it!

Step 4

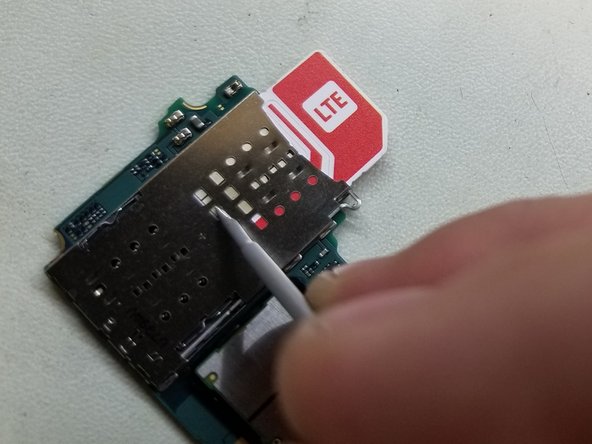
– Grab a small slot screwdriver and gently poke around the SIM reader openings—think of it as a treasure hunt, but for your SIM card. Glide the SIM out slowly, no wild moves.

– Once the SIM is peeking out enough to get a good grip, go ahead and pluck it out like a pro.

– Anytime you’re working with metal tools near the board, make sure the power’s off, zap any static off your tools, and handle everything with a gentle touch. Boards like a little TLC!

Step 5

– Now it’s time to put everything back together! Just retrace your steps from earlier, and you’ll have your device back in action in no time. If you hit a snag or need a hand, feel free to schedule a repair.

Success!
To put your device back together, simply retrace your steps in the opposite order. You’ve got this! And remember, if you hit a snag, feel free to schedule a repair.

How to Identify the Rear Camera Type for a Samsung Galaxy S7

Duration: 45 minutes
Steps: 4 Steps

Most folks don’t realize there are several versions of the Galaxy S7 floating around. This guide breaks down how to pinpoint exactly which rear camera you need to get your Galaxy S7 snapping again. Swap in the wrong camera, and you’ll be greeted with the dreaded “Camera Failed” message—so let’s make sure you’ve got the right part!

Step 1

– Here’s the scoop: on the left, we’ve got a Samsung ISOCELL S5K2L1 camera, and on the right, a Sony IMX260. Keep in mind, different versions of the Galaxy S7 come with different camera models. These cameras aren’t swap-friendly—each type needs its matching counterpart. Swap in the wrong one, and your phone will throw a ‘Camera Failed’ message. So, double-check that you’re matching the right camera to the right phone to keep everything snapping smoothly.

Step 2

– This camera stands out because it doesn’t have any manufacturer labels.

– Look for a green flex cable near the connector—that’s your clue!

Step 3

– Look for the “Sony” logo stamped right on the flex cable to spot this camera.

– You’ll notice a cool blue flex cable near the connector — that’s your camera’s signature color.

Step 4

– You’re almost done! Just work your way backwards through these instructions and you’ll be all set! If you need help, you can always schedule a repair

Success!

Samsung Galaxy S7 Teardown

Duration: 45 minutes
Steps: 23 Steps

This phone might have been opened a few times before, but we’re excited to dig into the mysterious thermal spreader ourselves. Will the new tech in the S7 live up to the hype? Only a teardown will reveal the truth. Keep up with the latest repair updates and get an exclusive look behind the scenes of our teardown process by following us on Instagram, Twitter, and Facebook.

Step 1

– While the legend says the number 7 has some magic, who knows what kind of magic the S7 brings? If we were just throwing guesses into the wind, here’s what you’d find inside: a 5.1-inch Super AMOLED display rocking 2560 × 1440 resolution (that’s a crisp 576 ppi), a Qualcomm Snapdragon 820 processor teamed up with 4 GB of RAM and an Adreno 530 GPU for smooth sailing, a 12-megapixel rear camera with dual pixel autofocus plus 4K video recording, and a 5-megapixel selfie cam to snap your best angles. Storage-wise, you get 32 or 64 GB built-in, plus room to grow with a MicroSD card up to 200 GB. It’s also waterproof with an IP68 rating, and runs on Android 6.0 Marshmallow. Need a hand with the repair? You can always schedule a repair.

Step 2

– Looking at the S7, it’s clear that it’s a step up from the S6. The back panel now curves smoothly around the sides, making it a lot more comfortable to hold. Nice touch, right?

– The S6’s glass-on-glue design didn’t exactly impress us in the repairability department. We gave it a 4 out of 10—and let’s just say, we weren’t exactly jumping for joy. But hey, the S7 might just turn out to be a pleasant surprise. Fingers crossed!

– Wait, which one’s the S7 again? No worries, just flip them over and take a quick look—no harm in double-checking.

Step 3

– Samsung stuck with the classic micro USB port, skipping out on the new USB Type-C trend.

– They tossed in a USB adapter to make switching to a new phone a breeze—almost as if they’re nudging you toward an upgrade before your current phone waves the white flag. Odd move.

– At the moment, Samsung seems pretty confident that the older, more universal connection works just fine.

– Maybe it’s because all those free Gear VR headsets would feel a little left out if the phones suddenly switched ports.

Step 4

– Since there are no visible screws on the outside, the only thing holding this Galaxy together is a healthy dose of glue. Time to get out our trusty twin-suction-cup iSclack and get to work—perfect for lifting those glass panels on the S7. Once you’ve got a little lift on the rear glass, gently slide in an opening pick and carefully slice through the adhesive. It’s a familiar routine, just a tad stickier this time around. Luckily, a hot iOpener makes quick work of softening stubborn adhesive, so keep it handy. If you need help along the way, you can always schedule a repair.

Tools Used
  1. iOpenerSamsung Galaxy S7 Teardown
  2. iSclackSamsung Galaxy S7 Teardown

Step 5

– Where last year we encountered sticky white adhesive, now we’re dealing with gooey black stuff. Maybe it was reformulated for waterproofing, or perhaps it just matches the new look—either way, it’s a change. Trying to remove the back cover hasn’t revealed much—just a smooth surface for the glass to cling to. Luckily, part of that surface includes screws to help you along the way. If you need help, you can always schedule a repair.

Step 6

– That smooth surface isn’t just for looks—it hides some handy components, like the S7’s antennas…

– …and it’s where the speaker is tucked away…

– …and, of course, MY axe.

– Wouldn’t it be great to have a battery you could swap out yourself, or at least an easy-to-reach connector? That’s wishful thinking these days. Samsung’s repairability game has changed a lot since the Galaxy S4 era.

Step 7

– Let’s get cozy with our components and take a good look at the individual parts, including that nifty wireless charging coil.

– All these modular bits connect to the motherboard through tiny spring contacts, making removal and replacement a breeze—once you tackle the glue and glass, that is!

Step 8

– Samsung took some heat for downsizing the battery on last year’s S6, but they listened and upped the game with a robust 3000 mAh battery in the S7.

– While this battery upgrade lets you enjoy more app and gaming time, it’s snugly fixed in place, which means getting it out can be a bit of a challenge.

– If it wasn’t made for easy access, then it probably wasn’t meant for easy repair or replacement. Bummer!

Step 9

– We’re working our way toward the motherboard now. First up, we carefully remove the 5-megapixel front-facing camera. It’s a bit of a journey, but nothing we can’t handle.

– The S7 camera upgrade isn’t exactly mind-blowing—if you were hoping for a selfie revolution, sorry! The only change here is a shiny new ƒ/1.7 aperture, so it’s more about the little things than a giant leap forward.

– With the front camera safely out of the way, we gently lift the motherboard and uncover a familiar daughterboard connector underneath. We’re almost there!

Step 10

– While the S6 boasts a 16-megapixel rear camera, the S7 takes a different path with a 12-megapixel/4K rear camera. It’s a bit of a surprise! But don’t worry; there’s more to this story.

– Taking a closer look at the camera assembly reveals some interesting details:

– These pixels are now measuring in at 1.4 µm, which is a nice 25% bump from last year’s model. So, even though there are fewer pixels, you can expect those late-night shots to shine brighter and clearer when you compare them side by side.

– Sony IMX260 12 MP image sensor (likely)

– Renesas OIS driver

– STMicroelectronics L2G2IS 2-axis MEMS gyroscope

– Winbond W25Q32FWXGIG 32 Mb flash memory

Step 11

– Time to lift those EMI shields and see what treasures are hiding underneath. Here’s what’s tucked away on the board:

– SK Hynix H9KNNNCTUMU-BRNMH 4 GB LPDDR4 memory stacked right on top of the Qualcomm MSM8996 Snapdragon 820

– Samsung KLUBG4G1CE-B0B1 32 GB MLC universal flash storage 2.0 for all your speedy data needs

– DSP Group DBMD4 audio and voice processor

– Qualcomm WCD9335 audio codec

– Maxim Integrated MAX98506BEWV audio amplifier

– Maxim Integrated MAX77854EWZ power management with built-in li-ion battery charger

– ON Semiconductor load switch

Step 12

– And here’s a few extra goodies:

– Avago AFEM-9040: a multiband multimode module that brings the magic.

– Murata FAJ15: a front-end module to keep you powered up.

– Qorvo QM78064: your high band RF fusion module ally.

– Qorvo QM63001A: a diversity receive module for top-notch reception.

– TDK D5287: a trusty antenna switch module to keep things connected.

– TDK D5275: another antenna switch module because more is merrier.

– Qorvo TQF6260: a power amplifier duplexer ready to boost your device.

Step 13

– Here’s a quick rundown of some key components to keep in mind: the Samsung 1316S7 Wi-Fi Module, probably rocking a Broadcom BCM4359 WiFi/Bluetooth chip, is a crucial part for wireless connectivity. The NXP Semiconductor 67T05 (PN67T) NFC controller handles tap-and-go magic, while the IDT P9221 wireless power receiver (likely an update of the P9220) keeps your device juiced wirelessly. The STMicroelectronics LSM6DS3 is your always-on 6-Axis IMU sensor, giving motion detection a serious boost. The Qualcomm PM8996 PMIC manages power like a boss, and the Qualcomm QFE3100 envelope tracker fine-tunes RF signals for clear communication. Lastly, the Qualcomm WTR4905 and WTR3925 RF transceivers keep your device talking wirelessly without a hitch. Need hands-on help? You can always schedule a repair with Salvation Repair to get everything sorted out.

Step 14

– Let’s dive into IC identification, part 2! Here are some processors and drivers you might encounter:

– 1. Samsung camera processor (could be the one!)

– 2. Zinitix ZF115N haptic driver – feel that feedback!

– 3. Samsung S2MPB02 power management – keeping things powered up!

– 4. Qualcomm PM8004 power management – another power pal!

– 5. Maxim Integrated MAX77838EWO power management – this one’s a real champ!

– 6. NXP Semiconductor NCX2200 comparator – making comparisons easier!

– 7. Toshiba TC7SBD385FU bus switch – switching things up!

Step 15

– Let’s dive into IC identification, part 3:

– Check out the NXP Semiconductor BGU8103—this little guy is the GPS/GLONASS/Galileo/BeiDou low noise amplifier, keeping your location signals crisp.

– Next, we have the NXP Semiconductor BGS8M2, which handles LTE low noise amplification.

– Also on the list is the NXP Semiconductor BGS8H2, another LTE low noise amplifier doing its part.

– Don’t forget the NXP Semiconductor BGS8L2, yet another LTE low noise amplifier in the lineup.

– Switching gears to Infineon, the BGSX22GN10 is a DPDT RF antenna switch, managing your antenna connections smoothly.

– Then there’s the Infineon BGS12SN6 RF switch, keeping RF signals in check.

– And finally, the Infineon BGS12PL6 RF switch wraps up this batch of important components.

Step 16

– IC identification, pt. 4:

– Spot the Infineon RF switch—this little guy handles radio signals like a pro.

– Find the Infineon antenna tuning switch, perfect for keeping those connections sharp.

– Check out the RDA Microelectronics RDA6213N FM radio receiver, your gadget’s backstage pass to FM tunes.

– Look for the ON Semiconductor FPF2495B—this chip keeps your device protected from voltage and current surprises.

– Track down the Diodes Incorporated AP7346D-3318FS6-7, a versatile dual 3.3V & 1.8V LDO regulator that keeps things running steady.

– Locate the Diodes Incorporated AP7340D-18FS4-7, the 1.8V LDO regulator that’s all about smooth power delivery.

– Last but not least, spot the Knowles MEMS microphone—the tiny powerhouse behind crystal-clear audio.

Step 17

– IC identification, pt. 5 (sensors):

– Get to know the Maxim Integrated MAX86902 – it’s your go-to heart rate sensor with integrated pulse oximetry and UV sensing, likely to be hanging out in your device.

– Meet the STMicroelectronics LSM6DS3, your trusty 3-axis accelerometer and gyroscope that keeps everything balanced and moving.

– Say hello to the Bosch Sensortec BMP280, the pressure sensor that’s always on the lookout for atmospheric changes.

– Don’t forget about the AKM Semiconductor AK09911, the 3-axis electronic compass that makes sure you never lose your way.

– Last but not least, we have the ABLIC, Inc. (formerly Seiko Instruments) S-5712CCDL1-I4T1U, the Hall sensor, quietly working behind the scenes.

Step 18

– Now it’s time to tackle the S7’s swappable headphone jack.

– Samsung went all-in with the IP68 rating on this flagship—think high-level water and dust defense.

– Rubber seals are guarding the lower microphone and speaker, so the inside stays safe from sneaky spills and dust.

– And check out that little rubber seal! Adorable, but also tough.

Step 19

– Just like the model before it, the S7’s soft button cables are cleverly wrapped around the frame behind the display.

– No worries though, we bring back our trusty iOpener to gently soften up that stubborn adhesive.

– While we’re at it, we grab a reliable opening pick and carefully tackle the not-so-fun job of prying open the OLED screen.

– These cables are sandwiched in a way that makes swapping out the daughterboard (including the charging port) almost impossible without removing the OLED display first.

Tools Used
  1. iOpenerSamsung Galaxy S7 Teardown

Step 20

– Lift up those stubborn soft button LED cables and you’ll finally set the daughterboard free.

– Just to keep it real, this tangled setup makes swapping out the display, digitizer, USB port, microphone, and soft button LEDs a total pain.

– If your charging port needs a swap, and you’re not a wizard with microsoldering, your options are: say goodbye to those soft button LEDs or go all in and replace the display too.

– The S7 is tough against water, but these repairs will give you a run for your money if something goes wrong that isn’t related to moisture.

Step 21

– Time to get to know the stars of the show! Here’s a lineup of the fabulous little chips and components you’ll be working with:

– First up, we’ve got the ABOV Semiconductor MC80F1504M, a nifty 8-Bit microcontroller with 8 Kb of flash memory. It’s like the brain of the operation!

– Next, say hello to the Qualcomm QFE2550 antenna tuner, making sure your signals stay sharp and clear.

– We’ve also got the Infineon antenna tuning switch, helping to keep everything tuned in just right.

– Don’t forget the Knowles MEMS microphone, capturing all those sweet sounds.

– And last but not least, the ABLIC, Inc. (formerly Seiko Instruments) S-5712CCDL1-I4T1U Hall sensor, adding some extra magic to the mix!

Step 22

– Okay, here we are: let’s take a look at the much-hyped ‘liquid cooling’ system in the S7.

– Turns out, it’s just a little copper pipe.

– It might not be as groundbreaking as Samsung makes it sound, but hey, most heat pipes use liquid to move heat around anyway.

– For the S7, we think the pipe pushes the heat into the phone’s metal midframe, which then spreads it out to the sides—or maybe right into your hands.

– Heat pipes aren’t new to smartphones, but the fact that we see more of them means phone processors are getting faster—and hotter—every year.

Step 23

– Samsung Galaxy S7 Repairability Score: 3 out of 10 (where 10 is the easiest to fix).

– Many of the parts are modular, meaning they can be swapped out without much hassle.

– Unlike the S6 Edge, the battery comes out without having to remove the motherboard—but keep in mind, sticky adhesive and a glued-on rear panel make the whole process trickier than it needs to be.

– To replace the USB port, you’ll need to remove the display (which might not survive the journey).

– Both front and back glass are prone to cracks, and the rear glass is held on with a powerful adhesive, so getting into the device could be a bit of a challenge.

– Replacing the glass without damaging the display is likely a mission impossible.

Success!

Samsung Galaxy S7 Screen Replacement

Duration: 45 minutes
Steps: 20 Steps

Ready to swap out that cracked or glitchy OLED on your Samsung Galaxy S7? This guide walks you through replacing just the display—no need to yank out the battery, SIM tray, or motherboard, unless you’re tackling both the battery and screen at once. Heads up: some replacement screens come pre-installed in a new frame (chassis), which means you’ll have to move all your phone’s internals and pop in a fresh battery. Double-check your replacement part before diving in. If your frame’s bent or busted, swap it out too, or you risk your new screen getting squished and damaged. Separating the display from the frame usually destroys the old screen, so only follow these steps if you’re ready for a new one. And if your screen looks like a tiny glass volcano, slap on some tape or a screen protector, and grab eye protection to keep those shards in check. Let’s get that screen shining again!

Step 1

– Warm up the long edge of the phone by gently applying a heated iOpener for around two minutes. This helps loosen things up for the next steps.

Tools Used
  1. iOpenerSamsung Galaxy S7 Screen Replacement

Step 2

– Once the back panel starts feeling a bit warm to the touch, grab your suction cup and place it near the heated edge—just steer clear of the curved parts.

– Now, gently pull on the suction cup and slide in an opening pick under the rear glass to lift it up.

Step 3

– Now that you’ve got the pick snugly placed in the glass, it’s time to give it some extra heat love with the iOpener. Reheat and stick it back on to help loosen that sticky adhesive.

Tools Used
  1. iOpenerSamsung Galaxy S7 Screen Replacement

Step 4

– Gently slide your opening pick along the edge of the phone, working to separate the adhesive. Think of it as peeling back the layers with a friendly nudge.

– Keep that pick in place and grab a second one as you move forward. Leaving the first pick inserted helps stop the glue from playing hard-to-get and sealing itself back up.

Tools Used
  1. iOpenerSamsung Galaxy S7 Screen Replacement

Step 5

– Now, let’s keep the momentum going! Just like before, warm up and slice through the remaining three sides of the phone.

– And here’s a handy tip: leave an opening pick in each edge as you move along to stop that pesky adhesive from sticking back together.

Step 6

– Gently lift the glass and peel it away from the phone. Keep it smooth and steady—no rush needed.

Step 7

– Ready to put the back cover back on? Grab that custom-cut adhesive strip and follow this guide like a pro!

– When you’re sprucing up the midframe surface with some isopropyl alcohol, just a heads up to steer clear of the wireless charging coil! That coating isn’t a fan of alcohol, and we don’t want it to break down on us. Careful now!

Step 8

– Unscrew the eight 3.5 mm Phillips screws keeping the NFC antenna and charging coil assembly in place. Take your time—slow and steady wins the race!

Step 9

– Grab your trusty spudger and slide the tip into the little notch on the left side of the antenna assembly. Gently pop that assembly right out of the frame—think of it like opening a stubborn bag of chips, but with less crumbs.

– Lift the antenna assembly out and set it aside. Boom, done!

Tools Used
  1. SpudgerSamsung Galaxy S7 Screen Replacement

Step 10

– Gently wedge the flat end of your spudger under the charging coil assembly and lift it out of the phone with care.

Tools Used
  1. SpudgerSamsung Galaxy S7 Screen Replacement

Step 11

– Grab the flat end of your spudger and gently pop the battery connector loose. Easy does it!

Tools Used
  1. SpudgerSamsung Galaxy S7 Screen Replacement

Step 12

– Gently pry up the display and digitizer connector using the flat end of your trusty spudger.

Tools Used
  1. SpudgerSamsung Galaxy S7 Screen Replacement

Step 13

– Grab an iOpener and gently press it onto a long edge of the phone. Hold it there for about 2 minutes to help loosen things up.

Tools Used
  1. iOpenerSamsung Galaxy S7 Screen Replacement

Step 14

– When the screen feels warm, slap a suction cup down as close to that heated edge as possible.

– Give the suction cup a gentle lift and slide an opening pick right under the display assembly.

Step 15

– After you’ve got the pick snugly tucked under the display, give it another warm hug with the iOpener to loosen up that stubborn adhesive.

Tools Used
  1. iOpenerSamsung Galaxy S7 Screen Replacement

Step 16

– Gently slide the opening pick down the side of your phone to loosen up that sticky adhesive.

– Take it slow so the pick tip stays put and doesn’t pop out of the gap. If it starts to get stubborn, warm things up again with the iOpener and try once more.

– Keep the pick in place, then grab a second one as you move on. Leaving the first pick there helps stop the glue from sticking back together.

Tools Used
  1. iOpenerSamsung Galaxy S7 Screen Replacement

Step 17

– Now, let’s keep the momentum going! Just like before, heat things up and carefully cut along the remaining three sides of your phone. You’ve got this!

– And remember, keep an opening pick on each side as you work your magic to stop that adhesive from sneaky resealing!

Step 18

– Gently pry up the side of the display opposite the display cable. Let the cable act like a hinge as you carefully open up the phone.

Step 19

– Gently lift the display from the mid frame, making sure to delicately guide the display connector through the opening in the mid frame.

– Now, go ahead and remove the display.

Step 20

– Ready to wrap things up? Stick that adhesive on the rear cover, then reverse your steps to put everything back together. If you hit any snags, you can always schedule a repair.

Success!
Now it’s time to bring your device back to life! Simply stick that adhesive onto the rear cover and reverse those steps like a pro. You’ve got this! And remember, if you run into any tricky spots, feel free to schedule a repair.

Samsung Galaxy S7 Loudspeaker Assembly Replacement

Duration: 45 minutes
Steps: 11 Steps

Ready to get your groove back? Follow these steps to swap out the loudspeaker assembly in your Samsung Galaxy S7 and turn the volume up on life.

Step 1

– Warm up a trusty iOpener and place it on one of the long edges of your phone for about two minutes. This little heat-up session will help things go smoothly!

Tools Used
  1. iOpenerSamsung Galaxy S7 Loudspeaker Assembly Replacement

Step 2

– Once the back panel feels nice and warm, stick a suction cup as close as you can to the heated edge—just be sure to steer clear of the curved part.

– Gently pull up on the suction cup and slide an opening pick underneath the rear glass to start the separation.

Step 3

– Once you’ve got that pick snugly in the glass, give it a little warmth again with the iOpener to make that adhesive nice and soft.

Tools Used
  1. iOpenerSamsung Galaxy S7 Loudspeaker Assembly Replacement

Step 4

– Gently slide the opening pick down the side of your phone, carefully separating that pesky adhesive like a pro.

– Once you’ve got that pick in place, grab a second one to keep the magic going! Keeping the first pick inserted will help stop the adhesive from getting all clingy again.

Tools Used
  1. iOpenerSamsung Galaxy S7 Loudspeaker Assembly Replacement

Step 5

– Keep the momentum going by repeating the heating and cutting steps along the other three sides of the phone. As you work, leave a little opening pick in each edge to keep the adhesive from sealing back up before you’re ready. If you need help, you can always schedule a repair.

Step 6

– Gently lift the glass and carefully detach it from the phone.

Step 7

– To pop the back cover back on, use a custom-cut adhesive strip and follow this simple guide.

– When wiping down the midframe with isopropyl alcohol, watch out—keep the alcohol away from the wireless charging coil. The coil’s coating isn’t a fan of alcohol and can get damaged if it gets wet.

Step 8

– Take out all twelve 3.5 mm Phillips screws with care—these little guys are keeping things together!

Step 9

– Slide the tip of your spudger into the tiny notch on the left side of the antenna assembly, then gently pry the assembly up and out of the frame like a pro.

– Lift out the antenna assembly and set it aside.

Tools Used
  1. SpudgerSamsung Galaxy S7 Loudspeaker Assembly Replacement

Step 10

– Grab the flat end of your spudger and gently pop the charging coil assembly out of the phone—nice and easy, like you’re lifting a pancake off the griddle.

Tools Used
  1. SpudgerSamsung Galaxy S7 Loudspeaker Assembly Replacement

Step 11

– Ready to put everything back together? Just work your way through the steps in reverse, and your device should be good as new. If you hit any snags, you can always schedule a repair with us!

Tools Used
  1. SpudgerSamsung Galaxy S7 Loudspeaker Assembly Replacement

Success!
To reassemble your device, follow these instructions in reverse order. Need help or have questions? You can always schedule a repair with Salvation Repair for expert assistance.

Samsung Galaxy S7 Display Adhesive Replacement

Duration: 45 minutes
Steps: 4 Steps

Ready to swap out that display adhesive on your Samsung Galaxy S7? This guide will walk you through the process with ease. Just follow along with the Galaxy S7 screen replacement guide to get your phone back in action. If you hit a tough spot, don’t hesitate to schedule a repair for a hand.

Step 1

– Scrape away all leftover adhesive and gunk from the phone’s frame. Then, give the surface a good clean with some high concentration isopropyl alcohol (90% or higher) and wipe it down using a lint-free cloth.

– Carefully peel off the clear plastic backing from the pre-cut adhesive strip to reveal one sticky side ready to stick.

Tools Used
  1. Isopropyl AlcoholSamsung Galaxy S7 Display Adhesive Replacement

Step 2

– Line up one edge of the adhesive with the matching edge of the phone frame, ensuring it’s oriented correctly. Gently lay the adhesive onto the frame without pressing too hard. Check that the adhesive’s cutouts align with the phone’s camera and sensors and aren’t covering them. If things aren’t sitting quite right, carefully peel the adhesive back up and try again. Need a hand? You can always schedule a repair for extra help.

Step 3

– After lining up the adhesive on the frame, take the flat end of a spudger and gently trace around the edges to press it down nicely. Don’t worry, your fingers work just as well if you prefer!

Tools Used
  1. SpudgerSamsung Galaxy S7 Display Adhesive Replacement

Step 4

– Start putting your device back together until you’re ready to add the screen.

– Peel off the green plastic liner from the adhesive strip to reveal the sticky side that’ll hold the screen in place.

– Carefully align the screen and gently set it down onto the adhesive, making sure it’s in the right spot.

– Press around the edges with your fingers to ensure the adhesive sticks securely all around the perimeter.

– Place a few books on top of the screen and let it sit for an hour—this will help the adhesive bond firmly. Just relax, let gravity do its thing!

Success!
Ready to wrap things up? Head back over to the Galaxy S7 screen replacement guide right here and keep that repair momentum going!

Samsung Galaxy S7 Battery Replacement

Duration: 45 minutes
Steps: 15 Steps

Is your battery feeling a bit sluggish? Constantly tethered to a charger because your S7 just can’t keep up? No worries! This guide will walk you through swapping out that worn-out battery for a fresh, energetic one. Just a heads up: the video guide suggests removing the SIM card, but it’s completely optional and won’t hinder your repair journey if you choose to leave it in. Before you dive in, make sure to drain that battery below 25%—a charged lithium-ion battery can be a bit dramatic if it gets punctured. And if you notice your battery is swollen, it’s time to tread carefully. No heating up your phone, please! If you need a little help loosening the adhesive, a dropper or syringe filled with some 90% isopropyl alcohol around the edges of the back cover should do the trick. Remember, swollen batteries can be tricky, so equip yourself with some eye protection and take it slow! If you’re feeling uncertain, don’t hesitate—just schedule a repair!

Step 1

– Warm up a trusty iOpener and place it on a long edge of the phone for about two minutes. Let that heat do its magic!

Tools Used
  1. iOpenerSamsung Galaxy S7 Battery Replacement

Step 2

– Once the back panel feels nice and toasty, grab your suction cup and stick it as close to the heated edge as you can—just steer clear of any curvy corners.

– Give the suction cup a gentle pull upwards, then slide an opening pick underneath the rear glass to start the separation.

Tools Used
  1. Isopropyl AlcoholSamsung Galaxy S7 Battery Replacement

Step 3

– With the pick snugly in place, warm things up again with the iOpener and give that adhesive another round of softening.

Tools Used
  1. iOpenerSamsung Galaxy S7 Battery Replacement

Step 4

– Gently slide your opening pick along the edge of the phone to loosen the adhesive, making sure to keep it in place. Then, grab a second pick and move on to the next step. Keeping that first pick inserted helps prevent the glue from sticking back together—think of it as keeping the door open for easy access. If you need a hand, you can always schedule a repair.

Tools Used
  1. iOpenerSamsung Galaxy S7 Battery Replacement

Step 5

– Repeat the heating and cutting steps on the remaining three edges of the phone. As you go, leave an open pick in each side to keep the adhesive from sealing back up. If you need help, you can always schedule a repair.

Step 6

– Gently lift the glass and take it off the phone with care.

Step 7

– Pop that back cover on using your custom-cut adhesive strip—stick with confidence!

– If you’re wiping down the midframe with isopropyl alcohol, keep it away from the wireless charging coil. That coating can’t handle a boozy bath!

Tools Used
  1. Isopropyl AlcoholSamsung Galaxy S7 Battery Replacement

Step 8

– Unscrew and set aside the twelve 3.5 mm Phillips screws—time to show those screws who’s boss!

Step 9

– Slide the tip of a spudger into the tiny notch on the left side of the antenna assembly, then gently lift the assembly up and out of the frame.

– Take out the antenna assembly.

Tools Used
  1. SpudgerSamsung Galaxy S7 Battery Replacement

Step 10

– Gently pry up the charging coil assembly using the flat end of a spudger to lift it out of the phone. You’ve got this!

Tools Used
  1. SpudgerSamsung Galaxy S7 Battery Replacement

Step 11

– Grab the flat end of that trusty spudger and gently coax the loudspeaker assembly up and out. You’ve got this!

Tools Used
  1. SpudgerSamsung Galaxy S7 Battery Replacement

Step 12

– Gently wiggle the flat end of your spudger to detach the battery connector. You’ve got this!

Tools Used
  1. SpudgerSamsung Galaxy S7 Battery Replacement

Step 13

– Drip a couple drops of high-strength (over 90%) isopropyl alcohol under each battery corner and let it chill for a few minutes—this loosens up that stubborn glue.

– Or, grab an iOpener and set it right on the battery.

– Let the iOpener hang out for at least a minute to soften up the adhesive holding the battery.

Step 14

– Grab your trusty opening pick and gently nudge the battery up from the bottom with a steady hand. Keep that pressure consistent, and you’ll have it free in no time!

Tools Used
  1. iOpenerSamsung Galaxy S7 Battery Replacement

Step 15

– Gently wedge an opening pick between the battery and the case to loosen any stubborn adhesive. Carefully lift the battery out of the compartment. If you used isopropyl alcohol during disassembly, give it about ten minutes to fully evaporate before installing the new battery. When you’re ready to install the fresh battery and adhesive, just follow this guide. If you need help along the way, you can always schedule a repair.

Tools Used
  1. Isopropyl AlcoholSamsung Galaxy S7 Battery Replacement

Success!
When putting your device back together, spread some adhesive on the back glass and simply work through these steps in reverse.
Once everything’s snug and secure, don’t forget to calibrate your new battery to keep things running smooth.
If you hit a snag or want a hand, you can always schedule a repair with us.

Samsung Galaxy S6/S7 Edge Screw identification

Duration: 45 minutes
Steps: 3 Steps

Samsung has stuck to the same screws across all mobile phones from the S3 to the S5 models, including the minis. The S6 series switched things up with new screws, so mixing them up can lead to damage if you go too far. Keep track of your screws and take your time—it’s all part of the process. If you need help, you can always schedule a repair.

Step 1

– The screws for the S6, S6 Edge, and S7 series are all 3.2mm. Keep that in mind as you dive into your repair adventure!

Step 2

– The S3, S4, and S5 screws measure 3.8mm, which is a bit beefier—0.6mm longer—than those in the S6 and S7 series. Keep that in mind when grabbing your screwdrivers!

Step 3

– Put everything back together by simply reversing these steps. You’ve got this! And if things get tricky, remember you can always schedule a repair with us.

Success!

Samsung Galaxy S7 Edge Rear Glass Replacement

Duration: 45 minutes
Steps: 7 Steps

Get ready to tackle that glass back replacement for your Samsung Galaxy S7 Edge! Just a heads up: those curved edges and the super strong adhesive can make the opening process a bit tricky. Stay cool, take your time, and don’t hesitate to repeat the heating and pulling a few times. Trust us, the adhesive will give in eventually!

Step 1

– Warm up an iOpener and press it against one of the long edges of your phone for about two minutes to loosen things up.

Tools Used
  1. iOpenerSamsung Galaxy S7 Edge Rear Glass Replacement

Step 2

– After the back panel feels nicely warmed up, stick a suction cup near the heated edge—just steer clear of the curved part to keep things smooth.

– Gently pull up on the suction cup and slide an opening pick under the rear glass to start popping it open.

Step 3

– Once your pick is snugly in the glass, give the iOpener a quick reheat and stick it back on to loosen that stubborn adhesive. Keep at it until things start to soften up nicely.

Tools Used
  1. iOpenerSamsung Galaxy S7 Edge Rear Glass Replacement

Step 4

– Gently glide the opening pick along the edge of your phone, carefully breaking that adhesive seal. You got this!

– Keep that pick in place and grab a second one as you move on to the next step. Keeping the first pick in can help stop the glue you just freed from sticking back down. You’re doing great!

Tools Used
  1. iOpenerSamsung Galaxy S7 Edge Rear Glass Replacement

Step 5

– Repeat the heating and cutting steps on the remaining three sides of the phone, keeping the process consistent. Leave an opening pick on each side as you go—this keeps the adhesive from sticking back together and makes your next step easier. If you need help, you can always schedule a repair.

Step 6

– Gently lift the glass and give it a little wiggle to free it from the phone.

Step 7

– Give your new part a quick side-by-side with the old one. Double-check for bits like the camera lens or leftover stickers that need swapping before you pop it in.

– Time to put everything back together—just reverse the steps and you’re good to go. If you hit a roadblock or want a pro to take over, you can always schedule a repair.

Tools Used
  1. TweezersSamsung Galaxy S7 Edge Rear Glass Replacement

Success!

Samsung Galaxy S7 Edge NFC Antenna and Charging Coil Assembly Replacement

Duration: 45 minutes
Steps: 10 Steps

Get ready to tackle the adventure of replacing the NFC antenna and charging coil in your Samsung Galaxy S7 Edge! Just a heads-up: those sleek, curved edges and the super strong adhesive can make the first opening a bit of a puzzle. But don’t sweat it! Take your time, warm things up a bit, and give those adhesive bonds a gentle tug. With a little patience and some good ol’ heat and pull cycles, you’ll be in business before you know it!

Step 1

– Warm up your iOpener and press it to a long edge of the phone for about two minutes. Let that heat work its magic!

Tools Used
  1. iOpenerSamsung Galaxy S7 Edge NFC Antenna and Charging Coil Assembly Replacement

Step 2

– Once the back feels nice and warm to the touch, grab a suction cup and place it as close to the heated edge of the phone as possible—just watch out for that curved part.

– Gently lift on the suction cup and slide an opening pick underneath the rear glass to start the separation.

Step 3

– With the pick snugly in place under the glass, give the iOpener another round in the microwave and lay it back on to loosen up that stubborn adhesive.

Tools Used
  1. iOpenerSamsung Galaxy S7 Edge NFC Antenna and Charging Coil Assembly Replacement

Step 4

– Gently work your way around the phone with the opening pick, carefully prying the adhesive loose as you go.

– Keep that pick in place for now and grab a second one – it’s about to get real. Leaving it in helps keep the adhesive from making a comeback.

Tools Used
  1. iOpenerSamsung Galaxy S7 Edge NFC Antenna and Charging Coil Assembly Replacement

Step 5

– Now, let’s keep the momentum going! Just like before, heat things up and gently slice around the remaining three sides of your phone.

– Remember to stick an opening pick on each side before moving on to the next. This way, the adhesive won’t try to sneakily reseal itself while you work!

Step 6

– Gently lift the glass and pop it off your phone like a pro!

Step 7

– Getting that new back cover on? Here’s how:

– If you’re putting the old back cover back on, or rocking a cover without sticky stuff already on it, follow along here.

– Grab some tweezers and carefully peel off any leftover adhesive from the phone’s frame. Next, wipe down the sticky spots with some high-strength isopropyl alcohol (90% or more) and a lint-free cloth to make sure everything’s nice and clean for the new adhesive.

– Peel the backing off the new rear glass adhesive, line up one edge of the glass with the phone’s chassis like a pro, then press it down firmly and evenly to stick it in place.

Tools Used
  1. TweezersSamsung Galaxy S7 Edge NFC Antenna and Charging Coil Assembly Replacement

Step 8

– Unscrew the seven 3.5 mm Phillips screws holding down the NFC antenna and charging coil assembly. Keep them safe—they’re tiny but mighty!

Step 9

– Grab that nifty little notch on the lower left of the upper antenna and give it a gentle pry to pop it out of the phone.

– Now, go ahead and remove the upper antenna like a pro!

Step 10

– Now, just put everything back together by following these steps in reverse—easy peasy!

Success!
Now it’s time to put it all back together! Just retrace your steps in reverse and you’ll have your device all set and ready to go. If you find yourself in a pickle, don’t hesitate to schedule a repair for some expert help!

🍪
Have a cookie! This site uses cookies to enhance your experience. Opt-Out Options.