Samsung Galaxy S7 Edge Loudspeaker Assembly Replacement

Duration: 45 minutes
Steps: 11 Steps

Get ready to tackle the loudspeaker assembly replacement in your Samsung Galaxy S7 Edge! Just a heads up, those curved edges and the super sticky adhesive can make getting started a bit tricky. Take your time, warm things up, and give it a few good pulls – the adhesive will give in eventually. You’ve got this!

Step 1

– Warm up your trusty iOpener, then set it along one of the long edges of your phone for about two minutes. Give the glue a chance to loosen up—patience is your friend here.

Tools Used
  1. iOpenerSamsung Galaxy S7 Edge Loudspeaker Assembly Replacement

Step 2

– Once the back panel feels nice and warm to the touch, stick a suction cup as close to the heated edge as possible—just watch out for the curved edges!

– Gently lift the suction cup and slide an opening pick under the rear glass to start the separation.

Step 3

– After getting that pick nice and snug under the glass, go ahead and warm things up again with the iOpener to melt the adhesive a bit more.

Tools Used
  1. iOpenerSamsung Galaxy S7 Edge Loudspeaker Assembly Replacement

Step 4

– Gently slide the opening pick along the side of the phone to loosen the adhesive. Keep the pick in place and grab a second one to continue. Leaving the pick inserted helps prevent the glue from sticking back together. If you need a hand, you can always schedule a repair.

Tools Used
  1. iOpenerSamsung Galaxy S7 Edge Loudspeaker Assembly Replacement

Step 5

– Now, let’s keep the momentum going! Just like before, heat up and carefully cut around the remaining three sides of your phone. You’re doing awesome!

– To keep things smooth, pop an opening pick on each side as you move on to the next. This will help stop that pesky adhesive from sticking back together. You’re on the right track!

Step 6

– Gently lift the glass and peel it away from the phone. Keep it smooth and steady to avoid cracks or damage. If you need help, you can always schedule a repair.

Step 7

– To put on a new back cover: If you’re reusing the old cover or using one without pre-installed adhesive, follow these steps. First, use tweezers to carefully remove any leftover glue from the phone’s frame. Next, clean the contact areas with high-concentration isopropyl alcohol (90% or higher) and a lint-free cloth to ensure a good bond. Then, peel the backing off the new rear glass, line up one edge with the chassis, and press it firmly into place. If you need a hand, you can always schedule a repair.

Tools Used
  1. TweezersSamsung Galaxy S7 Edge Loudspeaker Assembly Replacement

Step 8

– Unscrew those twelve 3.5 mm Phillips screws like a pro!

Step 9

– Find the small notch on the bottom left corner of the upper antenna and use it to gently pry the antenna out of its spot.

– Lift out the upper antenna and set it aside like a pro.

Step 10

– Gently lift out the wireless charging coil from the phone. You’ve got this!

Step 11

– To put your device back together, just retrace your steps in the reverse order. You’ve got this! If you hit a snag, remember, you can always schedule a repair for a helping hand.

Success!
Ready to bring your device back to life? Just retrace your steps in reverse order. If things get tricky, you can always schedule a repair.

Samsung Galaxy S7 Edge Display Assembly Replacement

Duration: 45 minutes
Steps: 32 Steps

Ready to tackle a Samsung Galaxy S7 Edge display swap? This guide walks you through swapping out just the screen, leaving your frame and battery right where they are. Heads up: that curved edge and stubborn adhesive make opening up the device a bit of a wrestling match. Take your time, use heat, be patient, and repeat the process until the adhesive finally gives in. Quick tip: some new screens come already attached to a new frame (aka chassis), which means you’ll need to move everything inside your phone and pop in a fresh battery. Double-check your replacement part before starting! If your frame is bent or damaged, swap it out so your shiny new screen fits snug and doesn’t get squished. Heads up—removing the display from the frame will destroy the old screen, so don’t start unless you’re committed to a new one. Got a seriously shattered screen? Wear eye protection and slap some tape or a screen protector on to keep glass shards under control.

Step 1

– Grab a SIM card opening tool, the trusty SIM eject bit, or a simple paperclip. Now, locate that tiny hole at the top edge of your phone.

– Gently press in the tool to get the tray to pop out like magic!

– Now, go ahead and pull the SIM/SD card combo tray from your phone. You’re doing great!

Step 2

– Warm up an iOpener and press it against one of the longer edges of the phone for about two minutes. Let the heat work its magic!

Tools Used
  1. iOpenerSamsung Galaxy S7 Edge Display Assembly Replacement

Step 3

– Once the back is nice and warm to the touch, grab a suction cup and place it as close to the heated edge of the phone as you can—just watch out for that curved part.

– Gently lift on the suction cup and slide an opening pick underneath the rear glass to start prying it up.

Step 4

– Now that you’ve got that pick snugly inserted into the glass, it’s time to give it a little extra love! Reheat and pop the iOpener back on there to loosen up that stubborn adhesive.

Tools Used
  1. iOpenerSamsung Galaxy S7 Edge Display Assembly Replacement

Step 5

– Gently slide the opening pick along the phone’s edge to loosen the adhesive like a pro.

– Keep that pick in place, then grab another one for the next move. Leaving it there stops the glue from sticking back together too soon.

Tools Used
  1. iOpenerSamsung Galaxy S7 Edge Display Assembly Replacement

Step 6

– Repeat the heating and cutting steps on the other three edges of the phone. Keep an opening pick on each side as you move along so the adhesive doesn’t seal back up. If you need help, you can always schedule a repair.

Step 7

– Gently lift the glass and carefully peel it away from the phone. Keep it steady and go slow to avoid damage.

Step 8

– To put on a new back cover: If you’re reusing your old back or using one without pre-applied adhesive, follow these steps. First, use tweezers to carefully remove any leftover adhesive from the phone’s frame. Then, clean the contact surfaces with high-concentration isopropyl alcohol (90% or above) and a lint-free cloth—this will help the new adhesive stick properly. Next, peel off the backing from the new rear glass, carefully align one edge with the phone chassis, and press the glass firmly into place. If you need help, you can always schedule a repair.

Tools Used
  1. TweezersSamsung Galaxy S7 Edge Display Assembly Replacement

Step 9

– Unscrew the twelve 3.5 mm Phillips screws—take your time, it’s not a race!

Step 10

– Find the little notch on the bottom left of the upper antenna – that’s your cue to gently pry it out of the phone.

– Carefully remove the upper antenna.

Step 11

– Gently lift up the wireless charging coil and set it aside—like giving your phone a quick breather.

Step 12

– Gently lift out the loudspeaker and set it aside—like you’re giving it a well-deserved break.

Step 13

– Gently pry the battery connector loose using the flat end of your trusty spudger.

Tools Used
  1. SpudgerSamsung Galaxy S7 Edge Display Assembly Replacement

Step 14

– Grab the flat end of a spudger and gently pry to disconnect the display cable. Keep it smooth and steady—no rush! If you need a hand with any part of this process, you can always schedule a repair.

Tools Used
  1. SpudgerSamsung Galaxy S7 Edge Display Assembly Replacement

Step 15

– Gently pry up the power button cable using the pointed end of your trusty spudger.

Tools Used
  1. SpudgerSamsung Galaxy S7 Edge Display Assembly Replacement

Step 16

– Gently use the spudger’s pointed tip to separate those red and white antenna cables. A little finesse goes a long way, so take your time and don’t force it!

Tools Used
  1. SpudgerSamsung Galaxy S7 Edge Display Assembly Replacement

Step 17

– Gently pop the home button connector loose with the flat end of your spudger—like giving it a tiny high five.

Tools Used
  1. SpudgerSamsung Galaxy S7 Edge Display Assembly Replacement

Step 18

– Grab your spudger’s pointed end and gently disconnect the front-facing sensory array cables. Keep it smooth and steady—you’re doing great! If you need a pro hand, you can always schedule a repair.

Tools Used
  1. SpudgerSamsung Galaxy S7 Edge Display Assembly Replacement

Step 19

– Grab your spudger and gently use the pointed end to disconnect the volume button cable. A little finesse goes a long way here!

Tools Used
  1. SpudgerSamsung Galaxy S7 Edge Display Assembly Replacement

Step 20

– Grab your spudger and gently wedge the flat end underneath the motherboard. Take it slow—no need to rush!

– Once it’s loose, carefully grip the edges of the motherboard and lift it up. Use the spudger to nudge any cables out of the way. Patience is key here!

Tools Used
  1. SpudgerSamsung Galaxy S7 Edge Display Assembly Replacement

Step 21

– Grab your trusty spudger and gently slide the flat end beneath the daughterboard ribbon cable to disconnect it from the motherboard’s underside. You’re doing great!

– Now, it’s time to lift out the motherboard with care. You’ve got this!

Tools Used
  1. SpudgerSamsung Galaxy S7 Edge Display Assembly Replacement

Step 22

– Warm up an iOpener and place it on the top edge of the display to loosen things up.

Tools Used
  1. iOpenerSamsung Galaxy S7 Edge Display Assembly Replacement

Step 23

– The edges of the display assembly are held in place by some seriously tough foam adhesive strips.

– There’s a layer of strong double-sided tape covering the entire copper surface underneath.

– The capacitive buttons stick right onto the display and are pretty delicate—easy to tear—so make sure to keep them intact since you’ll need to reuse them during the repair.

Step 24

– Once the edge starts to heat up, place the suction cup near the top edge, making sure it doesn’t cover the speaker grill.

– Gently pull on the suction cup to create a small gap at the top edge of the display.

– Carefully slide an opening pick into that gap. Just be cautious not to go in more than 0.25 inches.

Tools Used
  1. iOpenerSamsung Galaxy S7 Edge Display Assembly Replacement

Step 25

– Once you’ve got the opening pick in place, grab your heated iOpener and gently press it against the top edge again. This will help loosen up that stubborn adhesive, making the next steps a whole lot smoother.

Tools Used
  1. iOpenerSamsung Galaxy S7 Edge Display Assembly Replacement

Step 26

– Gently slide the opening pick along the top edge of the display, making sure not to push it in more than 0.25 inches.

– Keep the pick in place at the top edge to stop the adhesive from snapping back together.

Step 27

– Now, repeat that heating and cutting magic along the long edges of the phone. But hold off on the bottom edge for now—no need to cut it just yet!

– As you move along to the next edge, make sure to leave an opening pick in place. This will keep the adhesive from sealing itself back up on you. Smart move!

Step 28

– Slide an opening pick into the bottom right corner—just ease it in, no need to rush.

– Gently wiggle the pick, letting its edge work upward against the back of the display to slice through that sticky adhesive.

– Once you’ve made it through the corner, let the pick chill there. It’ll keep the adhesive from sticking back together.

Step 29

– Slip an opening pick into the bottom left corner—think of it as your backstage pass to the inside.

– Work the pick in gently, angling the sharp side up so it glides along the back of the display like a pro.

– When you’ve sliced through the adhesive in the left corner, leave the pick there to keep things from sticking back together.

Step 30

– Grab your opening picks and slide them around the home button and anywhere else you find stubborn adhesive. Be gentle but persistent—think of it like convincing a sticker to let go.

– Ease the phone open just a bit, starting from the edge farthest from the display cable. Slow and steady wins this race!

Step 31

– Gently lift the display assembly away from the midframe, making sure to guide the display cable through the opening in the midframe without tugging. Once free, remove the display assembly completely. If you need help, you can always schedule a repair.

Step 32

– Now it’s time to put everything back together! Just retrace your steps and follow these instructions in reverse order. If you hit a snag or feel unsure, don’t hesitate to schedule a repair for some expert help.

Success!
To put your device back together, just retrace your steps in the reverse order. Easy peasy! If you hit a snag, don’t hesitate to schedule a repair for some expert assistance.

Samsung Galaxy S7 Active Disassembly

Duration: 45 minutes
Steps: 4 Steps

Ready to give your Galaxy S7 Active’s screen a fresh look? This step-by-step guide walks you through the process of safely taking apart the screen. Just follow along, stay patient, and remember—if things get tricky, you can always schedule a repair. Let’s get started and bring that device back to life!

Step 1

– Warm up the adhesive on the screen by gently applying a blow dryer directly to it. Give it a few seconds to soften up!

Step 2

– Slide your metal spudger between the screen and the frame—think of it as giving them a gentle nudge to start the separation dance.

Tools Used
  1. Metal SpudgerSamsung Galaxy S7 Active Disassembly

Step 3

– Gently slide that metal spudger around the phone at least once, giving it a little dance to loosen things up. You’ve got this!

Tools Used
  1. Metal SpudgerSamsung Galaxy S7 Active Disassembly

Step 4

– Gently raise the screen using your hands.

Success!
Now it’s time to put everything back together! Just follow these steps in reverse and you’ll be back up and running in no time. If you encounter any tricky bits along the way, don’t hesitate to schedule a repair for a helping hand.

Samsung Galaxy S8 Vibrator Motor Replacement

Duration: 45 minutes
Steps: 26 Steps

Ready to tackle the removal of the vibrator motor in your Samsung Galaxy S8? Awesome! First things first, we’ll be peeling off the rear glass cover, so make sure you’ve got some replacement adhesive on hand to seal it back up when you’re done. And a quick safety tip: before you start disassembling, make sure to discharge your battery to below 25%. This reduces the risk of any fiery antics from a punctured battery—safety first, right? Let’s get to it!

Step 1

– Slide the iOpener right into the center of your microwave like it’s taking the prime seat!

Tools Used
  1. iOpenerSamsung Galaxy S8 Vibrator Motor Replacement

Step 2

– Give your iOpener some love by warming it up in the microwave for a solid thirty seconds. It’s like a cozy little spa treatment!

– While you’re tackling the repair, keep that iOpener nice and toasty. If it starts to chill out, just pop it back in the microwave for another thirty seconds. You’ve got this!

Tools Used
  1. iOpenerSamsung Galaxy S8 Vibrator Motor Replacement

Step 3

– Carefully take the iOpener out of the microwave, grabbing it by one of the flat ends to avoid getting too close to the heated center. Stay safe, it’s hot stuff!

Tools Used
  1. iOpenerSamsung Galaxy S8 Vibrator Motor Replacement

Step 4

– Grab a pot or pan and fill it up with enough water to completely dunk your iOpener.

– Get that water boiling and then turn off the heat. Safety first!

– Carefully drop the iOpener into the hot water and let it soak for about 2-3 minutes. Make sure it’s fully submerged, just like it’s enjoying a nice spa day.

– Using a pair of tongs, fish out the toasty iOpener from the water. Watch out, it’s hot stuff!

– Give your iOpener a good towel dry—no one likes a soggy iOpener.

– And voilà! Your iOpener is all set for action! If you find yourself needing to reheat it, just repeat the process: boil the water, let it chill for a moment, and then submerge your iOpener again for 2-3 minutes.

Tools Used
  1. iOpenerSamsung Galaxy S8 Vibrator Motor Replacement

Step 5

– Grab an iOpener and heat it up. Then, press it gently along one long edge of the S8 for about 2 minutes. Give it a moment to work its magic!

Tools Used
  1. iOpenerSamsung Galaxy S8 Vibrator Motor Replacement

Step 6

– In this part, you’ll be carefully slicing through the adhesive that holds the rear glass panel in place. Think of it as peeling away a stubborn sticker—slow and steady wins the race. The adhesive layout looks like the first image—so keep that in mind as you work. The prying pattern from the outside follows a specific route, as shown: focus on the thick adhesive areas first, where the glue is more stubborn, and be gentle around the thin spots. A quick heads-up: avoid prying near the fingerprint sensor to keep it safe and sound. If you get stuck or want some extra help, you can always schedule a repair.

Step 7

– When the back panel is nice and toasty, grab your trusty suction cup and stick it near the warm edge—just steer clear of the curved part.

– Give the suction cup a gentle lift and slide an opening pick underneath the rear glass. Smooth moves!

Step 8

– Once you’ve got that tool snugly nestled in the glass, warm things up again with the iOpener and give it another go to loosen the adhesive. Keep it cool and steady, you’ve got this!

Tools Used
  1. iOpenerSamsung Galaxy S8 Vibrator Motor Replacement

Step 9

– Gently slide that opening pick down the side of your phone, letting it work its magic on the adhesive. You’ve got this!

Tools Used
  1. iOpenerSamsung Galaxy S8 Vibrator Motor Replacement

Step 10

– Now, let’s keep this momentum rolling! Go ahead and give those other three sides a warm-up and a little slice just like the first side. You’re doing great!

– To keep things smooth sailing, pop an opening pick on each side as you tackle the next one. This way, that sticky adhesive won’t close up shop on you!

Step 11

– Use the opening picks to gently glide through any remaining adhesive and carefully pry the phone open a bit. When putting everything back together, line up the fingerprint sensor cable by angling the back cover until the connector sits perfectly over its socket. Then, gently press the flat end of your spudger straight down to snap the connector into place. To remove the glass from the phone, carefully lift it away as needed. If you need a hand, you can always schedule a repair.

Tools Used
  1. SpudgerSamsung Galaxy S8 Vibrator Motor Replacement

Step 12

– Ready for a fresh back cover? Let’s do this:

– Just follow these steps to pop on your old back cover or a new one (even if it’s missing the sticky stuff).

– If the camera bezel needs to make the move, check out our camera bezel replacement guide.

– Grab some tweezers and say goodbye to any leftover adhesive hanging out on the phone’s frame. Get things squeaky clean with isopropyl alcohol (90%+ is best) and a lint-free cloth—your new adhesive will thank you.

– Peel off the backing from your new rear glass. Line up one edge like a pro, then press the glass down confidently. Hello, new look!

Step 13

– Unscrew eleven 3.7 mm screws with your trusty Phillips #000 screwdriver. You’ve got this!

Step 14

– Carefully disconnect and remove the NFC antenna and charging coil assembly. If you run into any trouble along the way, remember you can always schedule a repair for professional help.

Step 15

– Start by removing the three 3.7 mm Phillips #000 screws. Keep it steady and gentle—these screws like to stay snug. If you run into trouble or need a hand, you can always schedule a repair.

Step 16

– Start by carefully removing the loudspeaker assembly. Take your time and handle with care—it’s a small part that makes a big difference. If you need help along the way, you can always schedule a repair.

Step 17

– Grab a SIM card ejector tool or a paperclip and gently insert it into the tiny hole on the left side at the top of your device.

– Press firmly to pop out the SIM tray.

– Carefully pull the tray out of the phone.

– When putting the SIM card back in, make sure it lines up the right way with the tray’s shape before sliding it in. If you need a hand, you can always schedule a repair.

Step 18

– Gently lift the battery connector using the flat end of your spudger, and give yourself a mental high-five for nailing this step.

Tools Used
  1. SpudgerSamsung Galaxy S8 Vibrator Motor Replacement

Step 19

– Grab your trusty spudger and gently pop the sensor array connector loose. Easy does it!

Tools Used
  1. SpudgerSamsung Galaxy S8 Vibrator Motor Replacement

Step 20

– Grab your trusty spudger and gently use the flat end to disconnect that front-facing camera connector. You’re doing great!

Tools Used
  1. SpudgerSamsung Galaxy S8 Vibrator Motor Replacement

Step 21

– Grab your trusty spudger and gently use the flat end to disconnect the display and digitizer connector. Easy does it—just a little wiggle and you’re all set!

Tools Used
  1. SpudgerSamsung Galaxy S8 Vibrator Motor Replacement

Step 22

– Grab your trusty spudger and gently prod the two antenna cables that link the motherboard to the daughterboard. Disconnecting them should feel like a breeze!

Tools Used
  1. SpudgerSamsung Galaxy S8 Vibrator Motor Replacement

Step 23

– Grab the flat end of your spudger and pop off that antenna ribbon cable connecting the motherboard to the daughterboard. It’s a gentle wiggle, not a wrestling match—just enough to set it free!

Tools Used
  1. SpudgerSamsung Galaxy S8 Vibrator Motor Replacement

Step 24

– Gently pry the motherboard loose using the flat end of a spudger, then disconnect it from the daughterboard.

Tools Used
  1. SpudgerSamsung Galaxy S8 Vibrator Motor Replacement

Step 25

– Gently lift the motherboard out of the phone—like you’re removing the last piece of Jenga.

Step 26

– Grab the flat end of a spudger and gently pry up to remove the vibrator motor. Easy does it—just a little leverage goes a long way. If you need a hand with the tools or steps, you can always schedule a repair.

Tools Used
  1. SpudgerSamsung Galaxy S8 Vibrator Motor Replacement

Success!
Once you’ve reapplied the adhesive, simply reverse these steps to put your device back together like a pro.
When you’re done, run through this guide in reverse to make sure everything’s working perfectly. If things get tricky, remember you can always schedule a repair with us!

Samsung Galaxy S8 Rear Camera Bezel Replacement

Duration: 45 minutes
Steps: 15 Steps

Ready to give your Samsung Galaxy S8 a little TLC? This guide will help you swap out that rear camera bezel and the camera glass like a pro! If your new part doesn’t come with adhesive, no worries! Just grab some high-bond tape or pre-cut adhesive to get the job done right. Let’s dive in and make that camera shine!

Step 1

– Warm up an iOpener and stick it along one of the long edges of your S8 for about 2 minutes to loosen things up.

Tools Used
  1. iOpenerSamsung Galaxy S8 Rear Camera Bezel Replacement

Step 2

– In the following steps, you’ll be carefully cutting through the adhesive that holds the rear glass panel in place. Don’t worry, take it slow and steady!

– The adhesive on the rear case is applied just like in the first image, so keep an eye out for it as you go.

– When you’re prying the phone open, follow this pattern to make sure you’re hitting all the right spots:

– Thicker adhesive sections

– Thinner adhesive sections

– Watch out! Avoid prying here to protect the fingerprint sensor.

Step 3

– Once the back panel feels warm and cozy to the touch, grab a suction cup and place it as close to the heated edge of the phone as possible—just keep away from that curved edge. Then, gently lift on the suction cup and slide an opening pick underneath the rear glass to get things started.

Step 4

– Keep your tool nice and snug in the glass, then give the iOpener another round of heat to loosen up that stubborn adhesive.

Tools Used
  1. iOpenerSamsung Galaxy S8 Rear Camera Bezel Replacement

Step 5

– Take your opening pick and gently slide it down the side of the phone. You’re basically cutting through the adhesive, so take it slow and steady. It’s like peeling off a sticker, but with a little more finesse!

Tools Used
  1. iOpenerSamsung Galaxy S8 Rear Camera Bezel Replacement

Step 6

– Go ahead and repeat the heating and slicing steps on the other three sides of the phone.

– Keep an opening pick tucked in at each side as you move along to stop the adhesive from snapping back shut.

Step 7

– Start by gently sliding the opening picks around the edges to cut through any stubborn adhesive and pry the phone open just enough to get inside.

– When reconnecting the fingerprint sensor cable during reassembly, first angle the back cover into place until the cable connector lines up perfectly with its socket. Then, grab the flat end of your spudger and softly snap the connector into its socket by pressing straight down—no need for force, just a gentle tap.

– Carefully lift and remove the glass from the phone, taking your time to avoid any cracks or damage.

Tools Used
  1. SpudgerSamsung Galaxy S8 Rear Camera Bezel Replacement

Step 8

– To put on a new back cover:

– Use this guide as your go-to for reinstalling the old back cover or fitting a new one without pre-applied adhesive.

– If your new part doesn’t have the camera bezel, you’ll want to transfer that over—check out our camera bezel replacement steps for that.

– Grab some tweezers and gently peel off any leftover adhesive from the phone’s chassis. Then, clean the sticky spots with high-concentration isopropyl alcohol (90% or higher) and a lint-free cloth. This gets the surface ready for the new adhesive to stick perfectly.

– Peel the backing off the adhesive on your new rear glass, carefully line up one edge with the phone chassis, and press it down firmly to secure the glass in place.

Tools Used
  1. TweezersSamsung Galaxy S8 Rear Camera Bezel Replacement

Step 9

– Grab your iOpener and give the rear camera bezel at the top of the back glass a nice warm hug for about two minutes.

– If things feel a little chilly, just reheat and reapply the iOpener until your phone gets toasty. Keep an eye on those iOpener instructions so you don’t accidentally go full volcano mode.

Tools Used
  1. iOpenerSamsung Galaxy S8 Rear Camera Bezel Replacement

Step 10

– Slip an opening pick under the top edge of the rear camera bezel—think of it like sliding into a DM, but for your phone.

– Gently glide the pick around the bezel’s edges to loosen up the adhesive holding it to the rear glass. Take it slow, like you’re convincing a stubborn sticker to let go.

– Whatever you do, don’t pry on the side that’s up against the fingerprint sensor. That part is strictly off-limits!

Step 11

– Grab an opening pick or tweezers to gently pop the camera bezel off the rear glass.

– If it’s being stubborn, slide the opening pick around to carefully slice through any leftover adhesive.

– Watch out for the fingerprint cable so you don’t accidentally snag the camera bezel while pulling it free.

Tools Used
  1. TweezersSamsung Galaxy S8 Rear Camera Bezel Replacement

Step 12

– Grab a spudger and gently pry away any glue holding the camera bezel to the back glass—think of it as peeling apart a stubborn sticker. Next, give the area a good clean with high-concentration isopropyl alcohol (90% or higher) and a lint-free cloth. Swipe in a single direction—no back-and-forth scrubbing—to prep the surface for the new adhesive. If you need a hand during this process, you can always schedule a repair.

Tools Used
  1. SpudgerSamsung Galaxy S8 Rear Camera Bezel Replacement

Step 13

– Carefully peel off the clear cover from the camera bezel adhesive strip—let that sticky side shine.

– Line up the rear camera and flash holes inside the back glass with the matching spots on the adhesive strip. Precision makes perfection!

– Lay the adhesive strip onto the rear glass, making sure it doesn’t sneak over the edges of the camera or flash cutouts.

– Press the adhesive down with your fingers or the flat side of a spudger, giving it a good bond to the glass.

Tools Used
  1. SpudgerSamsung Galaxy S8 Rear Camera Bezel Replacement

Step 14

– Gently peel off the green backing from the adhesive strip. Keep an eye out so the sticky part stays on the glass, not on the backing.

Step 15

– To reassemble your device, follow the above steps in reverse order.

– After you’ve completed the repair, follow this guide to test your repair.

– Take your e-waste to an R2 or e-Stewards certified recycler.

– Repair didn’t go as planned? Check out our Answers community for troubleshooting help.

Success!
Ready to put things back together? Just retrace your steps, but in reverse—like rewinding a mixtape.
Give your device a test run using our guide, and make sure everything’s working as it should.
Got leftover parts or old tech? Drop them off at an R2 or e-Stewards certified recycler to keep the planet happy.
If something’s not quite right, swing by our Answers community for troubleshooting tips, or schedule a repair with us if you need a hand.

Samsung Galaxy S8 NFC Antenna and Charging Coil Assembly Replacement

Duration: 45 minutes
Steps: 14 Steps

Ready to give your Samsung Galaxy S8 a little TLC? This guide will walk you through swapping out the NFC antenna and charging coil like a pro! We’ll start by removing that rear glass cover, and don’t forget to get some replacement adhesive to secure it back once we’re done. Before diving in, make sure your battery is below 25%—it helps avoid any firework moments if we accidentally poke it. So, let’s keep everything safe and sound while we get your phone back in action!

Step 1

– Pop that iOpener right in the middle of the microwave like a boss!

Tools Used
  1. iOpenerSamsung Galaxy S8 NFC Antenna and Charging Coil Assembly Replacement

Step 2

– Give the iOpener a quick thirty-second warm-up in the microwave. It’s like a spa day for your repair buddy!

– As you go through the repair, keep an eye on the iOpener – when it starts to cool down, just pop it back in for another thirty seconds. Simple as that!

Tools Used
  1. iOpenerSamsung Galaxy S8 NFC Antenna and Charging Coil Assembly Replacement

Step 3

– Carefully take the iOpener out of the microwave by grabbing one of the two flat ends—avoid the hot center like it’s a hot potato!

Tools Used
  1. iOpenerSamsung Galaxy S8 NFC Antenna and Charging Coil Assembly Replacement

Step 4

– Grab a pot or pan and fill it with enough water to cover your iOpener.

– Bring the water to a boil, then turn off the heat.

– Drop your iOpener into the hot water for 2-3 minutes—make sure it’s taking a full bath!

– Use some tongs to carefully lift the iOpener out of the water.

– Give it a good towel dry so it doesn’t drip everywhere.

– Your iOpener is all warmed up and ready to go! If you need to reheat it, just boil the water again, turn off the heat, and let it soak for another 2-3 minutes.

Tools Used
  1. iOpenerSamsung Galaxy S8 NFC Antenna and Charging Coil Assembly Replacement

Step 5

– Warm up an iOpener and stick it on one of the long edges of the S8 for about 2 minutes to loosen things up.

Tools Used
  1. iOpenerSamsung Galaxy S8 NFC Antenna and Charging Coil Assembly Replacement

Step 6

– In this part, you’ll carefully slice through the adhesive sealing the rear glass panel. Think of it as a gentle dance around the edges. The adhesive layout is shown in the first image—so keep that visual in mind. The prying pattern from the outside looks like this: areas with thick adhesive, and spots with thinner adhesive. Just a quick tip—avoid prying near the fingerprint sensor to keep it safe. If you need a hand with any tricky parts, you can always schedule a repair to get professional help.

Step 7

– Once the back panel gets warm, go ahead and apply a suction cup as close as you can to the heated edge – just be careful not to get too close to the curved edge.

– Next, pull up on the suction cup and slide an opening pick under the rear glass – taking care not to push too hard, since you don’t want to risk damaging anything.

Step 8

– After securing the tool snugly under the glass, heat things up again and slap the iOpener back on to loosen that sticky adhesive action.

Tools Used
  1. iOpenerSamsung Galaxy S8 NFC Antenna and Charging Coil Assembly Replacement

Step 9

– Gently slide the opening pick down the side of your phone to loosen that stubborn adhesive and get things moving.

Tools Used
  1. iOpenerSamsung Galaxy S8 NFC Antenna and Charging Coil Assembly Replacement

Step 10

– Go ahead and repeat the heating and slicing dance on the other three sides of your phone.

– Keep an opening pick wedged in each side as you move along to stop the adhesive from sneaking back together.

Step 11

– Grab those opening picks and slice through any stubborn adhesive holding things together. Once you get a little space, you’re almost there!

– When putting everything back together, make sure to line up that fingerprint sensor cable. Once it’s in position, gently press down with your spudger to snap the connector into place. It’s like a gentle high five for your phone!

– Carefully remove the glass from the phone. Take your time with this step—no need to rush!

Step 12

– Ready to give your phone a fresh look? Let’s get that new back cover on!

– Start by checking out this guide to either pop that old back cover back in place or to attach a new back cover that doesn’t come with adhesive already. Easy peasy!

– If you’re swapping in a new part, don’t forget to move over the camera bezel. Need a hand with that? Just follow our camera bezel replacement guide.

– Grab your trusty tweezers and gently peel off any leftover adhesive from the phone’s chassis. Next, it’s time to clean up! Use some high concentration isopropyl alcohol (at least 90%) and a lint-free cloth to prepare those areas for the new adhesive.

– Now, peel the adhesive backing off the new rear glass. Line up one edge with the phone chassis—take your time—and then press down firmly to secure it in place. You’ve got this!

Step 13

– Start by grabbing your Phillips #000 screwdriver. Then, carefully remove the eleven 3.7 mm screws holding things together. Keep them safe—you’ll want to put them back in when you’re done. If you need a hand at any point, you can always schedule a repair.

Step 14

– Now that you’ve reapplied the adhesive, it’s time to put your device back together—just retrace your steps like a pro!

– Once you’ve wrapped up the repair, give your work a quick test run to ensure everything’s working like a charm. And remember, if you hit a snag, you can always schedule a repair.

Success!

Don’t Despair, Repair! Top Options for Your iPad Mini

Why iPad Mini repair Matters for Your Daily Productivity

When you need an iPad Mini repair, turning to a professional service like Salvation Repair is often the best choice. Professional technicians have the expertise and tools to handle these delicate devices correctly.

Common iPad Mini Repairs:

  • Screen replacement – $100-$300 depending on model
  • Battery replacement – $80-$125 across all generations
  • Charging port repair – $100-$145 for most models
  • Camera/speaker fixes – $80-$125 typical range

Important: The iPad Mini has a repairability score of only 2/10, making professional repair the safest choice for most users.

Your iPad Mini is more than just a tablet – it’s your portable office, entertainment center, and creative tool all rolled into one compact device. When it breaks, your productivity takes a hit and your daily routine gets disrupted.

The good news? iPad Mini repair doesn’t have to be a nightmare. Whether you’re dealing with a cracked screen, dead battery, or unresponsive charging port, there are reliable solutions that can get your device back in working order without breaking the bank.

As repair community discussions reveal, “Bring up the iPad mini in a conversation with the repair community and you will hear a roar of ‘Oh, I HATE the mini'” – but this reputation comes from the device’s sensitive components and specific repair requirements, not because it can’t be fixed properly.

I’m Ralph Harris, and with over 20 years of electronics repair experience and more than 500 Apple repair certifications, I’ve guided countless customers through successful iPad Mini repair decisions. My team at Salvation Repair has published over 2000 repair guides, and I’m here to help you choose the best path forward for your specific situation.

Infographic showing iPad Mini repair decision flowchart: assess damage severity, determine device age and value, compare professional vs DIY costs, choose between Salvation Repair professional service for complex issues or simple fixes for minor problems, with emphasis on professional service for screen repairs and battery replacements due to low repairability score - iPad Mini repair infographic roadmap-5-steps

First Steps: Identifying Your iPad Mini and the Problem

back of an iPad Mini with model number - iPad Mini repair

Before we dive into any iPad Mini repair, we need to play detective for a moment. Think of this as getting to know your patient before surgery – we need to identify exactly which iPad Mini you have and what’s wrong with it.

This isn’t just paperwork busywork, I promise. Different iPad Mini generations are like different car models – they might look similar on the outside, but under the hood, they’re completely different beasts. Using the wrong parts or repair approach can turn a simple fix into an expensive disaster.

How to Identify Your Specific iPad Mini Model

Finding your iPad Mini’s model number is easier than you might think, and it’s absolutely crucial for getting the right repair. Every iPad has a unique “A” number – like A1432 or A2133 – that tells us exactly which generation and type you have.

You’ll find this number etched in tiny print on the back of your iPad Mini, usually near the bottom. If your eyes aren’t what they used to be (no judgment here!), you can also find it digitally. Just go to Settings > General > About > Model Number and tap on it to reveal the “A” number.

Why does this matter so much? Because an iPad Mini 4 Wi-Fi model (A1538) uses completely different parts than an iPad Mini 5th Generation (A2133 for Wi-Fi or A2124 for Wi-Fi + Cellular). Even though they might look nearly identical from the outside, their screen assemblies, batteries, and internal components are rarely interchangeable.

Wi-Fi versus cellular models also make a difference. Cellular models have extra antennas and circuitry that can affect repair procedures, especially if we’re working on the device’s casing. If you need help identifying your specific model, check your iPad’s specifications for a comprehensive breakdown.

Diagnosing Common iPad Mini Repair Issues

Once we know which iPad Mini you have, it’s time to figure out what’s actually wrong. This detective work helps us fix the real problem instead of just treating symptoms.

Cracked screens and broken glass are by far the most common issues we see. Sometimes it’s just the top glass layer (the digitizer), and other times the LCD display underneath is damaged too. Either way, a cracked screen makes your iPad Mini frustrating or impossible to use.

Unresponsive touchscreens can be tricky. Your screen might look perfect but refuse to respond to touches, or worse, register “ghost touches” you never made. This often points to digitizer problems, and with iPad Minis, it can be related to those sensitive flex cables we mentioned earlier.

Battery problems sneak up on you over time. Your iPad Mini’s battery might be crying for help if it drains rapidly even with light use, won’t hold a charge for long, or causes unexpected shutdowns when the battery percentage still looks decent. Apple considers a battery worn out when it holds less than 80% of its original capacity. If your battery is swelling and pushing the screen up, that’s an emergency – stop using it immediately.

Charging port damage usually announces itself when your cable feels loose or your iPad Mini charges inconsistently. Sometimes there’s even a broken lightning connector tip stuck inside the port.

Broken buttons – whether it’s the home button, power button, or volume buttons – can range from stuck to completely unresponsive. Here’s something interesting about iPad Minis: on some models, the power button functionality actually routes through the digitizer home flex, making it more connected than you’d expect.

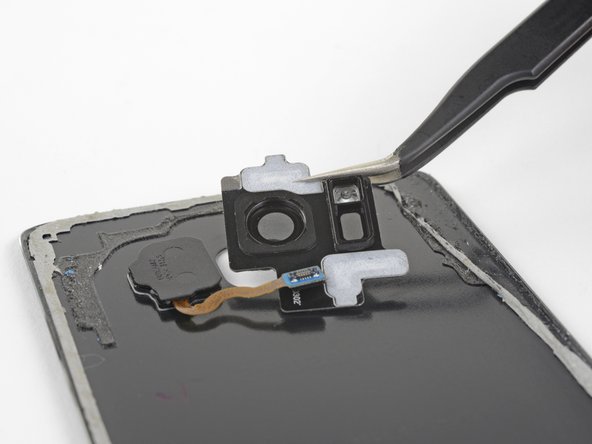
Speaker and camera issues round out the common problems. Distorted sound, no sound at all, or a camera that’s gone blurry or stopped working entirely are all fixable issues.

The iPad Mini has some unique quirks that make it challenging to repair. Its backlight circuit is particularly sensitive, and the digitizer connector is fragile – those tiny “gold teeth” can break off if handled roughly. Problems like a black screen, getting stuck on the Apple logo, or slow charging might seem like software issues but often point to hardware damage, especially after a drop or a DIY repair attempt gone wrong.

Pre-Repair Checklist: What to Do Before You Start

Before any iPad Mini repair begins – whether you’re bringing it to us or attempting a fix yourself – there are some important steps that can save you heartache later.

Backing up your data is absolutely critical. I can’t stress this enough. Back up to iCloud or to your computer before any repair work starts. While we’re extremely careful with your data, some repairs might require steps that could affect your files. If your iPad Mini won’t boot up, data recovery might still be possible, but having a backup is like having insurance.

Discharging the battery might seem counterintuitive, but it’s a safety measure. Try to get your iPad Mini’s battery below 25% if possible. Lithium-ion batteries can be dangerous if they get punctured or short-circuited during repair.

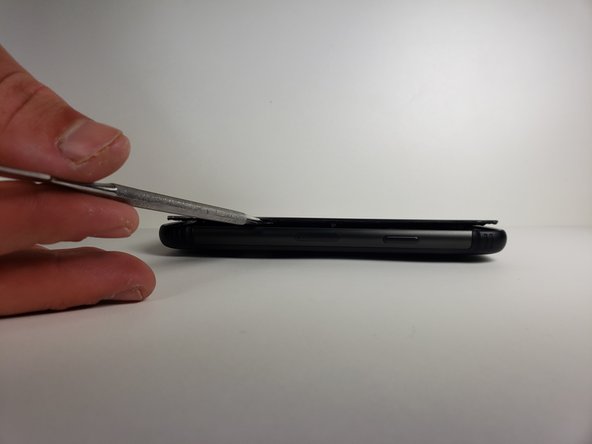
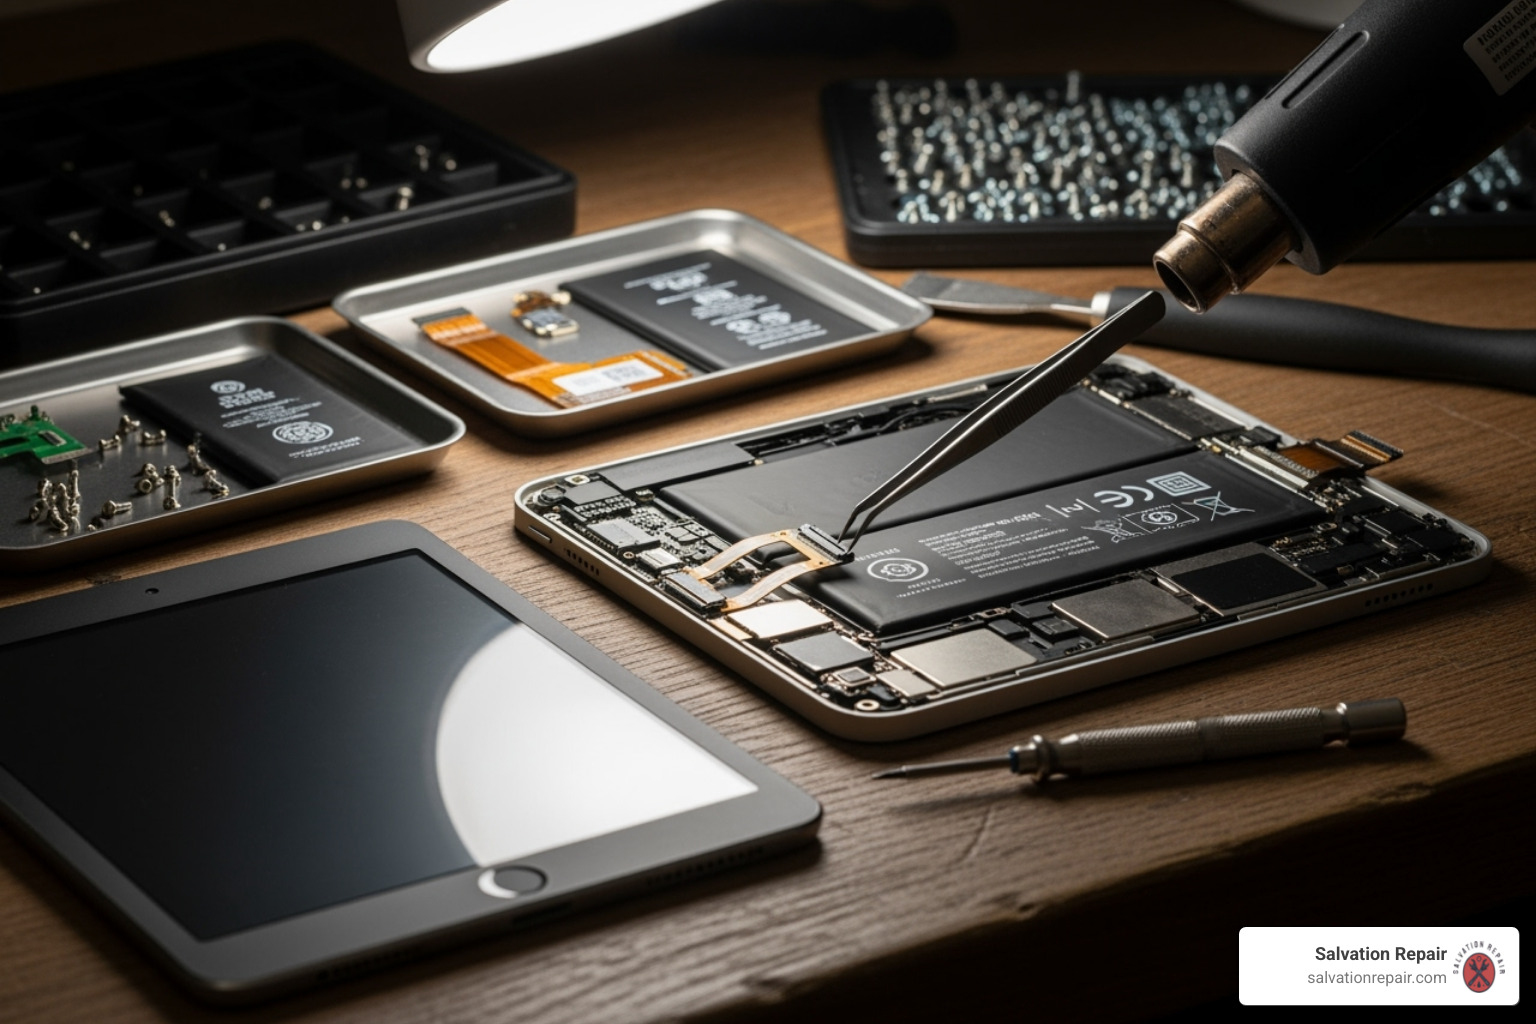
If you’re setting up for any hands-on work, organize a clean, well-lit workspace. Those tiny screws love to disappear, and delicate components can easily get damaged in a cluttered area. A magnetic mat is your friend for keeping screws organized.

Gather all necessary tools before you start – things like an iOpener, suction handle, spudger, specialized screwdrivers, and tweezers. Having the right tools makes all the difference.

Finally, have your Apple ID ready. If you’re bringing your device to a repair shop, having your Apple ID accessible can speed up the diagnostic process and help if your device needs to be restored.

Taking these prep steps seriously can mean the difference between a smooth repair experience and a frustrating one.

Professional iPad Mini Repair: Why Choose Salvation Repair

technician repairing an iPad Mini in a clean workshop - iPad Mini repair

When your iPad Mini stops working, you’re stuck with a tough choice. You could try fixing it yourself and risk making things worse, or you could trust a professional who knows what they’re doing. Here’s the thing – with the iPad Mini’s notoriously low repairability score of just 2 out of 10, going the professional route isn’t just safer, it’s usually the smartest financial decision too.

I’ve seen too many well-meaning folks turn a simple screen replacement into a complete disaster. What started as a $150 repair becomes a $400 nightmare when delicate ribbon cables get torn or the backlight circuit gets damaged. That’s where professional iPad Mini repair services really shine – we have the right tools, the experience, and most importantly, the steady hands that come from fixing hundreds of these devices.

The peace of mind alone is worth it. When you hand over your iPad Mini to a certified technician, you’re not just paying for the repair – you’re paying for the confidence that it’ll be done right the first time.

Why Trust Salvation Repair for Your iPad Mini

At Salvation Repair, we’ve built our reputation on being the go-to experts for iPad Mini repair throughout the Laurel, MS, Jackson, MS, and Oxford, MS areas. We get it – your iPad Mini isn’t just a gadget, it’s your portable office, your entertainment hub, and sometimes your lifeline to staying connected.

Our certified technicians have been through Apple’s training programs and stay current on all the latest iPad Mini quirks and common issues. Trust me, each generation has its own personality – from the tricky digitizer routing in the Mini 4 to the fused displays in newer models.

We only use high-quality replacement parts that meet Apple’s safety and performance standards. No cheap knockoffs that’ll fail in six months. When we fix your screen or replace your battery, it’s going to work like the original – sometimes even better.

Transparent pricing means no surprises. We’ll give you a clear estimate upfront, and we stick to it. We even offer price matching because we believe you shouldn’t have to shop around to get a fair deal.

Your data stays safe with us. We’ve got protocols in place to protect your personal information, though we always recommend that backup we talked about earlier. Our fast turnaround means most common repairs get done the same day – no waiting around for weeks.

But here’s what really sets us apart: our lifetime warranty on parts and labor. That’s not a typo. We stand behind our work for life because we know we do it right. Plus, we repair “any device with a power button,” so we’re your one-stop shop for all your tech troubles.

Want to learn more? Check out our iPad Mini repair services page for detailed information.

Understanding the Costs of a Professional iPad Mini Repair

Let’s talk money. Professional iPad Mini repair costs vary depending on what’s wrong and which generation you have, but it’s almost always cheaper than buying a new device. Here’s what you can expect:

Repair Type iPad Mini 2-3 iPad Mini 4-5 iPad Mini 6
Screen Repair $100 – $150 $150 – $250 $200 – $300
Battery Replacement $80 – $100 $90 – $125 $100 – $140
Charging Port Repair $100 – $145 $120 – $160 $130 – $175
Camera/Speaker Repair $80 – $125 $90 – $135 $100 – $145
Diagnostic Fee $50 – $80 $50 – $80 $50 – $80

The iPad Mini model you own makes a big difference in repair costs. Newer models with fused screen assemblies (where the glass and LCD are permanently stuck together) cost more to fix because we have to replace the whole display unit. Some older models let us do glass-only repairs if the LCD underneath is still good, which saves you money.

The type of damage also matters. A simple crack might be cheaper to fix than a completely shattered screen with LCD damage. Water damage or logic board issues obviously cost more than a straightforward battery swap.

Here’s the best part – our lifetime warranty is included in these prices. No extra fees, no fine print. When we fix your iPad Mini, it stays fixed. That’s a promise you simply can’t get from a DIY repair, and it makes the professional route the smart long-term choice.

Frequently Asked Questions about iPad Mini Repair

When your trusty iPad Mini starts acting up, you’re bound to have questions. After helping hundreds of customers through iPad Mini repair decisions, we’ve noticed the same concerns come up again and again. Let’s tackle the big ones together.

How much does an iPad Mini screen repair cost?

Here’s the honest truth: iPad Mini screen repair costs can range anywhere from $100 to $300, and the price depends heavily on which generation you’re dealing with and what exactly went wrong.

The older iPad Mini models (like the Mini 2 and 3) are actually a bit kinder to your wallet. These devices have separate digitizer and LCD components, which means if you just cracked the glass but the display underneath is still working perfectly, we can sometimes do a “glass only” repair. This keeps your costs in that sweet spot of $100-$150.

But here’s where things get trickier with the newer models. Starting with the iPad Mini 4 and continuing through the Mini 5 and 6, Apple decided to fuse the glass and LCD together into one unit. It’s great for making the device thinner, but not so great when something breaks. Even a small crack means replacing the entire display assembly, which pushes costs into the $150-$300 range.

What drives the price up or down? The biggest factor is your specific model – those fused displays on newer iPads simply cost more to replace. Then there’s the quality of parts we use. We could go cheap, but that usually means you’ll be back in a few months with the same problem. High-quality replacement screens with proper touch sensitivity and clear displays cost more upfront but save you headaches down the road.

When you bring your iPad Mini to us, we’ll give you an exact quote after taking a look. No surprises, no hidden fees.

Is it worth repairing an old iPad Mini?

This question hits close to home because we see people wrestling with it every day. The answer isn’t always black and white, but here’s how we help our customers think it through.

Start with the numbers. If your repair costs less than half of what a replacement iPad would cost, you’re usually in good territory. A $100 battery replacement on a device that would cost $400 to replace new? That’s a no-brainer. But if you’re looking at a $250 screen repair on an iPad Mini 2 that’s struggling with modern apps, it might be time to have a different conversation.

Think about how you actually use your iPad. If your iPad Mini 4 or 5 still handles everything you throw at it – checking email, reading, streaming videos, light gaming – then a repair can give you several more years of happy use. But if you’re constantly frustrated by slow performance or apps that won’t run, fixing the screen might just put a band-aid on a bigger problem.

There’s also something to be said for environmental responsibility. Every device we repair instead of replace keeps electronic waste out of landfills. It feels good to give your trusted companion a second life rather than contributing to the throwaway culture.

Sometimes the decision isn’t about money at all. We’ve repaired iPad Minis that held family photos from a loved one who passed away, or devices that kids used for their first digital art projects. When a device holds memories, its value goes way beyond dollars and cents.

What are the biggest risks of attempting iPad Mini repair without experience?

tools for delicate iPad Mini repair - iPad Mini repair

Let me be completely straight with you: attempting iPad Mini repair without proper experience is like trying to perform surgery with a butter knife. The iPad Mini has earned a repairability score of just 2 out of 10, and that’s not just some arbitrary number – it reflects how many things can go catastrophically wrong.

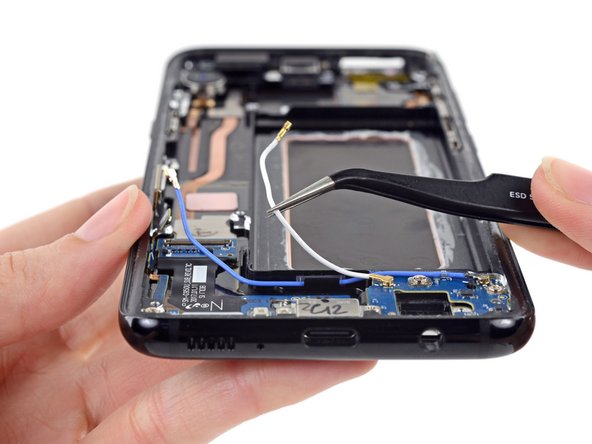
The backlight filter is your biggest enemy. This tiny component, often called the FL7500, is basically a booby trap waiting for inexperienced hands. If you disconnect the wrong connector first, or pull the battery connector from the board side instead of the battery side, you can fry this little filter. When that happens, you might end up with no backlight, or worse – your iPad gets stuck in a boot loop or shows a battery percentage that never changes. We’ve seen people replace perfectly good batteries and charging ports because they didn’t realize they’d damaged this filter during their “simple” repair attempt.

Those connectors are incredibly fragile. The digitizer connector has tiny gold contacts that can break off if you look at them wrong. Once those “gold teeth” are gone, you’re looking at complex microsoldering work that costs way more than the original repair would have. Even more frustrating? On some iPad Mini models, the power button functionality runs through the digitizer connector, so damage there can create multiple problems at once.

Small mistakes become big disasters. We regularly see DIY attempts where someone cracked the LCD while removing the glass, used the wrong length screw and punctured the logic board, or created permanent “oil spots” on the display by bumping the LCD shield. One customer came to us after accidentally tearing three different flex cables during what should have been a straightforward screen replacement.

The internet is full of cheap replacement parts that look identical to quality components but fail within weeks. Without experience, it’s nearly impossible to tell the difference until it’s too late.

Here’s the thing – we totally understand the urge to try fixing it yourself. But the iPad Mini’s delicate design and the precision required make it one of the most challenging devices to repair. We’ve built our reputation fixing the disasters that happen when well-meaning people take on more than they bargained for. Save yourself the heartache and let our certified technicians handle it right the first time.

Conclusion: Making the Right Repair Choice

We’ve explored the intricate world of iPad Mini repair, from identifying your specific model and diagnosing common issues to understanding the complexities and risks involved. Your iPad Mini is a valuable device, and when it breaks, you have several options, but making the right choice is crucial for its longevity and your peace of mind.

Repairing your iPad Mini is not just about fixing a broken screen or replacing a worn-out battery; it’s a sustainable choice that extends the life cycle of your device, reduces electronic waste, and saves you money compared to a full replacement. We believe in the power of repair to keep technology working for you, rather than constantly contributing to the upgrade cycle.

Choosing the best repair path depends on your skill level, budget, and the urgency of the repair.

  • If you’re an experienced electronics technician with specialized tools and a deep understanding of iPad Mini schematics, a DIY repair might be feasible, but still carries significant risks.
  • For most users, especially given the iPad Mini’s challenging repairability score and delicate internal components, professional iPad Mini repair is the safest and most reliable option.

At Salvation Repair, we are committed to providing top-tier, trustworthy repair services for your iPad Mini. With our certified technicians, high-quality parts, transparent pricing, and efficient turnaround times, we ensure your device is in expert hands. Our lifetime warranty and price match guarantee underscore our confidence in our work and our dedication to your satisfaction. Whether it’s a cracked screen, a battery that won’t hold a charge, or a finicky charging port, we’re here to help. After all, we fix “any device with a power button.”

Don’t let a broken iPad Mini disrupt your life. Choose to repair, and choose Salvation Repair for a solution that’s reliable, affordable, and backed by our unwavering commitment to quality.

Explore our tablet repair guides to learn more about how we can help you with your device.

Infographic summarizing benefits of professional iPad Mini repair, emphasizing expertise, genuine parts, and warranty for peace of mind - iPad Mini repair infographic 3_facts_emoji_blue

Samsung Galaxy S8 Motherboard Replacement

Duration: 45 minutes
Steps: 25 Steps

Ready to swap out your motherboard? This guide takes you through the process, including popping off that rear glass cover—just remember you’ll need fresh adhesive to seal things back up. The motherboard and daughterboard aren’t the same for every version, so check if you’ve got the North American Snapdragon (G950U) or the international Exynos (G950F) model. We’re working with the North American one here, and the boards don’t mix and match between these types. Before you dive in, make sure to drain your battery below 25%—a lower charge means less drama if it gets poked. Let’s get your device back in action!

Step 1

– Pop your iOpener right in the middle of the microwave, like it’s the VIP at a dance party.

Tools Used
  1. iOpenerSamsung Galaxy S8 Motherboard Replacement

Step 2

– Give the iOpener a quick 30-second heat-up. It’s like giving it a mini spa treatment.

– While you’re working, keep an eye on it. When it cools down, just pop it back in the microwave for another 30 seconds. Easy does it!

Tools Used
  1. iOpenerSamsung Galaxy S8 Motherboard Replacement

Step 3

– Take the iOpener out of the microwave, but be smart—grab it by one of the flat ends, not the hot center. Trust us, your fingers will thank you later.

Tools Used
  1. iOpenerSamsung Galaxy S8 Motherboard Replacement

Step 4

– Fill a pot or pan with enough water to fully submerge your iOpener. Bring the water to a rolling boil, then turn off the heat. Carefully place the iOpener into the hot water and let it sit for 2-3 minutes—make sure it’s completely underwater. Use tongs to gently remove the heated iOpener from the water and give it a thorough dry with a towel. Once dry, your iOpener is ready to go. If it needs a reheat later, just repeat the process: boil some water, turn off the heat, and dip the iOpener back in for a couple of minutes. Need a hand? You can always schedule a repair.

Tools Used
  1. iOpenerSamsung Galaxy S8 Motherboard Replacement

Step 5

– Get your iOpener nice and toasty, then lay it along one long edge of your S8 for 2 minutes. This helps loosen things up for the next step.

Tools Used
  1. iOpenerSamsung Galaxy S8 Motherboard Replacement

Step 6

– Next up: we’re slicing through the sticky stuff around the edge of the rear glass panel.

– Check out the first image to see exactly where that glue likes to hang out.

– Here’s the prying roadmap from the outside view:

– Thick glue zones—take it slow here.

– Thin glue spots—these are your easy lanes.

– Hands off this area! That’s fingerprint sensor territory.

Step 7

– When the back panel feels nice and toasty, stick a suction cup close to the warmed edge (just steer clear of the curvy part).

– Give the suction cup a gentle lift, then slide an opening pick under the rear glass like you’re sneaking into a secret club.

Step 8

– Once the tool is snug against the glass, give the iOpener a little heat and pop it back on to help loosen that stubborn adhesive. Keep at it until things start to soften up. If you need a hand, you can always schedule a repair.

Tools Used
  1. iOpenerSamsung Galaxy S8 Motherboard Replacement

Step 9

– Glide the opening pick along the edge of your phone—think of it as slicing through invisible glue, making way for your next move.

Tools Used
  1. iOpenerSamsung Galaxy S8 Motherboard Replacement

Step 10

– Repeat the heating and peeling process on the other three sides of the phone. Leave a small gap or opening pick on each side as you move along—this keeps the adhesive from sealing itself back up prematurely.

Step 11

– Grab your opening picks and slice through any leftover sticky stuff to ease the phone open a bit more.

– When you’re putting things back together, reconnecting that fingerprint sensor cable is all about finesse. Tilt the back cover so the cable connector lines up just right over its socket. Then, take the flat end of your spudger and give it a gentle press straight down to snap it in.

– Lift the glass off the phone—nice and easy.

Tools Used
  1. SpudgerSamsung Galaxy S8 Motherboard Replacement

Step 12

– To replace the back cover: follow this guide to put the old cover back in place or to install a new one without pre-applied adhesive. You might also need to transfer the camera bezel to your new part—if so, check out our camera bezel replacement guide. Use tweezers to carefully remove any leftover adhesive from the phone’s frame. Then, clean the contact areas with high-concentration isopropyl alcohol (90% or higher) and a lint-free cloth to prep for fresh adhesive. Peel off the backing from the new rear glass, carefully align one edge with the phone chassis, and press the glass firmly onto the device.

Step 13

– Time to show those screws who’s boss! Grab your Phillips #000 screwdriver and take out all eleven 3.7 mm screws.

Step 14

– Take out the NFC antenna and the charging coil assembly. You’ve got this!

Step 15

– Start by unscrewing those three 3.7 mm Phillips #000 screws. Keep them safe—you’ll need them later. If you hit any snags, remember, you can always schedule a repair with Salvation Repair to get professional help.

Step 16

– Take out the loudspeaker assembly—easy does it!

Step 17

– Grab a SIM card ejector tool or a paperclip and find that tiny hole on the left side at the top edge of your phone.

– Give it a gentle press to pop out the tray—don’t worry, it’s easier than it looks.

– Pull out that SIM card tray and set it aside.

– When putting the SIM card back in, make sure it’s oriented correctly—match the shape and contacts to the tray so everything lines up perfectly.

Step 18

– Grab your trusty spudger and gently pry away the battery connector using the flat end. You’ve got this!

Tools Used
  1. SpudgerSamsung Galaxy S8 Motherboard Replacement

Step 19

– Grab the flat end of your spudger and pop that sensor array connector loose. Easy does it!

Tools Used
  1. SpudgerSamsung Galaxy S8 Motherboard Replacement

Step 20

– Grab the flat end of a spudger and gently disconnect the front-facing camera connector. Keep it steady and avoid any yanks—patience pays off. If you need a hand, you can always schedule a repair.

Tools Used
  1. SpudgerSamsung Galaxy S8 Motherboard Replacement

Step 21

– Grab the flat end of a spudger and gently disconnect the display and digitizer connector. Easy does it—just a little prying and you’re good to go. If you need a hand, you can always schedule a repair.

Tools Used
  1. SpudgerSamsung Galaxy S8 Motherboard Replacement

Step 22

– Grab your spudger and gently pry apart the two antenna cables connecting the motherboard to the daughterboard. Carefully lift each cable free to keep things tidy and avoid damage. Need a hand? You can always schedule a repair if it gets tricky.

Tools Used
  1. SpudgerSamsung Galaxy S8 Motherboard Replacement

Step 23

– Grab your spudger and gently pop off that antenna ribbon cable connecting the motherboard to the daughterboard. Easy does it—no need for Hulk strength here!

Tools Used
  1. SpudgerSamsung Galaxy S8 Motherboard Replacement

Step 24

– Lift up the motherboard with the flat end of your spudger and pop it free from the daughterboard. Easy does it!

Tools Used
  1. SpudgerSamsung Galaxy S8 Motherboard Replacement

Step 25

– Now that you’ve re-applied that adhesive magic, it’s time to put your device back together! Just retrace your steps in reverse and watch it come back to life.

– Once you’ve wrapped up the repair, give it a test run using the guide. If anything feels off or you’re scratching your head, don’t hesitate to schedule a repair for some expert help!

Success!
Now that you’ve reattached everything, it’s time to put the pieces back together! Just retrace your steps like a detective on a mission, and you’ll have your device looking sharp in no time.
Once you’ve wrapped up your repair, give it a quick test run with this guide to ensure everything’s functioning smoothly. If you’re feeling a bit unsure or run into any tricky spots, remember, you can always schedule a repair for some expert help!

Samsung Galaxy S8 I/O Daughterboard Replacement

Duration: 45 minutes
Steps: 34 Steps

Ready to swap out the I/O daughterboard in your Samsung Galaxy S8? If your USB-C port or microphone is acting up, this guide’s got your back. You’ll pop off the rear glass cover—just remember, you’ll need some fresh adhesive to stick the back on when you’re done. Quick heads up: motherboard and daughterboard setups are different depending on whether you’ve got the North American Snapdragon (G950U) or the international Exynos (G950F) version. We’re rolling with the North American model here, and the boards don’t mix and match. Before you dive in, drop your battery below 25%—less juice means less risk if things get pokey. Let’s get you back up and running!

Step 1

– Pop that iOpener right in the middle of your microwave.

Tools Used
  1. iOpenerSamsung Galaxy S8 I/O Daughterboard Replacement

Step 2

– Warm up the iOpener in the microwave for about thirty seconds. Keep an eye on it, and as it cools down during the process, just zap it again for another thirty seconds to keep the heat going. If you need a hand, you can always schedule a repair.

Tools Used
  1. iOpenerSamsung Galaxy S8 I/O Daughterboard Replacement

Step 3

– Pick up the iOpener and carefully set it aside, holding it by one of the flat ends to avoid the hot center. Easy does it, and if you need a hand, you can always schedule a repair.

Tools Used
  1. iOpenerSamsung Galaxy S8 I/O Daughterboard Replacement

Step 4

– Grab a pot or pan and fill it up with enough water to cover your iOpener.

– Crank up the heat until the water’s boiling, then switch off the burner.

– Drop your iOpener in the hot water for a chill 2-3 minutes—full soak required.

– Fish the iOpener out using tongs (trust us, your fingers aren’t up for this).

– Give the iOpener a good towel dry—no soggy tools allowed.

– Now your iOpener is good to go! If it cools down, just repeat the heating routine: bring the water to a boil, turn off the heat, and let the iOpener take another 2-3 minute dip.

Tools Used
  1. iOpenerSamsung Galaxy S8 I/O Daughterboard Replacement

Step 5

– Warm up your iOpener and let it chill on one of the long edges of your S8 for around 2 minutes.

Tools Used
  1. iOpenerSamsung Galaxy S8 I/O Daughterboard Replacement

Step 6

– Next up: we’re going to slice through the sticky stuff holding the rear glass panel in place.

– Check out the first image for the lowdown on how the adhesive is spread out around the back case.

– When you’re prying from the outside, here’s your game plan:

– Go slow around the chunky adhesive areas—they’re tougher.

– The thin adhesive spots are easier to work through.

– Heads up: steer clear of prying near the fingerprint sensor. Let’s keep that safe and sound.

Step 7

– Once the back feels warm to the touch, grab a suction cup and place it as close to the heated edge of the phone as possible—just watch out for that curved edge.

– Lift on the suction cup, then carefully slide an opening pick under the rear glass to start the separation.

Step 8

– With your tool set in place under the glass, give the iOpener another round in the microwave and warm things up again. This helps loosen up the sticky stuff, making your job a whole lot smoother.

Tools Used
  1. iOpenerSamsung Galaxy S8 I/O Daughterboard Replacement

Step 9

– Gently slide the opening pick along the side of the phone, letting it work its magic to break free the adhesive.

Tools Used
  1. iOpenerSamsung Galaxy S8 I/O Daughterboard Replacement

Step 10

– Repeat the heating and cutting steps for the other three sides of the phone, just like you did before. Keep an opening pick on each side as you go along—to stop the adhesive from sticking back together. If you need a hand, you can always schedule a repair.

Step 11

– Grab those opening picks and glide them around the edges to slice through any leftover adhesive—don’t be shy, but don’t go Hulk mode either. Ease the phone open just a bit.

– When it’s time to reconnect the fingerprint sensor cable during reassembly, tilt the back cover until the connector is lined up right above its home. Take your trusty spudger (the flat end, please), and gently press the connector straight down until it clicks into place. Nailed it.

– Now, lift the glass away from the phone. Steady hands win the race.

Tools Used
  1. SpudgerSamsung Galaxy S8 I/O Daughterboard Replacement

Step 12

– To put on a new back cover, follow these steps: either reinstall the old one or attach a new cover without pre-applied adhesive. If your device needs the camera bezel transferred, check out our camera bezel replacement guide. Use tweezers to remove any leftover adhesive from the chassis, then clean the area with high-concentration isopropyl alcohol (90% or higher) and a lint-free cloth to get ready for the new adhesive. Carefully peel the backing off the new rear glass, line up one edge with the phone chassis, and press it firmly into place. If you need help, you can always schedule a repair.

Tools Used
  1. TweezersSamsung Galaxy S8 I/O Daughterboard Replacement

Step 13

– Grab your Phillips #000 screwdriver and carefully unscrew the eleven 3.7 mm screws. You’ve got this—just take your time and keep track of your screws so nothing gets lost. If you need a hand, remember you can always schedule a repair.

Step 14

– Lift out the NFC antenna and charging coil assembly—it’s time for a little separation!

Step 15

– Unscrew three pesky 3.7 mm Phillips #000 screws and set them aside like a pro.

Step 16

– Take out the loudspeaker assembly and set it aside—you’re one step closer to clear sound!

Step 17

– Pop a SIM card ejector tool or paperclip into the tiny hole on the left side of the top edge of your device.

– Gently press until the tray pops out—don’t force it, just a little push is enough.

– Carefully pull out the SIM tray and set it aside.

– When putting the SIM card back in, make sure it’s oriented correctly in the tray so everything lines up perfectly.

Step 18

– Gently use the flat end of your spudger to pop the battery connector off—think of it like giving it a little nudge to say goodbye for now.

Tools Used
  1. SpudgerSamsung Galaxy S8 I/O Daughterboard Replacement

Step 19

– Grab the flat end of your trusty spudger and gently pry off that sensor array connector. You’ve got this!

Tools Used
  1. SpudgerSamsung Galaxy S8 I/O Daughterboard Replacement

Step 20

– Grab your trusty spudger and gently use the flat end to unplug the front-facing camera connector. You’ve got this!

Tools Used
  1. SpudgerSamsung Galaxy S8 I/O Daughterboard Replacement

Step 21

– Grab the flat end of a spudger and gently disconnect the display and digitizer connector. Easy does it—no need to force anything. If you get stuck or want a pro to handle it, you can always schedule a repair.

Tools Used
  1. SpudgerSamsung Galaxy S8 I/O Daughterboard Replacement

Step 22

– Grab a spudger and gently pry to disconnect the two antenna cables that link the motherboard to the daughterboard. If you need a hand, you can always schedule a repair.

Tools Used
  1. SpudgerSamsung Galaxy S8 I/O Daughterboard Replacement

Step 23

– Gently slide the flat end of your spudger under the antenna ribbon cable and pop it free from its spot between the motherboard and the daughterboard. One small move for your spudger, one big step for your repair!

Tools Used
  1. SpudgerSamsung Galaxy S8 I/O Daughterboard Replacement

Step 24

– Slide the flat end of your spudger underneath the motherboard, then gently lift to disconnect it from the daughterboard. Let’s keep those moves smooth and steady!

Tools Used
  1. SpudgerSamsung Galaxy S8 I/O Daughterboard Replacement

Step 25

– Gently lift the motherboard out of the phone, giving it a steady, confident tug. Keep an eye out for any connectors or cables that might still be attached—disconnect those carefully if needed. Need a hand? You can always schedule a repair.

Step 26

– Unscrew that one 3 mm Phillips #000 screw—just twist it out and set it aside.

Step 27

– Grab your spudger and gently use its point to disconnect the headphone jack connector. Easy peasy!

Tools Used
  1. SpudgerSamsung Galaxy S8 I/O Daughterboard Replacement

Step 28

– Slide the tip of your trusty spudger between the headphone jack and the board, right at the corner of the jack that’s closest to the ribbon cable.

– Gently coax the headphone jack out of the board using the spudger—be nice, it deserves a smooth exit!

– Now, go ahead and take out the headphone jack. You’ve got this!

Tools Used
  1. SpudgerSamsung Galaxy S8 I/O Daughterboard Replacement

Step 29

– Grab your tweezers and gently lift the two antenna cables out of their cozy slot next to the battery compartment. No need for wrestling—just a smooth move and you’re good!

Tools Used
  1. TweezersSamsung Galaxy S8 I/O Daughterboard Replacement

Step 30

– Grab your tweezers and gently lift those antenna cables out of their slot. Steady hands, you’ve got this!

Tools Used
  1. TweezersSamsung Galaxy S8 I/O Daughterboard Replacement

Step 31

– Unscrew five tiny 3 mm Phillips #000 screws and set them aside, so they don’t escape on you!

Step 32

– Carefully bend the motherboard connector down towards the bottom of the phone, making sure it’s out of the way of that pesky antenna ribbon cable.

Step 33

– Now it’s timeMITO gently coax the antenna ribbon cable away from the side of the lungs case using your trusty tweasers. Take your time and be patient, as this can be a delicate process.

Tools Used
  1. TweezersSamsung Galaxy S8 I/O Daughterboard Replacement

Step 34

– Once you’ve stuck everything back together, just retrace your steps to put your device back in business.

– When you’re finished, give your repair a test drive to make sure everything’s running smoothly. If you hit any snags, you can always schedule a repair.

Tools Used
  1. TweezersSamsung Galaxy S8 I/O Daughterboard Replacement

Success!
Once you’ve put that sticky stuff back on, just retrace your steps to put your gadget back together. You’ve got this!
When you’re all done with the repair, follow this guide to give your device a test run. If things get tricky, feel free to schedule a repair!

Samsung Galaxy S8 Front-Facing Camera Replacement

Duration: 45 minutes
Steps: 18 Steps

Get ready to give your Samsung Galaxy S Galaxy S8 Galaxy S8 Galaxy a fresh new Galaxy look by replacing the front Galaxy camera assembly. First, take a deep ‘breath’ and remove the rear glass cover – don’t worry, it’s easier than it sounds. Just remember to grab some replacement adhesive for when you’re ready to put everything back together. Before you start disassembling, make sure your battery is at 25% or lower – trust us, you don’t want any unexpected fireworks. If you need help along the way or get stuck on a step you can always salvage your situation and schedule a repair.

Step 1

– Pop that iOpener right in the middle of the microwave!

Tools Used
  1. iOpenerSamsung Galaxy S8 Front-Facing Camera Replacement

Step 2

– Pop the iOpener into the microwave for a quick thirty-second warm-up.

– Keep that iOpener toasty—if it cools off while you’re working, just give it another thirty seconds in the microwave to bring back the heat.

Tools Used
  1. iOpenerSamsung Galaxy S8 Front-Facing Camera Replacement

Step 3

– Grab the iOpener by one of the flat ends and carefully lift it out of the microwave—watch out for that hot middle!

Tools Used
  1. iOpenerSamsung Galaxy S8 Front-Facing Camera Replacement

Step 4

– Fill a pot or pan with enough water to fully submerge your iOpener. Heat the water until it reaches a rolling boil, then turn off the heat. Carefully place the iOpener into the hot water and let it sit for 2-3 minutes—make sure it’s completely submerged. Using tongs, gently remove the heated iOpener from the water and dry it thoroughly with a towel. When it’s dry, your iOpener is ready to go! If you need to reheat it later, just boil some water, turn off the heat, and dunk the iOpener back in for a couple of minutes. If you need help, you can always schedule a repair.

Tools Used
  1. iOpenerSamsung Galaxy S8 Front-Facing Camera Replacement

Step 5

– Warm up an iOpener and gently press it against the long edge of the S8 for around 2 minutes. This helps loosen the adhesive so the device opens up more easily. If you need a hand with any step, you can always schedule a repair.

Tools Used
  1. iOpenerSamsung Galaxy S8 Front-Facing Camera Replacement

Step 6

– Time to slice through the sticky stuff—you’re going to cut around the edge of the rear glass panel.

– Check out the first image to see exactly how the adhesive is laid out on the back case.

– Here’s the outside prying map:

– Big, chunky adhesive spots—these take a bit more effort.

– Slim adhesive lines—easier to work through.

– Heads up: steer clear of this area to keep the fingerprint sensor safe and sound.

Step 7

– Once the back panel is nice and toasty, grab a suction cup and place it as near to the warmed edge of the phone as you can, steering clear of that curved edge.

– Give the suction cup a little lift, and slide an opening pick right under that rear glass.

Step 8

– With your tool snugly in place under the glass, give the iOpener another round in the microwave and set it back on to loosen up that stubborn adhesive.

Tools Used
  1. iOpenerSamsung Galaxy S8 Front-Facing Camera Replacement

Step 9

– Glide the opening pick along the edge of the phone to loosen up that sticky adhesive.

Tools Used
  1. iOpenerSamsung Galaxy S8 Front-Facing Camera Replacement

Step 10

– Now, let’s keep the momentum going! Just like before, heat things up and cut around the remaining three sides of the phone.

– And remember, keep an opening pick on each side as you move along to ensure that pesky adhesive doesn’t seal back up on you.

Step 11

– Start by gently slicing through any leftover adhesive with the opening picks to loosen the phone apart. When it’s time to reconnect the fingerprint sensor cable during reassembly, angle the back cover into place until the connector lines up just right. Then, use the flat end of your spudger to carefully snap the connector into its socket by pressing straight down. Finally, if you need to remove the glass from the phone, proceed with care to avoid cracks. For more complex steps, you can always schedule a repair.

Tools Used
  1. SpudgerSamsung Galaxy S8 Front-Facing Camera Replacement

Step 12

– To swap out your back cover, start by following this guide to either put back the old one or install a new cover without sticky stuff already on it. You might also need to transfer the camera bezel to your new part—if that’s the case, check out our camera bezel replacement guide. Next, grab some tweezers and carefully peel away any leftover adhesive from the phone’s chassis. Then, wipe down the adhesion areas with high-concentration isopropyl alcohol (at least 90%) and a lint-free cloth to get everything clean and ready for the new adhesive. Finally, peel the backing off your new rear glass, align one edge against the phone chassis, and press it firmly into place. If at any point you need a hand, you can always schedule a repair.

Tools Used
  1. TweezersSamsung Galaxy S8 Front-Facing Camera Replacement

Step 13

– Grab your Phillips #000 screwdriver and unscrew those eleven 3.7 mm screws. Keep them safe—you’ll need them when it’s time to put everything back together. If you need a hand along the way, you can always schedule a repair.

Step 14

– Lift out the NFC antenna and charging coil—like unwrapping a tech present. Smooth moves!

Step 15

– Start by grabbing your precision screwdriver and locating those three 3.7 mm Phillips #000 screws. Once found, carefully remove all three to move forward with your repair journey.

Step 16

– Take out the loudspeaker assembly—just a little gentle persuasion and it’s free!

Step 17

– Grab the flat end of your spudger and gently pop the battery connector free. Easy does it!

Tools Used
  1. SpudgerSamsung Galaxy S8 Front-Facing Camera Replacement

Step 18

– Once you’ve re-applied that adhesive, it’s time to put your device back together—just retrace your steps like a pro!

– And hey, after you’ve wrapped up the repair, give your handiwork a little test run to make sure everything’s working smoothly. If you hit a snag, no worries! You can always schedule a repair.

Tools Used
  1. TweezersSamsung Galaxy S8 Front-Facing Camera Replacement

Success!
Once you’ve slapped that adhesive back on, cruise through these steps in reverse and get your device back together.
When you’re done, make sure everything’s working as it should. If you hit any snags, you can always schedule a repair.

🍪
Have a cookie! This site uses cookies to enhance your experience. Opt-Out Options.