Samsung Galaxy S9 Rear-Facing Camera Replacement

Duration: 45 minutes
Steps: 18 Steps

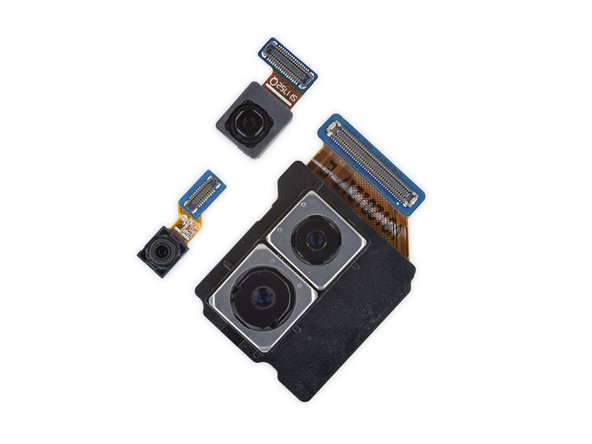
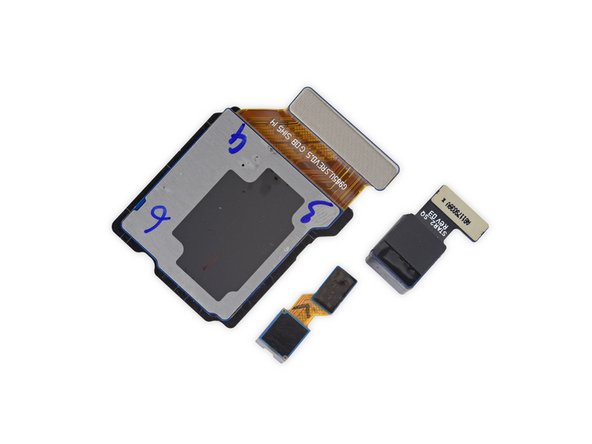
Get ready to give your Samsung Galaxy S9 a brand new rear-facing camera. If the lens is cracked or scratched, it’s time for a replacement. When installing the new camera, make sure it’s level and straight to ensure everything lines up perfectly. Keep in mind that swapping out the rear camera will affect your phone’s waterproofing, unless you also replace the adhesive seal on the back cover. Don’t worry, with these steps, you’ll be taking great photos in no time.

Step 1

– Kick things off by turning off your device so you’re ready to go. Then, grab a heated iOpener and gently press it along a long edge of the phone to loosen up the adhesive under the back glass. Keep the heat on for at least two minutes—patience pays off!

Tools Used
  1. iOpenerSamsung Galaxy S9 Rear-Facing Camera Replacement

Step 2

– In these steps, you’ll be gently slicing through the adhesive that holds the back cover in place—think of it like peeling a sticker, but with more finesse.

– Follow the lines shown here to cut through the adhesive smoothly:

– Thick patches of sticky stuff that need a little more love to loosen up.

– Lighter, thinner adhesive areas that come away more easily with a careful slice.

– Keep clear of this zone—it’s where the fingerprint sensor flex cable lives, and we want to keep it happy and unscathed.

Step 3

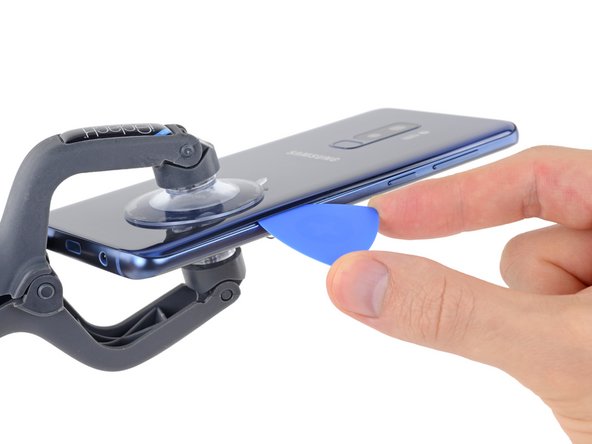
– Stick a suction cup onto the back cover like you mean business.

– Gently pull up on the suction cup to create a little gap between the cover and the frame—just enough to sneak in a tool.

– Slide an opening pick into that gap and cruise over to the bottom right corner.

– Grab another pick and send it over to the bottom left corner for backup.

– Pop in a third opening pick to keep that adhesive from pulling a sneak attack and sealing itself up again while you work.

Step 4

– Gently insert just the tip of your opening pick at the bottom left corner, then glide it smoothly along the side toward the top.

– Keep the pick moving around the top corner and hold it there to stop the adhesive from sealing back up.

Step 5

– Take your opening pick and cruise it from the bottom right corner straight up the side to the top.

– Keep the pick moving around the corner and slice through any leftover adhesive at the top edge of your phone.

Step 6

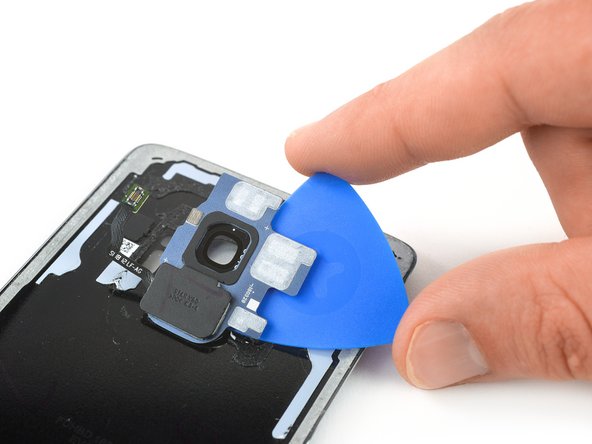
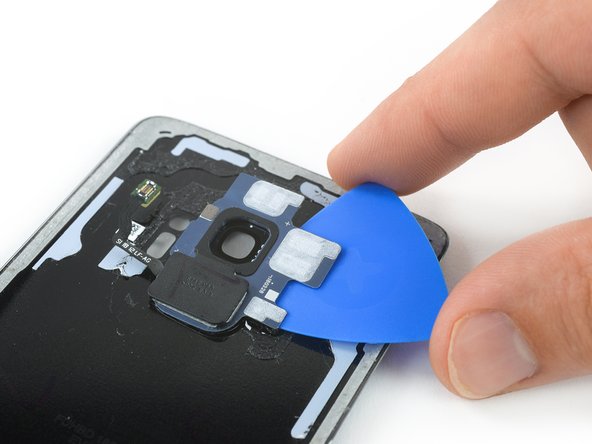
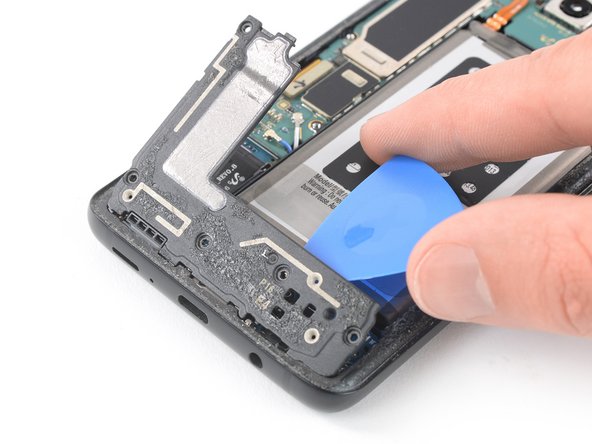
– Gently lift up the rear glass on the side where the volume button hangs out—no sudden moves!

– Grab a spudger and use the edge to pop up and disconnect that fingerprint sensor flex cable like a pro.

Tools Used
  1. SpudgerSamsung Galaxy S9 Rear-Facing Camera Replacement

Step 7

– Start by carefully removing the rear glass panel. Take your time and keep everything safe. When you’re ready to put it back together, follow this guide to reapply the adhesive and snap the rear glass back into place smoothly. If you’re planning to swap out the rear glass entirely, be sure to transfer the rear camera bezel, including the fingerprint sensor, following these steps. Need a hand? You can always schedule a repair for expert help.

Step 8

– Grab your trusty #000 Phillips screwdriver and unscrew the fifteen 4mm screws. A little twist here and there, and you’re on your way!

Step 9

– Take out the NFC coil assembly—just a gentle lift and you’re good to go!

Step 10

– Take off the motherboard bracket—one more step closer to victory!

Step 11

– Time to pop off that speaker cover/antenna assembly. Get a good grip and gently detach it. You’ve got this!

Step 12

– Gently pry up the battery connector with a spudger to disconnect it, making sure you’re not forcing anything. If you need a hand, you can always schedule a repair.

Tools Used
  1. SpudgerSamsung Galaxy S9 Rear-Facing Camera Replacement

Step 13

– Unscrew one 3mm screw using a #000 Phillips screwdriver. You’ve got this!

Step 14

– Gently pry apart those six cables with a spudger—think of it as giving each connection a little friendly nudge to free them up. If you hit a stubborn one, take your time and stay patient. Need a hand? You can always schedule a repair to get professional help.

Tools Used
  1. SpudgerSamsung Galaxy S9 Rear-Facing Camera Replacement

Step 15

– Grab your SIM card remover tool (or just an unbent paperclip) and give that release lever a gentle press. Your SIM card will pop right out, ready for the next step!

Step 16

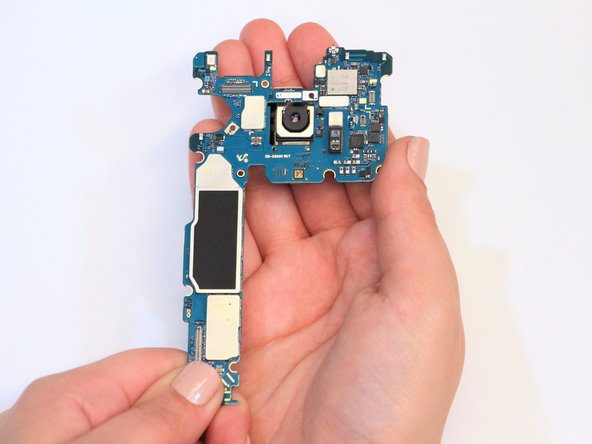
– Gently coax the motherboard out using a spudger—it’s like giving it a little nudge to say, ‘Time to come out and play!’

Tools Used
  1. SpudgerSamsung Galaxy S9 Rear-Facing Camera Replacement

Step 17

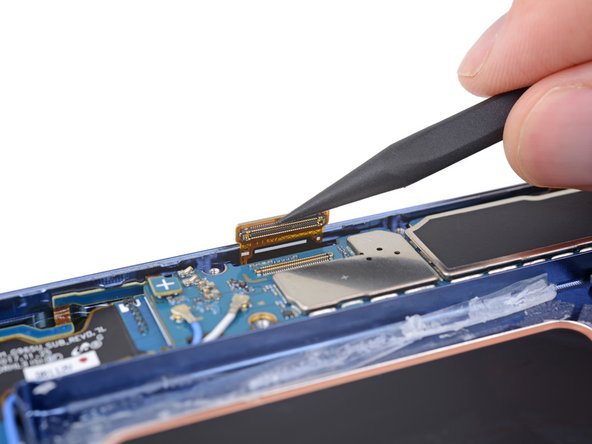
– Gently pop one connector loose using your trusty spudger—think of it as giving your device a little wake-up call.

Tools Used
  1. SpudgerSamsung Galaxy S9 Rear-Facing Camera Replacement

Step 18

– Now it’s time to put your device back together! Just retrace your steps in reverse, and you’ll be back in action in no time. If you hit a snag, remember, we’re here to help! Feel free to schedule a repair if you need a hand.

Success!
Ready to put everything back together? Just walk through the steps in reverse order and you’ll have your device up and running again. If you hit a snag, you can always schedule a repair.

Samsung Galaxy S9 Rear Glass Removal

Duration: 45 minutes
Steps: 7 Steps

Follow this guide to safely remove the rear glass of your Samsung Galaxy S9. Keep in mind, cracking open your device will break its waterproof seal. If you skip replacing the adhesive seals, your phone will work just fine, but it won’t be able to handle water like before. You’ll need fresh adhesive to put everything back in place during reassembly. If you need help, you can always schedule a repair.

Step 1

– Alright, first things first—power down your phone. Safety first, right?

– Now, grab your heated iOpener and gently apply it to one of the long edges of your phone to help loosen up the sticky adhesive under that rear glass. Give it at least two minutes with the heat—patience is key here!

Tools Used
  1. iOpenerSamsung Galaxy S9 Rear Glass Removal

Step 2

– Next up, you’ll be working your way through the adhesive holding the back cover tight.

– Here’s where you’ll want to slice through the sticky stuff:

– Thicker stripes of adhesive

– Thinner stripes of adhesive

– Steer clear of this spot—it’s where the fingerprint sensor flex cable hangs out, so no poking or prying here!

Step 3

– Start by pressing a suction cup onto the back cover. You’ve got this!

– Gently lift the bottom edge of the back cover with your suction cup to create a tiny opening between the back cover and the frame. Just a little wiggle here!

– Now, slide an opening pick into that gap you just made and glide it over to the bottom right corner. Nice and smooth!

– Time for a second opening pick! Slide it over to the bottom left corner to keep things moving.

– Don’t forget to add a third opening pick to hold off that pesky adhesive from sealing back up while you finish the removal process. You’re doing great!

Step 4

– Just sneak the tip of the opening pick in at the bottom left corner, and slide it smoothly up the side to the top—think of it as tracing the edge.

– Swing the pick around the top corner and let it chill there to keep the adhesive from sticking back together.

Step 5

– Gently slide your opening pick from the bottom right corner along the side, working your way up to the top.

– Then, maneuver the pick around the corner and carefully cut through the remaining adhesive at the top of the phone.

Step 6

– Gently lift the rear glass from the side where the volume button hangs out—easy does it!

– Grab a spudger and use its edge to pop up and disconnect the fingerprint sensor flex cable. Precision is key, but you’ve got this!

Tools Used
  1. SpudgerSamsung Galaxy S9 Rear Glass Removal

Step 7

– Start by carefully removing the rear glass—patience is key here. Once it’s off, follow this guide to reapply the adhesive and put the rear glass back in place. If you’re looking to swap out the rear glass entirely, this guide will also walk you through transferring the rear camera bezel along with the fingerprint sensor. Need a hand? You can always schedule a repair for expert help.

Success!

Samsung Galaxy S9 Rear Camera Bezel With Fingerprint Sensor Replacement

Duration: 45 minutes
Steps: 11 Steps

Ready to pop out the rear camera bezel and fingerprint sensor on your Samsung Galaxy S9? Let’s do it! Just a heads up: cracking open your S9 means saying goodbye to its waterproof powers unless you swap in fresh adhesive seals. If you skip the adhesive, your phone will still work just fine—but don’t take it swimming. Grab some replacement adhesive for reassembly, and you’ll be back in business.

Step 1

– Kick things off by turning off your device. Then, grab a heated iOpener and gently place it along a long edge of the phone to soften up the adhesive behind the rear glass. Keep the iOpener in place for at least two minutes to do its magic. If you need a hand along the way, you can always schedule a repair.

Tools Used
  1. iOpenerSamsung Galaxy S9 Rear Camera Bezel With Fingerprint Sensor Replacement

Step 2

– Next up, you’ll be slicing through the adhesive that’s holding the back cover in place.

– Here’s where you’ll be cutting through the sticky stuff:

– Thicker patches of adhesive

– Thinner strips of adhesive

– Steer clear of this zone—there’s a fingerprint sensor flex cable hiding there, and you don’t want to mess with it.

Step 3

– Stick a suction cup onto the back cover to get a grip. Gently lift the bottom edge with your suction cup, creating a tiny gap between the back and the frame. Slide an opening pick into that gap and carefully work it toward the bottom right corner. Grab a second pick and do the same toward the bottom left. To prevent the adhesive from sealing back up, insert a third pick to keep the opening open as you continue the rest of the removal. If you need help, you can always schedule a repair.

Step 4

– Gently slide the opening pick in, just the tip for now, from the bottom left corner and move it along the edge to the top.

– Once you reach the top corner, leave the pick in place to keep that adhesive from making a comeback.

Step 5

– Gently slide the opening pick from the bottom right corner up along the side to the top. You’re doing great!

– Now, take that opening pick and smoothly glide it around the corner to slice through the last bit of adhesive at the top of the phone. Almost there!

Step 6

– Gently lift up the side of the rear glass where the volume button hangs out—like you’re opening a secret door.

– Take your trusty spudger and carefully pop up the fingerprint sensor flex cable. Go slow, no rush—precision beats speed here!

Tools Used
  1. SpudgerSamsung Galaxy S9 Rear Camera Bezel With Fingerprint Sensor Replacement

Step 7

– Start by carefully removing the rear glass panel to get things started. When you’re ready to put everything back together, follow this guide to reapply the adhesive and reattach the rear glass securely. If you’re planning to swap out the rear glass altogether, make sure to transfer the rear camera bezel along with the fingerprint sensor to keep everything functioning smoothly. Need a hand? You can always schedule a repair with Salvation Repair for expert help.

Step 8

– Set a warm, friendly vibe by placing a heated iOpener on the rear camera lens cover. Keep it there for at least two minutes to soften things up and make the next steps smoother. If you need a hand along the way, you can always schedule a repair.

Tools Used
  1. iOpenerSamsung Galaxy S9 Rear Camera Bezel With Fingerprint Sensor Replacement

Step 9

– Take an opening pick and gently slide it between the top edge of the bezel and the rear glass—like you’re sneaking into a secret club.

– Work the pick around to slice through the sticky adhesive holding the upper part of the bezel. Go slow and steady—no need to rush the masterpiece!

Step 10

– Slide your opening pick under the right side of the rear camera bezel—think of it as sneaking into a club, but for phone parts.

– Glide the pick around the bezel to loosen up that stubborn adhesive. Take a victory lap with your tool!

– Give the pick a little twist to lift the rear camera bezel and fingerprint sensor. It should pop off like a lid on a fresh jar of salsa.

Step 11

– Stick on the new back cover using pre-cut adhesive or some trusty double-sided tape.

– Pop everything back together by reversing these steps—like hitting rewind, but for your device.

– Once you’ve got the rear cover in place, press down firmly for a few minutes to help that adhesive set. Heavy books come in handy here.

– Fire up your device and run through a quick check to make sure everything’s working. And hey, if you ever need a hand, you can always schedule a repair.

Tools Used
  1. TweezersSamsung Galaxy S9 Rear Camera Bezel With Fingerprint Sensor Replacement

Success!
Attach the new back cover with the pre-cut adhesive or double-sided tape. Make sure it’s securely in place!
Reassemble your device by simply following the steps in reverse order. Easy, right?
Once the rear cover is on, apply firm, steady pressure for a few minutes to help the adhesive stick. A few heavy books on top should do the trick!
All done! Now, give your repair a test run to make sure everything’s working perfectly. If something feels off, don’t hesitate to schedule a repair.

Samsung Galaxy S9 NFC Antenna and Charging Coil Replacement

Duration: 45 minutes
Steps: 11 Steps

Ready to swap out the NFC antenna and charging coil on your Samsung Galaxy S9? Let’s get to it! Just a heads-up: cracking open your S9 means saying goodbye to those waterproof seals. If you skip swapping in new adhesive seals, your phone will still work—just don’t take it for a swim. Make sure you’ve got some fresh adhesive ready to stick things back together when you reassemble.

Step 1

– First things first: power down your phone. Trust me, it’s way less dramatic than letting it surprise you halfway through.

– Grab a heated iOpener and park it along one long edge of your phone. This gives the sticky glue under the rear glass a chance to chill out. Keep it there for at least two minutes to let the magic happen.

Tools Used
  1. iOpenerSamsung Galaxy S9 NFC Antenna and Charging Coil Replacement

Step 2

– In this part, we’re gently slicing through the adhesive that holds the back cover in place—think of it as peeling away a sticky sticker but with finesse.

– Follow these lines where the adhesive is thicker—it’s the hearty stuff that needs a little extra love to get through:

– Now, target the thinner, more delicate adhesive areas—they’re more like the thin layer of frosting on a cupcake, easy to slice into.

– Just a heads-up: steer clear of the zone near the fingerprint sensor flex cable—no slicing or prying there, to keep that sensitive part intact and happy.

Step 3

– Stick a suction cup onto the back cover—think of it as giving your device a little handle.

– Gently lift the bottom edge of the back cover using the suction cup, just enough to get a sneaky peek between the cover and the frame.

– Slide an opening pick into that gap and cruise over to the bottom right corner.

– Grab a second pick and glide it over to the bottom left corner—you’re basically a pick-wielding ninja now.

– Pop in a third pick to keep the adhesive from sticking things back together while you work your magic.

Step 4

– Slide just the tip of your opening pick from the bottom left corner up along the side to the top. Easy does it—no need for a deep dive!

– Swing the pick around the top corner and leave it chilling there. That way, the sticky adhesive won’t get any ideas about closing back up.

Step 5

– Gently slide the opening pick from the bottom right corner along the side, working your way up. Then, carefully maneuver the pick around the corner and cut through the remaining adhesive at the top of the device. Need a hand? You can always schedule a repair if things get tricky.

Step 6

– Gently lift the side of the rear glass where the volume button hangs out. Keep it steady, and you’re halfway there!

– Grab your spudger and carefully work its edge under the fingerprint sensor flex cable. Pry it up to disconnect—easy does it!

Tools Used
  1. SpudgerSamsung Galaxy S9 NFC Antenna and Charging Coil Replacement

Step 7

– Pop off that rear glass—gently does it!

– Putting things back together? Just follow these steps to swap in fresh adhesive and set the rear glass back in place.

– Thinking about a new rear glass? Check out this guide to transfer your rear camera bezel, fingerprint and all.

Step 8

– Unscrew those eight 4 mm Phillips #00 screws—like loosening tiny bolts on a secret hatch.

Step 9

– Gently slide an opening pick under the right edge of the plastic cover that hides the NFC antenna and charging coil. Then, give it a twist or a gentle pry to pop loose the plastic clips holding the cover in place. If you need help, you can always schedule a repair.

Step 10

– Slide an opening pick under the left edge of the plastic cover, like you’re sneaking a peek at a surprise party.

– Give it a little twist or gentle pry to pop those plastic clips loose, freeing the cover like a magician revealing their next trick.

Step 11

– Give your phone a test run before sealing it up—just to make sure everything’s working as it should.

– To put everything back together, flip through these steps in reverse. It’s like rewinding, but with more screws.

– Once you’re done, check out the guide to make sure your repair is on point. If you hit a snag, you can always schedule a repair.

Success!
If you can, power up your phone and give your repair a quick test before you go all in with the adhesive and seal it up again.
To put your device back together, just retrace your steps from earlier.
Once you’ve wrapped up the repair, don’t forget to follow this guide to check that everything’s working perfectly.

Galaxy S9 Plus Moisture Detected Fix

Duration: 45 minutes
Steps: 3 Steps

Step 1

– So, your phone’s got a built-in bouncer for its USB-C port—it checks for any sketchy resistance between two pins when you plug in the charger. If there’s too much water hanging out in there, the phone throws a warning (or an audio beep) and slams the door shut on charging.

– The moisture check happens the moment you plug in your charger. So, if you’ve just been caught in the rain or your phone took a dip, keep this in mind.

– Salt water or anything with chlorine is basically the arch-nemesis of your connector. If your port gets hit, do NOT try to charge it. Clean and dry that thing like it’s your job before you plug it in again. That little bit of effort could totally save your connector—and your phone.

Step 2

– Let’s tackle this issue together:

– 1. Grab some compressed air and give the connector a gentle puff to clear out any pesky liquid or loose debris. If you don’t have that, a straw works wonders too—just blow directly into the connector!

– 2. Time for a little cleaning! Dampen a tiny strip of paper towel with clean water and carefully drop a bit of water into the connector. Then, use those paper towel strips to soak it up again.

– 3. Patience is key! Let the connector dry for about 6 hours before charging. Feel free to use your phone during this time, just keep it unplugged.

– If you’re in a pinch and need to charge urgently, wireless charging (S9+) is your friend!

– Keep in mind that the charge cable connector might be harboring some salt or rust. A gentle clean as mentioned above will help prevent any transfer to your phone, which could cause the same issue again.

– If you spot any fabric fibers hanging out inside the connector, you can carefully remove them with a needle by scraping the bottom. Using a magnifying glass can make this task a breeze!

Tools Used
  1. Compressed AirGalaxy S9 Plus Moisture Detected Fix

Step 3

– A wet connector means no charging, so let’s keep those electronics dry and happy! If you’re still having trouble, don’t hesitate to schedule a repair for some expert help.

Success!

Samsung Galaxy S9+ Teardown

Duration: 45 minutes
Steps: 19 Steps

Samsung doesn’t mess around with skipping numbers—here’s the Galaxy S9+, notch-free and ready to show off its insides. Is it a sleek powerhouse or just a fancy emoji generator? Only a teardown will reveal the truth. Want a peek inside the regular Galaxy S9? We’ve got that too. For more tech goodness and updates, catch us on Facebook, Twitter, and Instagram.

Step 1

– The S9+ is packing some serious specs and a variety of aperture sizes. Here’s the scoop:

– Notchless 6.2″ AMOLED Display with a stunning resolution of 2960 × 1440 (~530 ppi)

– Qualcomm Snapdragon 845 or Samsung’s own Exynos 9810, depending on where you are in the world

– 12 MP OIS dual-aperture main camera—switch between f/1.5 and f/2.4 modes—plus a 12 MP OIS secondary camera and an 8 MP selfie cam for those perfect shots

– Headphone jack and microSD slot for all your audio and storage needs

– IP68 water and dust-proofing rating, so it can handle a little adventure

– Running on Android 8.0 Oreo for a smooth experience

Step 2

– Up top, you’ll see the standard SIM slot along with a slightly shifted camera and fingerprint sensor combo. Say goodbye to fingerprint smudges on your lens! Down at the bottom, it looks almost identical to the S8—yes, that means the 3.5mm headphone jack is still hanging in there. At first glance, that tiny opening might look like a speaker grille replaced with a port, but nope—that’s still a grille, with the mesh tucked way back. Wondering if speaker holes filled with lint are a thing? Not really. If you need help with this process, you can always schedule a repair.

Step 3

– Samsung’s keeping it classy with a notch-free look and impressively slim bezels, standing out among a crowd of iPhone-inspired designs.

– Flip it over, and while the iPhone X’s camera bump grabs attention, the S9+ goes for a wider sensor layout that’s a little more chaotic in appearance.

– On display: S9+ rocking the left side, iPhone X showing off its ‘bezel-less’ notch game on the right.

– Glass backs are all the rage for wireless charging—awesome for convenience, but not so forgiving if you’re prone to drops.

– Back in the day, swapping the iPhone 4S’s glass back was a breeze in under two minutes; with these newer models, don’t expect an easy swap.

Step 4

– Before getting started, let’s give a shoutout to our friends at Creative Electron for some high-energy recon to kick things off.

– Aside from a shiny new dual camera and a few minor component shuffles, everything here looks pretty much the same as the last time around. No surprises!

Step 5

– While it’s not quite the S4, the S9 still offers a welcome break from some of the more recent, tricky teardowns. A little heat and a plastic opening tool go a long way, but be prepared—it’s not exactly a smooth ride! Thanks to some experience (and a bit of luck), we can safely disconnect the sensor assembly cable without drama. Remember, detailed documentation makes everything easier. If you need a hand, you can always schedule a repair.

Step 6

– After braving the tricky process of opening up the phone, we make our grand entrance to the back.

– Next stop: the rear camera, where we get to check out the slick new dual aperture setup.

– Most cameras use at least five blades to keep the aperture nice and round as it shifts through different f-stops. This Galaxy switches things up with just two rotating, ring-shaped blades for a quick adjustment.

Step 7

– First up, the relocated fingerprint sensor. It’s held in place with a sticky ring that keeps it safe from spills—time to gently pry it free.

– Pro tip: that fingerprint sensor cable loves to hide in glue under the back cover. Watch out, or you’ll end up with a sticky situation. Maybe next time Samsung will give us a break!

– After removing fifteen screws, the midframe pops out like a seasoned pro, bringing along the wireless charging coil, antenna assembly, and lower speaker for the ride.

Step 8

– To loosen a glued-down battery in a Galaxy phone, you have a couple of options. First, you can carefully apply some heat with a heat gun or a specialized tool, then gently pry the battery free using a plastic pry tool—just be ready with a fire extinguisher, a bucket of sand, and nerves of steel. Alternatively, for a gentler approach, load a syringe with some Adhesive Remover and carefully apply it around the edges to dissolve the glue. Keep in mind, Samsung often uses a sticky black webbing on top of their batteries—no clear idea why, but if you’ve got insights, shout out! If you need help with this process, you can always schedule a repair to get it done professionally.

Step 9

– Let’s set the motherboard free: just remove two screws and pop off a couple FPC connectors with your trusty spudger.

– Surprise! The display cable is sneakily threaded through a narrow opening in the chassis and locked onto the motherboard, as if clinging for dear life…

– Motherboard: officially liberated.

– …But if you’ve checked out any Galaxy teardowns lately, you probably saw this move coming.

– Samsung, we get the reasoning, but surely you can give us a display that’s easier to disconnect and swap out—without prying off a glued cover. Challenge accepted?

Tools Used
  1. SpudgerSamsung Galaxy S9+ Teardown

Step 10

– Even though we’ve got dual image sensors, this double camera is actually a single unit, all snug on one PCB with just one connector!

– The S9+ camera lineup is now a total of four—along with the shiny new dual main camera, we’ve got the selfie and iris cameras joining the party.

– This time around, it looks like the camera series is dubbed ‘Star’, a fun twist from last year’s ‘Dream’ cameras.

– Our pals at TechInsights took a peek inside the camera modules, and guess what? There are chips hiding in there! Samsung boasts that their integrated DRAM lets the camera handle up to four times more image data. How about some 960 FPS slow-mo action?

Step 11

– The headphone jack makes a handy comeback here. Its gasket keeps your phone protected, and since it’s modular, replacing it is a straightforward, budget-friendly task if needed. Next, we grab the versatile daughterboard assembly, which includes coaxial cables, microphone, USB-C port, and plenty of spring contacts—think of it as the control center of the device. Then, we move on to the second speaker—the earpiece—which now also functions as a loudspeaker, giving you that nice stereo or even ‘surround sound’ experience that modern phones can deliver. If you need help, you can always schedule a repair.

Step 12

– Lay out that motherboard and take a look! On Side A, you’ll spot all the main players:

– Samsung K3UH6H60AM-NGCJ LPDDR4X 6 GB DRAM sitting on top of the Qualcomm Snapdragon 845

– Toshiba THGAF4G9N4LBAIR 64 GB UFS (NAND flash plus controller)

– Avago AFEM-9096 front end module

– Qualcomm Aqstic™ WCD9341 audio codec

– Maxim Integrated MAX77705F PMIC

– Qualcomm QET4100 envelope tracker

– Maxim MAX98512 audio amplifier

Step 13

– Side B packs a punch with all the components that didn’t make it onto Side A. Here’s what you’ll find: the Murata KM7N16048 Wi-Fi/Bluetooth module, the NXP PN80T NFC controller, the Qualcomm PM845 (probably a PMIC), the Qualcomm SDR845 RF transceiver, the Skyworks SKY78160-11 WLAN front-end module, the Qualcomm PM8005 power management IC, and the Skyworks SKY13716-1 low band front-end module. Take your time to identify and handle each part carefully—these are the key players in keeping your device connected and powered up. If you need help, you can always schedule a repair.

Step 14

– IC Identification, pt. 2:

– Meet the Qualcomm QDM3870—your high-band diversity front-end module, keeping things speedy.

– The Qualcomm D5319 is here for your mid-band diversity duties.

– RDA Microelectronics RDA6213N FM transceiver—probably the one making your tunes play.

– Samsung S2MPB02—camera’s power boss.

– Samsung S2DOS05—display’s power manager.

– Samsung S2MPB03—camera power management, part two.

– Renesas (used to be IDT) P9320S—your wireless charging receiver.

Step 15

– IC Identification, pt.3:

– Meet the NXP PCAL6524—your 24-bit I/O expander for all those extra signals.

– Here’s the ON Semiconductor FPF3688UCX, running the show as a load switch.

– Spot the Texas Instruments boost converter (very likely), kicking voltage up a notch.

– Another ON Semiconductor star: FAN48618BUC53X 1A boost regulator for a bit of extra power.

– Vishay DG2730: 2-port, 480 Mbps USB 2.0 DPDT analog switch—keeping your connections snappy.

– Richtek RT8010GQW 1A step-down DC-DC converter, dropping voltage like it’s hot.

– Texas Instruments TPS7A05 200mA LDO regulator, smoothing things out at the end.

Step 16

– Sensor Showdown, pt. 4:

– Meet the STMicroelectronics LSM6DSL – your phone’s motion maestro, handling all things accelerometer and gyroscope.

– Say hi to the AKM Semiconductor AK09916C, the compass that keeps your directions on point.

– Next up: STMicroelectronics LPS22HB. This pressure sensor is the air whisperer, keeping tabs on altitude.

– Heart rate sensor – your phone’s personal fitness coach.

– Ablic S-5712CCDL1-I4T1U hall sensor is here for magnetic moves.

– And the Semtech SX9320 proximity sensor (probably) – keeping your screen off when your face is up close.

Step 17

– Getting into the display teardown is a bit of a tug-of-war—lots of heat and patience needed. The glue can be stubborn, so instead of fighting it with a bunch of iOpeners, grab a heat gun to warm things up and make the process smoother. When replacing a broken screen, it’s a bit of a marathon, but with steady effort, you’ll get there. The display cable, made by Samsung and often labeled ‘Star’, combines both the display and digitizer in a sealed unit, so handle it carefully. You’ll also find two final chips attached to the display: the Samsung S6SY761X touch controller, which you might recognize from the S8 series, and the Winbond W25Q80EWUXIE 8 Mb serial NOR flash. If at any point you need a hand or want to get the job done professionally, you can always schedule a repair with Salvation Repair.

Tools Used
  1. Heat GunSamsung Galaxy S9+ Teardown

Step 18

– Time to get up close and personal with the biometrics!

– On the left, we’ve got the trusty S9+ hardware: iris scanner, front-facing camera, IR emitter, and proximity sensor (probably that AMS TMD4906). Looks like a familiar face from last year, doesn’t it?

– On the right, meet the heart of Apple’s notch: Face ID hardware. This includes a front-facing camera, IR dot projector, IR camera, plus space for the flood illuminator and rangefinder, all tucked neatly into the display.

– Some assembly required—don’t worry, it’s nothing you can’t handle.

– Early reviews are in, and it seems like Samsung might’ve gotten a little too excited about Animoji without a hardware refresh to keep up. But hey, we all get a little ahead of ourselves sometimes.

Step 19

– All done! Check out the Galaxy S9+ parts you’ve just uncovered. If you hit a snag or want a pro touch, you can always schedule a repair.

Success!

Samsung Galaxy S9 Plus Rear Glass Removal

Duration: 45 minutes
Steps: 8 Steps

Get ready to tackle the task of removing the rear glass from your Samsung Galaxy S9 Plus! Just a heads up, when you pop it open, you might mess with the waterproof seal, so keep that in mind. If you don’t replace those adhesive seals, your phone will still work like a champ, but it won’t be splashing around in water anymore. Make sure to grab some replacement adhesive to reattach everything when it’s time to put it all back together. Happy repairing!

Step 1

– First things first, let’s power down that phone of yours. Safety first, right?

– Grab your trusty iOpener and let’s get to work on loosening that sticky adhesive lurking beneath the rear glass. Apply the iOpener for a solid two minutes. Don’t hesitate to give it another go if you feel like the back cover is still playing hard to get!

Tools Used
  1. iOpenerSamsung Galaxy S9 Plus Rear Glass Removal

Step 2

– Get ready to slice through the sticky stuff holding on the back cover.

– Aim for the adhesive spots shown below:

– Where it’s thick, you’ll need a bit more muscle.

– Thin areas—easy does it.

– Steer clear of this zone so you don’t mess with the fingerprint sensor flex cable.

Step 3

– Stick a suction cup onto the back cover to get things popping.

– Gently lift the bottom edge of the back cover with your suction cup, creating a tiny gap between the cover and the frame.

– Slide an opening pick into that gap and carefully work it down to the bottom right corner.

Step 4

– Grab a second pick and cruise over to the bottom left corner—slide it right in.

– Pop a third pick at the bottom of your phone and let it hang out there while you work. It’ll keep the adhesive from pulling a sneaky reseal move on you.

Step 5

– Take your opening pick and slide it from the bottom left corner up along the side of your S9 Plus like you’re buttering toast.

– Pause halfway up the left side once you’ve sliced through the sticky stuff, and let your pick chill there for a bit.

– Now, repeat the move on the bottom right corner—slide your pick halfway up that side too, and leave it hanging out there.

Step 6

– Place a fourth opening pick on the right side of the frame and gently slide it up toward the top right corner. Then, run a fifth opening pick along the left edge of the phone all the way to the top left corner. Use the picks to carefully cut through the remaining adhesive beneath the upper part of the rear glass. If you need help, you can always schedule a repair.

Step 7

– Gently lift up the rear glass on the side where the volume buttons hang out. No need to rush—let’s treat it like a first date.

– Grab a spudger and pop up the fingerprint sensor flex cable. It’s just a little connection, nothing wild.

Tools Used
  1. SpudgerSamsung Galaxy S9 Plus Rear Glass Removal

Step 8

– Seal the deal with your new back cover using some pre-cut adhesive or double-sided tape—it’s like giving your device a warm hug!

– Now, let’s put everything back together by retracing your steps—it’s like a fun little dance in reverse!

– Once the rear cover is on, give your phone a little TLC by applying firm, steady pressure for a few minutes. You can even stack some heavy books on top to help the adhesive bond like best friends!

– And just like that, you’re done! Follow this guide to test your repair and make sure everything is working smoothly. If you run into any hiccups, don’t hesitate to schedule a repair!

Success!
Stick on the fresh back cover using pre-cut adhesive or some trusty double-sided tape.
Put everything back together by reversing these steps.
Once the rear cover is in place, give your phone a solid squeeze for a few minutes—stack some books on it if you’re feeling fancy—to help the adhesive set.
When you’re done, take it for a test drive using this guide. If things get weird, you can always schedule a repair.

Samsung Galaxy S9 Plus NFC Antenna and Charging Coil Replacement

Duration: 45 minutes
Steps: 11 Steps

In this guide, we’ll walk you through removing the NFC antenna and charging coil from your Samsung Galaxy S9 Plus. Just a heads-up: opening your phone will break the waterproof seals, so while your phone will still work, it won’t be as resistant to water unless you replace those seals. Don’t worry though – you’ll need some fresh adhesive to put everything back in place when you’re done reassembling.

Step 1

– First things first, let’s power down your phone. Safety first, right? Now, grab your trusty iOpener and get ready to work some magic! Place it on the back of your device to loosen up that stubborn adhesive hiding beneath the rear glass. Give it a good two minutes to work its charm. If you’re feeling adventurous, don’t hesitate to repeat this step a few times to make the back cover removal a breeze!

Tools Used
  1. iOpenerSamsung Galaxy S9 Plus NFC Antenna and Charging Coil Replacement

Step 2

– Now, it’s time to carefully cut through the adhesive holding the back cover in place. Think of it as peeling away the layers—smooth and steady wins the race.

– Follow these zones where the adhesive is lurking:

– Thick patches of glue that want to keep your device sealed tight.

– Sparser, thin spots where the adhesive is a little more forgiving.

– Keep your prying tools away from the fingerprint sensor flex cable—it’s delicate and doesn’t want to be sliced or pried in this area.

Step 3

– Stick your suction cup onto the back cover—give it a good press so it grabs hold.

– Gently pull up on the bottom edge of the back cover with your suction cup until you see a tiny gap between the cover and the frame—don’t rush it!

– Slide an opening pick into that gap and cruise it over to the bottom right corner.

Step 4

– Grab another opening pick and slide it down to the bottom left corner—like playing a smooth game of phone Tetris.

– Pop in a third pick at the bottom edge and leave it hanging out there. That’s your trusty sidekick preventing the adhesive from sneakily sticking itself back together while you work on removing the rear glass.

Step 5

– Gently start to slide the tip of your opening pick from the bottom left corner, tracing along the side of the S9 Plus. Keep the pick in place once you’ve sliced halfway up the left edge of the phone’s adhesive. Then, glide the opening pick from the bottom right corner up to the middle of the frame and leave it there—you’re making progress! If you need help, you can always schedule a repair.

Step 6

– Grab a fourth opening pick and let it cruise along the right edge of the frame all the way up to the top right corner.

– Take a fifth pick, slide it up the left side of the phone, and park it at the top left corner.

– Work your pick under the upper section of the rear glass to slice through the last bits of adhesive holding it down.

Step 7

– Gently lift up the side of the rear glass where the volume button hangs out—no need to rush, just a smooth move.

– Grab your trusty spudger and use its edge to pop up and disconnect the fingerprint sensor flex cable. Nice and easy does it!

Tools Used
  1. SpudgerSamsung Galaxy S9 Plus NFC Antenna and Charging Coil Replacement

Step 8

– Start by carefully removing the rear glass panel. Once it’s off, follow this guide to reapply the adhesive and put the rear glass back in place smoothly. If you’re thinking about replacing the rear glass entirely, this guide will also walk you through transferring the rear camera bezel along with the fingerprint sensor. Need a hand? You can always schedule a repair for extra help.

Step 9

– Unscrew those nine 4 mm Phillips #00 screws and set them aside.

Step 10

– Slip an opening pick gently under the right side of the plastic cover that hides the NFC antenna and charging coil.

– Turn the pick sideways to lift the cover free from its plastic clips.

– Carefully work your way around the cover, prying upward to release the remaining clips and free the piece.

Step 11

– Gently lift off the plastic cover that’s holding the NFC antenna and charging coil in place. It’s a quick move to make sure everything’s set for the next steps!

Success!
If you can, power up your phone and give your repair a quick test run before you seal it up with some fresh adhesive.
To put your device back together, just retrace your steps in reverse order.
Once you’ve wrapped up the repair, follow this guide to ensure everything is working smoothly.

Samsung Galaxy S9 Plus Headphone Jack Replacement

Duration: 45 minutes
Steps: 20 Steps

Follow this straightforward guide to remove the headphone jack from your Samsung Galaxy S9+. Keep in mind, you’ll want some fresh adhesive on hand to stick the fingerprint sensor back in place during reassembly. If you need help along the way, you can always schedule a repair.

Step 1

– Power down your phone—let it take a little nap before we dive in.

– Grab an iOpener and let it work its magic on the adhesive under the back glass. Keep it on for about two minutes. Don’t worry if you need to repeat it a couple of times to get the back cover off—sometimes the glue just likes to stick around!

Tools Used
  1. iOpenerSamsung Galaxy S9 Plus Headphone Jack Replacement

Step 2

– Get ready to tackle that back cover! In the next steps, we’ll be cutting through the adhesive that’s holding it in place.

– Here’s where you’ll want to focus your slicing:

– The thick adhesive spots

– The thinner adhesive areas

– Just a friendly reminder: steer clear of prying or slicing in this zone to keep the fingerprint sensor flex cable safe and sound!

Step 3

– Stick a suction cup onto the back cover – it’s like giving your device a little hug!

– Gently lift the bottom edge of the back cover with your trusty suction cup, creating a tiny gap between the cover and the frame. You’re doing great!

– Slide an opening pick into that gap and glide it over to the bottom right corner. Keep it smooth and steady!

Step 4

– Pop in a second opening pick and slide it toward the bottom left corner. It’s like creating a little path for the next step.

– Now, grab a third opening pick and insert it at the bottom end of the phone. This pick stays in place during the rear glass removal to keep that sticky adhesive from making things harder than they need to be.

Step 5

– Begin by gently sliding the tip of the opening pick from the bottom left corner along the side of your S9 Plus. Take your time, it’s like giving your phone a little massage!

– Once you’ve cut through the adhesive halfway up the left side, leave that opening pick right where it is. It’s doing a great job holding the fort!

– Now, slide the opening pick from the bottom right corner halfway up the frame and let it chill there. You’re making great progress!

Step 6

– Place the fourth opening pick on the right side of the frame, and gently slide it towards the top right corner. Take your time, you got this!

– Now grab your fifth opening pick and slide it along the left side of the phone, making your way to the top left corner. Easy does it!

– Use the opening pick to carefully cut through the remaining adhesive near the upper part of the rear glass. Keep it steady and smooth for a clean break.

Step 7

– Gently lift up the side of the rear glass where the volume button hangs out—no need for brute force, just a little finesse.

– Grab your trusty spudger and slide the edge under to pop up and disconnect the fingerprint sensor flex cable, nice and easy.

Tools Used
  1. SpudgerSamsung Galaxy S9 Plus Headphone Jack Replacement

Step 8

– Start by carefully removing the rear glass panel. When it’s time to put everything back together, follow this guide to apply new adhesive and reattach the rear glass smoothly. If you’re thinking about swapping out the rear glass, this guide will also walk you through transferring the rear camera bezel and the fingerprint sensor. For tricky parts, remember, if you need help, you can always schedule a repair.

Step 9

– Start by removing the nine 4 mm Phillips #00 screws to get the show on the road. Keep those screws safe—you’ll need them later. If you need extra hands, just schedule a repair with Salvation Repair to make things smooth sailing.

Step 10

– Slide an opening pick under the right side of the plastic cover that holds the NFC antenna and charging coil.

– Turn the pick sideways to gently lift the cover out of its plastic clips.

– Carefully work your way around the cover, prying up to release all remaining clips and free the part.

Step 11

– Pop off that plastic cover that’s hiding the NFC antenna and charging coil. It’s like unveiling the secret layer in your phone—just lift it off and you’re one step closer to victory!

Step 12

– Take the flat end of your spudger and gently pop up the battery flex cable—like giving your phone a little wake-up nudge!

Tools Used
  1. SpudgerSamsung Galaxy S9 Plus Headphone Jack Replacement

Step 13

– Start by unscrewing the two 4 mm Phillips #00 screws. Keep them safe—they’ll need to go back in later. If you run into any snags, remember you can always schedule a repair with us to get it done right.

Step 14

– Gently pop off that plastic cover from the motherboard—no need to wrestle with it, just a smooth move and you’re good to go.

Step 15

– Time to get those five 3.5 mm Phillips #00 screws out of there! Grab your trusty screwdriver and let’s make them disappear.

Step 16

– Slide your opening pick under the top edge of the loudspeaker assembly—think of it as giving the speaker a gentle nudge.

– Carefully lift up the loudspeaker assembly with the pick, like you’re opening a stubborn snack bag. Take it slow; you’ve got this!

Step 17

– Take out the loudspeaker assembly—just ease it out, like you’re pulling the plug on a quiet party.

Step 18

– Unscrew the 3.5 mm Phillips #00 screw and keep it safe—you’ll need it later!

Step 19

– Gently use the flat end of a spudger to lift and disconnect the headphone jack flex cable. You’ve got this!

Tools Used
  1. SpudgerSamsung Galaxy S9 Plus Headphone Jack Replacement

Step 20

– Time to put your device back together! Just follow these steps in reverse. Don’t forget to add some fresh adhesive where needed after giving those areas a good clean with isopropyl alcohol (>90%).

– When you’re reassembling, make sure to secure that fingerprint sensor with some pre-cut adhesive or double-sided tape. It’s a small step that makes a big difference!

– Got some e-waste? Be a hero and take it to an R2 or e-Stewards certified recycler.

– Once you’ve wrapped up the repair, check out this guide to test your handiwork.

– If things didn’t go quite as planned, no worries! Try some basic troubleshooting, or feel free to reach out to our Answers community for a helping hand.

Tools Used
  1. TweezersSamsung Galaxy S9 Plus Headphone Jack Replacement

Success!

🍪
Have a cookie! This site uses cookies to enhance your experience. Opt-Out Options.