Samsung Galaxy S21 Plus Battery Replacement
Duration: 45 minutes
Steps: 27 Steps
Just a heads up: let your battery drop below 25% before you crack open your phone.
Ready to give your Samsung Galaxy S21 Plus a new lease on life? This guide walks you through swapping out an old or tired battery. Heads up: If you're rocking a different model, you might spot an extra antenna cable along the midframe. If your battery looks swollen—handle it with care! For safety, try to run your battery down below 25% before popping your phone open; it helps keep things chill if the battery gets bumped. You don’t absolutely have to unplug the interconnect cables, but trust us—it makes getting the battery out and putting everything back together way smoother. Skipping the adhesive seals? Your phone will still work, but say goodbye to water resistance. Grab some fresh adhesive if you want things to stick like new when you reassemble.
Step 1

You can use a hair dryer, heat gun, or hot plate to warm things up a bit, but watch out! Overheating your phone could lead to some serious damage to the display and the internal battery. Keep it cool while you work your magic!


Step 2


- Grab a suction handle and secure it to the bottom edge of the back cover, keeping it nice and close to the edge.
- Give the back cover a gentle lift with the suction handle to create a tiny gap between it and the frame.
- Slide an opening pick into that gap you just made.
- Carefully glide the opening pick down to the bottom left corner to slice through the adhesive.
- Keep that opening pick in place so the adhesive doesn’t decide to seal up again!
If the back cover's cracked, the suction cup might not want to stick. No worries—try holding it in place with some strong tape, or superglue the suction cup on and give it a little time to set before moving forward. When you're having trouble creating a gap, a bit of extra heat can do wonders—just remember to follow the iOpener instructions carefully to avoid overheating. If you need a hand or want to make sure everything's done right, you can always schedule a repair with Salvation Repair.
Tools Used

Step 3


- Pop in a second opening pick at the bottom edge of your phone like a pro.
- Gently slide that pick over to the bottom right corner to cut through the adhesive.
- Keep those opening picks in place to stop that adhesive from sealing up again.
Step 4


If the adhesive gets stubborn and won't cut easily, it's probably cooled off. Just give it a couple of minutes with your iOpener to warm it up again—patience pays off! If you need help, you can always schedule a repair.
- Pop a third opening pick into the bottom right corner of your phone—like you’re dealing cards, but for tech.
- Slide that pick up the right edge to loosen up the stubborn adhesive. Take it slow; no need to rush.
- Leave the pick chilling in the top right corner to keep the adhesive from getting cozy again.
Tools Used
Step 5


When you're getting close to the camera assembly, just pop in the tip of the opening pick (about 4-5 mm) to keep that camera safe and sound—no smudges or damage on our watch!
- Gently wedge a fourth pick under the top right corner of your device to start loosening things up.
- Carefully slide the pick along the top edge to cut through the adhesive holding it together.
- Keep the pick in the top left corner to stop the adhesive from sticking back together as you work.
Step 6


When you're slicing near the power button, keep your opening pick shallow—just the tip, about 3-4 mm. That way, you won't accidentally mess with the power and volume button flex cable hiding underneath.
- Slip a fifth opening pick beneath the bottom left corner to get things started. Then, glide the pick along the left edge of the back cover, carefully slicing through any remaining glue. Take your time—patience makes perfect. If you need a hand, you can always schedule a repair.
Step 7


- Start by removing the back cover to get to the inside. When you’re ready to put everything back together, take a moment to power on your device and test all functions—this way, you catch any issues early before sealing it up tight. Once you're satisfied, shut down your device completely before proceeding. Gently peel away any leftover adhesive chunks using tweezers or your fingers, and wipe away any sticky residue with some high-concentration (over 90%) isopropyl alcohol for a clean finish. If you're using Samsung-specific pre-cut adhesives, follow this guide. For double-sided tape, follow this guide to get it just right. If you need a hand at any point, you can always schedule a repair.
Step 8


Handle the battery gently—don't poke or bend it, or it might leak nasty chemicals or even catch fire. Also, keep an eye on the cable under the charging coil. Work at a slow pace and stop if your tool catches on the cable. If you need a hand, you can always schedule a repair.
- Gently slide an opening pick under the lower left corner of the NFC antenna and charging coil assembly.
- Carefully maneuver the pick along the bottom left edge to wiggle it free from the battery. Keep it smooth and steady!
Step 9


- Slide an opening pick under the lower edge of the NFC antenna and charging coil assembly. You're doing great!
- Gently glide the opening pick along the bottom of the assembly to detach it from the loudspeaker. Keep it smooth and steady!
Step 10


- Grab your trusty spudger and gently pry the charging coil connector straight up from its socket. It's like giving it a little lift!
Tools Used

Step 11


- Grab your trusty spudger and gently pry the NFC antenna connector straight up from its socket. You're doing great!
Tools Used
Step 12

- Grab your trusty Phillips screwdriver and get ready to tackle those five 3.9 mm-long screws holding the NFC antenna and charging coil assembly in place. You're going to do great!
Step 13


- Grab a trusty pair of tweezers or just your nimble fingers, and gently lift out the NFC antenna and charging coil assembly. You've got this!
Step 14

- Grab your trusty spudger and gently pry the battery cable connector straight up from its socket. Easy peasy!
Tools Used
Step 15

- Grab your Phillips screwdriver and take out those six 3.9 mm screws holding the loudspeaker assembly in place. Let’s get that speaker ready for its big exit!
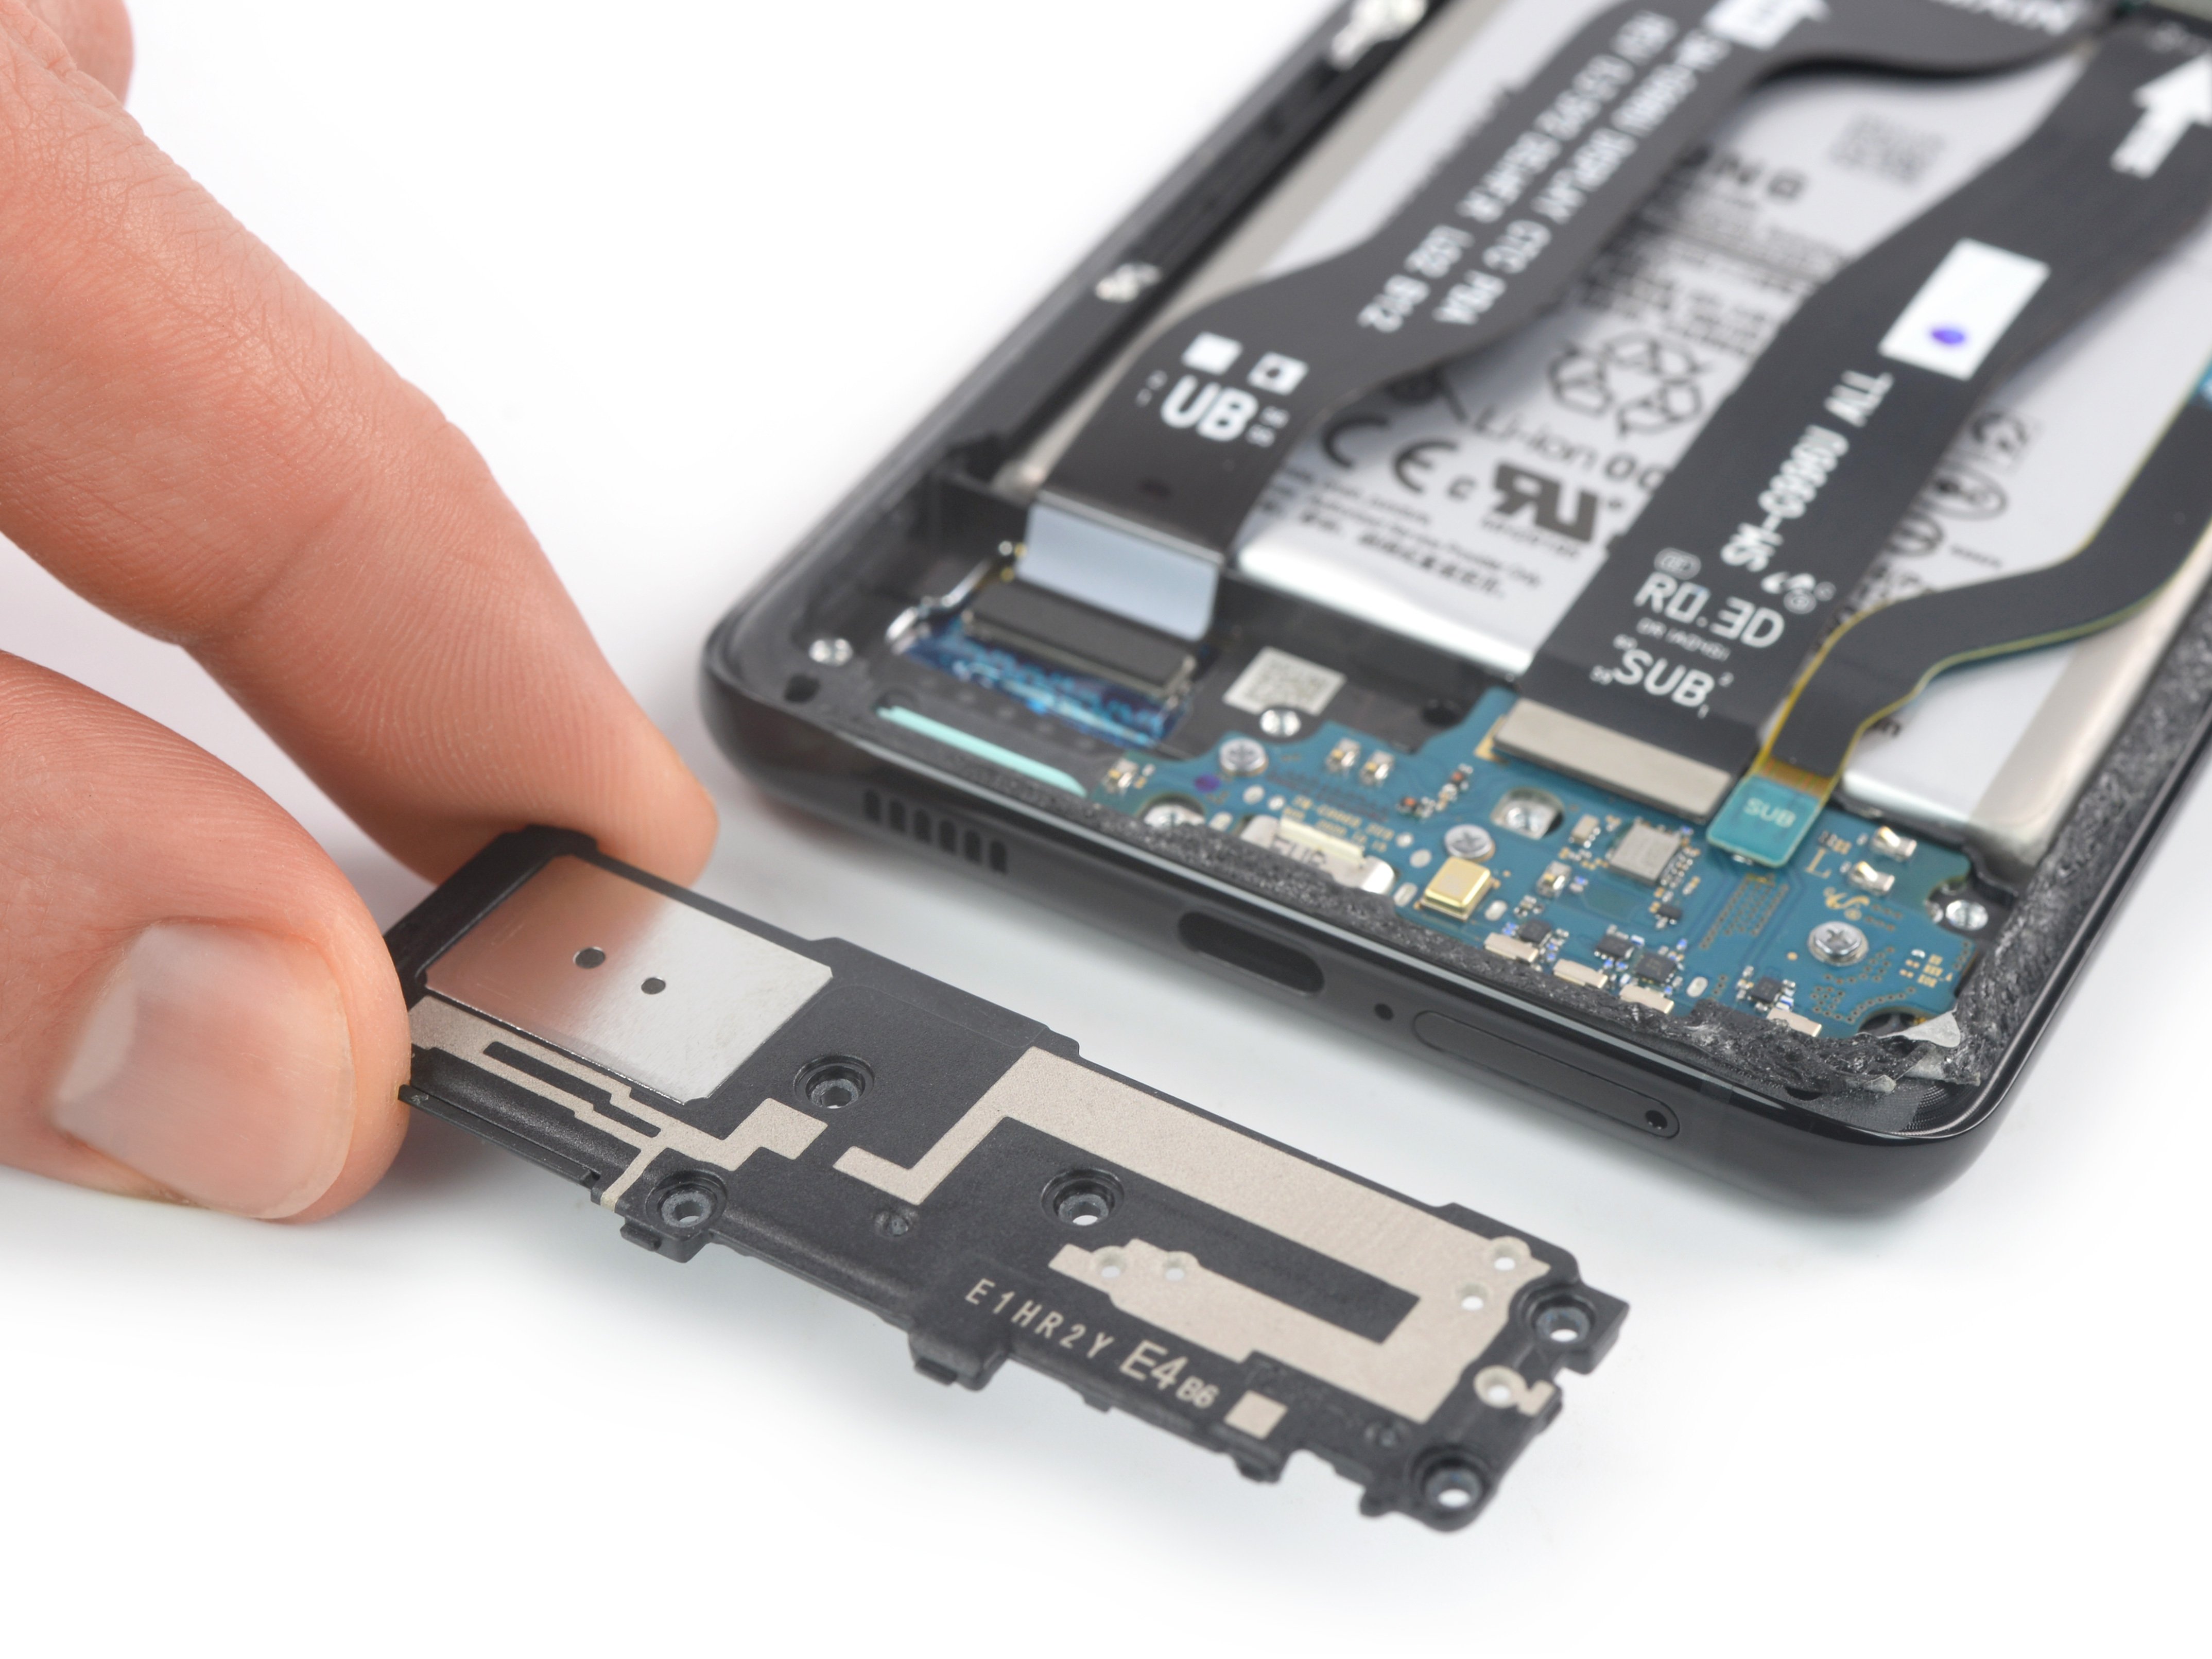
Step 16


- Slide an opening pick into the tiny gap between the top of the loudspeaker assembly and the midframe. It's like a little dance move for your tools!
- Now, use that opening pick to gently nudge the loudspeaker assembly upwards by tilting it down. You're doing great—keep it smooth and steady!
Step 17


- Carefully detach the loudspeaker assembly. Once you’re ready to put everything back together, make sure to reapply fresh adhesive in the spots that need it, after giving the area a good clean with isopropyl alcohol (>90%). If you get stuck or need a hand, you can always schedule a repair.
Step 18


- Grab a spudger and gently pry up the upper connector of the display flex cable to disconnect it from the socket. Easy does it—just lift straight up to keep things safe. If you need help, you can always schedule a repair.
Tools Used
Step 19

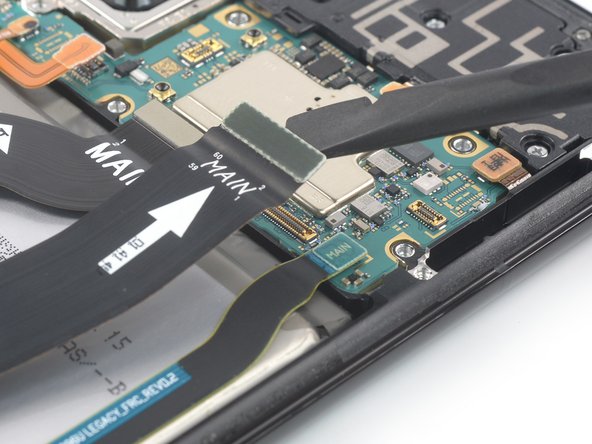
- Grab your trusty spudger and gently pop the main and interconnect flex cables off the motherboard by lifting their top connectors straight out of their sockets. Easy does it—no need to rush, just a smooth little pry!
Tools Used
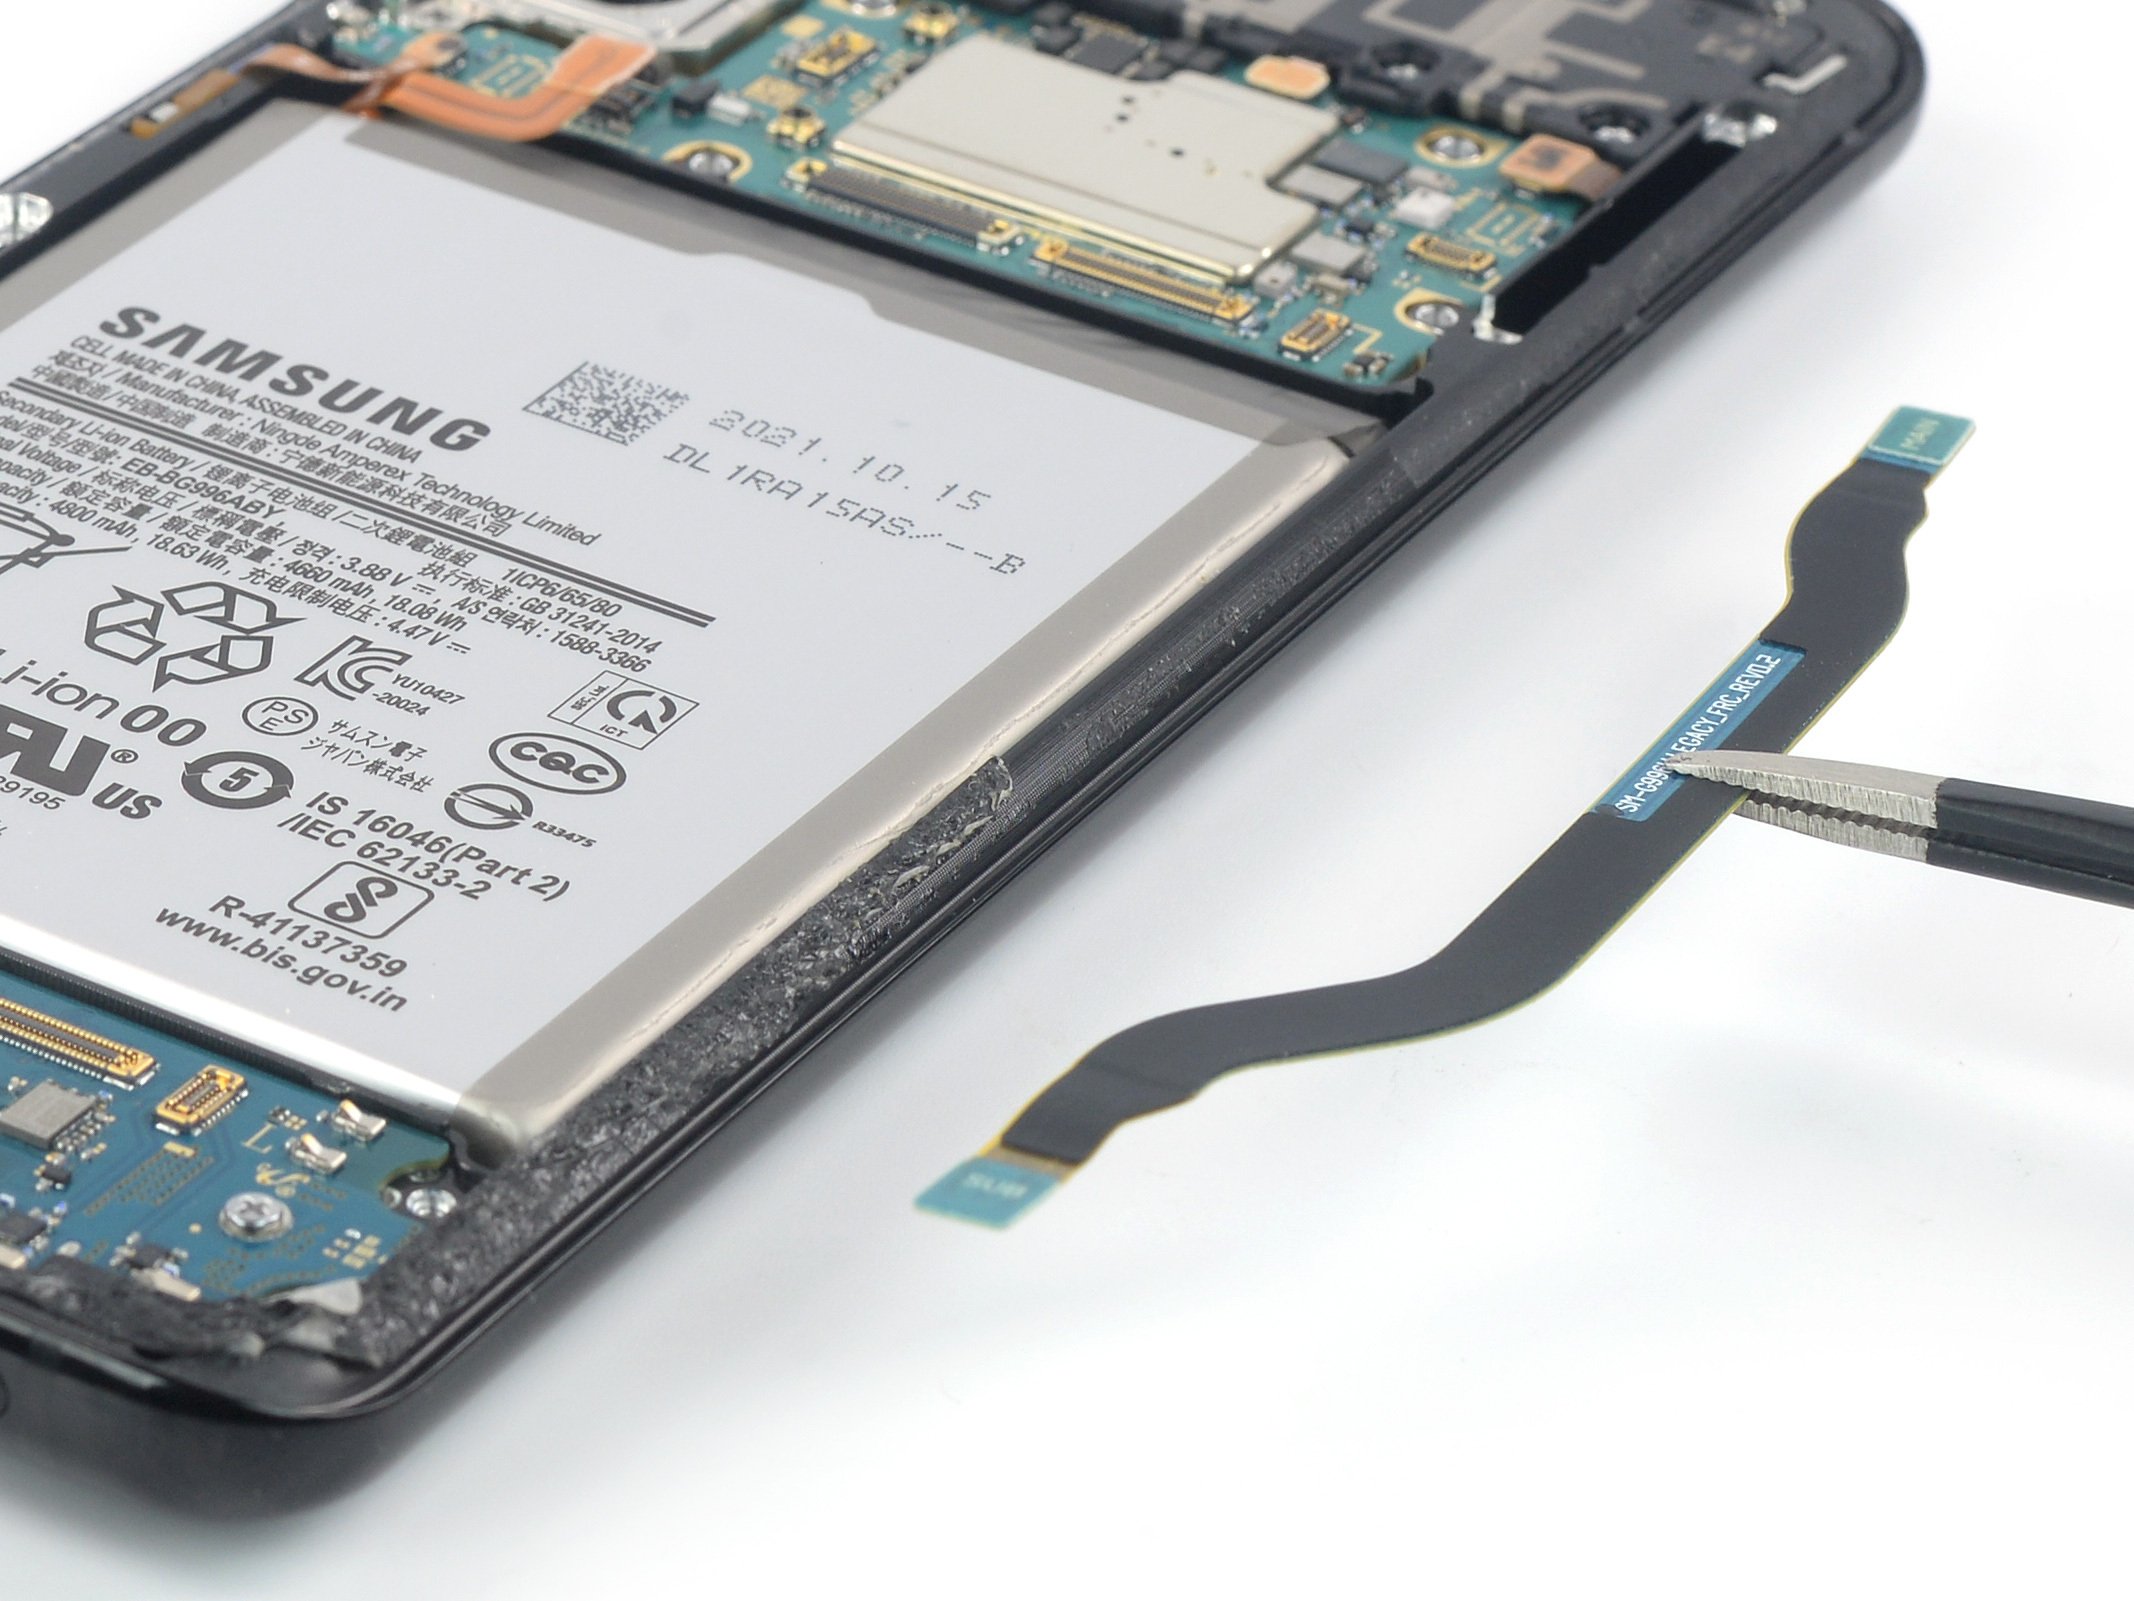
Step 20


- Pop the display flex cable connector up with your spudger—just a gentle upward flick and it’s free.
- Pinch or tweeze the flex cable out like you’re picking the first pickle from the jar—slow and steady wins the race.
Tools Used
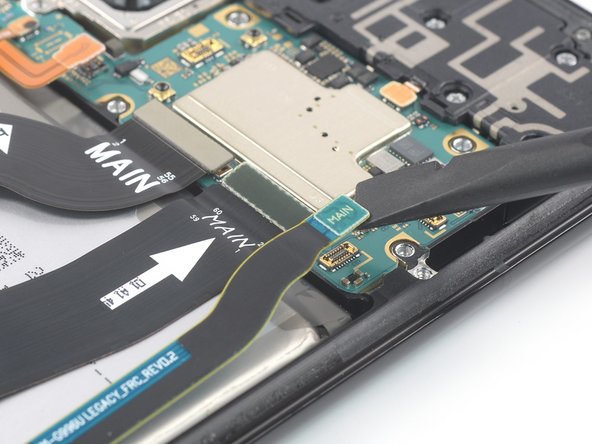
Step 21
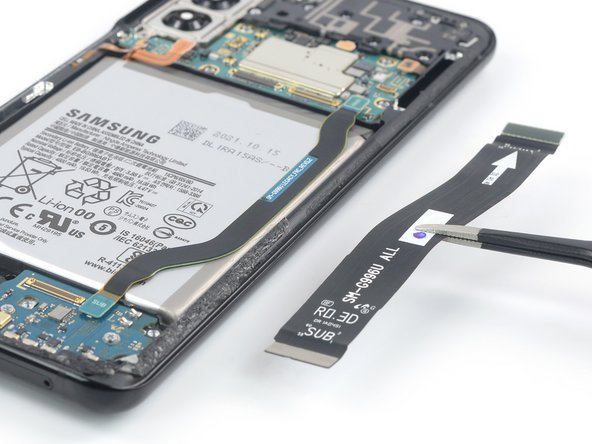

- Grab your trusty spudger and gently pry the main flex cable off the daughterboard by lifting its bottom connector straight up from the socket. You've got this!
- Now, use your fingers or a pair of tweezers to delicately detach the main flex cable. Easy peasy!
Tools Used
Step 22


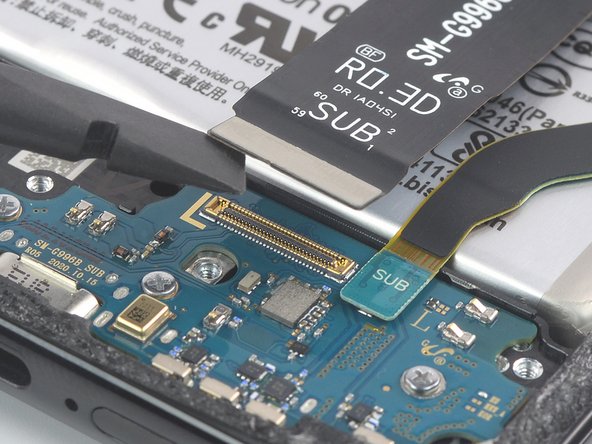
- Grab your trusty spudger and gently lift the bottom connector of the interconnect flex cable straight up from its socket on the daughterboard. Time to disconnect!
- Now, with a steady hand, use your fingers or tweezers to carefully detach the interconnect flex cable. You're doing great!
Tools Used
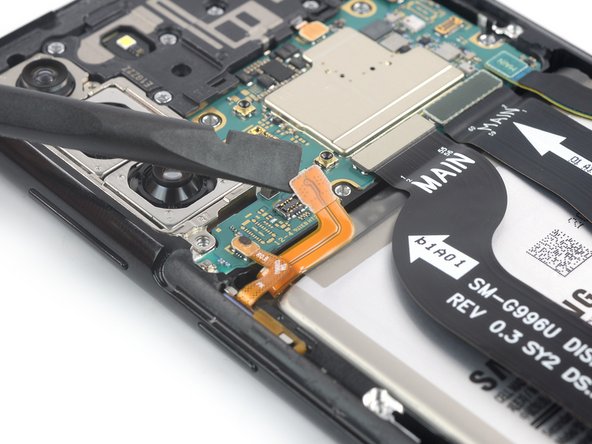
Step 23


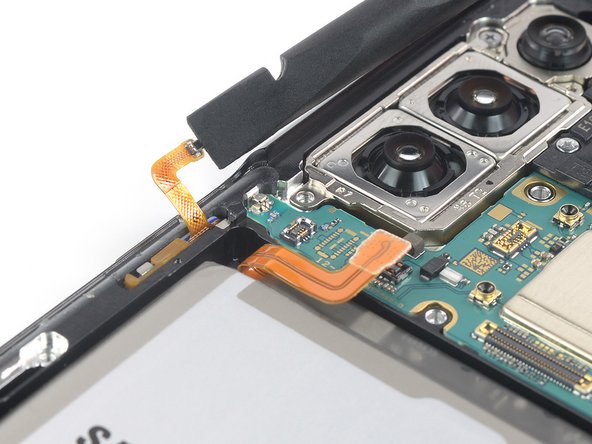
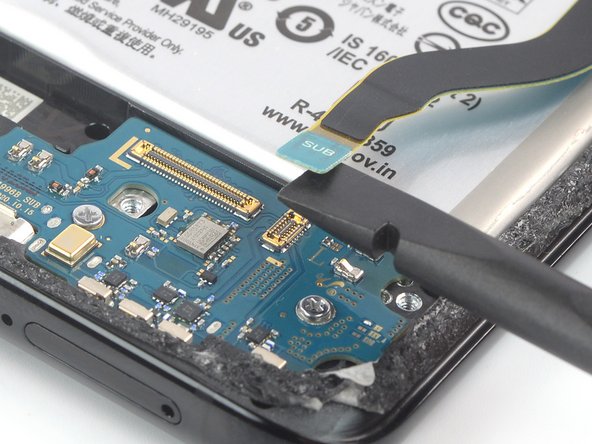
- Grab your spudger and gently pry the power button flex cable straight up to disconnect it from its socket. Then, carefully bend the flex cable aside with your spudger to keep it out of harm’s way during the battery removal. If you need a hand, you can always schedule a repair.
Tools Used
Step 24


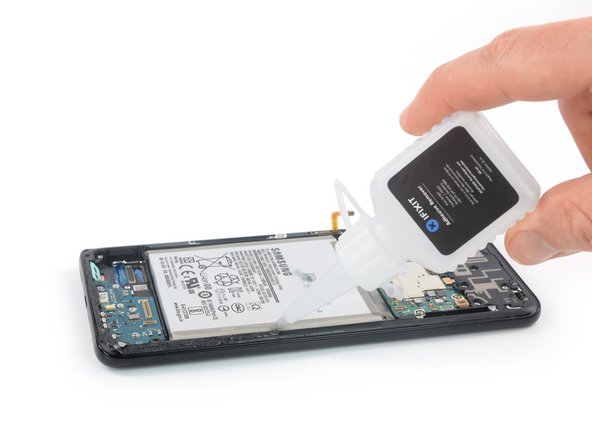
Just use a few drops—if it needs more, you can always add later. The midframe has two cutouts, so too much isopropyl alcohol could sneak its way to the screen and mess things up. Take it slow and keep that screen happy!
The battery adhesive on the Samsung Galaxy S21 Plus is seriously clingy. If dousing it with high concentration isopropyl alcohol (over 90%) doesn’t do the trick, grab an iOpener and heat up the screen for at least two minutes. That should help loosen things up under the battery and make removal way easier.
- Drop 1-2 drops of high-concentration (over 90%) isopropyl alcohol into the gaps between the frame and the edges of the battery. Don't be shy—get those gaps nicely coated.
- Give the alcohol a couple of minutes to work its magic and loosen up the battery adhesive. Patience pays off—let it soak in for at least two to three minutes to make the removal smoother.
Tools Used
Step 25
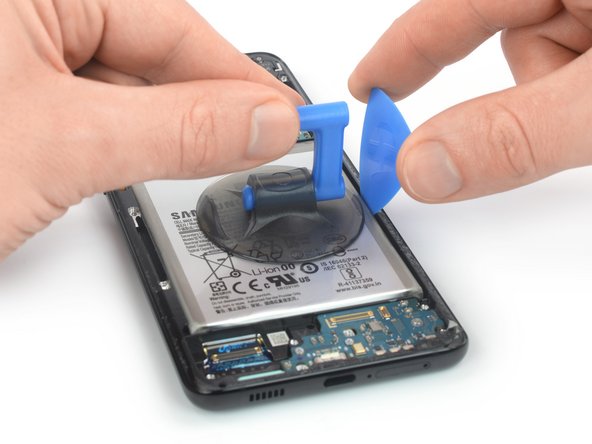

Now it's time to get a little leverage - insert the opening pick into the edge with the biggest gap between the midframe and the battery. This will give you some extra room to work with and make the process way easier.
- Stick a suction handle onto the battery, getting it as close to the battery’s edge as you can—no need to wrestle with it.
- Slide an opening pick into the gap between the battery’s edge and the frame. Take it slow and steady; no need to rush.
- Twist the pick so its long edge slips right into the gap. You got this!
Tools Used
Step 26


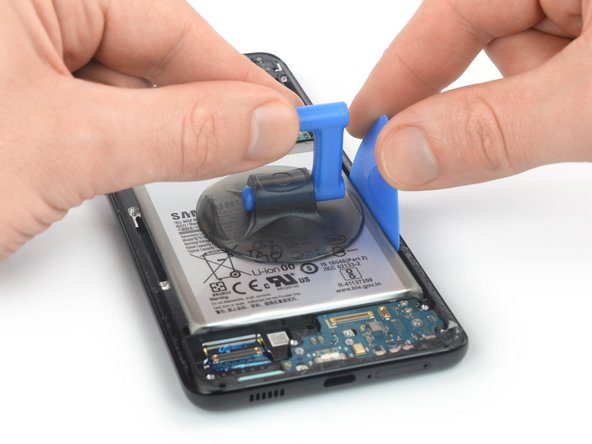
Handle that battery with care—no poking or bending allowed! A damaged battery could spill some nasty stuff or even get a little too hot to handle. If you're having a tough time lifting it out, just add a bit more isopropyl alcohol and give it another go!
If you're having a tough time lifting the battery with your suction handle, consider switching it up with a heavy-duty suction cup for a little extra oomph!
- With a steady grip, lift the suction handle and gently angle the opening pick downward to coax the battery free. You've got this!
Tools Used
Step 27


If your battery looks banged up or bent out of shape, don’t put it back in—playing with damaged batteries is asking for trouble.
- Pop out the battery—don’t forget to peel away any stubborn sticky bits.
- If you used isopropyl alcohol, give it a chill ten-minute break before you toss in the new battery. This lets everything dry out nicely.
- Reassembly time:
- Stick the fresh battery down with pre-cut adhesive or double-sided tape. For perfect placement, slap the adhesive inside your device right where the old stuff was—don’t put it straight on the battery. Press it in so it feels secure.
- For a smooth fit, hook the battery up to the motherboard briefly to line it up. Once it’s in place, unplug it again.