Nintendo Wii Motherboard Replacement
Duration: 45 minutes
Steps: 41 Steps
Ready to swap out your Wii’s motherboard? This guide will walk you through the process—just a heads-up, you’ll be taking out almost every part inside your Wii along the way. Take your time, keep track of those tiny screws, and let’s get your console back in action!
Step 1


– Grab a metal spudger and gently pry off the white plastic screw covers near the front of the lower case. Take your time – they should come off with a little coaxing.
Tools Used

Step 2

– Pop out the covers you just took off, and you’ll spot two 8.3 mm Tri-Point screws hiding underneath. Go ahead and remove those sneaky guys.
Step 3

– Unscrew the lone 5.9 mm Phillips screw located right beneath the controller port door, closest to the faceplate.
Step 4

– Grab a metal spudger and gently pry off that rubber foot stuck on the side of the Wii near the DVD drive opening. If you need help, you can always schedule a repair.
Tools Used
Step 5

– Locate the tiny 5.9 mm Phillips screw hidden beneath the foot you just took off, and remove it with your screwdriver. Keep it safe—it’s the key to getting everything back together smoothly. If you need help along the way, you can always schedule a repair.
Step 6


– Gently lift the faceplate off the front of the Wii, no rush here!
– Grab a pair of tweezers and carefully disconnect the LED cable’s plastic connector from the motherboard. Precision is key.
– Now, remove the faceplate completely and set it aside.
Tools Used

Step 7


Keep the momentum going by doing the same for the memory card port cover. You’re almost there—just a few more covers to go!
– Flip open the controller port cover until it stands up straight, forming a perfect right angle with the black bezel.
– Now, gently pull the controller port cover upwards, releasing it from the outer case with ease.
Step 8


– Take out the last two 4.1 mm Phillips screws hanging out on the top edge of the black plastic controller port bezel.
– Gently lift the bezel from the long edge that’s farthest from the controller ports, then set it aside. Easy does it!
Step 9

– Grab your Phillips screwdriver and take out the two 5 mm screws sitting just above the controller ports.
Step 10

– Grab a metal spudger and gently pry off the three screw covers stuck to the side of the Wii. Keep at it until they pop free—easy does it!
Tools Used
Step 11

– Time to evict some screws:
– Take out the two 5 mm Phillips screws
– Remove the 8.2 mm Tri-Point screw
Step 12

– Grab a metal spudger and gently pry off the two rubber feet at the bottom of the Wii, just near those rear ports. A little wiggle, and they should pop right off!
Tools Used
Step 13

A 4mm hex driver should do the trick to reach those sneaky screws hidden in the recesses. Make sure your bit is nice and extended for the best reach.
– Time to get those feet off and uncover the two 8.2 mm Tri-Point screws hiding underneath. Once they’re revealed, take them out and move on to the next step!
Step 14

– Carefully lift the outer case straight up from the body of the Wii, giving it a gentle wiggle if needed. Remember, patience is key—take your time and keep it steady. If you need a hand, you can always schedule a repair.
Step 15

The screw stays put on the battery door, no worries about it rolling away!
Once you pop off the battery door, the system time will reset. It’s just how it goes, so don’t be surprised!
If it’s been a while since you’ve swapped out the CR2032 battery, now’s a great chance to give it a fresh one.
– Take out the tiny Phillips screw holding the battery door in place on the bottom of the device. Then, gently pull the battery door away to remove it. If you need help, you can always schedule a repair.
Step 16

– Take out that sneaky 8.2 mm Tri-Point screw hiding under the battery door.
Step 17

– Take out the two 8.2 mm Tri-Point screws holding the DVD drive shield in place by the controller ports.
Step 18

Watch out for those sharp edges when you’re removing the DVD shield – they can be a bit sneaky and might give you a cut if you’re not careful!
– Gently lift the DVD drive shield upwards and carefully take it off the Wii.
Step 19

– Unscrew the four 9 mm #1 Phillips screws holding the DVD drive in place on the bottom panel. Time to get that drive out!
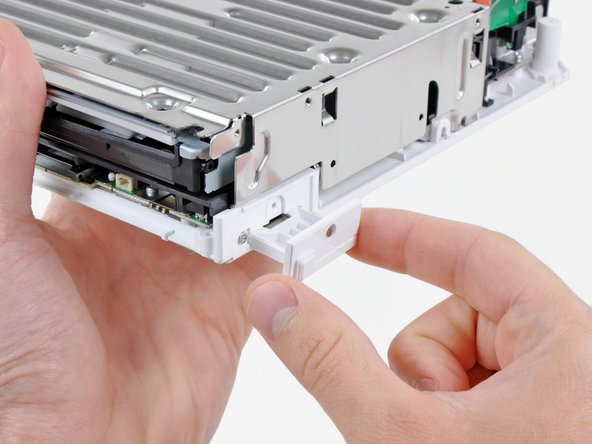
Step 20

– Gently lift the side of the DVD drive that’s away from the controller ports, just enough to peek at the cables hiding beneath.
– Carefully pull out the DVD drive power cable from under the plastic cover, right near the heat sink. Take it slow to avoid any mishaps!
Step 21

– Gently disconnect the DVD drive power cable from its socket. No need to rush – just give it a little tug and you’ll be all set.
Step 22


Make sure you’re gently prying up on the retaining flap, not the socket itself. You got this!
– Gently lift the retaining flap on the DVD drive ribbon cable socket using your fingernail. No need to rush—take it slow.
– Carefully pull the DVD drive ribbon cable out of its socket. You got this, just a smooth motion.
– Now, remove the DVD drive from the Wii. It’s almost done—just a little more and you’re on your way!
Step 23

Make sure your tweezers are gripping the fan connector, not the motherboard socket. A solid hold on the connector will make your life a lot easier!
– Grab a pair of tweezers and gently lift the fan connector out of its socket on the logic board. Easy does it!
Tools Used
Step 24


– Unscrew the two 10 mm Phillips screws that are holding the fan in place on the fan shroud.
– Carefully lift the fan out of the Wii and set it aside.
Step 25


– Grab the tip of your spudger or any other pointy tool and gently work one of those black plastic retaining fingers off the fan shroud, just enough to give it some space away from the Wi-Fi antenna board.
– Now, carefully lift the Wi-Fi antenna out of the fan shroud. Easy does it!
Step 26

– Unscrew the 10 mm Phillips screw holding down the second Wi-Fi antenna at the top of the fan shroud. It’s a small task, but every little step counts!
Step 27

– Peel away the two strips of tape holding the second Wi-Fi antenna cable in place on the plastic bracket next to the heat sink. A little finesse goes a long way here!
Step 28

– Gently unclip both antennas from the Wii frame and set them aside for now. You’ve got this!
Step 29


– Unscrew the three 10 mm Phillips screws that are holding the fan shroud in place on the Wii.
– Gently lift the fan shroud off the heat sink and take it out of the Wii. You’re almost there!
Step 30


– Start by removing the six screws that hold the EMI fingers in place on the bottom panel—these little guys keep everything snug.
– Next, gently lift out both sets of EMI fingers from the Wii, giving them a little wiggle if needed.
– Unscrew the four 7 mm Phillips screws—these are your standard-sized screws holding things together.
– Finally, remove the two 11.3 mm Phillips screws to free up more components and prepare for the next step.
Step 31


– Start by removing these three screws — they’re the first step to getting inside.
– Gently lift the bracket out of the Wii, giving it a little wiggle to free it.
– Unscrew the 7 mm Phillips screw holding things in place.
– Remove the two 10 mm Phillips screws securing the component.
Step 32


Keep an eye on that tiny square nut tucked away by the black plastic bracket — it’s easy to overlook, but crucial. Make sure you don’t lose it before moving on. If you need help, you can always schedule a repair.
– Start by unscrewing the three 10 mm Phillips screws that hold the black bracket in place near the front bottom of the Wii. Gently lift up the bracket and use your other hand to carefully pull the retaining clip away from where the Wi-Fi antennas enter the motherboard shield. Finally, lift the bracket away from the Wii. If you need help at any point, you can always schedule a repair.
Step 33

– Time to prove your screwdriver skills! Remove the nine remaining 7 mm Phillips screws that are holding the motherboard cover to the bottom panel.
Step 34

– Gently lift off the motherboard cover, being careful not to snag any cables along the way.
– Heads up: some models have a thermal pad for the wireless chip stuck to the underside of the cover. Remember to put it back in place when you’re reassembling!
Step 35

– Take out the four 11.3 mm Phillips screws holding down the heat sink to the bottom panel. Keep it friendly, straightforward, and encouraging—you’re doing great! If you need help, you can always schedule a repair.
Step 36

When you’re working around those delicate processors, remember to handle the thermal pads with care! If you’re not replacing them, try your best not to disturb them – they’re pretty fragile and can tear up on you. Planning to swap them out? Thermal paste should do the trick.
– Carefully lift the heat sink away from the motherboard to continue with your repair. If you need help, you can always schedule a repair.
Step 37

– Gently lift the side of the Wi-Fi board that’s farthest from the heat sink and ease it out of its socket on the motherboard. Just make sure you don’t apply too much sideways pressure on the connector, it’s a delicate little thing.
– Carefully remove the Wi-Fi board and antennas from the Wii. Take your time and make sure everything’s disconnected safely!
Step 38

– Gently pry up the Bluetooth board from the motherboard, using the flat end of a spudger or your fingertips. Start at the end closest to the center of the motherboard.
– Carefully peel the front edge of the Bluetooth board away from the EMI foam that’s stuck to the motherboard.
– Now, just go ahead and remove the Bluetooth board. You’re almost there!
Step 39


Remember, you’re gently lifting the retaining flap, not the socket itself. Take it slow and steady!
– Gently use your fingernail to lift the flap that holds the DVD drive ribbon cable in place.
– Carefully pull the DVD drive ribbon cable out of its socket and set it aside, ready for the next step.
Step 40

– Gently detach the DVD drive power cable from the motherboard socket, and carefully take it out of the Wii.
Step 41

– Gently grip the motherboard by its edges and carefully lift it off the bottom panel.
Success!