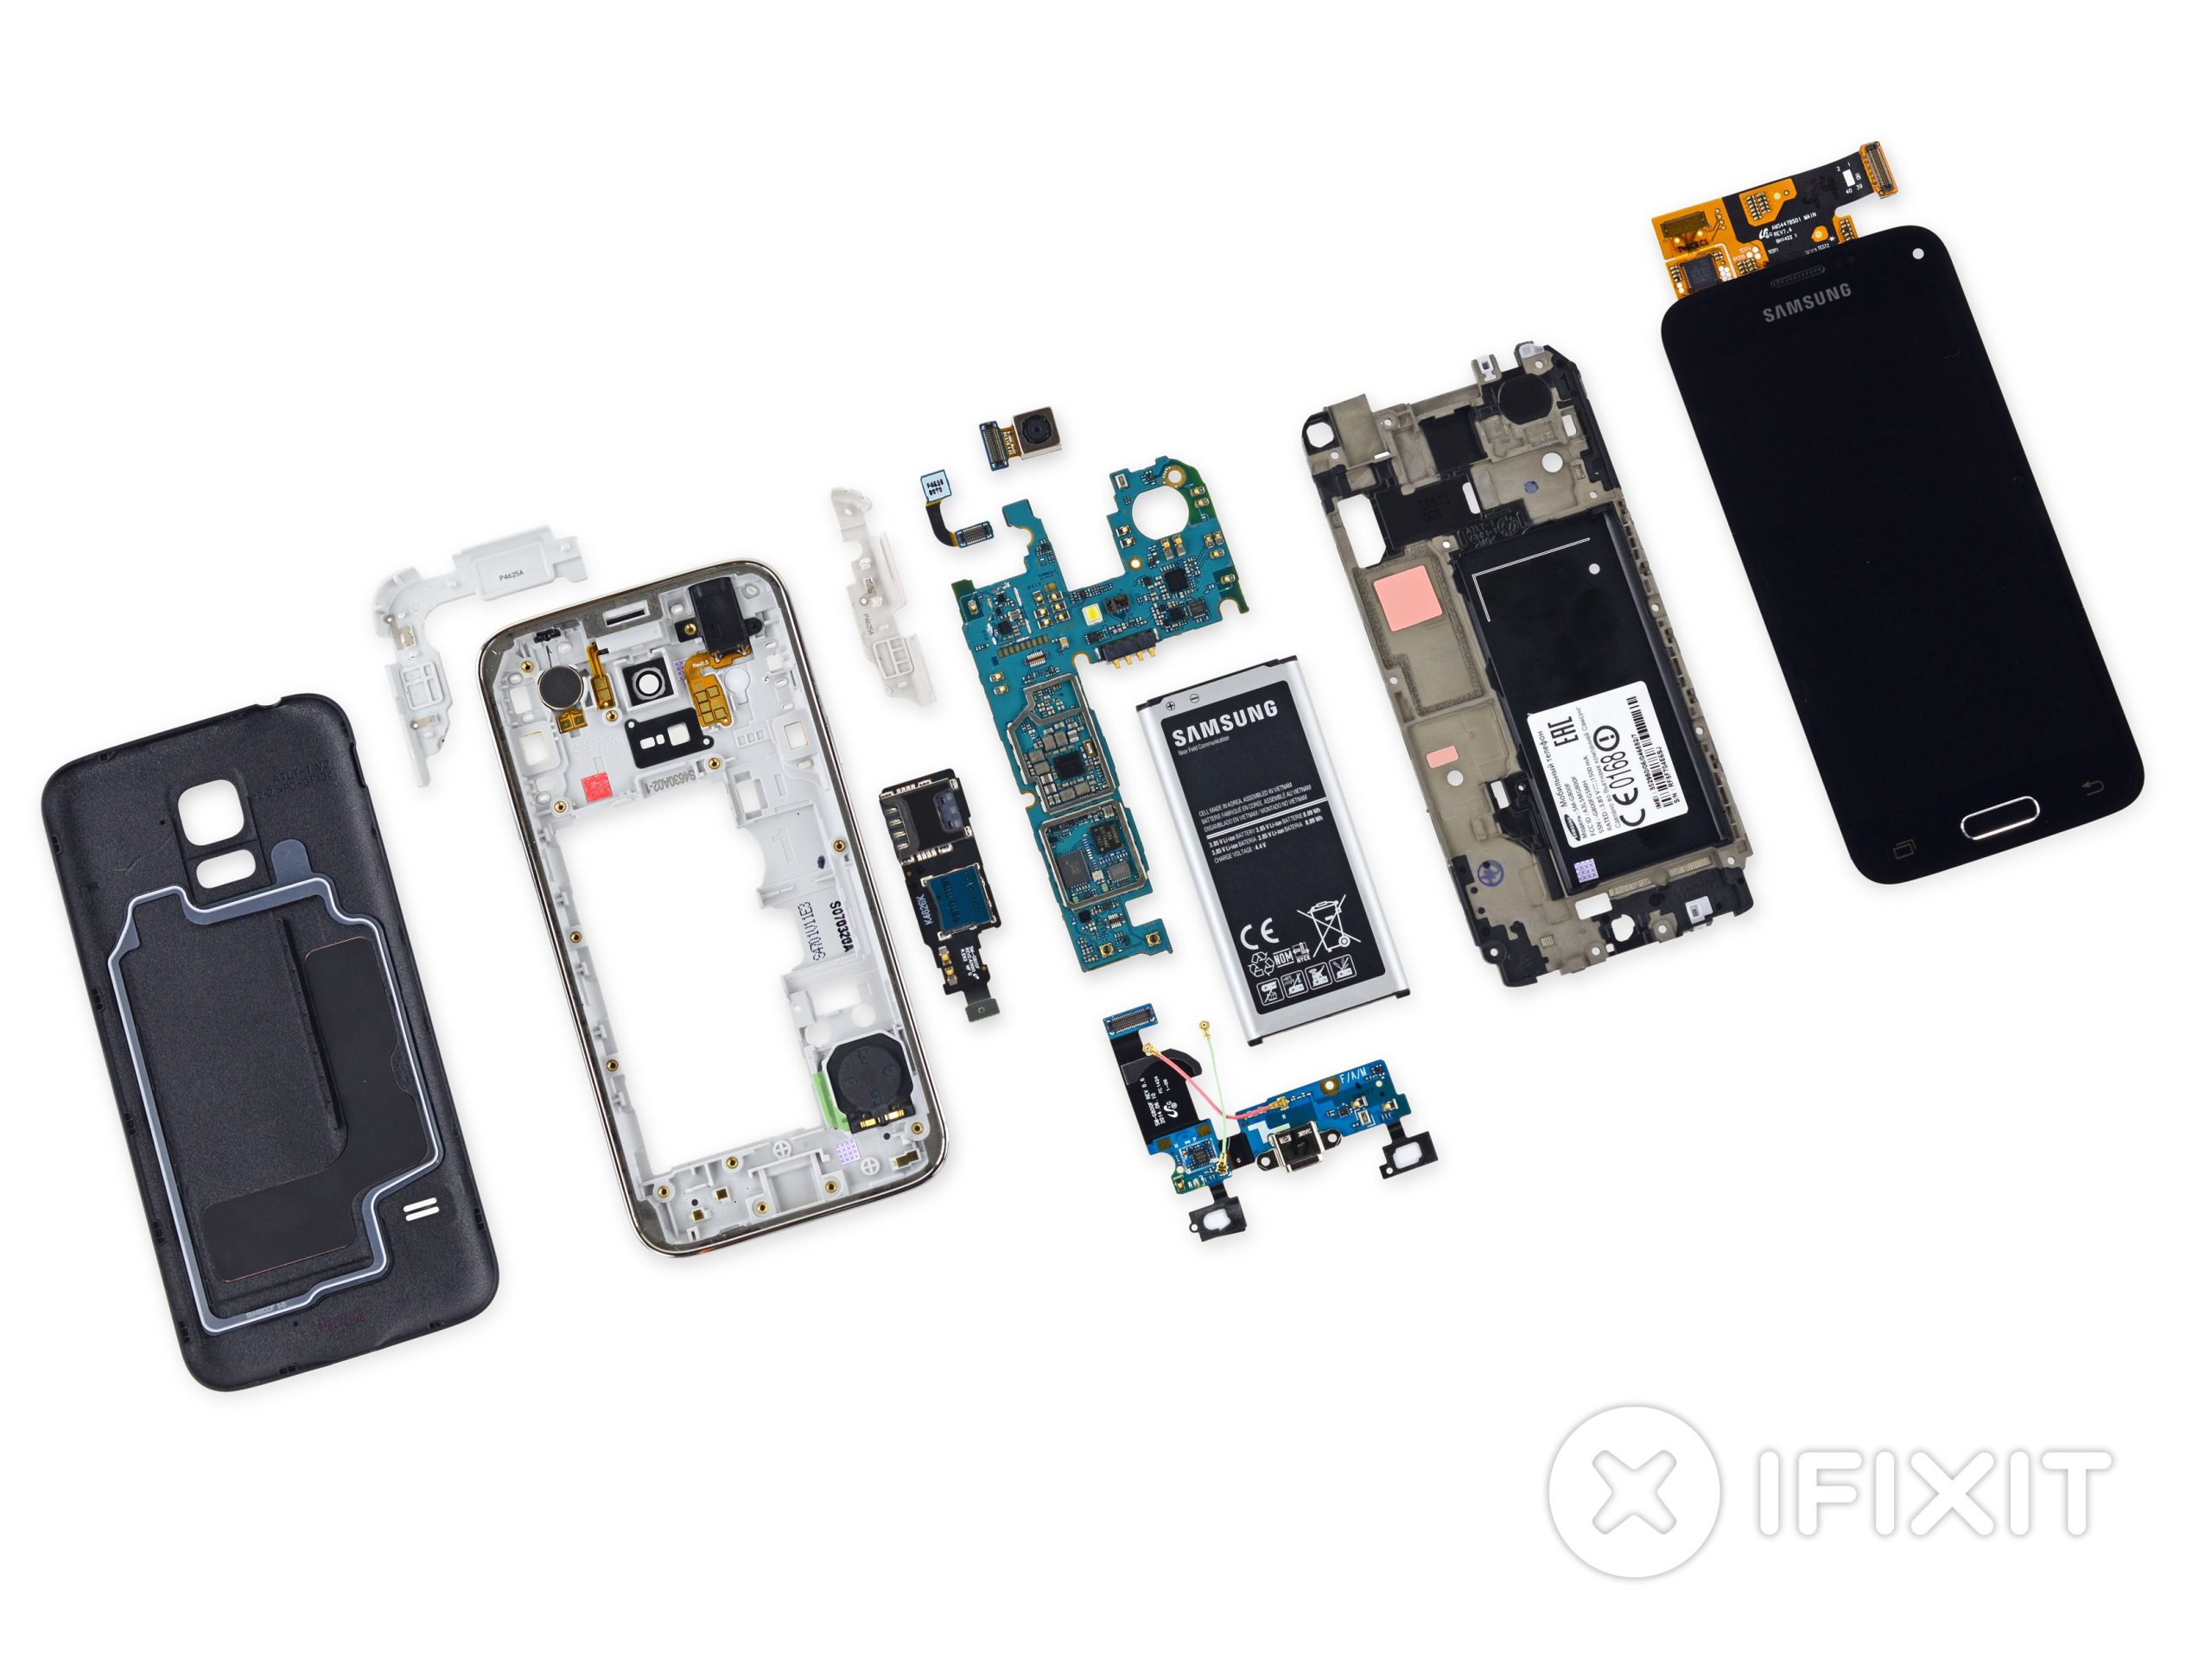
Samsung Galaxy S5 Mini Teardown Guide for Repair and Replacement
Duration: 45 minutes
Steps: 18 Steps
We got our hands on the Galaxy S5 Mini—think of it as the S5’s little sibling: lighter, smaller, and just a bit more laid-back. This version took the scenic route from Russia, so we’ll note any unique tweaks for that market. Along the way, we’ll explore some cool tech under the hood, including envelope tracking. Ready for a closer look? Let’s see what makes this compact powerhouse tick!
Step 1

– Looking for a smaller take on the Samsung Galaxy S5? Meet the Samsung Galaxy S5 Mini. Check out the key specs:
– 1.4 GHz quad-core Exynos 3 Quad (Exynos 3470) processor
– 4.5” HD Super AMOLED screen with 720 x 1280 resolution at 326ppi
– 8.0 MP rear camera with autofocus and LED flash, plus a 2.1 MP front camera
– Connectivity includes Wi-Fi 802.11 a/b/g/n, NFC (on LTE version), Bluetooth v4.0 LE, microUSB 2.0, A-GPS + GLONASS, and IR remote
– 1.5 GB RAM and 16 GB of internal storage, expandable up to 64 GB with a microSD card
– 2,100 mAh battery to keep you powered
– Packed with sensors: accelerometer, gyroscope, compass, heart rate monitor, proximity, and fingerprint sensor
Step 2


Samsung seems to have nailed that perfect ‘just right’ size with this phone—kind of like the Goldilocks of the smartphone world.
Looking at the numbers, the Mini trimmed down by 10.9 mm in height and 7.2 mm in width, but it’s now 1.2 mm thicker. So, does this slight size shift make a big difference in how easy or tough it is to repair? Let’s find out.
– Let’s take a look at our contenders for this showdown: the Galaxy S5, Galaxy S5 Mini, and iPhone 5s, all lined up for their close-ups.
– At first glance, the S5 and its Mini sibling seem like twins, just one is a little more compact than the other. Here’s a quick rundown on their dimensions:
– The Galaxy S5 comes in at 142 x 72 x 7.9 mm.
– The Galaxy S5 Mini is a bit more petite, measuring 131.1 x 64.8 x 9.1 mm.
Step 3


– A little twist and flick, and voilà – the rear cover comes off without a hitch. It’s a win for repairability, and we’re glad Samsung kept this design around for easy battery swaps.
– Just like the Galaxy S5, the Galaxy S5 Mini comes with a nifty dust and water-resistant seal. It’s got you covered in more ways than one.
– Notice the change? When Samsung shrunk the Galaxy S5, they moved the SIM and microSD slots from their usual cozy duplex spot to two separate slots along the left edge of the battery compartment.
– Props to the microSD card slot in the S5 Mini. With expandable storage, you won’t need any extra magic to store all your cat (or rat) photos.
Step 4


This is a 25% dip in battery capacity compared to the Galaxy S5’s 2800 mAh powerhouse.
– Time to wake up the S5 Mini! First step: pop the battery in to get things rolling. Then, let’s take it out again for a quick inspection.
– First impressions? This battery’s definitely smaller than the regular Galaxy S5’s. But let’s check the other side just to be sure.
– Here’s the scoop: the S5 Mini’s battery is a 2100 mAh, 3.85 V, 8.09 Wh lithium-ion pack.
– For comparison, the iPhone 5S battery is only 1440 mAh—so the Mini’s got a bit more juice.
– Confirmed: the S5 Mini’s battery is smaller than its big sibling’s.
– Battery size isn’t everything, though! With a more compact screen and a less power-hungry processor, maybe the Mini can stretch that charge further.
Step 5


– Remember the wild ride opening up the S5’s big sibling? This time, with the same setup and our trusty Galaxy S5 manual, we’re not falling for any tricks.
– To get inside, don’t mess with the front—there’s a sneaky back door waiting for you. Let’s dive in the right way!
Ah, the joys of repair guides! This step-by-step walkthrough is here to help you get your device back in shape. Follow along carefully, and if things get tricky, remember you can always schedule a repair with Salvation Repair for some expert assistance. Let’s get started and bring your device back to life!
Step 6
While we’re waiting for our Oscar nod, let’s note that this intense scene highlights how common adhesive is in our favorite devices. Just like with its full-sized counterpart, this sticky situation isn’t great news for repairs. If you need help, you can always schedule a repair.
– Here comes the iOpener, ready to work its magic on the adhesive holding everything together. Let’s get this mini mission started.
Tools Used

Step 7

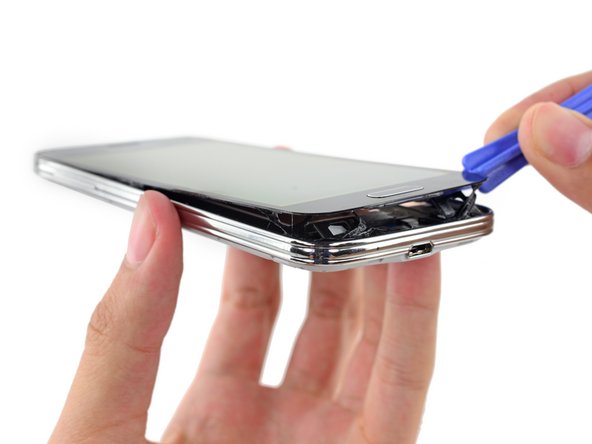

– Getting into this device can be a bit of a challenge—think of it as a tricky puzzle with some stubborn adhesive holding things together. Be patient with the prying and pulling; it’s all part of the process. Once you’ve loosened the rear, carefully lift the display, making sure to disconnect the data cable from the home button. This step allows you to safely remove the display and continue with the rest of the repair. If you need help, you can always schedule a repair.
Step 8


– Flip the display over and check out the back—home button still hanging in there. Here are a few things worth noting:
– This display assembly is a Samsung creation, tagged as AMS447BS01.
– Now, let’s get our screwdriver into action on the interior midframe.
– Say hello to the Cypress CYTMA545 TrueTouch Multi-Touch All-Points Touchscreen Controller.
– And meet the 1200T E45H2, handling all things finger scanner.
Having two midframes on this device adds a little extra challenge to the repair. To swap out any internal parts, you’ll need to heat things up to loosen the display assembly, then carefully pry it off. After that, you’ll have to separate the two midframe sections before you can access the internals. Take your time and follow each step closely—if you need a hand, you can always schedule a repair.
Step 9


We think this one’s for the Band 7 antenna, designed to cover Europe. The green coax cable connects to the usual WCDMA and LTE bands, but Band 7 is LTE-only and runs at 2.5 GHz. This means it needs its own dedicated antenna to give you the best reception possible. Smooth and strong signal—just how we like it.
– Samsung kept things simple by putting the daughterboard connector right on top of the motherboard—no need to wrestle with the whole thing just to get it out.
– Once the daughterboard is out, check out that extra antenna cable hanging out—our Galaxy S5 didn’t have that little surprise.
Step 10
– Ever wondered how to remove a motherboard? Well, here’s your chance! We’ll guide you through removing the motherboard from a Samsung Galaxy S5 Mini using just a precision screwdriver. It’s easier than it sounds!
– It may look simple when we do it, but always remember: in a parallel universe, the motherboard might just decide to remove you instead!
Step 11


These cameras are a bit mysterious—no clear sign of who made them. After a quick search turned up nothing, we’re tossing the question out to you all. Got any leads?
– The elusive double pry comes around only once in a while and favors the skilled. Our expert teardown technician smoothly removes both cameras with a single opening tool motion. During inspection, we find the 2.1 MP front camera labeled G800F R02 1425 and the 8.0 MP rear camera marked DGE18402. If you need help, you can always schedule a repair.
Step 12


Samsung didn’t hold back with the glue, but taking out the assembly was still a breeze.
– With a bit of gentle persuasion, coax the SIM and microSD card tray assembly to loosen up and lift away from the motherboard. Take your time and be careful not to force anything. If you need a hand, you can always schedule a repair.
Step 13

– Let’s take a peek at the chips powering this compact motherboard: first up, we’ve got the Samsung K3QF5F50MM 1.5 GB DRAM paired with the 1.4 GHz quad-core Exynos 3 Quad underneath. Fun fact—this includes the baseband modem integrated into the apps processor, a first for a Galaxy phone sold outside Korea. Then there’s the Toshiba THGBMBG7D2KBAIL 16 GB NAND Flash, ready to store your data. Moving on, we have the TriQuint TQP9059S Power Amplifier Module boosting signal strength, and the Broadcom BCM4334 Dual-Band 802.11n Wi-Fi/BT 4.0 +HS/FM Receiver Combo Chip keeping you connected. Don’t forget the Murata DF HWF, Skyworks 3529-11 60486 1, and the ABOV Semiconductor 116CUB 1414—each playing its part in making your device tick. If you need help with any of these components, you can always schedule a repair.
Step 14

– Flip over the motherboard and check out the other side for these key components:
– Shannon 889 N7FT4AMZ (a Samsung-developed RFIC Transmitter/Receiver that helps with wireless signals)
– Broadcom BCM475201UB (this one’s your multi-constellation GNSS receiver, making GPS on point)
– Wolfson Microelectronics WM1811AE (a multi-channel audio hub CODEC that ensures smooth sound processing)
– InvenSense M651M (this little guy packs a 6-axis accelerometer and gyro for motion sensing)
– Samsung S3FWRN (this NFC chip lets your device communicate wirelessly with others nearby)
– Shannon510 60XZP0 1424FP8 (another essential part to keep things running smoothly)
– SWKM GPF10 (last but not least, helping the system stay connected and performing at its best)
Step 15


Envelope Tracking is a pretty rare feature in phones, and this one’s breaking the usual pattern—it’s not running on a Qualcomm chip!
– Time for a little science with Salvation Repair! Today, we’re diving into Envelope Tracking.
– Originally developed back in the 1930s to make high-power AM radio transmitters more efficient, Envelope Tracking is all about keeping the power amplifier in check, making sure it matches the exact power needed for the transmission. This helps cut down on unnecessary energy use, keeping things efficient.
– Our Euro Mini is rocking an R2 Semiconductor R2AA217C Envelope Tracking Modulator, which controls the TriQuint TQP9059S Power Amplifier.
– In simpler terms: less wasted power means longer battery life and cooler operation. More time for those cat videos and a cooler pocket. Pretty sweet, right?
Step 16


– This phone’s got more layers than your favorite snack. Just when you think you’ve reached the core, the external midframe throws a few more panels your way.
– Panels two and three are held tight with some stubborn adhesive, but once you pop them open, you’ll spot spring contacts and a couple of button cables. The actual buttons, though? They’re still locked up tight for now.
Step 17


– Gently lift the button cables away from the sticky adhesive, and they should pop right out of their little button homes.
The plastic button covers tend to stick stubbornly in place. The mechanical button on the cable is the most likely to give out, but luckily it’s pretty straightforward to replace. Just a heads-up: if your S5 Mini takes a tumble, you might end up with some scuffed exterior buttons. No worries, though—it’s all part of the charm. For tricky parts, or if you prefer a pro touch, you can always schedule a repair.
Step 18


– Samsung Galaxy S5 Mini gets a repairability rating of 5 out of 10 (with 10 being a walk in the park).
– Swapping out the battery? Piece of cake—just pop it right out.
– The display comes off early in the game, which speeds things up. But heads up: it’s glued in tight and needs a careful hand, plenty of patience, and some heat to coax it out without turning it into a glass mosaic or cutting any cables.
– Once you’re inside, things like the cameras, headphone jack, vibrator motor, and speakers are mostly modular and simple to swap.
– For anything beyond the battery, you’ll have to take the display off first, so keep that in mind to avoid accidental damage along the way. If things get dicey, you can always schedule a repair.