Samsung Galaxy S10 Repair Guide: Step-by-Step DIY Teardown
Duration: 45 minutes
Steps: 17 Steps
After Samsung’s latest lineup, we half-expected a Galaxy SX, but instead, here are the familiar S10 and S10e models. Are they really as simple as their names suggest? There’s only one way to find out—time for a teardown! For more updates and detailed teardowns, follow us on Twitter, Instagram, and Facebook. If you need assistance, you can always schedule a repair.
Step 1


– So, what makes the S10e so ‘e-mazing’ compared to the S10? Let’s break it down, spec style:
– Both have Super AMOLED Infinity-O displays—the S10e rocks a 5.8″ (2280 × 1080) screen, while the S10 stretches out to 6.1″ (3040 × 1440).
– Under the hood, you’ll find a Qualcomm Snapdragon 855 processor, or a Samsung Exynos 9820 depending on your region.
– Selfie game strong with a 10-megapixel front camera. On the back: the S10e comes with a dual-aperture 12 MP wide-angle and a 16 MP ultra wide camera. The S10 adds in an extra 12 MP telephoto lens for that zoom action.
– Fingerprint magic: the S10e keeps it classic with a sensor on the side button, while the S10 hides an ultrasonic fingerprint sensor under the display.
– Both phones feature a headphone jack (yay!) and a microSD card slot for expandable storage.
– Ready for adventure—IP68 water and dust resistance means both phones can handle the elements.
Step 2


Check out our video teardown where we take apart the S10+—it’s a wild ride!
– These phones’ sleek, single-piece fronts might not give away all their secrets right away, but notice the curved display edges on the S10 and S10+. From the back, you’ll see two distinct camera setups: all have wide and ultra-wide lenses, but the S10 and S10+ get bonus telephoto options. While we’re examining these devices as if it’s 1894, Creative Electron provides top-notch X-ray images to help us see inside. Keep in mind, the S10+ features a dense ceramic back, making it more opaque to X-rays compared to its glass-backed siblings. In other words, it’s a bit darker on the inside.
Step 3


By the way, fingers crossed that these newly placed fingerprint sensors make unlocking your device a bit smoother and safer.
It seems like a tempered glass screen protector might mess with the ultrasonic sensor, so Samsung is stepping up to prevent that little hiccup. But seriously, why does the S10e even need one?
– Both phones look pretty similar on the outside, but you’ll notice the S10e rocks a big power button—that’s where it hides its classic fingerprint sensor.
– The S10 keeps things mysterious, tucking its fingerprint sensor out of sight (you’ll need to crack it open to spot it).
– S10 and S10e both keep the headphone jack dream alive, with matching USB-C, mic, and speaker ports along the bottom.
– Up top, get your first real-life look at the ‘hole-punch’ displays—plus, they come with screen protectors already installed.
Step 4


Samsung may have unintentionally made repairs a bit easier here. By moving the fingerprint sensor away from the back cover, they’ve removed the flex cable headache that has made Galaxy repairs a bit tricky in recent years.
– Time for the latest phone, and yep, we’re starting things off with some heat—and our trusty iSclack gets another workout.
– The moment of truth: we lift off the back covers, half-expecting a surprise. But nope—no traps here, the panels come right off.
– Look closely and you’ll spot those heat-dissipating graphite pads carefully set into the back covers. Something in here is built to get toasty, but your fingers stay safe.
– And hey, is it just us, or is the adhesive not fighting back as much this round?
Tools Used

Step 5


Wireless charging isn’t the most efficient thing around—it tends to produce a lot of heat along the way. While that may not sound great, it’s just part of the process.
As for the long-term impact on your phone’s battery life from this extra heat, it’s still up in the air. It might affect your battery, especially if it’s one that’s tricky to replace. But don’t worry too much—just keep an eye on it!
– Just a handful of Phillips screws separates us from the good stuff. Our Marlin driver set has everything we need, and luckily Samsung’s only using one driver for now, so no extra tools required.
– These midframe assemblies come with integrated coils that now have a cool new feature: wireless charging for other devices.
– That’s probably why this year’s coils are sandwiched between two layers of graphite—because a wireless charger that both transmits and receives generates quite a bit of heat.
Step 6


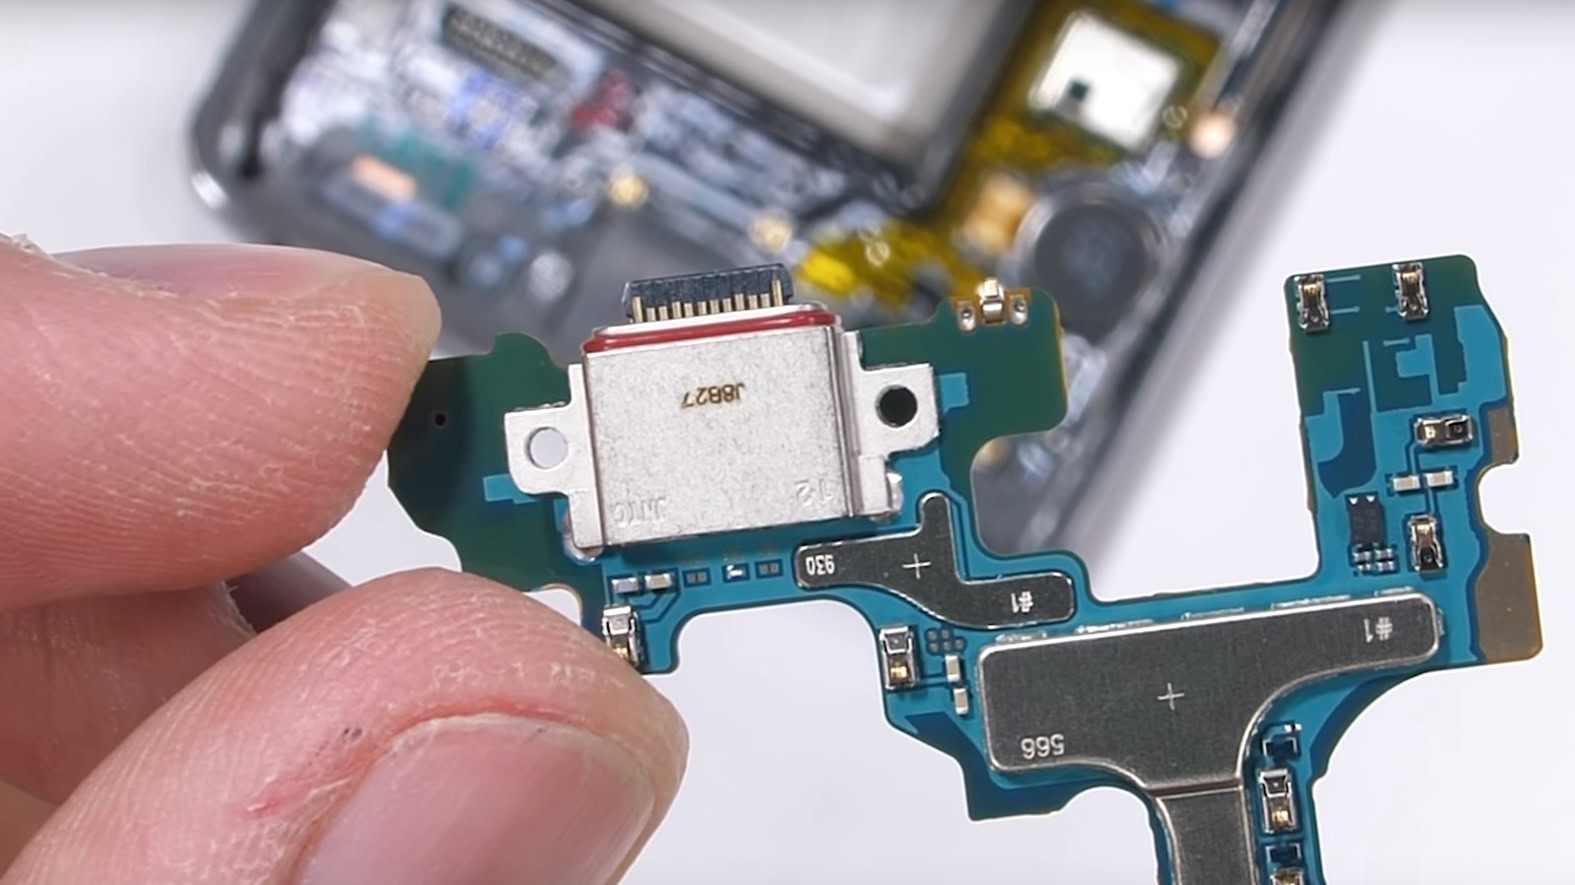
Unfortunately, the USB-C port has become part of the package deal. What used to be one of the few easily replaceable parts on Galaxy phones—namely, the modular USB-C port—is now integrated, making repairs a bit more involved. If you need help, you can always schedule a repair.
– Samsung’s headphone jacks are tiny—about 12 mm tall and 8 mm across—and they’re completely modular, which is pretty neat. Sadly, there’s just not enough space for one in an iPhone or even an iPad. We’ll talk cameras in a moment, but first, we’re removing the selfie cams to make room for the motherboard extraction. Our teardown engineer smoothly lifts the motherboard in perfect sync… or does it? If you need help, you can always schedule a repair.
Step 7


– Time to check out what’s hiding under the motherboard—there are a couple of interesting surprises.
– The chunky copper heat pipe here is much more substantial than what we saw in the S9, almost like the one in the Note9.
– We also peel back a layered thermal interface material. That big sheet of copper gives plenty of surface area for heat to escape, but since copper can be a bit squishy, the soft interface helps fill in any little gaps that could otherwise cause overheating or slowdowns.
– There’s a thin sticker here too, apparently doubling as RF shielding. There’s even a big hole in the metal shield underneath, revealing a PMIC and a large pink thermal pad.
– In short: with fast charging and reverse wireless charging on board, this phone’s electronics have to deal with a lot of heat. Samsung really went all out to keep things cool.
Step 8


This year’s code name is “Beyond”—a fresh upgrade from last year’s stellar “Star”. Ready to explore the new features and updates? Let’s get started with some easy steps to keep your device in top shape. If you need help at any point, you can always schedule a repair.
– First, let’s pop the main camera array off the board. It’s tucked into a yellow plastic frame—probably made of ABS or nylon in its natural, un-dyed color. (It’s got that 80’s vibe, but we’re cool with it.)
– Now, let’s place both camera arrays next to their respective selfie cams, one on the far left and the other on the far right. Nothing too fancy, just a clean layout.
– The S10’s array (on the left) packs in an extra camera compared to the S10e—a 12 MP, ƒ/2.4 telephoto with OIS—and it connects to the same spot as the regular wide-angle camera.
– The 12 MP wide-angle cameras also have OIS, plus they bring over the dual-aperture magic from the S9+ for some extra photo flair.
– Last but not least, the 16 MP, ƒ/2.2 ultra-wide modules come with slightly beefier plastic frames. They’re a bit thicker, but still fit in snugly.
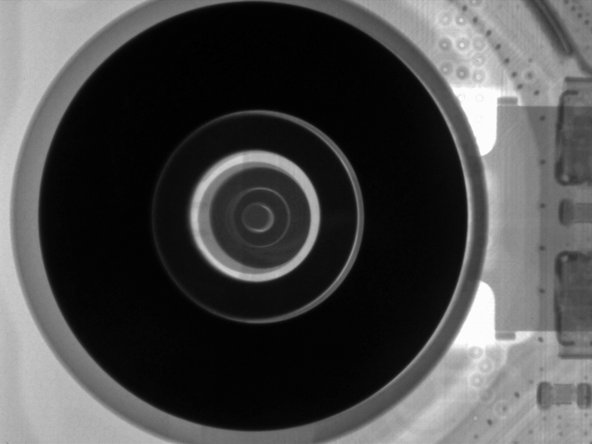
– If you’re wondering how it all fits together, further teardown gets a bit messy. But don’t worry, we’ve got an X-ray shot that shows the telephoto camera’s sensor and its OIS electromagnets in action.
Step 9

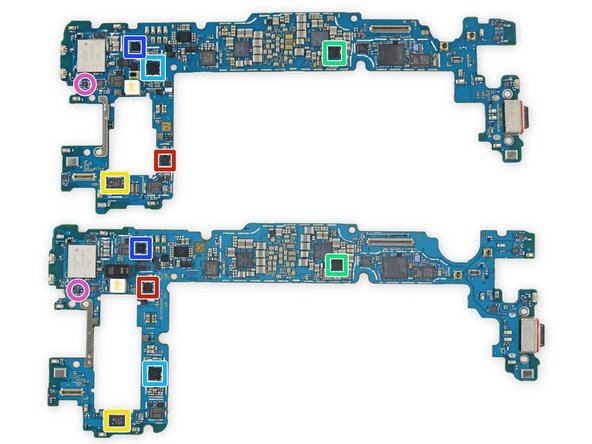
– Alright, let’s dive into the heart of these motherboards, steering clear of the thermal pads and cameras for now. On the front side, whether you’re looking at the S10e (top) or the S10 (bottom), here’s what you’ll find: the S10e houses a Toshiba 128 GB UFS NAND flash storage chip labeled THGAF8T0T43BAIR, while the S10 sports a 512 GB Samsung eUFS NAND flash chip marked KLUFG8R1EM-B0C1. Over the Qualcomm Snapdragon 855 SoC, you’ll spot the layered Samsung K3UH7H70AM-AGCL LPDDR4X RAM. Also in the mix are the Qualcomm WCD9341 audio codec, a Qorvo QM78062 RF front-end module, a Maxim MAX77705C PMIC, and the Skyworks SKY78160-51 Low Noise Amplifier. When working through these components, handle with care and keep track of each part. If you need help, you can always schedule a repair.
Step 10


– Samsung didn’t skimp—there’s a whole lineup of chips on the flip side, too:
– Murata KM8D03042 (probably your Wi-Fi/Bluetooth powerhouse)
– Qualcomm SDR8150 RF Transceiver
– Qualcomm PM8150 Power Management chip
– IDT P9320S wireless charging receiver
– Qorvo QM78062 Power Amplifier Module (most likely)
– NXP PN80T NFC controller with built-in Secure Element
– Qualcomm QDM3870 RF front end module
Step 11

– Now that we’ve covered the big names, let’s take a closer look at some of the smaller but equally interesting components: the Cirrus Logic CS35L40 audio amplifier, Qualcomm QET5100 envelope tracker, Skyworks SKY13716-11 low-band LNA front-end module, a likely Samsung S2DOS05 display power management IC, a probable Samsung S2MPB02 camera power management IC, the STMicroelectronics STM32G071EBY6 32-bit Arm Cortex-M0+ microcontroller with 128 KB of flash, and the NXP Semiconductor BGU8103 GPS/GLONASS/Galileo/Compass low noise amplifier. These tiny parts pack a punch and play crucial roles in your device’s performance. When working on these, handle with care and follow each step carefully. If you need help, you can always schedule a repair.
Step 12


– Wrapping things up, here are some of the key sensors and components you might encounter: the STMicroelectronics LPS22HH pressure sensor, the STMicroelectronics LSM6DSO accelerometer, the Samsung S2MIS01 MST driver, a likely Diodes Incorporated AH1897T Hall Effect sensor, the Vishay DG2730 USB 2.0 DPDT analog switch, the NXP Semiconductor NCX2200 low voltage comparator, and the RDA Microelectronics RDA6213N FM transceiver. Keep these in mind as you navigate your repair, and if things get tricky, you can always schedule a repair for extra help.
Step 13


Batteries don’t last forever—especially in modern smartphones. They’re consumable, meaning they’ll need to be replaced before the phone’s run is over. If you start noticing your phone’s battery isn’t holding a charge like it used to, it might be time for a swap.
– Time to tackle the battery! These two power packs are stuck down tight to their metal midframes, and there’s not a pull tab in sight.
– No sweat—we grab our trusty adhesive remover and set up a little ‘waterfall’ while we wait for the glue to chill out.
– The S10e packs an 11.94 Wh battery on the left, while the S10 on the right steps it up to 13.09 Wh—a solid 13% bump from last year’s 11.55 Wh.
– Just for kicks, the iPhone XR and XS carry 11.16 Wh and 10.13 Wh, respectively.
Step 14


Sure, it might be old tech for bats and dolphins, but a smartphone that uses sound to read your fingerprint? Now that’s pretty clever. (Courtesy of Qualcomm.)
– We’re diving right in and taking our chances with these delicate displays. Once we open up the S10, we can finally see the sleek new ultrasonic fingerprint sensor setup.
– The tech is impressive, but let’s be real—this little guy didn’t stand a chance. We gave it our best shot, but it’s just not coming out unscathed.
– Other ICs:
– Qualcomm QBT2000 Ultrasonic Fingerprint Sensor Controller
– If Samsung has any repair tips they’d like to share, we’re all ears. But for now, get ready to pay a pretty penny for a new screen if that sensor decides to quit on you.
– Samsung S6SY771X Touchscreen Controller
– Winbond W25Q80EWUXIE 8 Mb Serial Flash Memory
Step 15


While this component isn’t the most flashy part of the repair, it’s actually a lot more dependable than the stuff underneath the screen. Trust us, it’s worth taking the time to handle it right. If you need help along the way, you can always schedule a repair.
– Handling the flat display on the S10e can be a bit nerve-wracking, but it’s not quite as intimidating as tackling the curved S10 screen. Keep in mind, neither of these screens are known for their durability, so a careful approach is key. The S10e doesn’t have any fancy ultrasonic tech glued to the back, but it does have a familiar face: the capacitive touch sensor nestled into the power button. Now, this repair isn’t for the faint of heart — you’ll need to fully remove the screen to get to the button underneath. The touch controller IC, the same one that powered last year’s S9 display and earlier models, is part of what makes this all work smoothly. If at any point you feel stuck or unsure, you can always schedule a repair with Salvation Repair for expert help.
Step 16


– These ultra-thin Samsung displays are like secret agents for heat management—packed with layers of copper and graphite to keep everything cool and running smoothly.
– The camera cutout in those layers? Totally planned. It’s carefully crafted pixel by pixel with a laser, punching all the way through the midframe and motherboard to connect directly to the camera.
– Unlike the camera, the proximity and fingerprint sensors sneak through the OLED screen, letting us see more of that beautiful edge-to-edge design. You wouldn’t notice them in regular use, but with the display out of the way, they’re easy to spot.
Step 17


Big shoutout to Greg Kramer for helping us figure out all the thermal management upgrades on these phones! Any slip-ups are totally on us, but we appreciate the support. Thanks, Greg!
– We’ve taken apart two entire phones just for your viewing fun, but here’s a quick summary if you’re short on time: These devices have big batteries that are still glued in and not super easy to swap out. Wireless charging other devices from these phones can generate a lot of heat, which might not be great for long-term battery health. The displays are pretty impressive, but replacing them isn’t cheap or straightforward—plus, the new fingerprint sensor placement adds a bit of a challenge. Ready to get started? If you need help, you can always schedule a repair.
Success!


