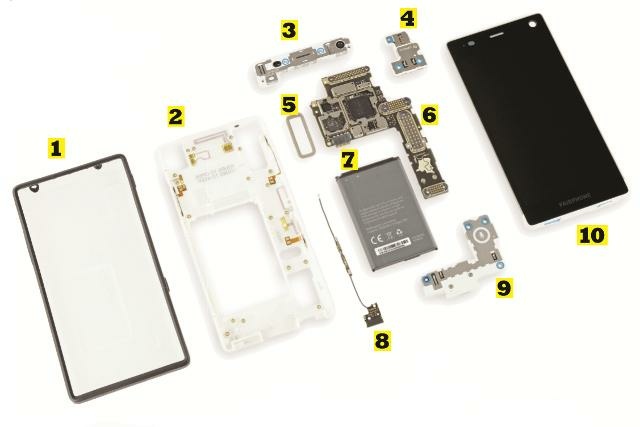
Fairphone 2 Rear Camera Module Replacement
Duration: 45 minutes
Steps: 9 Steps
Ready to bring your Fairphone 2 camera back to life? This guide will walk you through the simple steps to swap out the camera module and get snapping again in no time. Let’s dive in!
Step 1


– Find a corner of your slim case and wedge your thumbnail between the two pieces.
– Gently lift the back part to pop those snap-fit connections loose.
– Take off the back section of the slim case.
Step 2


– Slide your thumbnail between the slim case’s front edge and your phone’s body.
– Gently pop the snap connectors loose by pulling the front part to the side while nudging the display.
Step 3

– Let’s get started by taking off the front part of that slim case.
Step 4


– Time to set that battery free! Gently push it towards the top of your phone to get it moving.
– Now, carefully pull the battery out and away from your phone – you’re making great progress!
Step 5


– Once you’ve popped out the battery, you’re ready to set the display assembly free.
– Flip those two blue switches inward—think of it as giving them a little high-five.
– Now, gently slide the display assembly down towards the bottom of your phone. Smooth moves!
Step 6
An alternative method to slide the display assembly open – give it a try!
Step 7

– Gently lift off the display assembly to get things rolling.
Step 8


The module should now pop up just a bit, thanks to those pogo pins underneath.
– Unscrew the three Phillips #0 screws hanging out in the blue circles. They’re ready to move on to bigger and better things!
Step 9

– To put everything back together, just follow these steps in reverse – easy peasy!
– Need to know what to do with your old module? Check out the Salvation Repair support page and forum for the lowdown.
– You’re almost done! If you need help or want to make sure everything is done correctly, you can always schedule a repair.