Fairphone 2 Teardown
Duration: 45 minutes
Steps: 14 Steps
Get ready to dive into the world of repair with the Fairphone 2, a game-changing device that’s all about being modular, affordable, and conflict-free. We’re stoked to share our hands-on experience with this latest release, and we’re excited to see how it stacks up in terms of repairability. Join us as we take a closer look and explore what makes this phone tick. For the latest repair news and updates, check out our social media channels on Facebook, Twitter, and Instagram. If you need help with your own repair, you can always schedule a repair.
Step 1


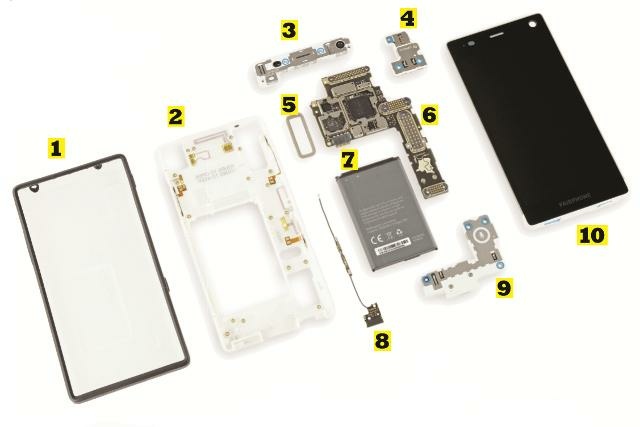
– Introducing the second-gen Fairphone! It’s a bit bigger and definitely sleeker than before:
– A 5-inch 1080p LCD display (446 ppi) with the trusty protection of Gorilla Glass 3
– Powered by the reliable Qualcomm Snapdragon 801 chipset
– 2 GB of LPDDR3 RAM to keep things moving smoothly
– 32 GB of internal storage, plus extra room for your files with a MicroSD slot
– A 2420 mAh user-removable lithium-ion battery for a solid charge
– Capture the moment with the 8 MP rear camera
– Running on Android 5.1 Lollipop, giving you the smooth experience you expect
Step 2


The phone fits perfectly into this case, and the best part? It’s easily removable, no fuss or tricks required!
– Measuring 143 × 73 × 11 mm, the Fairphone 2 steps up in size compared to its predecessor.
– Pop off the transparent case and you’ll spot two SIM slots ready and waiting. Flexibility for the win!
– Notice a mysterious five-pin connector with nothing attached? We’ll get to the bottom of that soon.
– The phone comes with a reassuring message: ‘Designed to open.’ Now that’s what we like to see!
– Weighing in at 168 g (with the case itself making up 20 g), the Fairphone 2 only adds 6 grams more than the first model.
Step 3


Call us optimists, but we think things are only going to get better from here.
– Let’s kick off this repair by checking out the rear case. It’s nice and secure, but don’t worry, it’s easy to remove without any tools.
– Before you start, make sure to take out the battery to avoid any issues when releasing the screen.
– You might be wondering where all the adhesive is – but don’t get too comfortable, it’s still there! Just be gentle and careful when handling the parts.
– We love it when manufacturers include repair guides with their devices. It makes our job easier, and yours too!
Step 4


Fairphone used these handy breakout boards to mix and match modular parts, making everything play nicely together.
– We were a bit thrown off by the absence of visible screws, but those clearly marked clips made it a breeze.
– Taking off the display assembly is as easy as flipping some switches and sliding the panel right out.
– On the midframe, you’ll spot a bunch of pogo pins — their matching counterparts live on the back of the display assembly.
– Just below the contact pads on the display assembly, remove the metal shield to reveal where the display connects to the breakout board.
– So far, removing the front panel has us using zero tools, which is pretty sweet.
Step 5

Amazingly, up until this point we’ve only needed one tool: hands!
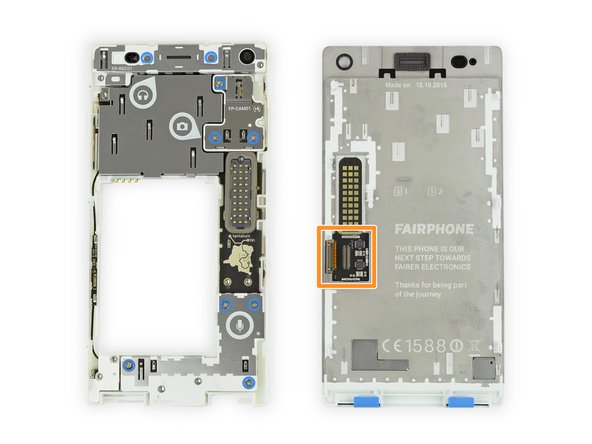
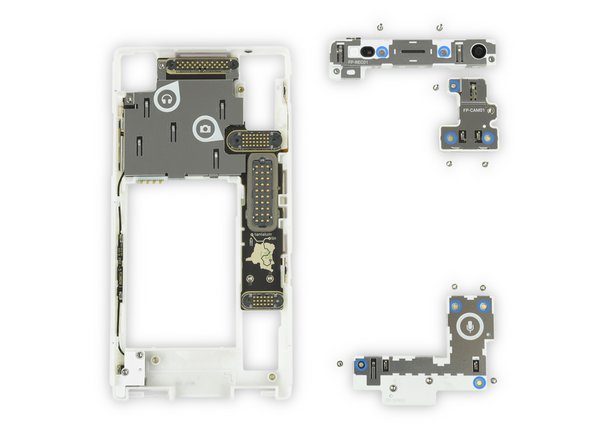
– And there it is—the mainframe, featuring three easy-to-remove modules, each with its own playful icon showing what it’s all about:
– We also spot a handy little map pointing out where the phone’s conflict-free tin and tantalum come from. Pretty cool!
– Here’s what you’ll find: the headphone jack, earpiece speaker, and front camera are all bundled together in one module.
– Next up, the module with the rear camera—ready for your photo ops.
– And finally, the dedicated microphone module, keeping your calls crisp and clear.
Step 6

Don’t sweat it if you mix up these Phillips screws – they’re all the same size, 5.5 mm, so you can’t go wrong!
– Let’s roll up our sleeves and see just how repair-friendly the Fairphone 2 really is.
– With a Phillips #0 screwdriver in hand, those three modules come out without breaking a sweat.
– Underneath, it’s all spring contacts—no flex cables or press connectors to wrangle.
Tools Used

Step 7

And just like that, we’ve wrapped up the first level of user repairs. The Fairphone is built to come apart easily into modular pieces, but what if you want to dive deeper and fix a specific module?
– The modules are secured with Torx T5 screws—probably to keep casual tinkerers at bay—but don’t worry, they’re still straightforward to open.
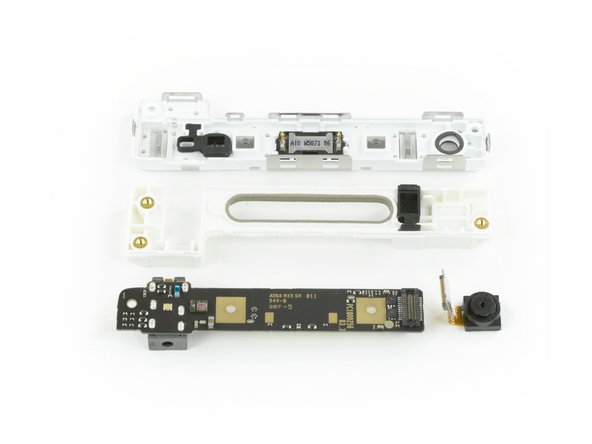
– We kick things off with the top module: the front-facing camera easily detaches thanks to a simple flex cable connector.
– Spring contacts power the earpiece speaker, which means swapping it out is a breeze.
– The headphone jack is soldered onto the board, but since that’s the last piece, replacing the whole board shouldn’t break the bank.
Step 8


Fairphone has made some clever tweaks, moving cables and connectors to make component swaps a whole lot easier for DIY repair enthusiasts – a big win for fixing your device at home!
– Next up, let’s dive into the rear camera module.
– This little guy packs an 8 megapixel CMOS sensor with a 1/3.2 inch size and a ƒ/2.2 aperture. Not bad, right?
– It’s put together in the usual way: a plastic casing around a standard off-the-shelf component, all connected to a pogo interface board via a flex cable and connector.
– Who knows, maybe this module will get an upgrade in the future—fingers crossed for something awesome, like Project Ara!
Step 9

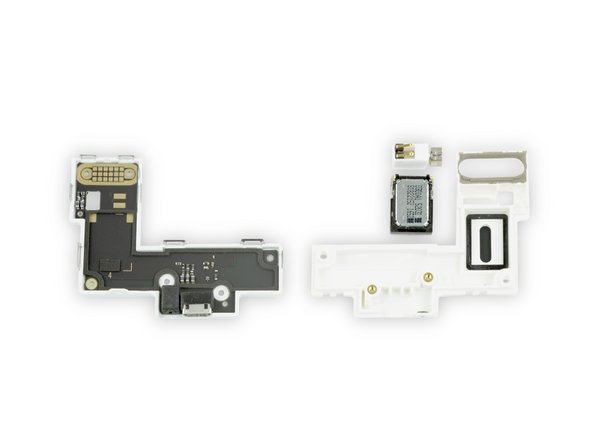
– Now, let’s tackle the last module that needs to be opened up. Don’t worry, it’s not as scary as it looks – despite only being marked with a microphone icon, it’s actually home to several important components.
– You’ll find that the vibration motor and loudspeaker are connected by spring contacts, which is great news because that means they’re relatively easy to remove.
– The USB port and microphone, on the other hand, are soldered to the board. This isn’t necessarily a bad thing, though – the USB port needs a bit of extra stability, and it’s got a lot more pins than a speaker, so it makes sense that it’s attached this way.
Step 10

Heads up: the heat spreader usually tears when you peel it off. No worries though—Fairphone offers replacement parts just for this.
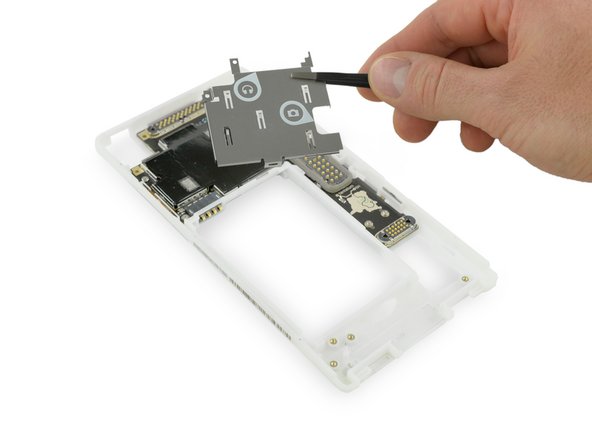
– Time to dive into the heart of the Fairphone 2—let’s get this repair rolling!
– First up, remove the metal shield plate, which is loaded with handy icons. Once that’s off, you’ll reveal the heat spreader, still keeping some of the fun stuff tucked away underneath.
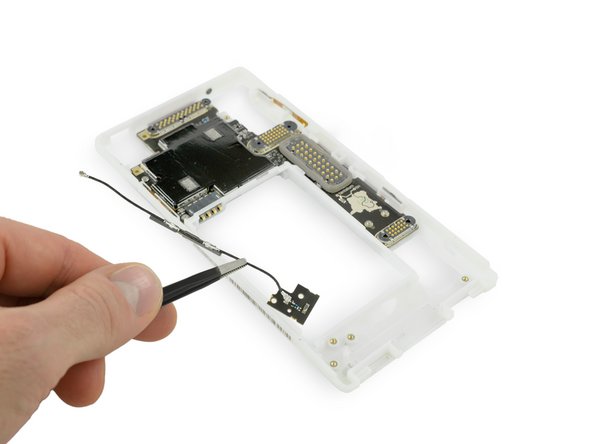
– As we go further, we come across the RF cable that carries the radio signal along the side of the frame to the main antenna. Gently disconnect it and keep moving!
Step 11

Looking ahead, you might want to consider adding NFC-enabled cases to your device for seamless, on-the-go payments. Super convenient, right?
– Look at that sleek design! The translucent plastic frame lets you peek at all the embedded antennas and buttons, which all connect to the motherboard via those handy spring contacts.
– Down at the bottom, we’ve got those five pogo pins we spotted earlier. This is actually a USB 2.0 device interface, complete with power input—perfect for future upgrades and snazzier cases.
Step 12

– Alright, let’s dive into the techy side of things!
– We’ve got the Samsung KLMBG4WEBC 32 GB eMMC NAND Flash. This little guy is key to your device’s storage.
– Next up is the Qualcomm WCN3680B, the Wi-Fi 802.11ac and Bluetooth combo chip. It keeps you connected, whether you’re browsing or streaming.
– The STMicroelectronics LSM330DLC 6-Axis Accelerometer + Gyroscope is up next. This sensor helps track your device’s motion and orientation.
– The AKM Semiconductor AKM8963C 3-axis Electronic Compass is ready to point you in the right direction, literally!
– We also have the Texas Instruments DRV2603 Haptic Driver. This component is responsible for providing those satisfying vibrations.
– And last but not least, the Qorvo Antenna Switch keeps your device’s antennas working smoothly for all your signal needs.
Step 13

– Now, let’s take a look at the backside – it’s packed with cool stuff!
– You’ll find the Samsung K3QF2F20EM-QGCF 2 GB LPDDR3 RAM, layered on top of the Qualcomm Snapdragon 801 MSM8974AB – pretty neat, right?
– Next up, we have the Qualcomm WTR1625L RF Receiver, which is similar to the one found in the iPhone 6 – nice to see some familiar tech!
– The RF Micro Device RF7389EU Multimode Multiband Power Amplifier Module is also back here, doing its thing to keep your device connected
– Salvation Repair recommends taking your time when handling the Qualcomm QFE1100 Envelope Tracking Power Management – it’s a delicate process
– The Qualcomm PM8841 PMIC is another important component, so be sure to handle it with care
– Your device’s audio is powered by the Qualcomm WCD9320 Audio Codec – let’s keep it sounding great!
– Finally, we have the Qorvo RF1496A SP12T Antenna Switch, which helps your device stay connected to the world
Step 14


Heads up: we’re teaming up with the European Commission to help shape the Fairphone repair manual, making it easier for everyone to collaborate and get those devices fixed right!
– Fairphone 2 gets a perfect 10 out of 10 for repairability—couldn’t be much easier!
– The LCD and cover glass come as one piece, making them a breeze to remove (though swapping them out can set your wallet back a bit more).
– Battery or display acting up? Both can be popped out and swapped without even hunting for a screwdriver.
– All the internal modules are held in place with Phillips #0 screws and simple connectors—no weird tools needed.
– Each module is its own little universe, and lots of individual parts inside can be swapped out if you want to dig deeper.
– Buttons and cables are easy to spot and even easier to get to. Spring contacts make future upgrades and quick part swaps a walk in the park.
– You’ll get built-in repair instructions right in the phone, plus handy icons to guide you as you go.
Success!

