
Samsung Galaxy S20 Plus Rear-Facing Camera Module Replacement
Duration: 45 minutes
Steps: 41 Steps
Ready to swap out the rear camera module on your Galaxy S20 Plus? This job covers all four rear cameras, plus the frame that keeps them in place. Heads up: you’ll be taking out the motherboard to get this done, and you’ll need fresh adhesive before you wrap things up. If things get tricky, you can always schedule a repair.
Step 1


If you poked the tool into the other hole, no biggie—the mic and its gasket are tucked safely away from any trouble.
- Grab a SIM card eject tool, a screwdriver bit, or just a trusty paperclip you've straightened out. Find the tiny hole on the SIM tray at the top edge of your phone, right by the plastic antenna band.
- Push in with steady pressure until the tray pops out like magic.
Tools Used

Step 2


The SIM card slips right out of the tray, so keep an eye on it—no surprise escapes!
- Pop out the SIM card tray—easy does it!
- When you slide the SIM back in, make sure it's facing the right way in the tray. No upside-down shenanigans.
- See that skinny rubber gasket hugging the SIM tray? It’s your phone’s shield against water and dust. If it looks beat up or is missing, swap in a fresh gasket or a new tray to keep your phone safe.
Step 3

Before you dive in, shut down your phone and unplug it. Let’s keep things safe and smooth!
A hair dryer, heat gun, or hot plate can do the trick, but don’t go wild with the heat—your screen and battery like it cool, so keep things warm, not scorching.
- Warm up your iOpener and give the bottom edge of the back cover a cozy two-minute hug.
Tools Used

Step 4


Handle the pick with care—too much pressure and you might just shatter that back cover glass!
If your display looks like it lost a battle with gravity, slap a layer of clear packing tape on there—your suction cup will thank you. If your suction cup is giving you attitude, switch to some heavy-duty tape. Worst case scenario, hit that glass with a dab of superglue and stick the suction cup right on.
These tight tolerances are stubborn, so don’t be shy with the iOpener—heat it up, use the suction cup, and repeat as needed until you get that perfect gap.
Struggling to make a gap? Crank up the heat along the edge and give it another shot.
- Stick a suction cup near the bottom center of the phone’s back—think of it as your grip buddy.
- Pull gently but firmly on the suction cup to loosen the back cover from the frame, creating a small gap.
- Slide the tip of an opening pick into that gap to start prying it apart.
Tools Used
Step 5


Avoid trying to slice through the adhesive at the corners of the phone where the glass curves, or you might end up with a cracked glass panel. Let's keep that screen intact!
- Wiggle your pick across the bottom edge to loosen up that sticky adhesive.
- Keep the pick parked in the gap so the glue doesn't sneak back together.
Step 6

- Warm up the left edge of the back cover with a heated iOpener for about two minutes. Your phone likes a little spa day before we get things moving.
Tools Used
Step 7


Handle the pick with care—too much pressure and you might just shatter that back cover glass!
These parts fit together tighter than a packed subway—so don't worry if it takes a few tries.
The glass here has a bit of a curve, so your pick won't go in deep. As long as the tip slips under the edge, you're set to keep moving.
If it's still stubborn, hit that edge with some more heat and give it another go.
- Stick a suction cup onto the back of the phone, aiming for the center near the left edge.
- Give that suction cup a firm, steady pull to start prying the back cover away from the frame.
- Slide the tip of an opening pick into the gap you’ve created.
- A few drops of high-concentration (over 90%) isopropyl alcohol in the seam can help loosen stubborn adhesive.
Step 8


- Once the pick is snugly tucked under the edge of the glass, give it a little tilt downwards and slide it in a bit more to completely break free from the back cover's adhesive. You've got this!
Step 9


When sliding along the ridge near the volume and power buttons, take it slow—this area’s glass cutout can be a drama queen and crack if you rush.
- Gently slide the pick along the left side of your phone to break the seal of the back cover's adhesive.
- Once you've slid the pick in, leave it resting under the left edge to keep that adhesive from sticking back together.
Step 10

A hair dryer, heat gun, or hot plate can do the trick, but watch out—don’t let the device get too hot. The display and internal battery are pretty sensitive to heat, so keep it gentle to avoid any damage.
- Warm up the right edge of the back cover with a heated iOpener for about two minutes—think of it as giving your device a little spa treatment before you get hands-on.
Tools Used
Step 11


Just like the last side, give your opening pick a little tilt downward to slide it smoothly under the back cover. Easy does it—you're almost there!
- Stick a suction cup onto the back of the phone, aiming as close to the center of the right edge as you can. Keep it steady!
- Pull gently but firmly on the suction cup to create a small gap between the back cover and the frame. Patience pays off here.
- Slide the tip of an opening pick into that gap to start prying it open. Keep going carefully to avoid any damage.
Step 12


While you're working on this step, the back cover might let go of one or both of your picks, and they could drop out. No worries—just set any escapee picks aside. The bottom edge won't seal up again from here onward, so you're good to keep moving.
- Gently glide your pick along the right side of your phone to break that stubborn adhesive holding the back cover in place.
- Once you're in there, keep your pick tucked under the right edge of the glass near the top to keep that adhesive from playing tricks on you and resealing itself.
Step 13

- Warm up the top edge of the back cover by gently applying a heated iOpener for about two minutes. This helps loosen things up and makes the next steps smoother. If you need a hand, you can always schedule a repair.
Tools Used
Step 14


Heads up—those curvy corners on the back cover are crack magnets! Take it slow and steady to keep your glass in one piece.
If you hit a snag and the slicing gets stubborn, just hit pause, give it a quick reheat, and then carry on. It’s all about patience and a little heat to keep things smooth sailing.
- Gently work the pick along the right edge, easing it around the top right corner. Keep sliding it along the top edge, all the way around to the left, until the back cover's adhesive gives way. If you hit any snags, remember you can always schedule a repair with Salvation Repair to get professional help.
Step 15


- Gently pry up the back cover. If it feels stuck, grab an opening pick and slide it along the edges to slice through any leftover adhesive.
- Take off the back cover and set it aside.
- On the way back to putting things together:
- Now’s a clever time to power up your phone and make sure everything’s working. Once you’ve checked, turn it off before diving back in.
- Remove any stubborn bits of adhesive using tweezers or just your fingers. If the adhesive is clinging on for dear life, a little heat can make it let go.
- If you’ve got custom-cut adhesives, check out the guide for those.
- Using double-sided tape? There’s a guide for that too.
Tools Used

Step 16

As you work through this repair, keep tabs on each screw—think of them as tiny treasures you’ll want to put back exactly where they belong. Staying organized helps everything go smoothly and makes reassembly a breeze.
- Grab a Phillips #00 screwdriver and get ready to unscrew those six little 4 mm screws holding down the motherboard bracket. Easy peasy—just a quick twist and you're on your way. If you need a hand, you can always schedule a repair.
Tools Used

Step 17


Hold off on taking out the bracket just yet—it's still chilling with the wireless charging coil!
- Grab your trusty tweezers and gently lift the motherboard bracket up and away from the plastic midframe. Give it a little wiggle to unclip it—easy does it!
Tools Used
Step 18


- Gently tilt up the motherboard bracket to give yourself a clear shot at the orange battery connector. Keep it light and steady—no need to force anything. If you hit a snag, remember you can always schedule a repair with the pros.
Step 19


Watch out for those tiny components near the socket when popping off connectors—those little guys are easy to bump!
- Grab your trusty spudger and gently pop up the battery connector—just a little wiggle and lift will do the trick.
Tools Used

Step 20


- Grab your spudger and gently pry up the wireless charging coil connector to disconnect it. Take it slow, you've got this!
Tools Used
Step 21


- Grab your tweezers and gently lift the wireless charging coil—no need to rush, just a smooth peel away from the device.
- Take out the wireless charging coil like you’re removing a VIP from the party.
- When putting things back together, start by reconnecting the charging coil and battery connectors, then tighten up those motherboard bracket screws for a snug fit. Once everything's lined up, press the coil pad down so it sticks nicely.
Tools Used
Step 22

- Grab a Phillips #00 screwdriver and unscrew the five 4 mm screws holding in the loudspeaker and lower midframe. Easy peasy—just keep track of those tiny screws! If you need a hand, you can always schedule a repair.
Tools Used


Step 24


- Grab your trusty spudger and gently pop up the main and auxiliary flex cables from the daughterboard hanging out near the bottom of your device. It’s like unplugging tiny, stubborn headphones—just with more style.
- When you’re reconnecting, line up the press connectors with care. Start by pressing down on one side until you hear that sweet click, then do the same for the other side. Skip pressing the middle—those pins are delicate, and nobody wants a bent connector drama.
Tools Used
Step 25


- Grab your trusty spudger and gently pop the main and auxiliary flex cables off the motherboard—think of it as unplugging tiny, high-tech seatbelts.
Tools Used
Step 26


- Gently lift and peel away the main and auxiliary flex cables—think of it as carefully unwinding a ribbon, not ripping a band-aid. If you hit any snags or need a pro touch, you can always schedule a repair with Salvation Repair.
Step 27


- Gently lift and disconnect the left 5G antenna cable from the motherboard. Keep it careful and steady—this step is all about finesse. If you need help along the way, you can always schedule a repair.
Step 28


- Grab a spudger and gently lift up that main display flex cable to disconnect it from the motherboard. You've got this!
Tools Used
Step 29


- Gently lift and bend the display and left 5G antenna flex cables out of the way of the motherboard and battery, keeping it smooth and tension-free. If you need a hand, just schedule a repair.
Step 30

- Grab your Phillips #00 screwdriver and unscrew the three 4 mm screws holding down the upper midframe. Time to show those screws who's boss!
Tools Used
Step 31


- Slide the tip of a spudger into the notch on the right side of the upper midframe and gently pry upward to pop the clips free. Once it's loose, lift off the upper midframe to continue your repair. Need a hand? You can always schedule a repair with Salvation Repair.
Tools Used


Step 33


- Gently pop up the side button flex cable from the motherboard like you're lifting a secret trapdoor.
- Swing that cable out of the way, giving yourself plenty of space to work your magic.
Step 34


- Gently pop up the front camera flex cable from the motherboard like you're giving it a little high five.
- Swing the cable aside so it’s not blocking the motherboard—think of it as clearing the dance floor.
Step 35


- Lift up and unplug that top 5G antenna cable from the motherboard—nice and easy, like pulling off a sticker.
Step 36


The module's got a little sticky situation with some adhesive, but it should come loose without much fuss.
- Grab your spudger and gently lift up the corner of the 5G millimeter wave antenna module—like popping the lid off a stubborn jar.
- Take out the 5G antenna module and set it aside somewhere safe.
- When putting things back together, start by reconnecting the 5G antenna connector to make sure everything lines up just right. Then, press the antenna module down so it sticks where it belongs.
Tools Used
Step 37

- Grab your Phillips #00 screwdriver and get ready to unscrew the two screws holding down the motherboard and camera assembly. You’re looking at one 4 mm screw and one 3.4 mm screw—easy peasy. If you hit any snags, remember you can always schedule a repair with Salvation Repair to lend a hand.
Tools Used
Step 38


- Take your spudger and gently wedge the flat end into the bottom left corner of the motherboard. Give it a little lift to pop it free from its cozy spot in the phone.
- Go ahead and lift the motherboard assembly out. Nice work!
Tools Used
Step 39
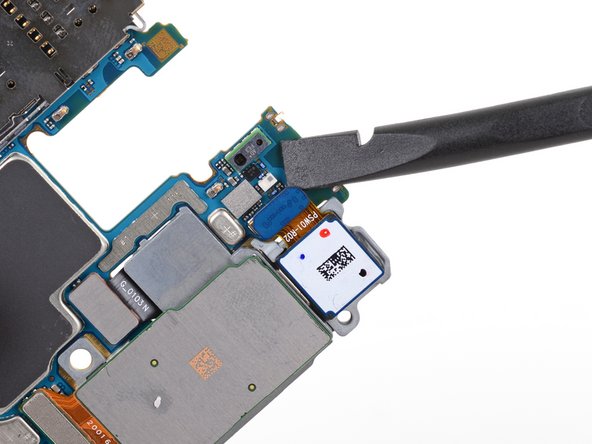

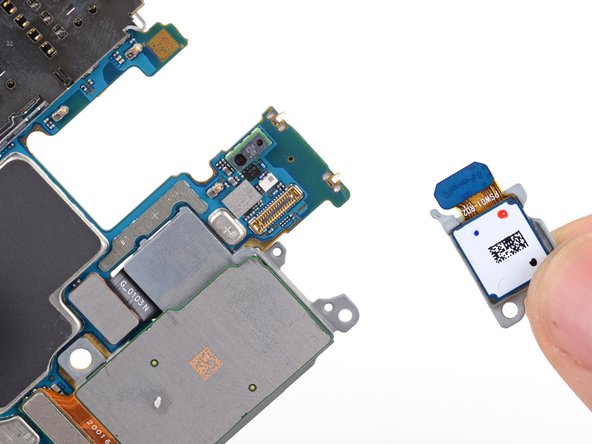
The module is gently held in place by a tiny post connecting it to the other cameras' frame, so with a little wiggling, you should be able to free it up easily.
- Grab your trusty spudger and gently pry up the ultrawide camera connector from the motherboard. It's like giving it a little nudge to say, 'Hey, time to disconnect!'
- Now, let's remove the ultrawide camera module. You've got this!
Tools Used
Step 40

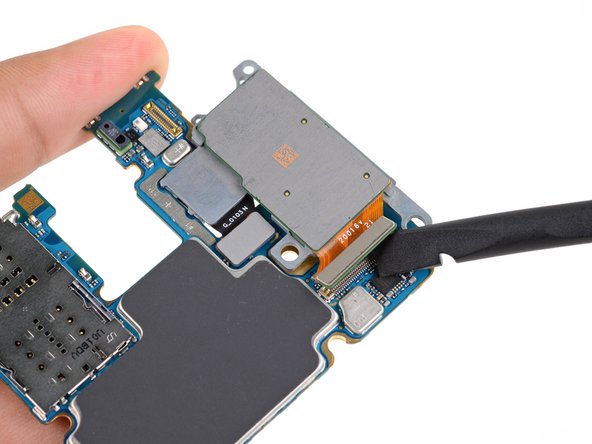
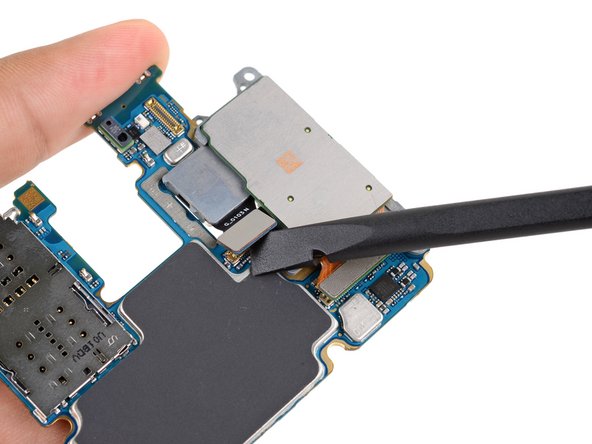
- Grab your trusty spudger and gently pop up the connectors for both the telephoto and wide-angle cameras from the motherboard. Easy does it—no need to rush!
- Next, lift up and disconnect the depth sensor. Give yourself a high five; you're moving right along!
Tools Used
Step 41

- Check out your new part next to the old one—sometimes bits and bobs (or sticky stuff) need to move over before you install.
- Ready to put things back together? Just follow these steps backwards and you’re golden.
- Once you’re done, give your device a quick test to make sure everything’s working.
- If you’ve got leftover parts or electronics, toss them at an R2 or e-Stewards certified recycler and give the planet a high five.
- Feeling stuck? Swing by our Answers community for advice, or you can always schedule a repair with the pros.


