Samsung Galaxy S10 and S10e Teardown
Duration: 45 minutes
Steps: 17 Steps
The iPhone may have gone full Roman numerals, but Samsung kept things classic with the S10 and S10e. Are these phones as straightforward as their names? Let’s crack them open and see what’s really inside. Want more tech teardown goodness? Follow us on Twitter, Instagram, and Facebook. If you want updates delivered straight to your inbox, check out our newsletter.
Step 1


- Curious about what makes the S10e stand out from the S10? Let’s dig into the specs and find out! We’ll look at the display sizes—5.8" Super AMOLED Infinity-O on the S10e versus 6.1" on the S10—along with the processors, cameras, and fingerprint sensors. The S10e features a side-mounted fingerprint button, while the S10 sports an ultrasonic sensor tucked under the screen. Plus, we’ll check out the headphone jack, microSD slot, and water resistance ratings. Exploring these differences helps us understand what’s behind the design choices. If you need a hand with anything more involved, you can always schedule a repair.
Step 2


We dive deep into the S10+ in our video teardown—check it out here!
- At first glance, these smartphones might seem pretty mysterious with their sleek, monolithic designs. But take a closer look at the S10 and S10+—you'll find those cool curved display edges waiting to be admired!
- Turning these devices around reveals a fascinating feature: while all of them come equipped with wide-angle and ultra-wide cameras, the S10 and S10+ have a little extra flair with their telephoto camera.
- While we might feel like we've time-traveled back to the 1800s when gazing at these phones, Creative Electron has got our back with their cutting-edge X-ray photos that unveil all the secrets hidden beneath the surface.
- Check this out: the S10+ sports a thick ceramic back cover that makes it much less transparent to X-rays compared to its glassy counterparts. In other words, it shows up much darker on X-ray scans!
Step 3


Fingers crossed that these moved fingerprint sensors will make prying things open a bit less nerve-wracking.
Samsung says a tempered glass screen protector can mess with the ultrasonic sensor—hence this tweak. Although, what’s up with the S10e needing one too? The plot thickens!
- The S10e and S10 may look like twins, but the S10e rocks a chunky power button that moonlights as a fingerprint sensor.
- The S10 is a bit mysterious—you won't spot its fingerprint sensor unless you bust out the teardown skills.
- Both models are still rocking headphone jacks, plus matching USB-C, mic, and speaker ports. Classic moves.
- Up top, you’ll catch your first real-life look at those hole-punch displays, already sporting their screen protectors.
Step 4


Looks like Samsung may have stumbled upon a clever repair upgrade! By relocating the fingerprint sensors from the back cover, they've waved goodbye to the pesky flex cable trap that has made Galaxy repairs a bit of a headache in the past.
- A shiny new phone may come with a shiny new way to open it... or maybe not! We're back to warming things up and putting our trusty iSclack to work.
- As we peel the backs off our phones, we're on the lookout for traps. Not today, Admiral Ackbar! The panels pop off with ease.
- Just when things start to cool down, we spot some clever heat-dissipating graphite pads snugly placed on the back covers. Looks like something's built to handle the heat without singeing your fingers.
- And wait, is it just us, or is the adhesive playing nice this time around?
Tools Used

Step 5


Wireless charging is kind of a power-hungry process, and it loves to throw a heat party while it’s at it.
We’re still waiting for the official word on how much this heat affects your phone’s battery health over time—especially when swapping the battery isn’t just a quick fix.
- Just a few standard Phillips screws stand between us and the exciting parts! Our Marlin driver set has got your back, and thankfully Samsung has kept it simple with just one driver for this step.
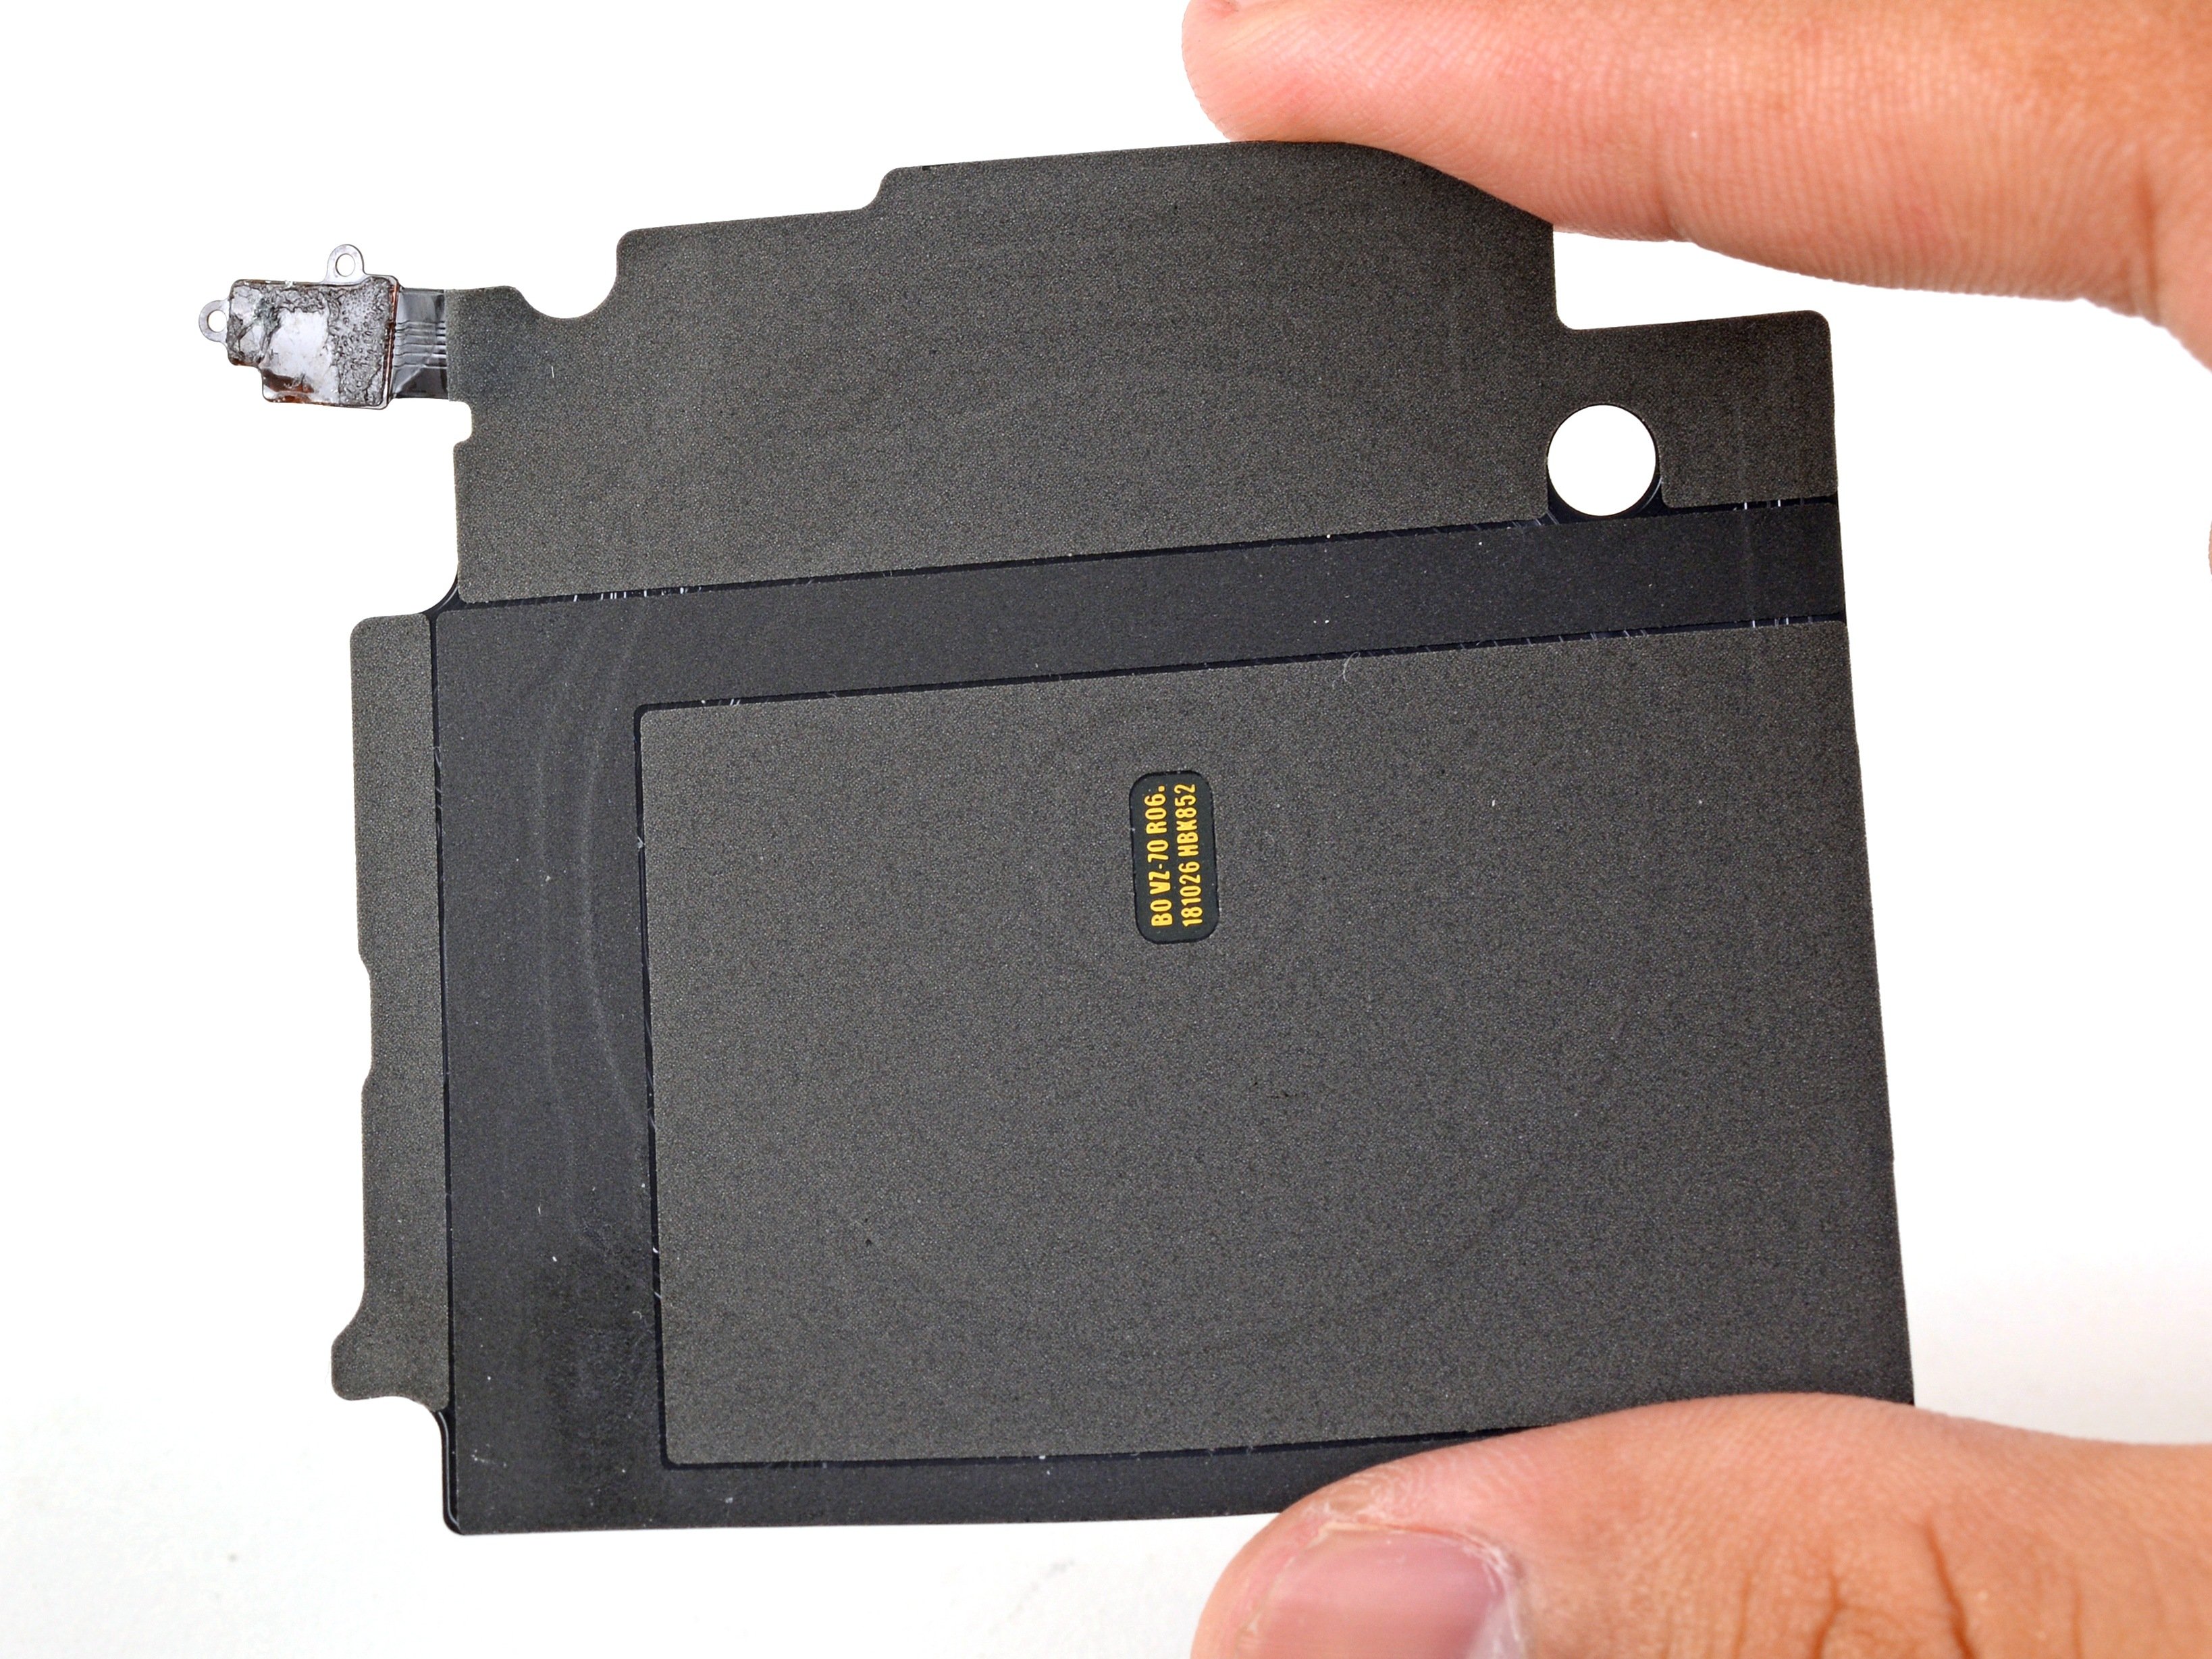
- These midframe assemblies come with their own special feature: they can now wirelessly charge other gadgets too!
- That's likely why the coils are snugly nestled between two layers of graphite this year—a wireless charger that can both send and receive will create a lot more heat.
Step 6


...and yep, the USB-C ports are now part of the main board too. The days of easily swapping out a separate charging port are over—so if your Galaxy’s port acts up, the fix isn’t as quick as it used to be.
- Samsung's headphone jacks are compact—just 12 mm tall and 8 mm wide—and completely standalone. We love a good modular part! Too bad there's no space for one in iPhones or iPads.
- We'll dive into cameras soon, but first, let's move those selfie cams aside so we can free the motherboard.
- Our teardown pro pulls off a smooth, perfectly coordinated motherboard lift...
- ...or do they? Stay tuned!
Step 7


- Peeking under the motherboard reveals some pretty interesting bits. First off, that big copper heat pipe sitting beneath the board is definitely beefier than the one in the S9—it’s more like the one from the Note9. Next, we carefully peel away a multi-layer thermal interface material from the board. That wide copper surface helps with heat transfer, but since it’s soft metal, a flexible interface layer helps fill in gaps and keeps everything running cool and smooth. We also notice a thin sticker that looks like it provides RF shielding, especially since there’s a large hole in the can lid underneath—showing a PMIC and a pink thermal pad. To sum it up: fast charging and reverse wireless charging crank up the thermal stress on the system, and Samsung has gone all out with cooling measures to keep things in check. If you want to get more hands-on, you can always schedule a repair with Salvation Repair.
Step 8


This year's codename is "Beyond"—a fresh upgrade from last year's cosmic "Star". Buckle up, because we're taking things to the next level!
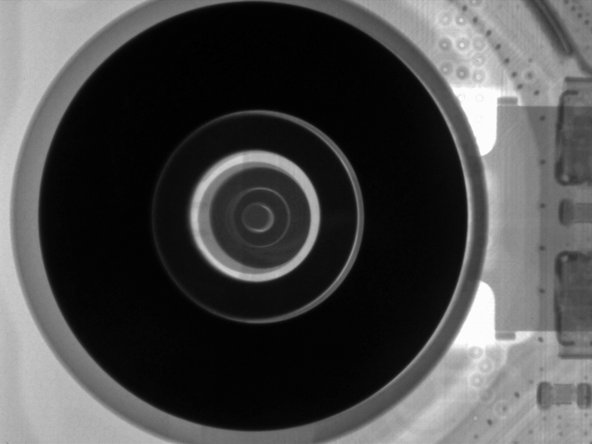
- Start by carefully removing the main camera array from the board. It’s housed in a yellow plastic frame—probably ABS or nylon in its natural hue, giving it a slightly retro vibe, but that’s part of the charm. Next, set each camera array aside near its corresponding selfie camera—left for the main, right for the selfie. For the Galaxy S10, note that the left array has an extra camera: a 12 MP telephoto with ƒ/2.4 aperture and OIS, connected on the same connector as the standard wide-angle. The 12 MP wide-angle cameras also feature OIS and the dual-aperture setup from the S9+. Lastly, the 16 MP ultra-wide modules, with ƒ/2.2, are a bit bulkier with thicker plastic frames. Want to see what’s happening inside? An X-ray view reveals the telephoto camera’s sensor and OIS electromagnets. If you need help with the more intense teardown steps, you can always schedule a repair.
Step 9

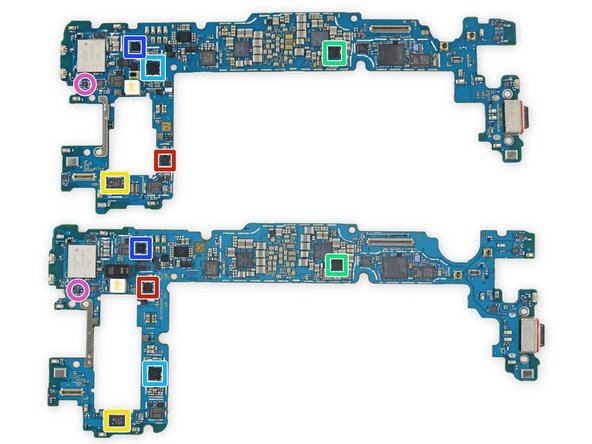
- Alright, let’s dive right into the heart of the matter—those chips! On the top side of our motherboards (S10e on top, S10 at the bottom), here’s what we’ve got:
- S10e: THGAF8T0T43BAIR 128 GB Toshiba UFS NAND flash storage
- S10: KLUFG8R1EM-B0C1 512 GB Samsung eUFS NAND flash storage
- Samsung K3UH7H70AM-AGCL LPDDR4X sitting proudly above the Qualcomm Snapdragon 855 SoC
- Qualcomm WCD9341 audio codec making sure your tunes sound great
- Qorvo QM78062, probably a snazzy RF Fusion front-end module
- Maxim MAX77705C PMIC keeping everything powered up
- Skyworks SKY78160-51 Low Noise Amplifier, because noise is so last season
Step 10


- Samsung really went all out this time, adding even more tech magic to the flip sides:
- Murata KM8D03042 (your likely Wi-Fi/Bluetooth buddy)
- Qualcomm SDR8150 RF Transceiver (the communication wizard)
- Qualcomm PM8150 Power Management (keeping the power flow just right)
- IDT P9320S wireless power receiver (your wireless charging friend)
- Qorvo QM78062 Power Amplifier Module (likely boosting those signals)
- NXP PN80T NFC controller w/ Secure Element (for those tap-to-pay moments)
- Qualcomm QDM3870 RF front end module (laying the groundwork for great connectivity)
Step 11

- We’ve checked out the big-ticket components—now let’s give a shout-out to the unsung heroes playing backstage:
- Cirrus Logic CS35L40 audio amplifier
- Qualcomm QET5100 envelope tracker
- Skyworks SKY13716-11 low-band LNA front-end module
- Probably a Samsung S2DOS05 display power management IC
- Probably a Samsung S2MPB02 camera power management IC
- STMicroelectronics STM32G071EBY6 32-Bit Arm Cortex-M0+ microcontroller with 128 Kb flash memory
- NXP Semiconductor BGU8103 GPS/GLONASS/Galileo/COMPASS low noise amplifier
Step 12


- And now, for the grand finale:
- STMicroelectronics LPS22HH pressure sensor
- STMicroelectronics LSM6DSO accelerometer
- Samsung S2MIS01 MST driver
- Most likely a Diodes Incorporated AH1897T Hall Effect sensor
- Vishay DG2730 USB 2.0 DPDT analog switch
- NXP Semiconductor NCX2200 low voltage comparator
- RDA Microelectronics RDA6213N FM transceiver (probably)
Step 13


Let's be real: batteries are like snacks—they'll run out eventually and need a replacement long before your trusty smartphone calls it quits.
- Time to tackle those batteries! Both are stuck down tight to their metal midframes—no easy pull tabs here.
- No stress—we’ll use some adhesive remover and let it do its thing while the glue chills out.
- The S10e packs an 11.94 Wh battery, while the S10 steps it up with 13.09 Wh (that’s a 13% bump from last year’s 11.55 Wh).
- Just for comparison, the iPhone XR runs on 11.16 Wh, and the XS has 10.13 Wh.
Step 14


It might seem like something out of a bat and dolphin tech book, but using sound waves to read your fingerprint on a smartphone is actually pretty impressive. (Thanks to Qualcomm!)
- Alright, we're going in! Removing these ultra-thin displays is always a gamble, but we like living dangerously. Once inside the S10, you’ll spot the fancy ultrasonic fingerprint reader.
- Cool tech, but don’t get too attached—the sensor is stubborn and not likely to survive an extraction. We threw everything short of a kitchen sink at it, and it's still holding on for dear life.
- Other chips you’ll see:
- Qualcomm QBT2000 Ultrasonic Fingerprint Sensor Controller
- If the fingerprint sensor ever throws a tantrum, just know that a new screen might cost you a small fortune. If things get dicey, you can always schedule a repair.
- Samsung S6SY771X Touchscreen Controller
- Winbond W25Q80EWUXIE 8 Mb Serial Flash Memory
Step 15


This component might not grab the spotlight, but it’s built tough and sticks around longer than anything beneath the display. Think of it as the reliable sidekick in your device’s repair story.
- Removing the flat display on the S10e isn't exactly a walk in the park, but it’s a bit less intimidating than tackling the curved S10 screen. Heads up—these displays probably won’t be winning any Fortnite tournaments after this. The S10e doesn’t have that fancy ultrasonic tech glued on the back, but it’s got its own familiar feature: a capacitive touch sensor built right into the power button. Just a heads-up: this repair means peeling the entire screen off to get to the button—kind of a full-on display removal mission. The touch controller IC inside is the same one used in last year’s S9s and previous Galaxy models, so it’s a familiar face in the repair world. And that serial flash memory? It’s a GigaDevice GD25LH40C 4 Megabit chip, sitting quietly, waiting to be handled. If you need a hand with any of this, you can always schedule a repair.
Step 16


- These ultra-slim Samsung displays don’t just look cool—they also help keep things chill inside your phone with layers of copper and graphite working together to whisk away heat from those busy components.
- See that camera hole? That’s no accident! It’s laser-zapped out, pixel by pixel, carving a perfect tunnel right through the midframe and motherboard straight to the camera. Science, but make it snazzy.
- Now, the hidden sensors—proximity and fingerprint—are even sneakier. They peek straight through the OLED screen, making for a wild edge-to-edge look. You won’t notice them during regular use, but with the screen popped off, they’re suddenly playing peekaboo.
Step 17


Big shoutout to Greg Kramer for helping us crack the code on these phones' thermal management upgrades. Any slip-ups are probably on us—thanks for the assist, Greg! If you hit a snag along the way, remember you can always schedule a repair for expert help.
- We went all-in and took apart two phones just for you—here’s the highlights if you’re short on time:
- But that's not all! If you’re feeling extra curious, check out our third teardown: we’ve got a video walkthrough of the S10+.
- Now let’s see how these phones stack up with their repair scores.
- Big batteries inside, but they're stuck down with glue and swapping them isn’t a breeze.
- These phones can wirelessly charge other devices, but heads up—it generates a lot of heat and could be tough on your battery in the long run.
- The screens are cool and packed with tech, but replacing them will still hit your wallet and patience hard—especially now that the fingerprint sensor’s moved. If this step looks impossible, you can always schedule a repair.