Samsung Galaxy S8 Plus Back Glass Replacement
Duration: 45 minutes
Steps: 13 Steps
Gear up to replace the back glass on your Samsung Galaxy S8 Plus! If your new part doesn’t come with adhesive already attached, no worries—just grab some adhesive designed for rear glass and fingerprint readers. You can choose pre-cut strips or a thin, high-strength tape to get the job done smoothly. Need a hand? You can always schedule a repair with Salvation Repair for a professional touch.
Step 1

- Warm up your iOpener and give the left edge of your phone’s back a nice two-minute spa session. This softens up the glue holding the back cover, making your next steps way easier.
You can use a hair dryer, heat gun, or hot plate for some gentle warmth, but watch out! Too much heat can be a bummer for your phone—both the OLED display and the internal battery don't handle heat like a champ.
Opening your phone can break the waterproof seals, so have some fresh adhesive on hand before you start. If you’re reassembling without replacing the adhesive, just be mindful to keep liquids at bay. You might need to warm up the iOpener a few times to get the perfect heat—just follow the instructions and avoid overheating. If you need a hand, you can always schedule a repair.
Tools Used

Step 2


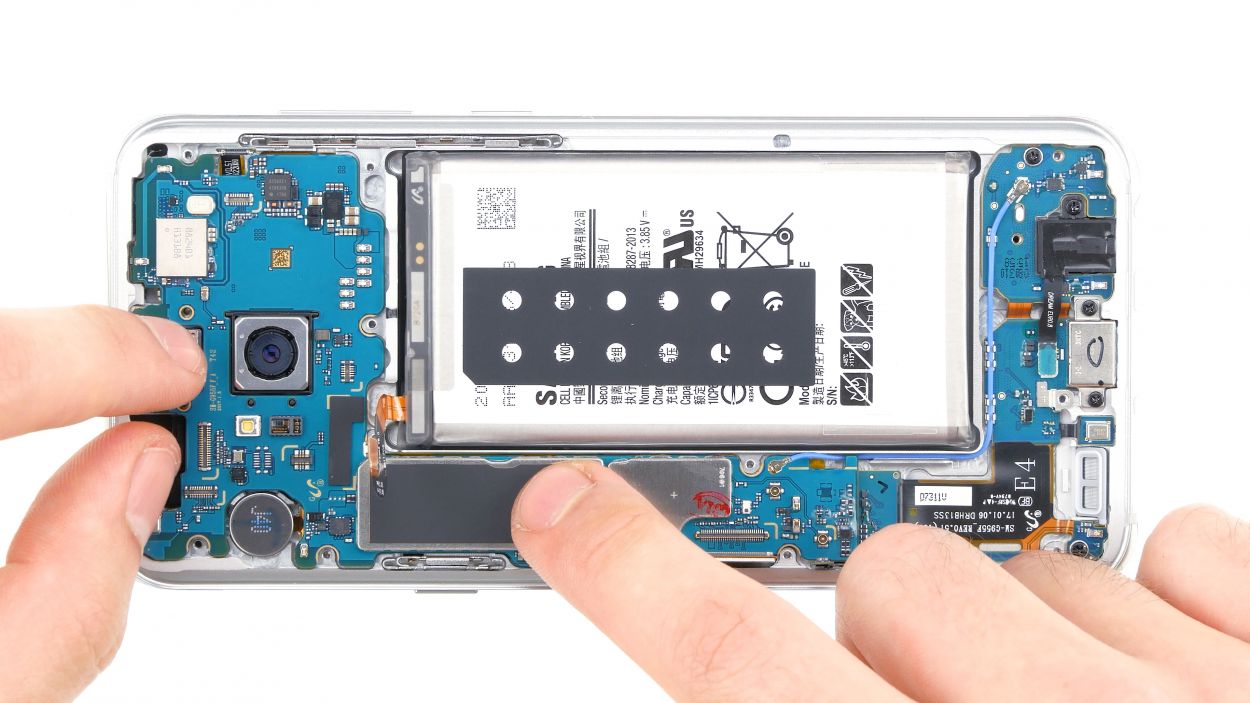
The adhesive pattern is shown clearly in the first image, highlighting the inside of the cover after it's been taken off. Keep an eye on that layout—it’s the key to a smooth reassembly.
- Time to get creative with some gentle prying — we're slicing through the adhesive that holds the back cover in place. Keep it smooth and steady!
- From the outside, you'll be cutting along the adhesive in the zones shown here: think of it as following a map of where the glue likes to hide.
- Thick patches of adhesive are the hearty ones, the tough cookies. Take your time here to make sure you get through them without fuss.
- In those thinner, more delicate spots, gentle cuts are the way to go. We want to loosen the grip without causing any collateral damage.
- And a quick heads-up: steer clear of prying or slicing near the fingerprint sensor flex cable to keep everything working smoothly. Protect that sensitive area!
Step 3


If you're rocking an iOpener, keep an eye on the heat levels—overdoing it might cause the gel pack to pop. Just follow the instructions, and you'll stay cool and successful.
The suction cup isn’t your best friend on the curved edges, so stick to the flatter parts for a better grip.
Got a cracked back cover? The suction cup might bail on you. Try some strong tape, or if you’re feeling crafty, glue the suction cup in place and let it set before moving on.
You might need to use some muscle here, but don’t worry—you only need a tiny gap for your tool to sneak in.
If things get stubborn, hit the adhesive with a little more heat to loosen it up. It cools off fast, so don’t be shy about warming it up again.
- Grab a suction cup and stick it to the back cover, right near that warmed-up edge.
- Gently lift the left side of the back cover with your suction cup, creating a tiny gap between the cover and the frame.
Tools Used
Step 4


Go easy on the rear glass—too much muscle or metal tools can turn it into a glitter bomb.
If you're feeling adventurous, after sliding in that pick, a few drops of isopropyl alcohol can be your secret weapon! Just drizzle it into the gap to help loosen up that sticky adhesive for the next steps. You'll be a pro in no time!
- Slide an opening pick into the gap like you’re slicing into a cake—just a little wiggle to get things started.
Step 5


To keep things smooth sailing, consider leaving that pick in place while you grab a second one for the next step. Keeping the pick inserted can help stop the glue you just separated from making a comeback.
- Take your opening pick and cruise down the left side of the phone, slicing through that sticky adhesive holding the back cover in place.
Step 6


Give the back cover a quick heat-up if it's cooling down too fast. We want to keep that glue soft and ready to work its magic!
The glue's got a bigger area here, so you’ll need to slide your pick in a bit deeper to get everything apart cleanly.
- Keep working your way along the bottom edge, slicing through that stubborn adhesive.
- It's handy to leave your opening pick in place and grab a fresh one for the next move.
Step 7


Heads up! The fingerprint sensor's flex cable is hiding in there, so don't go poking too deep with your pick. Check out the diagram in step 2 for a solid game plan.
- Carefully slide along the top edge and right side to break up any stubborn adhesive still hanging on.
Step 8


Hold up—don’t yank off the back cover just yet!
- Gently pry the back cover up from the left edge and swing it open just a tad.
Step 9


- Grab a spudger and gently pry up the fingerprint sensor flex cable to disconnect it. Keep it steady and work carefully—you're almost there! If you need a hand, you can always schedule a repair.
Tools Used

Step 10


- As you put everything back together, let's get that fingerprint sensor cable reconnected! First, tilt the back cover into place until the cable connector is perfectly aligned with its socket.
- Next, grab your trusty spudger and gently press down on the connector to snap it into place. Easy peasy!
Getting the connector in place takes a little patience and some gentle finesse. Avoid rushing or forcing it—let it slide in naturally. If your hands are on the smaller side, you might be able to press the connector in with your finger, just make sure not to strain or bend the cable. Take your time, stay steady, and if you need a hand, schedule a repair.
Tools Used
Step 11

If you like, you can pop the back cover back on without swapping out the adhesive. Just clear away any big gunk that might keep it from sitting nice and flat. Once it's on, give it a little heat and press down to lock it in place. It won’t be waterproof, but the glue usually holds strong enough to keep everything cozy.
Before you slap on new adhesive and seal it up, power on your phone and make sure your repair is working smoothly.
- Start by removing the back cover. To install a new back cover, follow these steps. If you're reattaching the back cover or installing one without pre-applied adhesive, just follow this guide. Sometimes, you might need to transfer the camera bezel to your new part—check out our camera bezel replacement guide if that's the case. Use tweezers to gently peel away any leftover adhesive from the phone’s chassis, then clean the area with high-percentage isopropyl alcohol (90% or higher) and a lint-free cloth to get the surface ready for fresh adhesive. Finally, peel the backing off your new rear glass, carefully align one edge with the chassis, and press firmly to set it in place. If you need help, you can always schedule a repair.
Tools Used

Step 12


If the fingerprint sensor is being stubborn, try giving it a bit more heat, and gently run a pick around its edge to loosen up the adhesive.
- Swapping out the rear glass? Time to give your fingerprint sensor a new home! Here’s how you do it:
- Warm up your iOpener and let it work its magic on the fingerprint sensor to loosen up that sticky adhesive.
- Gently press from the outside of the glass panel until the sensor pops free from its adhesive grip.
Tools Used
Step 13

- If your fingerprint sensor adhesive is still holding strong, feel free to give it a second chance! But if it’s seen better days, it’s time to say goodbye to the old adhesive and bring in the new.
- Once you've bid farewell to the old adhesive, grab some high concentration isopropyl alcohol (at least 90%) and give the edges of the fingerprint sensor a good clean. After that, it’s time to stick on the new adhesive like a pro!