Samsung Galaxy S8+ Battery Replacement
Duration: 45 minutes
Steps: 18 Steps
Before you start taking apart your phone, make sure to get that battery down below 25% to stay safe and avoid surprises.
Ready to swap out that tired battery in your Galaxy S8 Plus? With regular use, your battery might start slacking off after a year or two. If your phone won’t stay charged or keeps shutting down when you need it most, follow these steps to get things back on track. Make sure to run your battery down below 25% before you dive in—lithium-ion batteries and accidental pokes don’t mix well. Spot a swollen battery? Don’t mess around: skip the heat, wear eye protection, and handle with care! If the back cover won’t budge, a little isopropyl alcohol (90% or higher) around the edges can help loosen things up. If anything feels risky, you can always schedule a repair and let the pros handle it.
Step 1

A hair dryer, heat gun, or hot plate can help here, but keep an eye on the heat! Overheating your phone is a no-go—both the OLED screen and internal battery are heat-sensitive, and we definitely don’t want any accidental damage.
Before you dive in, l keep in mind that opening your phone will affect its waterproof& seals. Make sure you've got some replacement adhesivei handy to ensure everything stays nice and dry when you put it all back together. If you're not planning to replace the adhesive, just be extra careful not to get any liquids in there.
You might need to bust out the iOpener a few times just follow the instructions and you'll be golden. We don't want you to end up with a phone that's hotter than a freshly launched gadget.
- Grab an iOpener and gently warm up the back of your phone along the left edge for about two minutes. This helps loosen up the adhesive holding the back cover in place, making it easier to get inside.
Tools Used

Step 2


The adhesive layout is shown in the first image, giving you a clear view of the inside of the cover after it's been taken off. Keep this visual in mind as you work through the next steps. If you need a hand along the way, you can always schedule a repair.
- Time to slice through the sticky stuff holding down the back cover—grab your tool and get ready.
- From the outside, you’ll be working your way around the areas shown:
- Thick bands of adhesive—these will need a bit more elbow grease.
- Thin strips of adhesive—you’ll breeze right through these.
- Steer clear of this area so you don’t mess with the fingerprint sensor cable hiding underneath.
Step 3


Keep your cool when heating the iOpener—too hot and you’ll have a gel-pack geyser on your hands!
The suction cup might not stick well to the curved edges of the glass, so avoid putting it right on the edge. Give it a bit of space.
If the back cover of your phone is cracked, the suction cup might not have a strong grip. In that case, try using some strong tape to lift it, or apply a bit of superglue to the suction cup, let it set, and you should be good to go.
You’ll probably need to use a bit of muscle here, but don’t worry—you only need to create a tiny gap to slide your tool in.
If you're having trouble, apply more heat to soften the adhesive a bit more and try again. Adhesive cools pretty quickly, so you might need to reheat it a few times to get it to cooperate.
- Start by attaching a suction cup to the back cover, aiming for the heated edge for the best grip.
- Gently lift the left edge of the back cover with the suction cup, creating just enough space between the cover and the frame.
Tools Used
Step 4


Go easy—using too much muscle or prying with metal tools can turn your rear glass into a mosaic.
If you're feeling adventurous, once that pick is in place, consider dribbling a few drops of isopropyl alcohol into the crevice. It'll help loosen that stubborn adhesive for the next steps!
- Gently slide an opening pick into the gap to get things started. Keep it steady and work your way around to loosen the parts. If you need help, you can always schedule a repair.
Step 5


Pro tip: Leave the pick wedged in while you grab a second one for the next step. This helps keep the glue from sneaking back together where you’ve already separated it.
- Gently slide your opening pick down the left side of the phone to loosen up that adhesive and free the back cover. Take your time—sticky stuff ahead!
Step 6


Keep warming up the back cover so the glue stays soft—nobody likes dealing with sticky, stubborn glue.
There's a big patch of glue here, so go ahead and slide your pick deeper into the phone to break it loose.
- Keep slicing along the bottom edge of the phone to cut through the adhesive. It might help to leave the opening pick in place for now and grab another one to continue with the next step.
Step 7


Heads up: the fingerprint sensor's flex cable is hiding nearby, so keep your pick shallow and take a peek at the diagram in step 2. No need to play hide-and-seek with tiny parts!
- Carefully slice through any leftover adhesive along the top and right sides. Steady hands win the day!
Step 8


Hold up—don’t yank that back cover off just yet!
- Gently lift the back cover from the left edge and give it a little nudge to open it up just a bit.
Step 9


- Take a spudger and gently pop up the fingerprint sensor flex cable—think of it like opening a stubborn bag of chips, but with way cooler tech.
Tools Used

Step 10


Take your time with this step—no need to rush. It's all about a little patience and practice. Don’t try to force the connector into place, or it might get a bit grumpy with you.
If your hands are on the slimmer side, you might just be able to press the connector in with your finger. Just remember, no sudden moves—be gentle with that cable!
- When you're putting things back together, angle the back cover so the fingerprint sensor cable is ready to party right over its socket.
- Take the flat end of your spudger and press the connector straight down until it clicks into place—nice and easy!
Tools Used
Step 11

If you're feeling like skipping the adhesive swap, you can always reinstall the back cover without it. Just make sure to clear out any big chunks of old adhesive so it sits flat. Once it’s back in place, give it a little heat and apply some gentle pressure. It won’t be totally waterproof, but the adhesive usually holds up just fine.
Before sealing everything back up, power on your device and test out your repair. It's always a good idea to check before committing to the new adhesive and final seal.
- First things first, let's get that back cover off! It's time to reveal the inner workings of your device.
- Ready to put on a shiny new back cover? Here’s how to do it:
- If you're reinstalling the back cover or using one without pre-installed adhesive, just follow this handy guide.
- Oh, and if you need to move the camera bezel to your new part, no worries! Check out our camera bezel replacement guide for that.
- Grab some tweezers and gently peel away any leftover adhesive from the phone's chassis. Then, give those adhesion areas a good clean with high concentration isopropyl alcohol (at least 90%) and a lint-free cloth to get them ready for the new adhesive.
- Now, peel off the adhesive backing from the new rear glass, align one edge with the phone chassis, and press it down firmly. You've got this!
Tools Used

Step 12


- Take out the eleven 3.7 mm Phillips screws securing the wireless charging coil and antenna setup. It’s like a tiny hardware treasure hunt—just count them out as you go.
- If a screw acts stubborn even after you’ve loosened it all the way, go ahead and grab it with tweezers. Sometimes they just need a little extra nudge!
Tools Used
Step 13


The wireless charging coil and antenna assembly are held in place by some nifty little plastic clips.
- Gently lift the plastic around the edges with a spudger to release the clips. Take your time—patience pays off.
Tools Used
Step 14


- Lift out the wireless charging coil and antenna assembly. When putting it back, slide the top edge into the frame first, then press down on the rest until it snaps in place.
Step 15


- Grab your spudger and gently pop the battery connector straight up from its socket—like you're lifting a tiny trapdoor. Easy does it!
Tools Used
Step 16


A little alcohol goes a long way—too much can mess with your display, so keep it light!
The battery is really stuck down with some serious adhesive. Get ready for a bit of a tug-of-war!
- Drop 1-2 drops of high-concentration (>90%) isopropyl alcohol under each corner of the battery and let it soak in for a few minutes to loosen that stubborn adhesive.
- Or, you can give your battery a warm hug with a freshly heated iOpener right behind it for two minutes to help melt the adhesive. Feel free to reheat and reapply the iOpener as needed!
Tools Used
Step 17


Hey there! Just a friendly reminder to be gentle with that battery during your repair adventure. Soft-shell lithium-ion batteries can be a bit temperamental—if they get squished or damaged, they might leak some nasty stuff, catch fire, or even go kaboom! So, steer clear of using too much muscle or prying with metal tools. Take it easy and keep it safe!
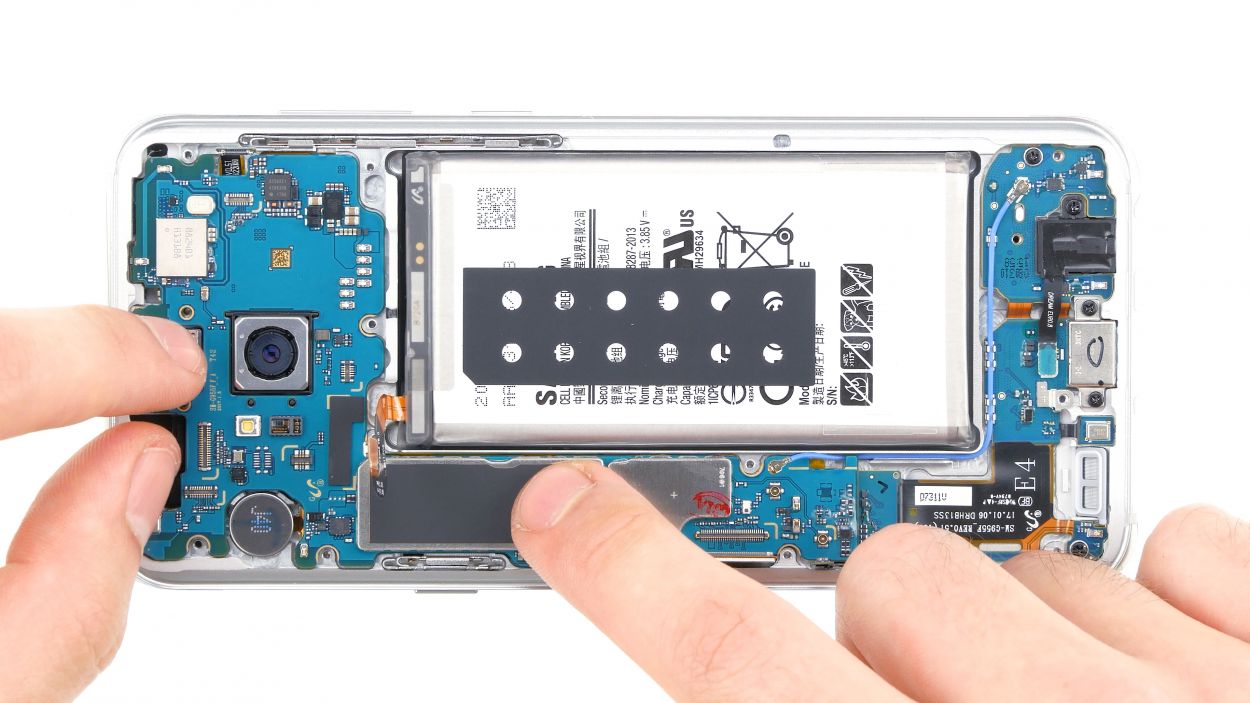
- Slip a couple of opening picks or a trusty plastic card along the edge of the battery—think of it as giving the battery a polite nudge.
- With steady, gentle pressure, coax the battery up and out of its spot. Take your time and let it know it’s moving to better things!
Step 18

Once you remove the battery, give it a well-deserved retirement—don’t put it back in! Pop in a fresh one to keep things safe and running smoothly.
- Time to put everything back together—just retrace your steps in reverse order.
- Give your new battery a boost by calibrating it once you're done. If things get tricky, you can always schedule a repair.