Samsung Galaxy S8 I/O Daughterboard Replacement
Duration: 45 minutes
Steps: 34 Steps
Before you get into disassembling your phone, it's a good idea to bring that battery down below 25%. Puncture it, and it might catch fire or even explode—though the risk drops a lot when it's discharged. So, slow and steady wins the safety race. If you need a hand, you can always schedule a repair.
Ready to swap out the I/O daughterboard in your Samsung Galaxy S8? If your USB-C port or microphone is acting up, this guide's got your back. You’ll pop off the rear glass cover—just remember, you’ll need some fresh adhesive to stick the back on when you’re done. Quick heads up: motherboard and daughterboard setups are different depending on whether you’ve got the North American Snapdragon (G950U) or the international Exynos (G950F) version. We’re rolling with the North American model here, and the boards don’t mix and match. Before you dive in, drop your battery below 25%—less juice means less risk if things get pokey. Let’s get you back up and running!
Step 1


For carousel microwaves: Ensure that the plate has room to spin like it's dancing. If your iOpener gets stuck, it might turn up the heat and cause a little too much drama!
Give your microwave a quick clean before you start—leftover mystery goop on the bottom can hitch a ride on your iOpener, and nobody wants that kind of souvenir.
- Pop that iOpener right in the middle of your microwave.
Tools Used

Step 2

Go easy on heating the iOpener—turning it into a hot potato might make it pop! Keep it under 100˚C (212˚F), because we're repairing, not cooking.
If the iOpener looks puffed up, hands off! That's not a feature.
If the middle is still too warm to handle, just let it chill for a bit before giving it another round in the microwave. A nicely heated iOpener should stay cozy for about 10 minutes.
Microwave wattage can affect heating time—more watts, faster heat, less watts, a bit slower. When your iOpener is just warm enough to handle without discomfort, it's ready to go.
- Warm up the iOpener in the microwave for about thirty seconds. Keep an eye on it, and as it cools down during the process, just zap it again for another thirty seconds to keep the heat going. If you need a hand, you can always schedule a repair.
Tools Used
Step 3

The iOpener gets seriously toasty—handle with care and don't be shy about grabbing an oven mitt if things heat up.
- Pick up the iOpener and carefully set it aside, holding it by one of the flat ends to avoid the hot center. Easy does it, and if you need a hand, you can always schedule a repair.
Tools Used
Step 4


The iOpener is going to be super toasty, so make sure to grab it by the end tabs only. Safety first, my friend!
No microwave? No problem! Just follow this step to warm up your iOpener by placing it in some boiling water.
- Grab a pot or pan and fill it up with enough water to cover your iOpener.
- Crank up the heat until the water’s boiling, then switch off the burner.
- Drop your iOpener in the hot water for a chill 2-3 minutes—full soak required.
- Fish the iOpener out using tongs (trust us, your fingers aren’t up for this).
- Give the iOpener a good towel dry—no soggy tools allowed.
- Now your iOpener is good to go! If it cools down, just repeat the heating routine: bring the water to a boil, turn off the heat, and let the iOpener take another 2-3 minute dip.
Tools Used
Step 5

- Warm up your iOpener and let it chill on one of the long edges of your S8 for around 2 minutes.
You can use a hair dryer, heat gun, or hot plate to loosen things up, but go easy on the heat! OLED screens and batteries aren’t fans of hot yoga—so keep it cool.
Opening your phone will break the waterproof seals, so have some replacement adhesive ready before you start. If you’re not replacing it, just be extra careful to keep liquids out during reassembly. While waiting for the adhesive to soften up, go ahead and check out the next step to see where to gently pry. You might need to reheat and reapply the iOpener a few times to get the device warm enough—just follow the instructions so you don’t overheat. If you need a hand, you can always schedule a repair.
Tools Used
Step 6


- Next up: we’re going to slice through the sticky stuff holding the rear glass panel in place.
- Check out the first image for the lowdown on how the adhesive is spread out around the back case.
- When you’re prying from the outside, here’s your game plan:
- Go slow around the chunky adhesive areas—they’re tougher.
- The thin adhesive spots are easier to work through.
- Heads up: steer clear of prying near the fingerprint sensor. Let’s keep that safe and sound.
Step 7


The suction cup can struggle to get a good grip on the curved areas of the glass.
If your phone's back cover is a bit broken, the suction cup might not stick very well. You can give it a shot with some strong tape, or even superglue the suction cup in place and let it dry before moving forward.
Because of that sneaky curved glass, you'll be pushing upwards instead of sliding in parallel to the phone's surface.
- Once the back feels warm to the touch, grab a suction cup and place it as close to the heated edge of the phone as possible—just watch out for that curved edge.
- Lift on the suction cup, then carefully slide an opening pick under the rear glass to start the separation.
Step 8

- With your tool set in place under the glass, give the iOpener another round in the microwave and warm things up again. This helps loosen up the sticky stuff, making your job a whole lot smoother.
Tools Used
Step 9


Take your time so the tool stays snug in the seam. If you find yourself struggling, just give the iOpener another heat-up and a little love before trying again.
- Gently slide the opening pick along the side of the phone, letting it work its magic to break free the adhesive.
Tools Used
Step 10


- Repeat the heating and cutting steps for the other three sides of the phone, just like you did before. Keep an opening pick on each side as you go along—to stop the adhesive from sticking back together. If you need a hand, you can always schedule a repair.
Step 11


As you lift the glass, take a quick peek to make sure that orange cable with the blue connector has popped free.
If the fingerprint sensor cable feels stuck or is pulling tight, pause! Don’t open the phone any further—just use the pointy end of a spudger to disconnect it, then keep going.
Heads up! The fingerprint sensor cable hangs out right next to the main camera, connecting the rear glass to the phone. It's a super short cable, so as you lift off the rear glass, it'll pop loose on its own—no need to wrestle with it.
- Grab those opening picks and glide them around the edges to slice through any leftover adhesive—don’t be shy, but don’t go Hulk mode either. Ease the phone open just a bit.
- When it’s time to reconnect the fingerprint sensor cable during reassembly, tilt the back cover until the connector is lined up right above its home. Take your trusty spudger (the flat end, please), and gently press the connector straight down until it clicks into place. Nailed it.
- Now, lift the glass away from the phone. Steady hands win the race.
Tools Used

Step 12

You can pop the back cover on without new adhesive if you want—just clear out any chunky bits that might stop it from sitting flat. Once it's in place, give it a little warmth and some gentle pressure to help it stick. No waterproofing here, but most glue will do the trick.
Fire up your phone and make sure the fix worked before you go wild with new adhesive or seal everything up.
- To put on a new back cover, follow these steps: either reinstall the old one or attach a new cover without pre-applied adhesive. If your device needs the camera bezel transferred, check out our camera bezel replacement guide. Use tweezers to remove any leftover adhesive from the chassis, then clean the area with high-concentration isopropyl alcohol (90% or higher) and a lint-free cloth to get ready for the new adhesive. Carefully peel the backing off the new rear glass, line up one edge with the phone chassis, and press it firmly into place. If you need help, you can always schedule a repair.
Tools Used

Step 13

- Grab your Phillips #000 screwdriver and carefully unscrew the eleven 3.7 mm screws. You've got this—just take your time and keep track of your screws so nothing gets lost. If you need a hand, remember you can always schedule a repair.
Tools Used

Step 14


- Lift out the NFC antenna and charging coil assembly—it's time for a little separation!
Step 15

- Unscrew three pesky 3.7 mm Phillips #000 screws and set them aside like a pro.
Step 16

- Take out the loudspeaker assembly and set it aside—you're one step closer to clear sound!
Step 17


- Pop a SIM card ejector tool or paperclip into the tiny hole on the left side of the top edge of your device.
- Gently press until the tray pops out—don’t force it, just a little push is enough.
- Carefully pull out the SIM tray and set it aside.
- When putting the SIM card back in, make sure it’s oriented correctly in the tray so everything lines up perfectly.
Step 18


The battery isn't part of the upcoming steps, so no need to remove it here. Just disconnect the battery, and you're all set to proceed.
- Gently use the flat end of your spudger to pop the battery connector off—think of it like giving it a little nudge to say goodbye for now.
Tools Used
Step 19


- Grab the flat end of your trusty spudger and gently pry off that sensor array connector. You've got this!
Tools Used
Step 20


- Grab your trusty spudger and gently use the flat end to unplug the front-facing camera connector. You've got this!
Tools Used
Step 21


- Grab the flat end of a spudger and gently disconnect the display and digitizer connector. Easy does it—no need to force anything. If you get stuck or want a pro to handle it, you can always schedule a repair.
Tools Used
Step 22


- Grab a spudger and gently pry to disconnect the two antenna cables that link the motherboard to the daughterboard. If you need a hand, you can always schedule a repair.
Tools Used
Step 23


- Gently slide the flat end of your spudger under the antenna ribbon cable and pop it free from its spot between the motherboard and the daughterboard. One small move for your spudger, one big step for your repair!
Tools Used
Step 24


- Slide the flat end of your spudger underneath the motherboard, then gently lift to disconnect it from the daughterboard. Let’s keep those moves smooth and steady!
Tools Used
Step 25


Be cautious not to catch the battery connector on your way out if you’re skipping the battery removal. Keep it smooth and snag-free for a clean disconnection.
- Gently lift the motherboard out of the phone, giving it a steady, confident tug. Keep an eye out for any connectors or cables that might still be attached—disconnect those carefully if needed. Need a hand? You can always schedule a repair.
Step 26

- Unscrew that one 3 mm Phillips #000 screw—just twist it out and set it aside.
Step 27


- Grab your spudger and gently use its point to disconnect the headphone jack connector. Easy peasy!
Tools Used
Step 28


- Slide the tip of your trusty spudger between the headphone jack and the board, right at the corner of the jack that's closest to the ribbon cable.
- Gently coax the headphone jack out of the board using the spudger—be nice, it deserves a smooth exit!
- Now, go ahead and take out the headphone jack. You've got this!
Tools Used
Step 29


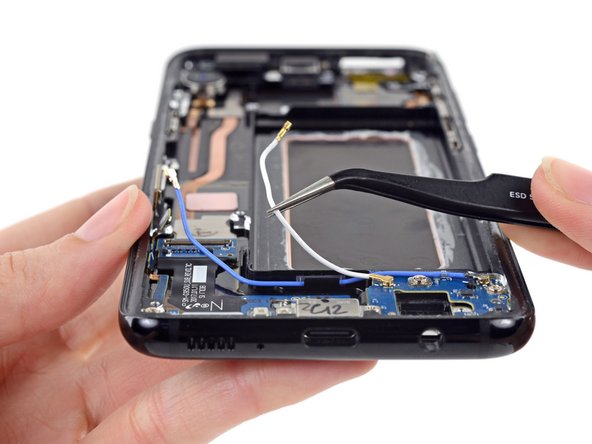
- Grab your tweezers and gently lift the two antenna cables out of their cozy slot next to the battery compartment. No need for wrestling—just a smooth move and you’re good!
Tools Used
Step 30

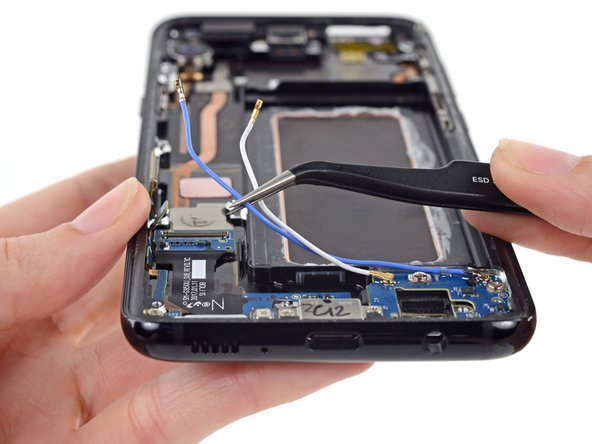
- Grab your tweezers and gently lift those antenna cables out of their slot. Steady hands, you've got this!
Tools Used
Step 31

- Unscrew five tiny 3 mm Phillips #000 screws and set them aside, so they don't escape on you!
Step 32


- Carefully bend the motherboard connector down towards the bottom of the phone, making sure it's out of the way of that pesky antenna ribbon cable.
Step 33


- Now it's timeMITO gently coax the antenna ribbon cable away from the side of the lungs case using your trusty tweasers. Take your time and be patient, as this can be a delicate process.
Tools Used
Step 34


- Once you've stuck everything back together, just retrace your steps to put your device back in business.
- When you're finished, give your repair a test drive to make sure everything's running smoothly. If you hit any snags, you can always schedule a repair.