Samsung Galaxy S7 Battery Replacement
Duration: 45 minutes
Steps: 15 Steps
Hey there! Before you get all hands-on with your phone, make sure the battery is below 25%.
Is your battery feeling a bit sluggish? Constantly tethered to a charger because your S7 just can’t keep up? No worries! This guide will walk you through swapping out that worn-out battery for a fresh, energetic one. Just a heads up: the video guide suggests removing the SIM card, but it’s completely optional and won’t hinder your repair journey if you choose to leave it in. Before you dive in, make sure to drain that battery below 25%—a charged lithium-ion battery can be a bit dramatic if it gets punctured. And if you notice your battery is swollen, it’s time to tread carefully. No heating up your phone, please! If you need a little help loosening the adhesive, a dropper or syringe filled with some 90% isopropyl alcohol around the edges of the back cover should do the trick. Remember, swollen batteries can be tricky, so equip yourself with some eye protection and take it slow! If you’re feeling uncertain, don’t hesitate—just schedule a repair!
Step 1
You can also use a hair dryer, heat gun, or hot plate to warm things up, but take it easy—too much heat can harm the OLED display and the battery inside. Keep it chill and steady!
Opening your phone? Just a heads up, it might mess with those fancy waterproof seals. Make sure you've got some replacement adhesive ready before you dive in, or be super careful to keep liquids away if you're putting it back together without a fresh seal.
You might find yourself giving the iOpener a little extra love with some reheating and reapplying to get your phone nice and cozy. Just follow those iOpener instructions closely so you don’t accidentally turn it into a sauna!
- Warm up a trusty iOpener and place it on a long edge of the phone for about two minutes. Let that heat do its magic!
Tools Used
Step 2
Be gentle with the rear glass—too much pressure or prying with metal tools might cause it to crack. Take it slow and steady to avoid any unwanted breaks. If you need help, you can always schedule a repair.
The suction cup might struggle to get a good grip on the curved edges of the glass.
If the back cover of your phone is cracked, the suction cup might not hold. Consider giving it a lift with some sturdy tape, or you could superglue the suction cup in place and let it set before moving on.
Thanks to that lovely curved glass, you'll be pushing upwards instead of sliding in parallel with the phone's surface.
If you're facing any difficulties, don't hesitate to apply a little more heat to soften that adhesive further, and give it another go. Just a heads up, the adhesive cools down pretty quickly, so you might need to warm it up a few times.
As a bonus tip, once the pick is in, feel free to drop a little isopropyl alcohol into the gap to help loosen up the adhesive for the next steps.
- Once the back panel feels nice and toasty, grab your suction cup and stick it as close to the heated edge as you can—just steer clear of any curvy corners.
- Give the suction cup a gentle pull upwards, then slide an opening pick underneath the rear glass to start the separation.
Tools Used
Step 3
- With the pick snugly in place, warm things up again with the iOpener and give that adhesive another round of softening.
Tools Used
Step 4
Take your time and ensure the tip stays snug in the seam. If you find yourself struggling to slide it in, just warm it up again and give the iOpener another go!
- Gently slide your opening pick along the edge of the phone to loosen the adhesive, making sure to keep it in place. Then, grab a second pick and move on to the next step. Keeping that first pick inserted helps prevent the glue from sticking back together—think of it as keeping the door open for easy access. If you need a hand, you can always schedule a repair.
Tools Used
Step 5
- Repeat the heating and cutting steps on the remaining three edges of the phone. As you go, leave an open pick in each side to keep the adhesive from sealing back up. If you need help, you can always schedule a repair.
Step 6
- Gently lift the glass and take it off the phone with care.
Step 7
- Pop that back cover on using your custom-cut adhesive strip—stick with confidence!
- If you're wiping down the midframe with isopropyl alcohol, keep it away from the wireless charging coil. That coating can’t handle a boozy bath!
Want to give your back cover another shot without fussing with new adhesive? Just pick off any big chunks of old glue that might keep it from lying flat. Once it’s seated properly, a little heat and some gentle pressure will help it settle in nice and secure. It’s not waterproof once resealed, but the glue's usually tough enough to keep things together. Before sealing everything up tight, make sure to power on your device and give it a quick test run—better to catch any issues early. If you need a hand with the whole process, you can always schedule a repair.
Tools Used
Step 8
- Unscrew and set aside the twelve 3.5 mm Phillips screws—time to show those screws who's boss!
Step 9
- Slide the tip of a spudger into the tiny notch on the left side of the antenna assembly, then gently lift the assembly up and out of the frame.
- Take out the antenna assembly.
Tools Used
Step 10
- Gently pry up the charging coil assembly using the flat end of a spudger to lift it out of the phone. You've got this!
Tools Used
Step 11
- Grab the flat end of that trusty spudger and gently coax the loudspeaker assembly up and out. You've got this!
Tools Used
Step 12
- Gently wiggle the flat end of your spudger to detach the battery connector. You've got this!
Tools Used
Step 13
Go easy on the alcohol—too much can leave your display feeling a little under the weather.
- Drip a couple drops of high-strength (over 90%) isopropyl alcohol under each battery corner and let it chill for a few minutes—this loosens up that stubborn glue.
- Or, grab an iOpener and set it right on the battery.
- Let the iOpener hang out for at least a minute to soften up the adhesive holding the battery.
Tools Used
Step 14
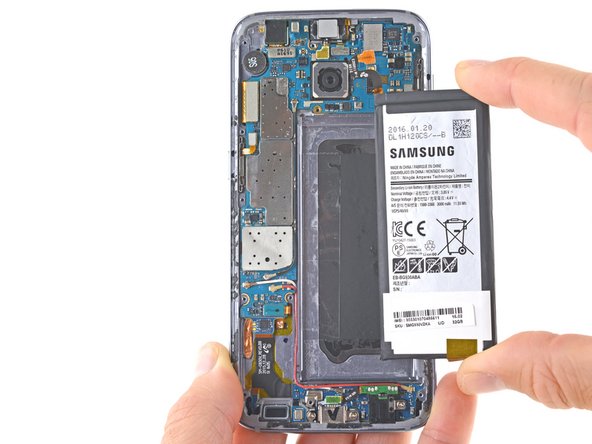
- Grab your trusty opening pick and gently nudge the battery up from the bottom with a steady hand. Keep that pressure consistent, and you'll have it free in no time!
Handle the battery gently—no need to bend or squeeze it! Lithium-ion batteries are like that one friend who can’t handle a joke—damage could lead to leaks, fires, or explosions. Don’t use metal tools to pry—they’re more like a mischievous cat than a gentle hand. When you’re working around the case, especially near the daughterboard and antenna cables, take your time and pry carefully—no rush, no accidents. If you need a hand, you can always schedule a repair.
Since the adhesive can be pretty stubborn, you might need to heat things up and reapply the iOpener multiple times to keep softening it. The glue's tough, so don’t be discouraged if it takes a few tries to get that pry pick sliding under the battery. Patience and a bit of persistence will get you through!
Tools Used
Step 15
Once you've taken out the battery, give it a retirement party—it’s not coming back! Pop in a fresh one to keep things safe and running smoothly.
- Gently wedge an opening pick between the battery and the case to loosen any stubborn adhesive. Carefully lift the battery out of the compartment. If you used isopropyl alcohol during disassembly, give it about ten minutes to fully evaporate before installing the new battery. When you're ready to install the fresh battery and adhesive, just follow this guide. If you need help along the way, you can always schedule a repair.


