Samsung Galaxy Tab 4 8.0 Verizon Front Facing Camera Replacement
Duration: 45 minutes
Steps: 6 Steps
Accidentally broke your front camera? No worries! Opening up your Samsung Galaxy Tab 4 8.0 might seem daunting, but it’s actually pretty straightforward. All you need are a plastic opening tool, tweezers, a bit of muscle, and these clear, step-by-step instructions. The process is simple, just be sure not to apply too much force when prying open the device – take it easy, and the replacement will go smoothly. And remember, if you need help at any point, you can always schedule a repair.
Step 1
Hey there! Before you dive into disassembling your Samsung Galaxy Tab 4 8.0, make sure it’s totally powered off and that you’ve popped out the SIM and Micro SD cards. Safety first!
And remember, when you’re prying those clips apart and getting the casing open, a gentle touch goes a long way! Too much force and you might find yourself with some broken bits. Take it easy!
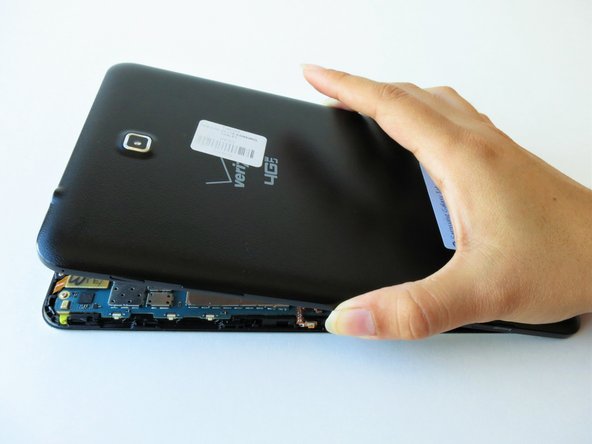
– Gently slide the blue plastic opening tool between the back plastic casing and the front panel’s metal edge at the top of the tablet.
Step 2
If you’re right-handed, you might find it easier to move clockwise and apply a bit more pressure around the corners to make things go smoothly.
You may hear a few pops as the plastic clips let go – no worries, that’s just the sound of progress!
– Keep working your magic with that blue plastic opening tool, sliding it along the edge of the tablet to gently pop off the back plastic casing from the front assembly panel. You’re doing great!
Step 3
– To keep that screen in perfect shape, gently lay the tablet face-down with the LCD screen touching the surface. Easy does it.
– Now, grab the back plastic casing firmly and give it a good lift away from the front assembly panel. It should come off without a hitch.
Step 4
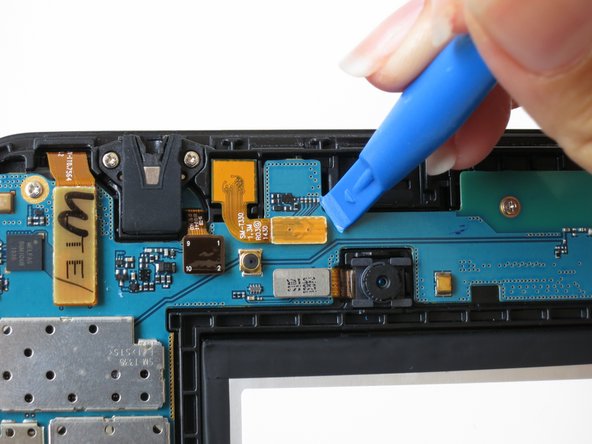
– You’ll find the ribbon cable for the front camera hanging out just above the battery, a little to the left. It’s like a hidden treasure waiting to be discovered!
– Gently slide the flat end of that trusty blue plastic opening tool right under the connector at the end of the ribbon cable. You’re doing great!
Step 5
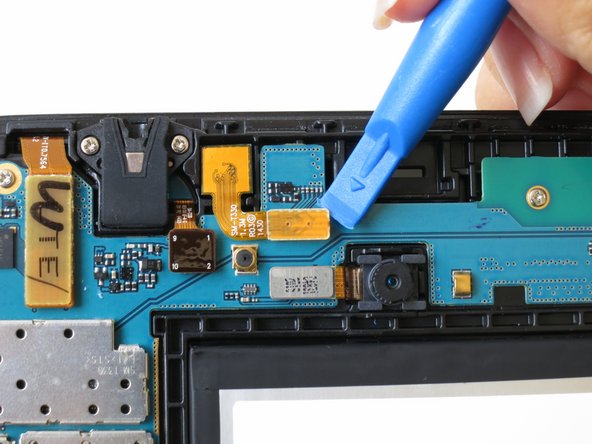
– Gently apply some pressure and slide the blue plastic opening tool downward. This will pop the gold rectangular connector of the front camera out of its spot on the motherboard. Take it easy, it’s a simple step!
Step 6
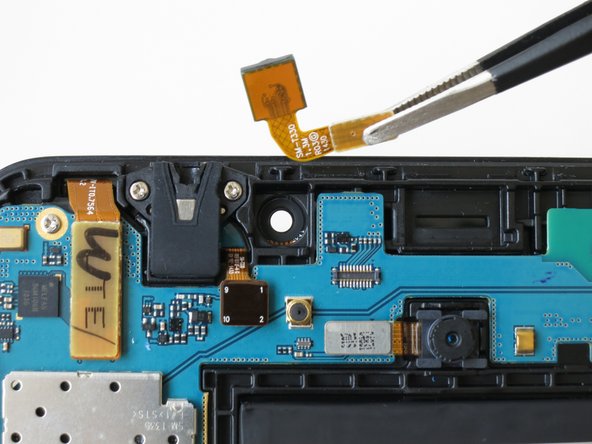
– Gently pinch that shiny gold rectangle with your tweezers and lift it out of its cozy little home.
Tools Used
Success!


