iPhone 16 Pro Max Battery Replacement
Duration: 45 minutes
Steps: 81 Steps
Here’s how to swap out the battery in your iPhone 16 Pro Max. iPhone batteries usually keep about 80% of their capacity for up to 500 charge cycles, which is around 18–24 months. If you find yourself charging more often or your phone feels slower, it might be time for a new battery. If the battery looks swollen, be extra careful while handling it. You’ll need a replacement battery and back glass adhesive to get this job done. Starting with iOS 18.1, battery health works with both original and aftermarket batteries. After you finish, run the Repair Assistant to reset the battery stats.
Step 1


Let your iPhone's battery dip below 25%—a low charge helps keep things safe when handling lithium-ion batteries. If you need a hand, just schedule a repair.
- Disconnect any cables from your iPhone—give it some solo time.
- Press and hold the power button plus either volume button, then swipe to turn off your iPhone. Nap time for your device!
Step 2


Make sure smooth area near bottom edge is big enough for suction cup to stick to
- If your screen or back glass is badly cracked, lay strips of packing tape over the glass to shield yourself and make disassembly smoother. This little trick keeps glass shards in check and helps you work more safely. When you're ready to move forward, and need a hand, you can always schedule a repair.
Tools Used

Step 3


- Grab your P2 pentalobe screwdriver and gently unscrew the pair of 7.4 mm screws on each side of the charge port. Keep them safe—you'll need them later. If you hit a snag or want a pro to take care of it, you can always schedule a repair.
Step 4


Hey there! Just a friendly reminder: if you push that opening pick in too deep, it might just give your device a little ouch. So let's mark that pick to keep things safe and sound.
Feeling crafty? You can also mark the other corners of your pick with varying measurements for extra precision.
For a fun twist, try taping a coin to your pick about 3 mm from the tip. It’s like a mini measuring tool!
- Grab your trusty opening pick and measure 3 mm from the tip. Give it a little mark with a permanent marker, just to keep things clear and precise. You've got this!
Tools Used

Step 5

Time to get that initial gap going! The next two steps will show you how to use a suction handle to get started.
Need some extra heat for that back glass? Grab an iOpener and follow the instructions to heat and apply it just right. It's easy – just make sure you're doing it properly!
- Grab a hair dryer or heat gun and warm up the bottom edge of the back glass until it feels nice and toasty to the touch.
Tools Used


Step 6


No gap yet? Give the edge a little more heat and try again—you got this!
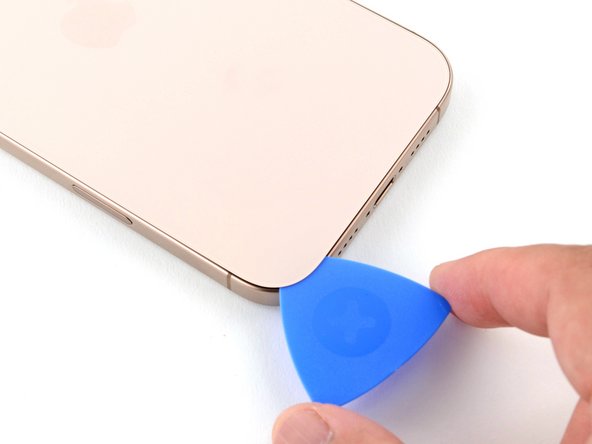
- Stick a suction cup at the bottom edge of the back glass to get things started.
- Pull gently but firmly on the handle to create a little space between the back glass and the frame—think of it as a friendly gap opener.
- Slide the tip of an opening pick into that gap to keep things moving and ready for the next step.
Tools Used
Step 7

As you carefully slice through the adhesive holding the back glass in place during the upcoming steps, remember to keep your pick no deeper than 3 mm. This way, you’ll steer clear of any potential mishaps in the sensitive areas below!
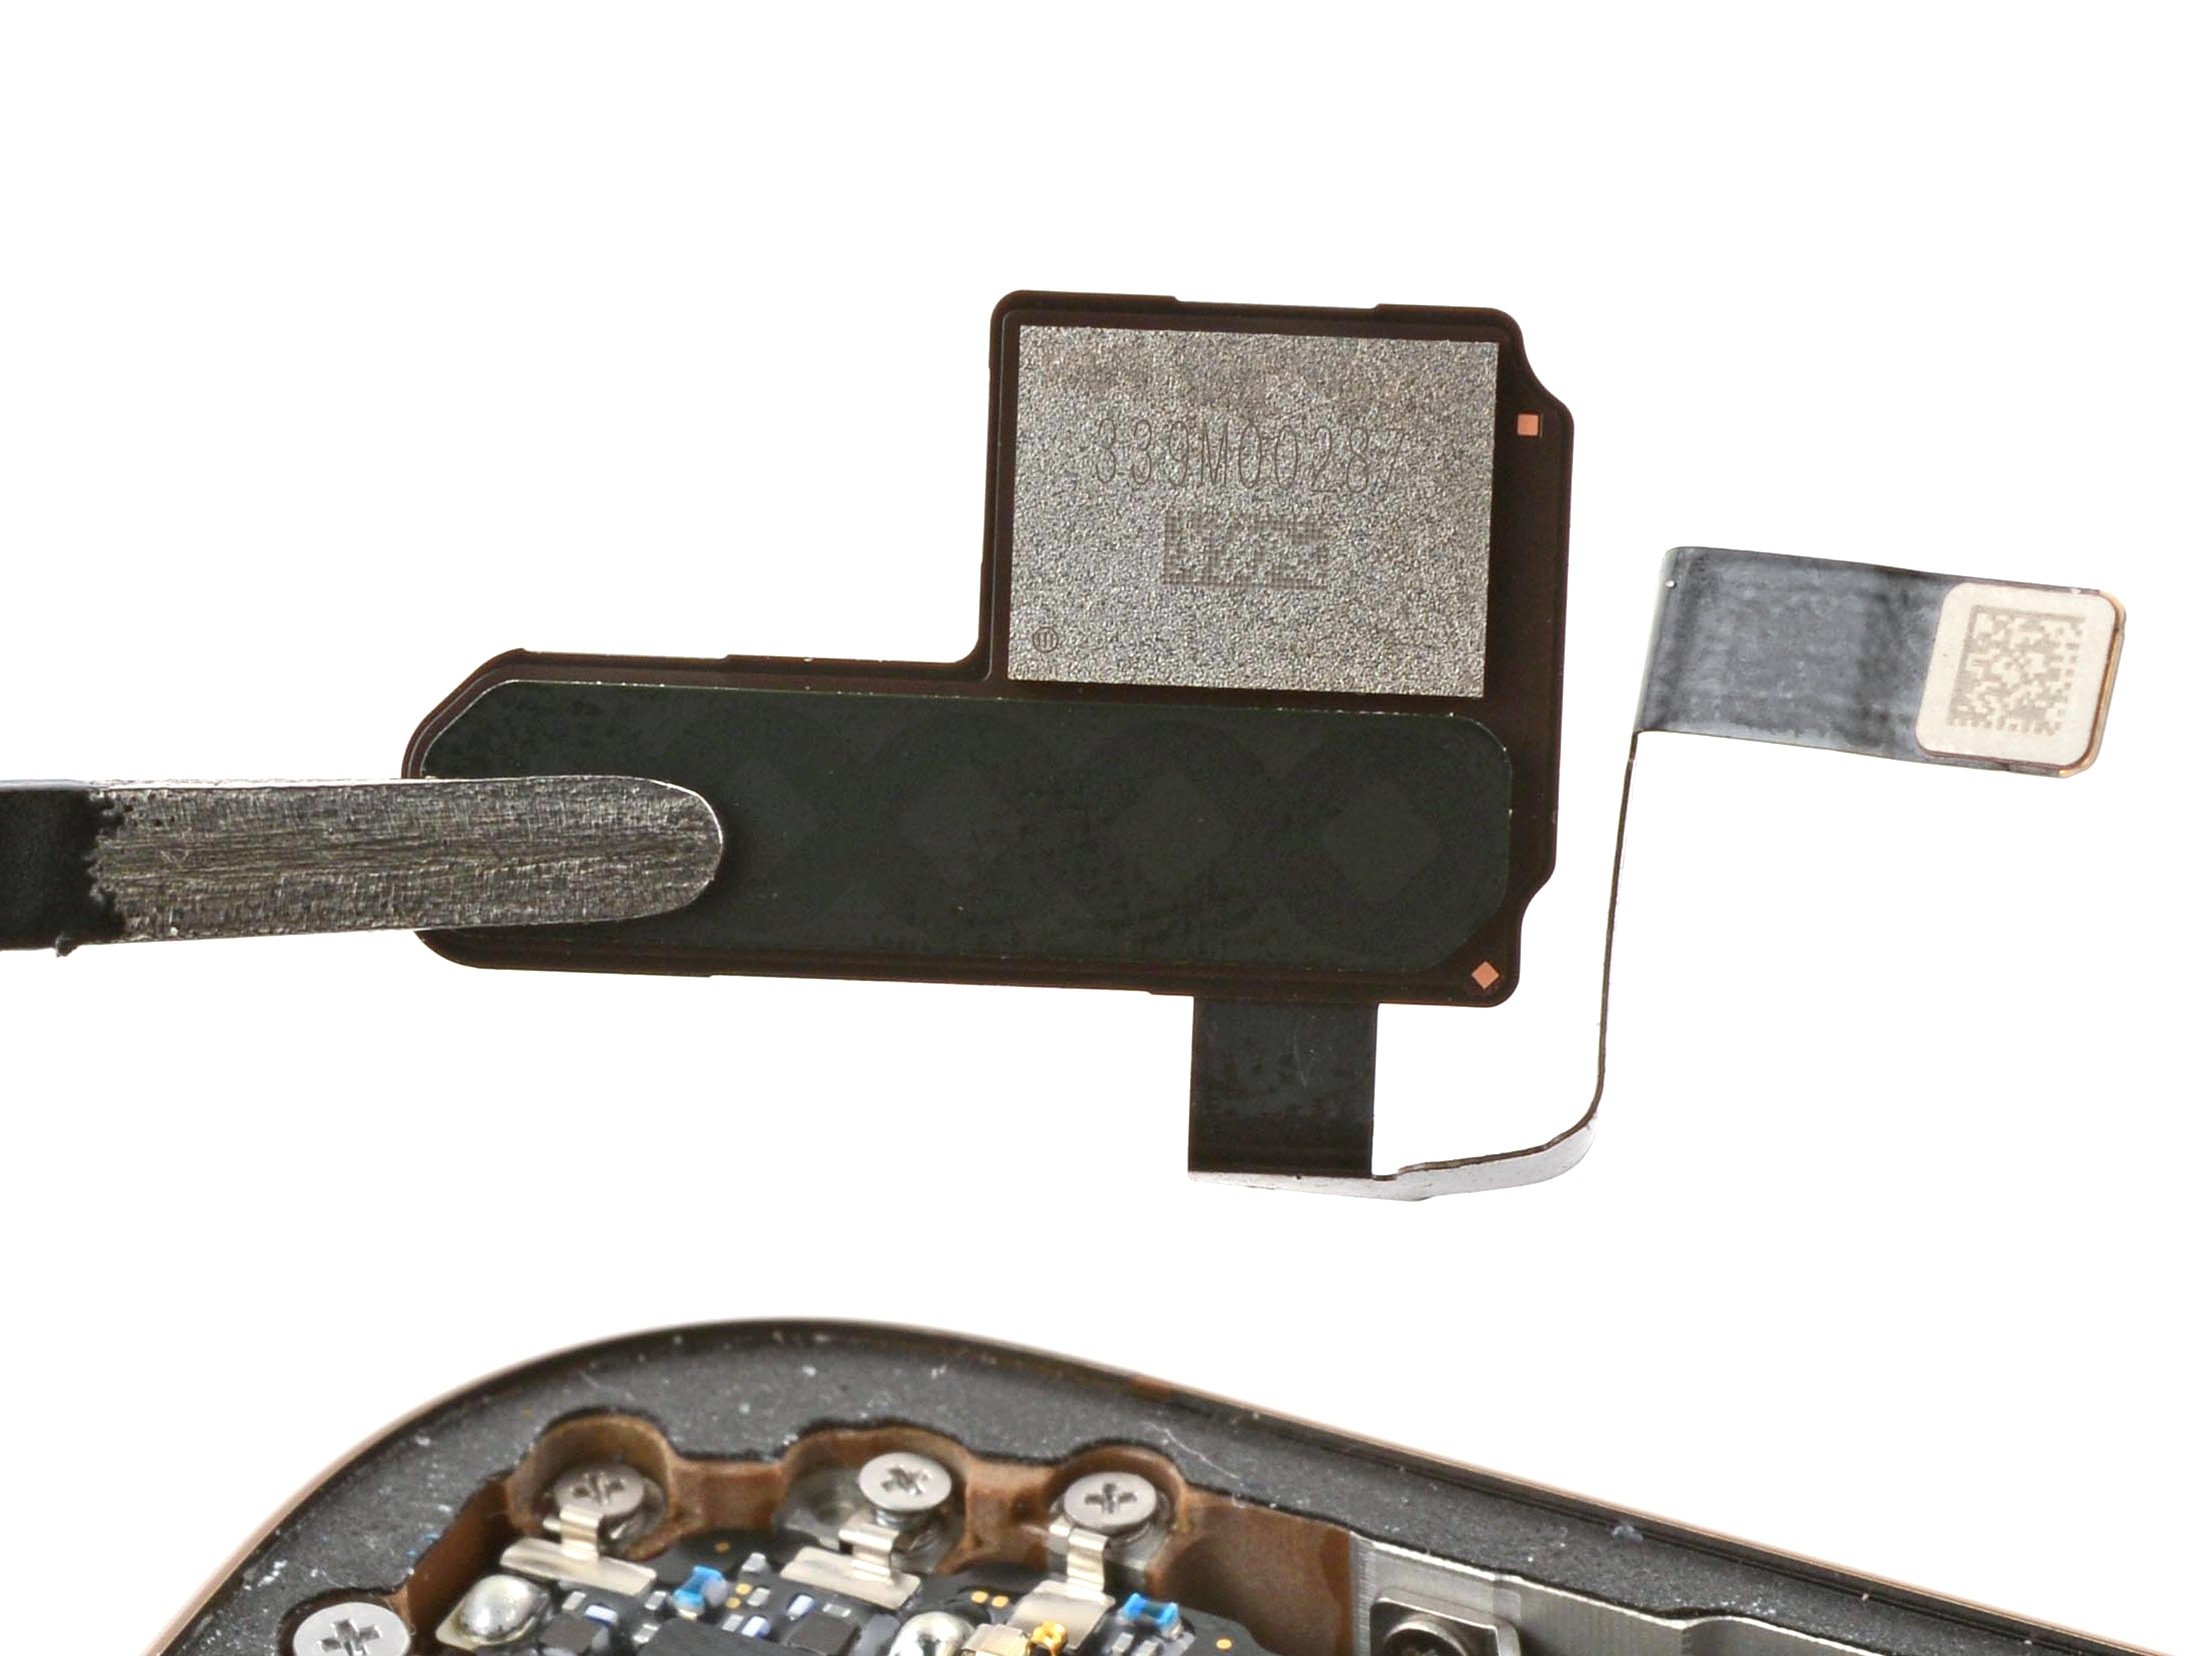
- Watch out for a skinny cable hanging out near the volume up button—it connects the back glass to your iPhone. Keep your pick away from this spot unless you want the cable to have a bad day.
- There are a bunch of spring contacts chilling around the edge of your iPhone.
Step 8

If the adhesive’s acting stubborn, give the edge another quick heat session and you’ll slice through like a pro.
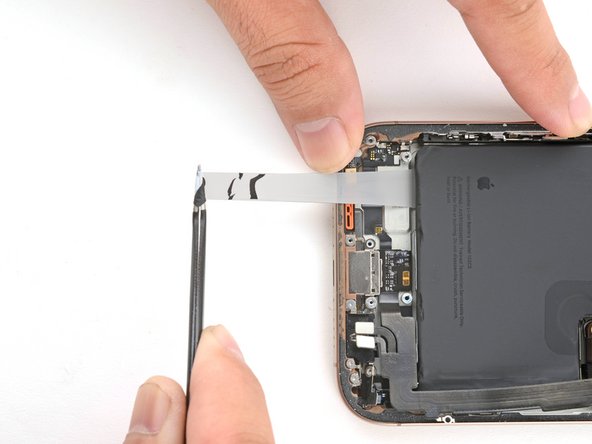
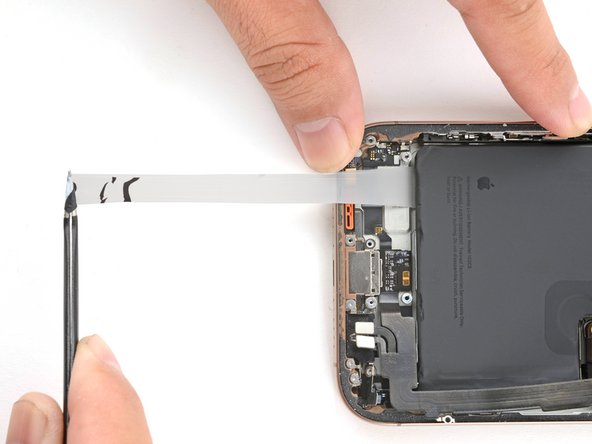
- Gently glide the opening pick along the bottom edge to loosen up that sticky adhesive.
- Pop the pick into the bottom-left corner to keep the glue from sneaking back together.
Step 9

- Grab your hair dryer or heat gun and warm up the left edge of the back glass until it feels nice and toasty.
Tools Used
Step 10


Be careful not to push your pick more than 3 mm in—you don’t want to risk damaging the spring contacts.
As you gently pass over the clips, you'll notice them click and release with a satisfying feel—like a secret handshake. Keep it smooth and steady to avoid any surprises. If you hit any trouble along the way, remember you can always schedule a repair for a pro touch.
- Pop a second opening pick into the bottom-left corner, snug up next to your first pick.
- Gently slide your pick along the left edge to break free the adhesive and release those sneaky metal clips.
- Keep this pick wedged in the top-left corner so the adhesive doesn’t decide to stick around again.
Step 11

- Warm up the top edge and top-right corner of the back glass with a hair dryer or heat gun until it feels nice and toasty to the touch.
Tools Used
Step 12


Keep it gentle—don't insert your pick more than 3 mm to avoid messing up the spring contacts. Think of it like a light touch, and you'll be good to go. If you need help, you can always schedule a repair.
- Pop in a third opening pick right at the top-left corner!
- Gently slide that pick along the top edge and curve it around the top-right corner, pausing just above the volume up button.
- Keep this pick in place to stop that pesky adhesive from sealing up again.
Step 13

- Grab a hair dryer or heat gun and warm up the right edge of the back glass until it’s pleasantly hot to the touch.
Tools Used
Step 14


Be careful not to push your pick in more than 3 mm, or you might damage those tiny spring contacts.
- Pop a fourth opening pick into the bottom-right corner like a pro.
- Gently slide that pick around the corner and up the right edge, stopping just below the volume down button—easy does it!
- Keep this pick in place to ensure the adhesive doesn't decide to make a comeback.
Step 15


At this stage, the back glass should pop free from the frame. If it’s feeling a bit stubborn, take your pick and run it around the edges again to spot any missed adhesive or clips holding on tight.
- Gently swing the back glass open to the right side of your iPhone—think of it as revealing a secret passage through the last bit of sticky adhesive.
- Prop up the back glass with something clean and sturdy to keep it safe while you work your magic.
Step 16

- Grab your trusty tri-point Y000 driver and get ready to take out the three screws holding the battery connector cover in place:
- Two screws, each 1.3mm in length
- One screw, 1.0mm in length
Step 17


- Gently lift up the battery connector cover and set it aside. Easy does it—no need to wrestle with it!
Step 18


- Carefully use the pointy end of a spudger to gently pry up and unplug the battery press connector.
Tools Used

Step 19

- Grab your trusty tri-point Y000 driver and let’s tackle those screws holding the back glass connector cover. We’re looking at four little guys!
- First up, you’ll need two screws that are 1.3 mm long – they’re the bigger twins in this crew.
- Next, don’t forget about the two shorter siblings, each measuring 1.0 mm long. They’re just as important!
Step 20


- Gently lift the back glass connector cover straight off and set it aside. If you need a hand, you can always schedule a repair.
Step 21


- Gently use the pointy end of a spudger to lift and unplug the back glass connector with care.
Tools Used
Step 22

- Let's get that back glass off!
Step 23


- Grab a Phillips screwdriver and unscrew the three screws holding down the Taptic Engine cover:
- One screw that's 2.9 mm long
- One screw that’s 1.3 mm long
- One screw measuring 2.4 mm long
Step 24


- Grab your trusty tweezers or just your fingers, and gently lift the top edge of the Taptic Engine cover. You've got this!
- Once the bottom edge pops free from the frame, go ahead and remove the Taptic Engine cover like a pro.
Tools Used

Step 25


- Gently use the tip of your trusty spudger to nudge up and disconnect the lower assembly cable from the logic board. You've got this!
Tools Used
Step 26


- Grab your trusty spudger and gently lift up the two connectors chilling near the bottom right edge of the frame. Just a little nudge—no need to go full superhero mode!
Tools Used
Step 27


- First, get ready to remove the lower assembly cable by taking out the two screws that hold it in place. You'll need to remove:
- One 1.0 mm-long tri-point Y000 screw - this little guy is pretty small, so be careful not to strip it!
- One 1.3 mm-long Phillips screw - this one is a bit bigger, but still, be gentle!
Step 28

- Grab your trusty hair dryer and give the lower assembly cable section over the Taptic Engine a warm-up. Heat it up until it feels comfortably hot to the touch.
Tools Used
Step 29


- Gently slide an opening pick beneath the lower assembly cable to detach it from the Taptic Engine.
- Carefully bend the cable aside to clear the way for accessing the Taptic Engine.
Step 30

- Grab your trusty Phillips screwdriver and unscrew the 2.1 mm-long screw that's holding the Taptic Engine in place. You've got this!
Step 31


- Grab your trusty spudger and gently nudge the corner bracket upwards with its pointy tip. You've got this!
Tools Used
Step 32


- Gently slide the tip of an opening pick along the top edge of the Taptic Engine to loosen the plastic buffer strip stuck to it.
Step 33


Be gentle when working around the battery – no need to apply too much pressure here!
- Grab your trusty spudger and gently nudge the Taptic Engine up from its cozy spot.
- Once it's feeling free, go ahead and lift that Taptic Engine out.
Tools Used
Step 34


- Unscrew the four fasteners holding the loudspeaker in place:
- One Phillips screw, 1.7 mm long
- One Phillips screw, 1.5 mm long
- One standoff screw, 4.1 mm long
- One tri-point Y000 screw, 1.3 mm long
Step 35


- Slide the tip of your spudger under the bottom-right screw hole of the loudspeaker.
- Gently lift and pop out the loudspeaker.
Tools Used
Step 36

Handle that battery with care—no dents or punctures allowed! Keep those sharp tools at a safe distance; we want to keep everything safe and sound.
Your iPhone’s battery is held in place with three stretch-release adhesive strips. The next few steps will guide you through gently removing these strips and freeing your battery. Take your time and follow along carefully—if you need a hand, you can always schedule a repair.
Step 37


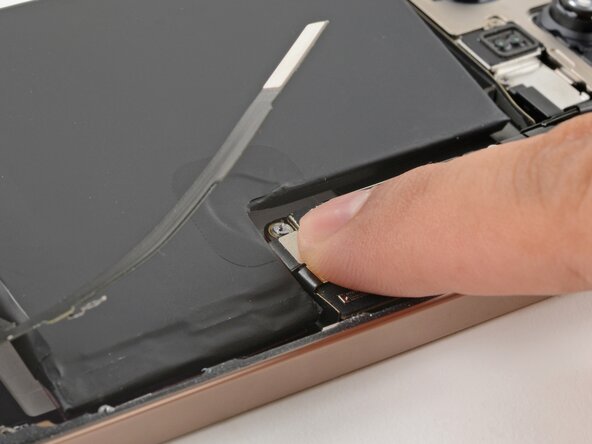
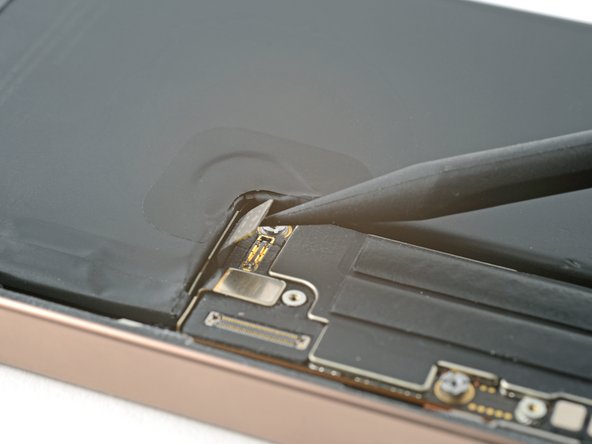
Hold up—don’t yank on that tab under the battery just yet.
- Grab your opening pick and carefully slide it under the black pull tab at the bottom of the battery.
- Use your tweezers to gently peel the tab away from the battery. No rush—take it slow and steady.
Tools Used
Step 38

If a strip happens to break off, don't fret! Just try to fish it out from beneath the battery. If it plays hard to get, it's okay to move on to the next strip.
Give that strip some quality time to stretch out and adjust your grip as needed. Just a friendly reminder: avoid dragging it over any components or cables lounging above the battery.
When your strip gets a bit too ambitious and grows long, simply wrap it around your tweezers and keep that pulling action going!
- Grab that pull tab with your trusty tweezers or your fingers—whatever feels good!
- Now, gently tug the adhesive out from beneath the battery, keeping it at a nice low angle for the best results. Slow and steady wins the race!
Tools Used
Step 39


Gently nudge the lower assembly cable aside to get to those sneaky adhesive strips.
- Do the same dance with the last two adhesive strips—peel, pull, and celebrate each one as it goes!
Step 40

If any of those adhesive strips decided to break up with you, no worries! Just move on to the next step and use some isopropyl alcohol to help you get rid of them.
- Pulled out all three stretch release adhesive strips? Nice work! Go ahead and lift out the battery, then jump ahead three steps for the reassembly party.
Step 41

If those adhesive strips decided to be a little too stubborn, no worries! These next steps will show you how to safely remove the battery without any hassle.
- Gently lift the bottom edge of the frame to give your iPhone a little tilt—think of it as giving it a gentle nudge to get things started.
- Grab a pipette or syringe and carefully squeeze out 2–3 drops of high-concentration (>90%) isopropyl alcohol right along the bottom edge of the battery, close to where those broken adhesive strips popped out.
- Give it a minute for the alcohol to seep under the battery and loosen up that stubborn adhesive—patience makes perfect here.
Step 42


Avoid bending or folding the battery. If it’s being stubborn, add a couple more drops of isopropyl alcohol and give it another go.
- Slide the flat edge of an opening pick gently between the left side of the battery and the frame, like you're opening a stubborn jar lid.
- Carefully pry the battery upward with steady, gentle force—patience is key here, giving the adhesive some time to loosen up.
- Once the adhesive starts to give way, grip the battery and lift it out smoothly. Easy does it!
Step 43

Well done on taking apart your iPhone! Now we’re diving into the reassembly adventure ahead. Get ready to put your device back together like a pro!
Keep in mind, depending on your iPhone model, some of the reassembly images might look a tad different. But don’t worry, the steps will still work perfectly for your iPhone!
Step 44


- Scrape off any leftover sticky glue from the battery slot. Then, give the frame a quick wipe with a lint-free cloth and a few drops of isopropyl alcohol to keep things clean and ready for the next step.
Step 45

If your new battery didn’t come with adhesive pre-applied, no worries! Just grab some stretch release adhesive strips or thin double-sided tape to keep it snug and secure.
- Gently lift and pull off the adhesive liner from the battery—it’s the first step to getting things moving!
Step 46

The battery adhesive is quite sticky! Take your time when lining up the battery in its slot—once it sticks, repositioning can be tricky. Patience here helps ensure a smooth install.
- Gently drop the battery into its spot—no cannonballs, please.
- Hook up the battery to the logic board for a quick test drive and make sure the cable isn’t playing hard to get.
- Let the battery chill in its new home, nice and snug in the recess.
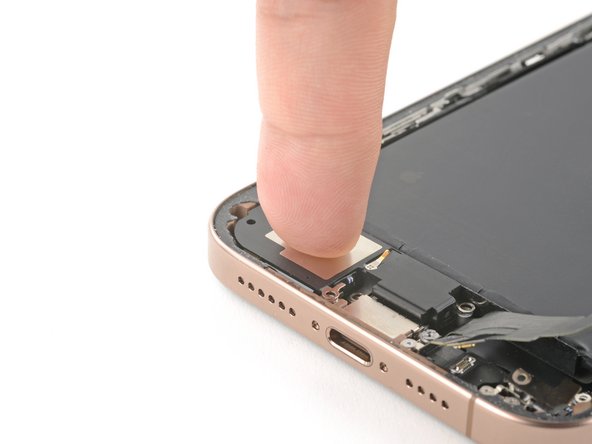
Step 47

- Give the battery a solid ten-second hug—press down with your fingers so it sticks to the frame.
- Unplug the battery from the logic board to cut the power connection.
Step 48

- Tilt the bottom edge of the loudspeaker towards the frame, just like you're gently angling a picture into place.
- Carefully press the loudspeaker into its cozy spot, making sure it sits snugly in its home.
Step 49
- Secure the loudspeaker by installing these four screws:
- One Phillips screw, 1.7 mm long
- One Phillips screw, 1.5 mm long
- One standoff screw, 4.1 mm long
- One tri-point Y000 screw, 1.3 mm long
Step 50

- Nestle the Taptic Engine snugly into its cozy little nook.
Step 51

- Gently pivot the corner bracket down into position using your finger. Keep it steady and make sure it clicks into place. If you need a hand, you can always schedule a repair.
Step 52
- Grab your trusty Phillips screwdriver and fasten that 2.1 mm-long screw securing the Taptic Engine like a pro! You've got this!
Step 53

- Gently nudge that lower assembly cable onto the Taptic Engine with your finger, like you're giving it a little high five!
Step 54

- Fasten the two screws that hold down the lower assembly cable:
- Pop in the 1.0 mm-long tri-point Y000 screw.
- Follow up with the 1.3 mm-long Phillips screw.
Step 55


- Gently press down and snap the two lower assembly cables into place—your finger or a spudger works great here. Give them a little wiggle to make sure they're secure!
Tools Used
Step 56

- Place the Taptic Engine cover back on, lining up those screw holes like a pro.
- Ensure the bottom edge clicks into place and the cover latches snugly onto the frame.
Step 57
- Let's get this repair started by using a Phillips screwdriver to secure the Taptic Engine cover with the following screws:
- One 2.9 mm-long screw
- One 1.3 mm-long screw
- One 2.4 mm-long screw
Step 58

- Give that assembly cable connector a little nudge onto the logic board with your finger or a spudger! You're doing great, keep it steady!
Tools Used
Step 59


Be gentle with those delicate grounding clips while you're sprucing up the frame! If one gets a little out of whack, just coax it back into place with your fingers or some tweezers. You've got this!
- Grab some blunt nose tweezers or just use your fingers to pull off the bigger chunks of adhesive around the frame.
- Take a spudger and scrape away any leftover sticky bits from the frame.
- If the adhesive is being stubborn, hit it with a little heat from a hair dryer or heat gun and give it another go.
Tools Used
Step 60


- If you're planning to reuse your back glass, grab some high-proof isopropyl alcohol (90% or higher), put a few drops on a microfiber or lint-free cloth, and give the edges a good wipe to get the surface ready for fresh adhesive.
Step 61

Take your time with this step. A squeaky clean frame helps the new adhesive stick perfectly, giving you a solid, lasting bond.
- Take a lint-free cloth or a coffee filter and wrap it around the tip of your spudger, then drip a few drops of high-strength isopropyl alcohol (90% or more) onto it.
- Gently swipe along the edges of the frame in one smooth direction to clear away any sticky adhesive leftovers.
Tools Used
Step 62

Check out the camera cutout and those little notches along the top and bottom edges to get a clear idea of how the adhesive will fit snugly into the frame.
- Place the adhesive sheet onto the frame to check it’s facing the right way before sticking it down.
Step 63


Be careful with that sticky glue! It loves to stick to everything, so hold off on letting it get cozy with anything until you're ready to give it a proper home on the frame.
If your adhesive has a bunch of liners, go ahead and peel off the one that reveals the sticky side meant for the frame.
- Find the little tab on the corner of the adhesive sheet and peel back just enough liner to reveal about a third of the sticky side.
Step 64


Once you press the adhesive into position, it's a one-way street—you won't be able to shift it around. If you need to adjust, you'll have to peel it off and start fresh with new adhesive. Need a hand? You can always schedule a repair.
- Gently line up the sticky edge of the adhesive strip with the matching edge of your iPhone's frame, making sure it’s just right.
- Once everything is looking good and aligned, softly press that adhesive strip onto the frame like you're giving it a little hug.
Step 65


No spare adhesive strips? No worries! You can put your iPhone back together and use it as usual, but just remember your water resistance will be taking a little break until you swap in new adhesive.
When the adhesive is lined up just right, the edges will snap perfectly into place—like a glove.
If the adhesive is a bit off, gently tug the long edges to get it sitting pretty with the frame.
If the adhesive starts to crease or wrinkle, don’t panic—peel it off and try again with fresh strips for a smooth finish.
- Keep peeling back the liner from the adhesive, gently pressing the sticky part into place as you go. Take your time and enjoy the process—you're almost there! If you need a hand, you can always schedule a repair.
Step 66


Those tiny grounding clips are delicate—try not to bend them! If one gets out of line, just nudge it back gently with your fingers or tweezers.
Be gentle! Pressing too hard might stretch and mess up the adhesive.
- Grab a spudger and gently nudge around the entire edge of your iPhone to loosen that stubborn adhesive. Keep it friendly, keep it steady—you're on your way to a smooth repair. If you need a hand, you can always schedule a repair.
Step 67


You might notice some liner hanging out around the edges—don’t peel those off just yet! They’re keeping your adhesive from sticking to random stuff during reassembly, so let them chill for now.
- Grab a spudger or use your fingers to lift the pull tab attached to the big front liner. It’s usually tucked in a corner of the liner, waiting for you.
- Once you’ve got the pull tab, give it a gentle tug to peel back the large front liner from its adhesive grip. Easy does it!
Tools Used
Step 68

- Lean the back glass gently against the right side of your iPhone—like it’s chilling out and waiting for its next move.
Step 69

- Grab your finger or the flat end of a spudger and gently press to reconnect the back glass connector onto the logic board. Keep it steady and make sure it's seated properly. If you run into any trouble, remember you can always schedule a repair with Salvation Repair.
Tools Used
Step 70

Now's a great time to check your handiwork before locking up your iPhone. Power it on and make sure everything’s working like a charm. Once you’re satisfied, power it down and finish putting it back together.
If your iPhone’s feeling shy and won’t turn on, plug it into a charger and give it another go.
Swapped out the logic board and your screen’s playing hard to get? Follow the screen guide for a step-by-step on connecting the display.
- Grab your finger or a spudger and gently press the battery press connector onto the logic board slot. Keep it firm but careful—you're making that connection happen! If you need a hand with this step, you can always schedule a repair.
Tools Used
Step 71

- Line up the back glass connector cover with its screw holes and gently set it down in place.
Step 72

- Grab your tri-point Y000 driver and get ready to secure the back glass connector cover with these four screws:
- Two screws, each 1.3mm long
- Two screws, each 1.0mm long
Step 73

- Line up the battery connector cover with the screw holes, and gently set it down where it belongs. Smooth moves!
Step 74

- Grab your trusty tri-point Y000 driver and let's get those three screws in place to secure the battery connector cover:
- First up, we have two screws that are 1.3 mm long, ready to do their job.
- And don’t forget the little one, a 1.0 mm long screw, who’s just as important!
Step 75


As you peel off the liners, keep everything clear of that sticky adhesive — we want it ready for action!
- Gently peel away all the perimeter liners using your fingers or a spudger, revealing the adhesive underneath. Keep an eye out for any stray liners on the frame or back glass and remove those too—your goal is to have a clean, liner-free surface before moving forward. If you need help, you can always schedule a repair.
Tools Used
Step 76


If you hit a spot that feels stuck, a clip around the edge might have bent and gotten pinched by the frame. Check the tight spot and carefully nudge any bent clips back into place.
- Gently lower the back glass onto the frame, starting with the top edge to get it in place.
- Press around the edges of the iPhone until the back glass is snug against the frame—just enough to sit flush and look good.
Step 77

The heat helps loosen things up and gets the adhesive nice and ready for a strong bond.
- Grab a hair dryer, heat gun, or an iOpener and gently warm up the back glass perimeter until it’s just a little too hot to hold comfortably. This helps soften the adhesive and makes the next steps smoother. If you need help, you can always schedule a repair.
Tools Used
Step 78


- Give the edges of your iPhone a good, confident squeeze with your fingers, working your way all around the perimeter.
Step 79


Or, grab some vise clamps and gently secure them around the edge of your device to help the new adhesive stick like a pro.
- Put your iPhone face-down on a clean, flat surface—give it the VIP treatment.
- Wrap some tape around the edge of the back glass to keep that finish looking sharp.
- Line up coins around the back glass until you’ve built a wall that’s as tall as the rear camera bumps. It’s like building a tiny fortress for your phone.
Tools Used
Step 80


Heads up—using coins might leave a subtle mark on the bottom book cover, so maybe skip the family heirlooms for this step!
A bit of pressure gets that adhesive working its magic.
- Grab 3-4 hefty books and stack them neatly right on top of your iPhone.
- Let those books work their magic for about 30 minutes.
Tools Used

Step 81
- Grab your P2 pentalobe driver and snugly install the two 7.4 mm screws on each side of the charge port. Easy does it!