Toshiba Encore WT8-A Tablet Motherboard Replacement
Duration: 45 minutes
Steps: 9 Steps
Ready to give your tablet a new lease on life? This step-by-step guide will walk you through the process of safely opening up your device and swapping out the motherboard—because sometimes, a fresh start is all it needs. Take a deep breath, grab your tools, and let’s get to it!
Step 1

Handle that metal spudger with care; we want the casing to stay as fabulous as it is!
– Gently slide the metal spudger between the back cover and the device to pry them apart without breaking a sweat.
Tools Used

Step 2


– Grab your trusty nylon spudger—it’s time to crack this case (gently, of course). Work it around the edges, sliding and prying as you go, until the back cover says ‘see ya!’
– Keep working the spudger around the perimeter, like you’re tracing a secret escape route for the cover. Eventually, it’ll pop free—no brute force required!
Step 3


– Grab your trusty Phillips head PH0 screwdriver and let’s tackle those 7 battery screws together!
– The 5 screws on the side? They’re a neat 3.5mm in size.
– And don’t forget about the 2 screws at the top and bottom, which are a cool 4.5mm.
Step 4


Make sure you’re gently prying up on the hinged flap, not the connector itself. We want to keep everything safe and sound!
The zero insertion force (ZIF) connector is your best buddy for keeping those fragile ribbon cables, like this trackpad cable, snug and secure.
– Grab your fine tweezers and gently flip up the tiny retaining flap. With that done, you can safely pull the ribbon cable out. Easy does it!
Tools Used

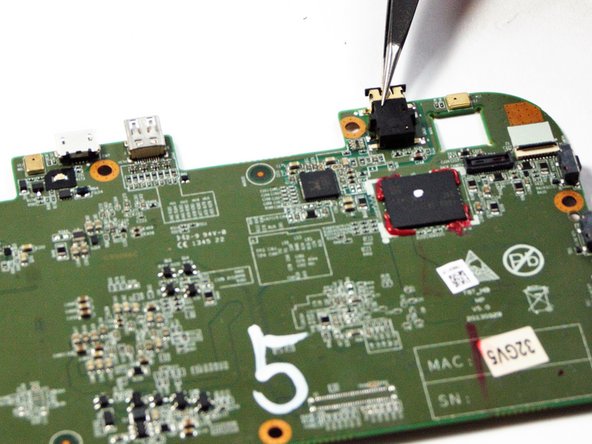
Step 5

Take it easy when you’re gently prying those colorful wires away from the motherboard—let’s keep everything intact and happy!
– Grab the colorful power cable and gently unplug it from its connector.
– Use the sharp tip of a spudger to carefully nudge each side of the connector—think of it as a little dance.
– Switch sides as you go, slowly coaxing the connector out of its socket like a pro.
Step 6

– The battery should easily lift right out of the device.
Step 7

– Grab your screwdriver and carefully remove the 4 – 4.5 mm screws from the motherboard assembly. Easy peasy!
Step 8

– Time to loosen things up! Remove the 2 – 3.5 mm screws securing the motherboard assembly. A steady hand and a precision screwdriver will do the trick!
Step 9

– Alright, time to put your device back together! Just follow these steps in reverse and you’ll be golden.
– If you find yourself in a pickle, you can always schedule a repair.
Success!