iPhone 15 Pro Max Loudspeaker Replacement
Duration: 45 minutes
Steps: 27 Steps
Ready to kick that crackly, static sound to the curb? This guide walks you through swapping out the loudspeaker in your iPhone 15 Pro Max. If your tunes sound like they're playing through a bowl of Rice Krispies and software tweaks haven't helped, it's time for a hardware upgrade. Grab some replacement screen adhesive for the finishing touch—let's get your phone sounding crisp again!
Step 1


Let your phone's battery dip below that 25% mark! A fully charged lithium-ion battery can be a bit of a drama queen when it comes to safety, so it's best to let it chill for a bit.
- First things first: unplug all cables from your phone.
- Next, press and hold the power button along with either volume button, then swipe to turn your phone off.
Step 2


Look for a nice smooth spot near the bottom edge that's just the right size for a suction cup to grab onto.
- If your screen or back glass is pretty banged up, go ahead and cover it with some overlapping strips of packing tape. This will keep you safe and make taking things apart a breeze!
Step 3


Be careful when using your opening pick! If you shove it in too deep, it might just turn into a little wrecking ball for your device. Take a moment to mark your pick to avoid any mishaps.
Feeling extra precise? Why not mark the other corners of your pick with different measurements to keep it on point!
Here's a nifty trick: tape a coin to your pick about 3 mm from the tip. It'll help keep your pick at the perfect depth!
- Grab your opening pick and measure 3 mm from the tip. Mark that spot with a permanent marker—think of it as giving your tool a snazzy little tattoo for precision!
Step 4

- Grab your P2 pentalobe driver and take out the two 7.2 mm screws hanging out by the charging port. Easy does it!
Step 5

Keep an eye on the heat while you're working—let's not turn that phone into a hot potato! The battery can be a bit dramatic when it comes to heat, so let's keep it cool.
- Grab your trusty hair dryer or heat gun and aim it at the bottom edge of the screen. Give it a nice warm-up until it feels hot to the touch.
Tools Used


Step 6


- Stick a suction handle onto the bottom edge of your screen—make sure it’s snug!
- Give that handle a good, steady pull to pop open a gap between the screen and the frame. You’ve got this.
- Slide the tip of an opening pick into the gap like a pro.
Tools Used

Step 7

Heads up! When you’re slicing through the adhesive holding the screen, watch out for these spots to keep everything safe and sound:
- Two super delicate cables are linking the screen to your phone—one is chilling just above the action button, while the other is hanging out near the middle of the left edge. Handle with care!
- There are several spring contacts dancing around the phone's perimeter. Make sure to keep your pick light in these spots, or you might accidentally bend those contacts. No need to go too deep!
Step 8


Keep your opening pick shallow—no deeper than 3 mm along the bottom edge—to avoid any sneaky damage.
- Gently glide your pick back and forth along the bottom edge to break that adhesive seal. You're doing great!
- Keep that pick snugly in the bottom right corner to make sure the adhesive doesn't decide to stick again. You're almost there!
Step 9

- Warm up the right side of the screen until it feels nice and toasty.
Step 10


Keep your pick no deeper than 5 mm along the right edge, or you might just get a little too cozy with the innards!
- Glide your pick around the bottom right corner of the screen, heading over toward the power button. You'll hit a sturdy little barrier—that's the clip holding the screen in place.
- Twist your pick so the flat side slides right under the screen.
Step 11


- Give that pick a little twist to open up the gap between the screen and the frame until you hear the satisfying click of the clip letting go.
- Slide in a second opening pick right next to the first one to keep the momentum going!
Step 12


- Gently slide the first pick to the bottom right corner of the screen, like you're guiding it on a little adventure.
- Next, slide the second pick up to the top right corner to loosen the adhesive. You're almost there!
- Leave these picks in place to keep the adhesive from sticking back together. You've got this!
Step 13

- Warm up the top edge of the screen until it feels nice and toasty to your fingertips.
Step 14


Keep your pick chill and don’t go deeper than 3 mm along the top edge.
- Gently slide your pick around the top right corner and along the top edge to pop free the two clips and adhesive holding it in place.
Step 15

- Warm up the left edge of the screen until it feels nice and toasty to the touch.
Step 16


Careful not to push your pick more than 2 mm along the left edge—those two screen cables are hanging out right there, and we want to keep them safe!
- Swing your pick around the top left corner like you're drawing a smile.
- Glide your pick down to the bottom left corner to loosen up that sticky adhesive.
Step 17


If the screen feels a little stubborn, don’t worry! Go back around the edges and check if you missed any spots where the adhesive or clips might still be holding on. A quick double-check can save you some extra effort later.
- Carefully swing the screen open to the left side of your phone, like you're unveiling a surprise!
- Rest the screen against a sturdy box or something similar, giving those cables a little break. They deserve it!
Step 18


As you go through this repair, keep a close eye on each screw and remember where it belongs. Trust us, getting them back in the right spot will save you some frustration later!
- Grab your trusty tri-point Y000 driver and loosen the six screws holding down the logic board cover:
- One screw that's 2.1 mm long
- Five screws that are 1.5 mm long
Step 19


- Grab the logic board cover with your tweezers or fingers and slide it down toward the bottom of the phone to free up the sensor cable.
- Lift off the cover.
Tools Used

Step 20


Getting that press connector back in action? Line it up with its socket and gently press down one side until you hear a satisfying click—then tackle the other side. Double-check that it’s sitting flat, because those rubbery edges around the socket love to play tricks and keep things from connecting all the way.
- Grab your trusty opening pick, slip the tip under the battery press connector, and gently pop it free. Disconnect complete!
Step 21
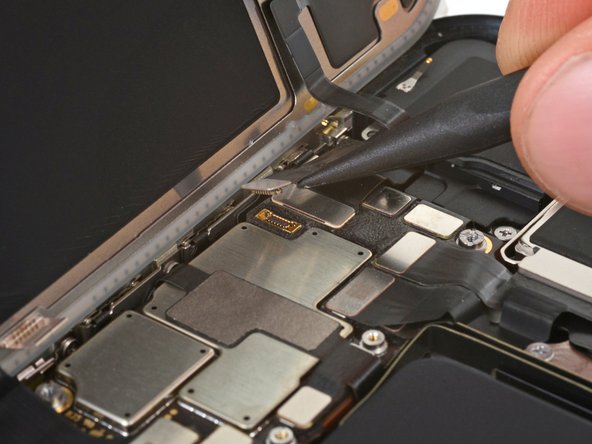

- Gently use the pointy end of a spudger to lift and unplug the ambient light sensor press connector located at the top left of the logic board.
Tools Used

Step 22


- Lift off the screen press connector—like unplugging a tiny, important seatbelt.
Step 23


Watch out for those spring contacts while cleaning the frame—they’re delicate little guys and deserve some gentle love!
- Take off the screen carefully.
- When putting everything back together, pause here and follow this guide to apply fresh screen adhesive.
Step 24

- Grab your trusty Phillips #000 driver and unscrew the four screws holding the loudspeaker in place:
- Three 2.1mm screws
- One 2.9mm screw
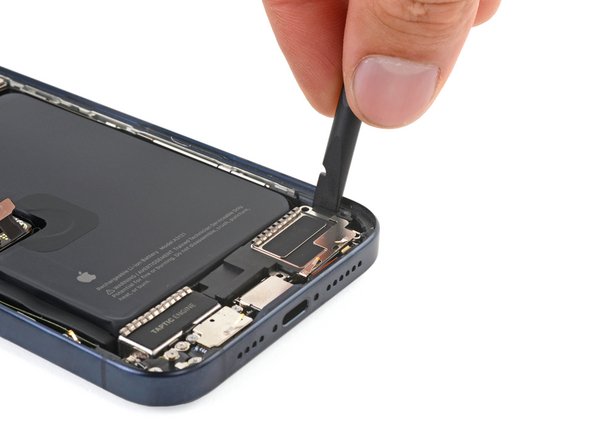
Step 25


Check out the strip of tape running along the top edges of the Taptic Engine and loudspeaker—it's keeping things tidy under the hood.
- Gently slide an opening pick under the tape nestled in the tiny gap between the Taptic Engine and the loudspeaker.
- Carefully glide the pick toward the left edge of the phone to peel the tape away from the Taptic Engine.
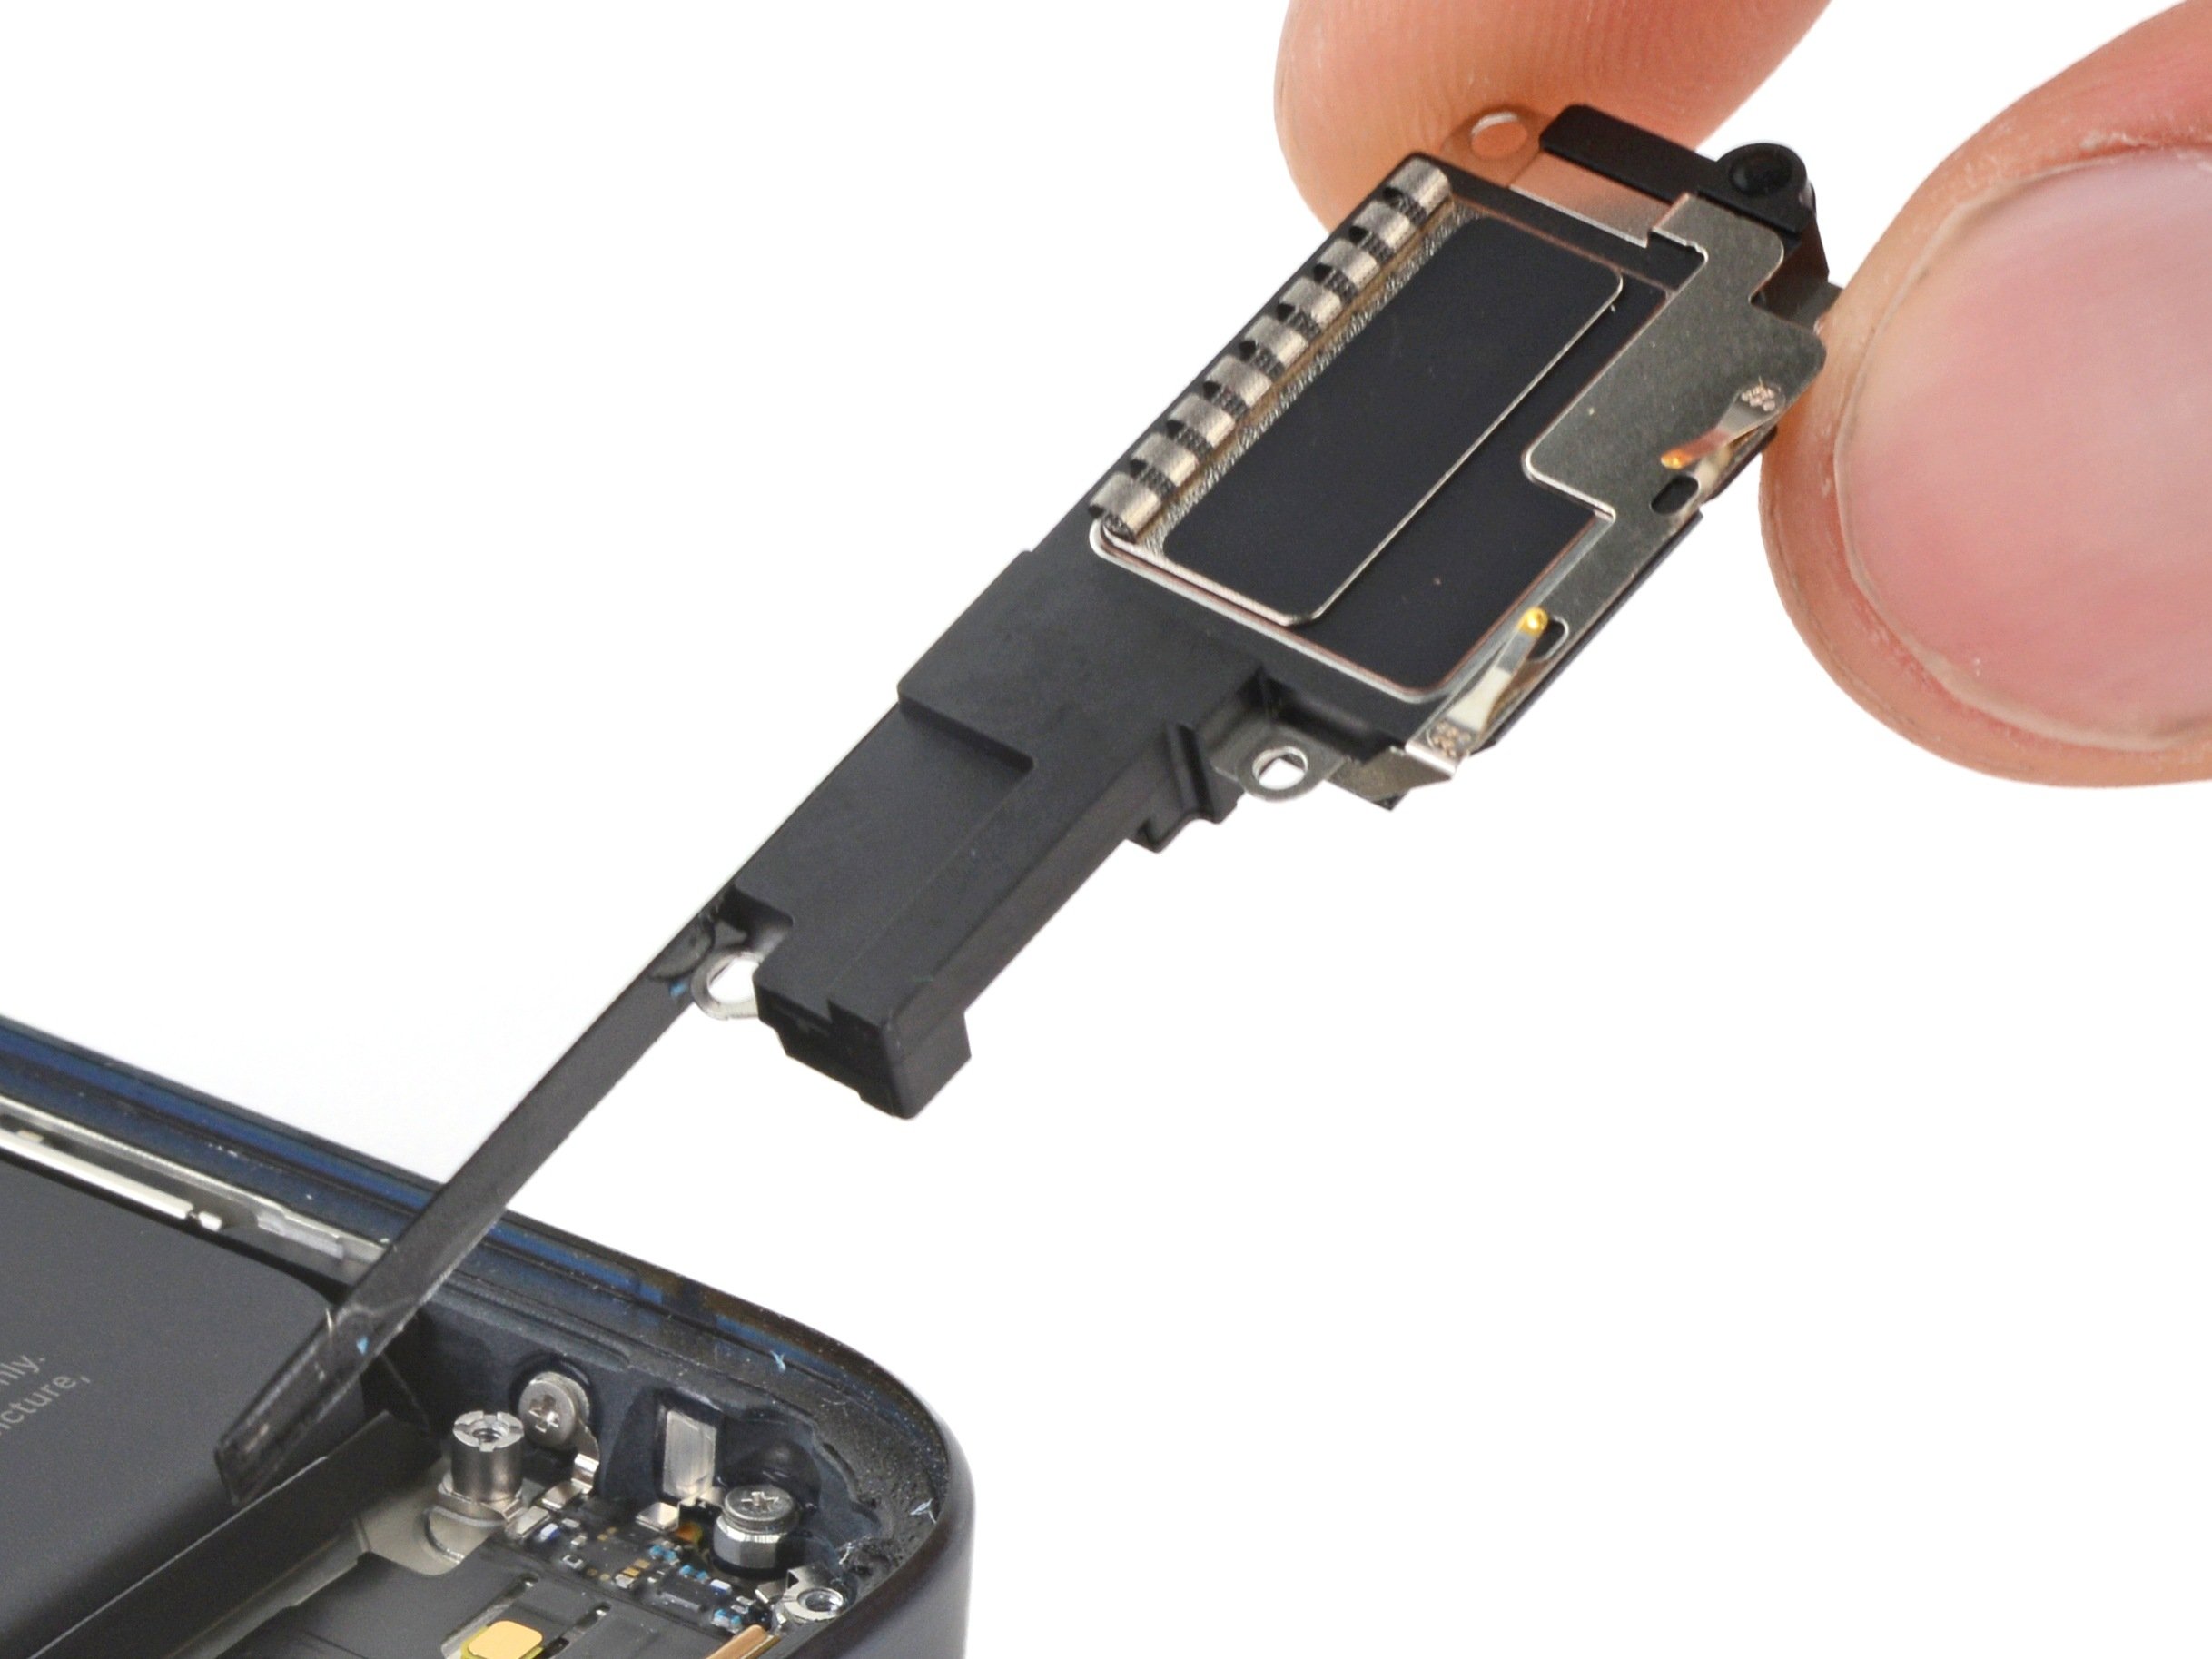
Step 26


- Slide the flat end of your trusty spudger between the right edge of the loudspeaker and the frame.
- Gently pry it up until you can snag the loudspeaker with your fingers.
- Carefully lift out the loudspeaker and set it aside.
Tools Used
Step 27


- Put your device back together by following these steps in reverse—easy peasy!
- Remember to recycle your e-waste responsibly at an R2 or e-Stewards certified facility.
- If things didn’t quite work out, try some basic troubleshooting or reach out to our Answers community for a hand. And if it’s still tricky, you can always schedule a repair with us.


