iPhone 15 Earpiece Speaker Replacement
Duration: 45 minutes
Steps: 32 Steps
Got some crackling or static in your iPhone during calls? It might be time to swap out that earpiece speaker! This guide will walk you through replacing the earpiece speaker in your iPhone 15. Make sure you have some replacement back glass adhesive on hand to finish off the repair. If you're feeling unsure or need a hand, no worries – you can always schedule a repair.
Step 1


Let your phone’s battery drop below 25% before starting—charged lithium-ion batteries can be a bit tricky, so better safe than sorry!
- Disconnect any cables hanging out of your phone. Give it some space!
- Press and hold both the power button and one of the volume buttons, then swipe to turn your phone off. Easy as pie.
Step 2


Find a nice smooth spot along the bottom edge that's large enough for your suction cup to get a good grip.
- If your screen or back glass is seriously cracked, slap some overlapping strips of packing tape over it to keep the mess contained and make taking it apart a whole lot easier.
Step 3


Be careful not to insert your opening pick too deeply, as it could harm your device. Use this step to mark your pick and keep your device safe!
Feel free to mark the other corners of the pick with different measurements to keep things precise.
Another fun option is to tape a coin to the pick about 3 mm from the tip. It's a clever little trick!
- Grab your trusty opening pick and measure 3 mm from the tip. Make a little mark with a permanent marker so you know where to go!
Step 4


- Grab your P2 pentalobe driver and carefully unscrew the two 7.7 mm screws flanking the charging port—steady hands win the day!
Step 5

Heads up! Keep the phone from getting too toasty—batteries and heat are not the best of friends.
- Grab a hair dryer or heat gun and gently warm up the bottom edge of the back glass. You’ll know it’s ready when it feels warm to the touch.
Tools Used


Step 6


- Stick a suction handle on the bottom edge of the back glass—like you're giving your phone a new best friend.
- Give the handle a confident, steady pull to open up a little gap between the back glass and the frame. No need to show off your muscles, just keep it smooth.
- Slide the tip of an opening pick into that gap—think of it as sneaking backstage at a concert.
Tools Used

Step 7

As you slice through the adhesive holding the back glass, keep an eye out—these spots can be a bit tricky!
- Heads up! There's a sneaky little cable right next to the volume down button, connecting the back glass to your phone. Keep your pick away from this spot—nobody wants a sliced cable surprise.
- Spring contacts are hanging out around the edges of your phone. Glide your pick just as deep as the step suggests—going further risks bending those contacts. Keep it chill and precise!
Step 8


Keep your opening pick's dive shallow — no deeper than 5 mm along the bottom edge to keep things safe and sound.
- Wiggle your pick playfully along the bottom edge to break free the adhesive's grip.
- Keep your trusty pick lodged in the bottom right corner to stop the adhesive from sealing back up like it's playing hide and seek.
Step 9

- Warm up the right edge of the back glass until it feels toasty. Your phone's not at the spa—just a little heat to help things along!
Step 10


Keep your pick no deeper than 7 mm along the right edge—no need to go on a deep dive here!
Avoid slicing past the volume buttons to keep that wireless charging cable safe and sound.
- Gently slide your pick around the bottom right corner, then guide it toward the volume down button. Keep going until you hit a solid stop – that's the big clip holding the back glass in place.
- Leave the pick in there to keep the adhesive from closing back up. You got this!
Step 11

- Warm up the left edge of the back glass until it feels nice and toasty.
Step 12


When you're working along the left edge, remember to keep your pick no deeper than 5 mm. You've got this!
- Pop a second pick into the bottom edge to start the fun.
- Give that second pick a spin around the bottom left corner.
- Slide it up to the top left corner, breaking free the adhesive as you go.
- Leave that pick in place to keep the adhesive from playing tricks and resealing.
Step 13

- Warm up the top edge of the back glass until it feels nice and toasty.
Step 14


Keep your pick at a safe distance—no deeper than 3 mm along the top edge, please!
You’ll probably hear and feel a couple of satisfying clicks when those top clips pop loose.
- Take your second opening pick and swing it from the top left corner over to the top right corner to slice through that sticky adhesive.
- Keep that pick in place so the adhesive doesn’t snap back together on you.
Step 15

- Warm up the top right corner of the back glass until it feels nice and toasty—just enough to make things easier to peel, not to grill a cheese sandwich!
Step 16


Keep your pick within 4 mm along the right edge – we want to keep things smooth and easy!
- Swing that second opening pick around the top right corner like a pro, then slide it over to the volume up button to loosen up that stubborn adhesive.
Step 17


If the back glass is giving you trouble, take a second pass around the edges to make sure you didn’t miss any sticky spots or clips that are still holding on tight.
- Swing the back glass open to the right side of your phone, nice and easy.
- Prop up the back glass on something sturdy so the cable doesn’t get any unwanted yoga practice.
Step 18

As you dive into this repair adventure, make sure to keep an eye on each screw and return it to its original home when you're done. It’s like a little screw reunion!
- Grab a tri-point Y000 driver and carefully remove the two 1.3mm screws that are holding down the lower connector cover. Nice and easy, you're doing great!
Step 19


- Grab your tweezers and gently slide the cover up toward the top of the phone to pop it free from the logic board. It’s like giving your phone a little nudge to wake up.
- Lift the cover off and set it aside—easy does it!
- When you’re putting things back together, hook the top edge of the cover into its slot on the logic board, then lock it down with its screw. Secure and snug, just how your phone likes it.
Tools Used

Step 20


To reconnect the press connector, simply line it up with its socket, then gently press down on one side until you hear that satisfying click. After that, press down the other side. Make sure it sits nice and flat—sometimes the insulating rubber around the socket might try to keep it from connecting fully.
You’ll notice a plus and minus sign on the connector head. It’s a quick visual guide to help you line things up correctly.
- With one hand, hold the back glass upright and give it a gentle twist to peek at the battery press connector hanging out just below the volume buttons.
- Grab an opening pick and pop that battery press connector off the logic board like you’re unplugging your phone from its morning nap.
Step 21


- Grab your trusty tri-point Y000 driver and carefully unscrew the tiny 0.9 mm screw holding down the middle connector cover. Keep it safe!
Step 22


- Grab the flat end of a spudger (or just use your finger if you’re feeling bold) and gently nudge the cover down toward the bottom of the phone—pop that top edge loose!
- Lift off the cover and set it aside like a pro.
- When you’re putting it back together, line up the cover so its tab is chilling just behind the clip on the logic board. Hold it down with one finger and slide the cover forward to lock it back in place.
Tools Used

Step 23


- Grab an opening pick to gently pry up and unplug the wireless charging coil and NFC connector—easy does it!
Step 24

- Carefully take off the back glass.
- When you're putting everything back together:
- Now’s a great time to check if everything's working before you seal up your phone. Reconnect the battery and back glass temporarily, power it up, and make sure it’s all good. Once you’re sure, power it down and continue with the reassembly.
- Follow this guide to apply adhesive and put the back glass back in place.
Step 25


- Grab your trusty tri-point Y000 driver and let's get to work! Carefully unscrew those two 1.3 mm-long screws holding down the upper connector cover.
- Now, gently lift off the cover and reveal the magic underneath!
Step 26


- Grab the tip of your opening pick and gently pry up to disconnect the antenna, front sensors, and the front camera press connectors—three in total. It's like unlocking a secret compartment, just with a bit of finesse!
Step 27


- Grab your tweezers or use your fingers, gently lift out the front camera and sensors from their cozy spots in the frame, and set them aside for now.
Tools Used
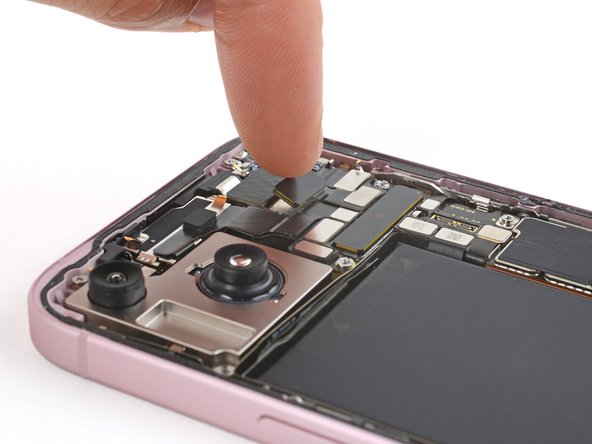
Step 28


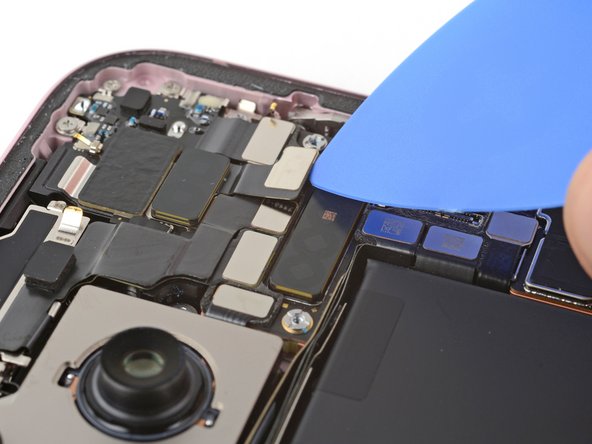
- Grab your opening pick and gently pop up the earpiece speaker press connector. Take it slow—no need to rush this little guy!
Step 29

- Grab a Phillips #000 driver and unscrew the five screws holding the earpiece speaker in place:
- Two screws, each 1.1 mm long
- Three screws, each 1.6 mm long
Step 30


- Grab your trusty tweezers or just your fingers, and gently lift the earpiece speaker away from the top of the phone. This will help you free that pesky gasket from the frame.
- Now, go ahead and remove the earpiece speaker!
Tools Used
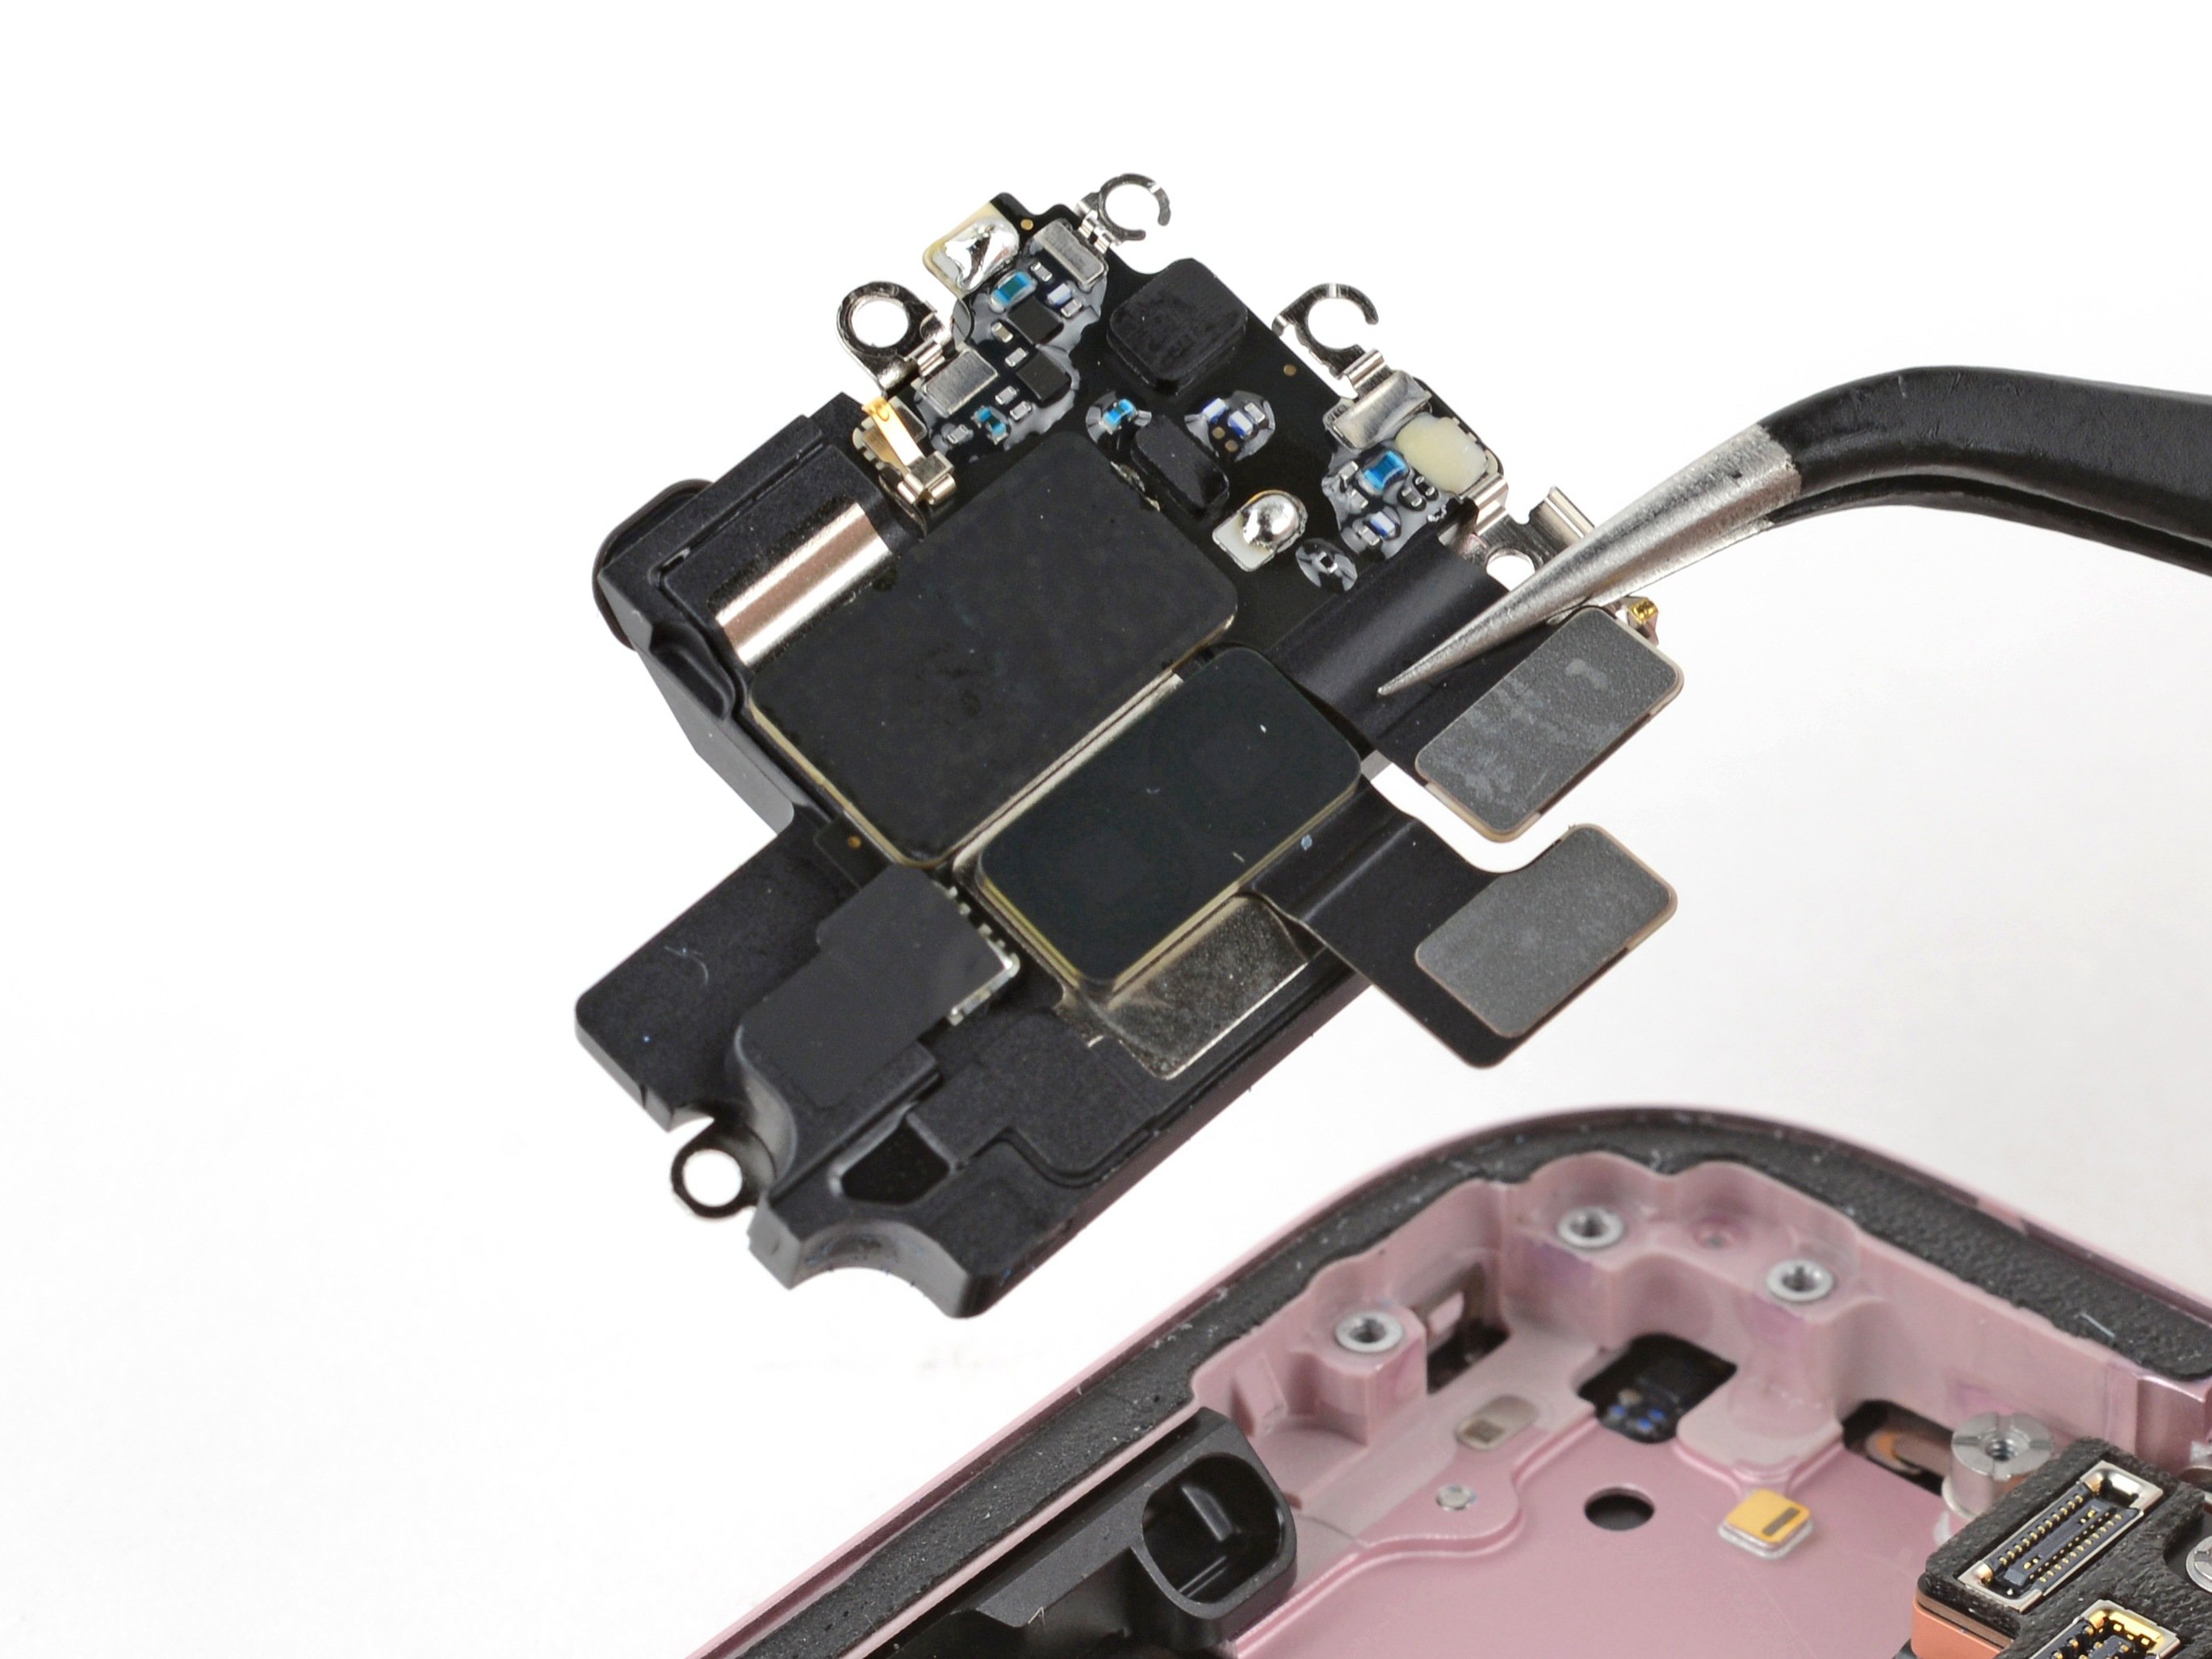
Step 31
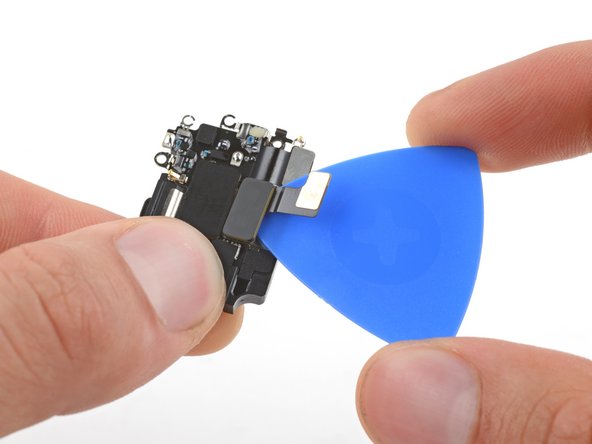
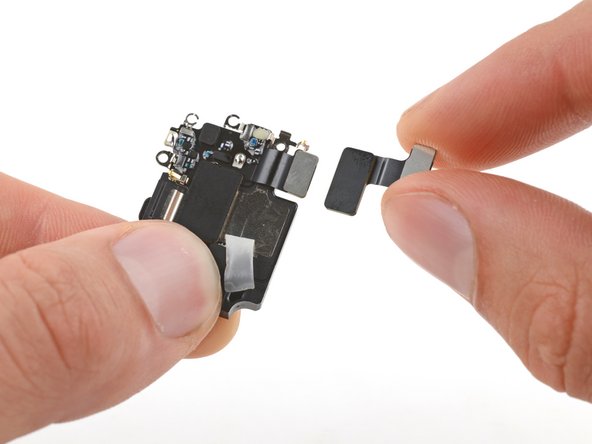

Heads up! Your earpiece speaker comes with an antenna stuck on it, so make sure to carefully transfer that little guy over to your new speaker.
- Slide your trusty opening pick between the antenna and the earpiece speaker. It's like a little treasure hunt!
- Gently work the pick under the antenna and lift it up to break free the adhesive holding it tight. You're doing great!
- Carefully take out the antenna. Almost there!
Step 32

- Put your phone back together by following these steps in reverse—easy as pie!
- Got e-waste? Make sure to drop it off at an R2 or e-Stewards certified recycler to keep things green.
- If things didn’t quite work out, give some basic troubleshooting a shot, or swing by our Answers community for a hand.
- And remember, if it’s feeling tricky, you can always schedule a repair with us.

