iPhone 15 Logic Board Replacement
Duration: 45 minutes
Steps: 59 Steps
To keep everything running smooth, make sure to swap out the matching parts along with your new logic board.
Ready to tackle the logic board swap in your iPhone 15? Grab some replacement back glass and screen adhesive to get the job done right. If your battery is looking a bit puffy, make sure to handle it with care and think about replacing it too. Remember, due to Apple's parts pairing quirks, the magic of your iPhone's features hinges on the logic board. Even a genuine replacement board might not do the trick without Apple's special calibration. To keep everything running smoothly, don’t forget to swap out these paired parts along with your new logic board: the Screen (for that True Tone and Auto-Brightness goodness), the Front Camera and Sensors (for most of the fun features), and the Battery (to keep that battery health data intact). If you need help, you can always schedule a repair.
Step 1


Let that battery of yours run down to below 25%! A fully charged lithium-ion battery can be a bit of a wild card when it comes to safety. So, let's keep things chill and make sure it's not too charged up before diving in.
- First things first, let’s give your phone a little breather. Unplug any cables that are connected to it.
- Now, let’s get that phone to take a quick nap! Press and hold both the power button and either volume button, then slide to power it off. Easy peasy!
Step 2


Find a nice, flat spot near the bottom edge—big enough for your suction cup to get a good grip.
- If your screen or back glass is seriously cracked, slap some overlapping strips of packing tape over the glass to keep yourself safe and make taking it apart a breeze.
Step 3


If you push the opening pick in too deep, it could mess up your device. Mark your pick at the right spot to keep things safe and sound.
Feel free to mark the other corners of the pick with different measurements to keep track.
Or, for a quick hack, stick a coin on your pick about 3 mm from the tip to act as a handy depth guide.
- Grab your trusty permanent marker and measure out 3 mm from the tip of that opening pick. Give it a little mark – you'll thank yourself later!
Step 4


- Grab your P2 pentalobe screwdriver and take out the two 7.7 mm screws hanging out by the charging port. Easy does it—let’s keep those screws safe for later!
Step 5

Heads up! Don’t crank up the heat too much—the battery really doesn’t like getting too hot and could get damaged.
- Grab your hair dryer or heat gun and warm up the bottom edge of the screen until it feels nice and toasty to the touch.
Tools Used


Step 6


- Grab a suction handle and stick it onto the bottom edge of your screen. You've got this!
- Give that handle a good, strong pull to pop open a little gap between the screen and the frame. Steady does it!
- Slide the tip of your opening pick right into that gap, and let’s keep moving forward!
Tools Used

Step 7

Heads up! When you’re slicing through the adhesive holding the screen, watch out for these tricky spots to keep things smooth and safe:
- Two fragile cables connect the screen to the phone—one sits just above the mute switch, and the other hangs out roughly halfway between the volume down button and the phone's bottom edge.
- Around the phone’s perimeter, there are several spring contacts. Be super careful not to shove your pick too deep near these spots to keep those contacts from bending out of shape.
Step 8


Keep your opening pick no deeper than 3 mm along the bottom edge, or you might find yourself in a pickle!
- Gently slide your pick back and forth along the bottom edge to loosen up that stubborn adhesive.
- Keep your pick wedged in the bottom right corner so the adhesive doesn’t sneak back together.
Step 9

- Warm up the right side of the screen until it feels comfortably heated to the touch.
Step 10


Be careful not to push your pick in more than 5mm along the right edge.
- Glide your pick around the bottom right corner and head toward the power button. You'll bump into a clip holding things tight—no worries, that's just part of the adventure.
- Flip your pick so the flat side slips right under the screen, like you're sliding into home base.
Step 11


- Grip the pick with one hand and gently twist it to pry open a little space between the screen and frame, releasing the right clip.
- Slide a second opening pick in just to the right of the first one.
Step 12


- Gently slide the first pick down to the bottom right corner of the screen.
- Next, slide the second pick up to the top right corner to loosen the adhesive.
- Keep these picks in place so the adhesive doesn’t snap back together.
Step 13

- Warm up the top edge of the screen until it feels pleasantly toasty.
Step 14


Keep your pick shallow—no deeper than 3 mm along the top edge to avoid any surprises!
- Pop a third opening pick into the top right corner, just above the last one you placed. You've got this!
- Gently slide your pick around that top right corner and along the top edge until you hit the top left screen clip. You're making progress!
Step 15


- Give your pick a little twist to slide its flat edge right under the screen.
- Now, give your pick another twist to pop that top left screen clip loose.
- Gently slide your pick over to the top left corner and keep going!
Step 16

- Warm up the left edge of your screen until it feels nicely toasty—just enough to help things loosen up.
Step 17


Keep your pick no deeper than 3 mm along the left edge to dodge those sneaky cables connecting the screen to the phone.
- Gently slide your pick around the top left corner of the screen and along the left edge to pop those clips loose and free the adhesive holding it down. You've got this!
Step 18


If your screen seems a bit stubborn, take a leisurely stroll around the edges and see if there are any sneaky bits of adhesive or clips that need a little extra love.
- Carefully swing the screen open, pivoting it around the phone’s left edge.
Step 19

- Grab your tri-point Y000 driver and spin out that tiny 0.9 mm screw holding the front sensor connector cover in place.
Step 20


- Grab those tweezers and gently lift the cover to a 90-degree angle—nice and steady!
- Unclip the cover from its spot on the logic board with a little wiggle and pop.
- Take the cover off and set it aside—you're doing great!
- When it's time to put it all back together, slide the cover in at a 90-degree angle so the hook clicks back into place, then gently lower it flat onto the press connector.
Tools Used

Step 21


To reconnect a press connector, line it up with its socket, then give one side a gentle push until you hear that satisfying click. Follow up with the other side, just a little press, and you’re golden.
- Gently slide the tip of your opening pick under the front sensor press connector to lift and unplug it.
Step 22

- Grab your tri-point Y000 driver and take out that tiny 0.9 mm screw holding down the screen connector cover.
Step 23


- Grab your tweezers and gently pop the cover up, sliding it out from the hook on the logic board with style.
- Go ahead and take the cover off—easy does it!
Tools Used
Step 24


- Gently slide the tip of your opening pick underneath the screen press connector and carefully lift it up to disconnect. You've got this!
Step 25

Watch out for those spring contacts while you clean the frame! We don't want any accidental damage, so be gentle and keep the good vibes going.
- First up, gently detach the screen from your device. Take your time; we want this to go smoothly!
- When you're putting everything back together, refer to this guide for tips on how to reapply adhesive and get that shiny new screen securely in place. You've got this!
Step 26

- Turn your phone over and place it gently on a soft surface, like a microfiber cloth, to keep its delicate insides safe while you work your magic.
Step 27

Keep an eye on the heat—too much and the battery could get cranky. You don't want that! Just a little warmth is all it needs to stay happy.
- Grab your trusty hair dryer or heat gun and give that bottom edge of the back glass a warm hug until it feels nice and toasty!
Tools Used
Step 28


- Stick a suction handle onto the bottom edge of the back glass like you mean business.
- Give it a strong, steady pull—think gym workout for your fingers—until you see a little gap appear between the glass and the frame.
- Slide the tip of an opening pick into the gap, channeling your inner ninja in precision and stealth.
Tools Used
Step 29

As you work your magic slicing through the adhesive on the back glass, watch out for these spots—they’re a bit tricky!
- Heads up! There’s a fragile cable linking the back glass to the phone right next to the volume down button. Avoid sliding your pick in there or you might accidentally slice it.
- Around the edge of the phone, you’ll find several spring contacts. Be sure to keep your pick shallow as directed in each step to prevent bending these little guys.
Step 30


Keep your opening pick shallow—no deeper than 5 mm along the bottom edge, or you might poke something you shouldn’t!
- Scoot your pick back and forth along the bottom edge to loosen up that sticky adhesive.
- Keep your pick chilling in the bottom right corner so the glue doesn't sneak back together.
Step 31

- Warm up the right edge of that back glass until it's nice and toasty.
Step 32


Keep your pick no deeper than 7 mm along the right edge to stay safe and sound.
Avoid slicing beyond the volume buttons to keep that wireless charging cable happy and intact.
- Gently rotate your pick around the bottom right corner, sliding it towards the volume down button. Keep going until you hit a solid stop from a big clip holding that back glass in place.
- Leave that pick right where it is to keep the adhesive from sealing up again while you work.
Step 33

- Gently warm up the left edge of the back glass until it feels warm to the touch. Don't rush it—just give it a little time to heat up!
Step 34


Along the left edge, keep your pick shallow—no deeper than 5 mm—to avoid any oops moments.
- Pop in a second opening pick at the bottom edge.
- Give that second pick a little twist around the bottom left corner.
- Slide it on up to the top left corner to break that adhesive seal.
- Keep this pick in place to stop the adhesive from sticking back together.
Step 35

- Warm up the top edge of the back glass until it’s nicely heated and ready for the next step.
Step 36


Keep your pick shallow—no deeper than 3 mm along the top edge—to avoid any surprises.
You might hear and feel a couple of clicks as those top two clips give way. No worries, it's all part of the process!
- Twist your second opening pick around the top left corner and glide it over to the top right corner to break that adhesive seal like a champ.
- Keep that pick right where it is to stop the adhesive from making a comeback!
Step 37

- Warm up the top right corner of the back glass until it feels nicely heated to the touch.
Step 38


Keep your pick to a maximum depth of 4 mm along the right edge—let’s not go digging too deep, okay?
- Twist the second opening pick around the top right corner and slide it over to the volume up button to gently break apart the adhesive.
Step 39


If the back glass feels like it’s holding on for dear life, take a stroll around the edges again to spot any sneaky adhesive or clips that didn’t want to let go.
- Carefully swing the back glass open to the right side of the phone, like you're unveiling a treasure!
- Prop the back glass against a raised surface to keep the cable nice and cozy, avoiding any unnecessary strain.
Step 40

Keep an eye on every single screw during this repair and make sure each one goes right back to its original spot—no screw left behind!
- Grab your trusty tri-point Y000 driver and let's get to work! Carefully unscrew those two 1.3 mm-long screws holding down the lower connector cover. You're doing great!
Step 41


- Grab your trusty tweezers and gently slide the cover up toward the top of the phone to pop it loose from the logic board.
- Lift that cover off and set it aside like a pro.
- When putting things back together, hook the top edge of the cover into its slot on the logic board before tightening the screw. Easy does it!
Tools Used
Step 42


To reconnect a press connector, line it up with its socket and gently press down on one side until you hear a click, then do the same on the other side. Make sure it lies flat, since the rubber insulation around the sockets can sometimes keep it from connecting properly.
You'll notice a plus and minus sign printed right on the head of this connector to help you get it oriented correctly.
- With one hand, hold the back glass upright and give it a little twist to uncover the battery press connector hiding just below the volume buttons.
- Now, grab your trusty opening pick and gently pry up to disconnect the battery press connector from the logic board.
Step 43


- Grab your trusty tri-point Y000 driver and carefully unscrew the tiny 0.9 mm screw holding down the middle connector cover. Keep it safe!
Step 44


- Gently use the flat end of a spudger or your finger to nudge the cover down toward the bottom of the phone and unclip its top edge.
- Take off the cover.
- When putting it back together, line up the cover’s tab just behind the clip on the logic board. Press down with one finger and slide the cover forward to snap the clip into place.
Tools Used

Step 45


- Grab your trusty opening pick and gently pry up to disconnect the wireless charging coil and NFC connector. Easy does it!
Step 46

- Take off the back glass carefully.
- When putting everything back together:
- Here’s a smart move—before sealing your phone for good, reconnect the battery and back glass temporarily, power it on, and double-check that everything’s running smoothly. Once you’re satisfied, power it down and finish the reassembly.
- Follow this guide to stick everything back in place and reinstall your back glass.
Step 47


- Grab your tri-point Y000 driver and spin out those two tiny 1.3 mm screws holding on the upper connector cover.
- Lift off the cover and set it aside.
Step 48


- Gently slide the tip of your opening pick under the connectors to pop them loose. You’ve got three little connections to disconnect—the antenna, front sensors, and front camera. Easy peasy!
Step 49


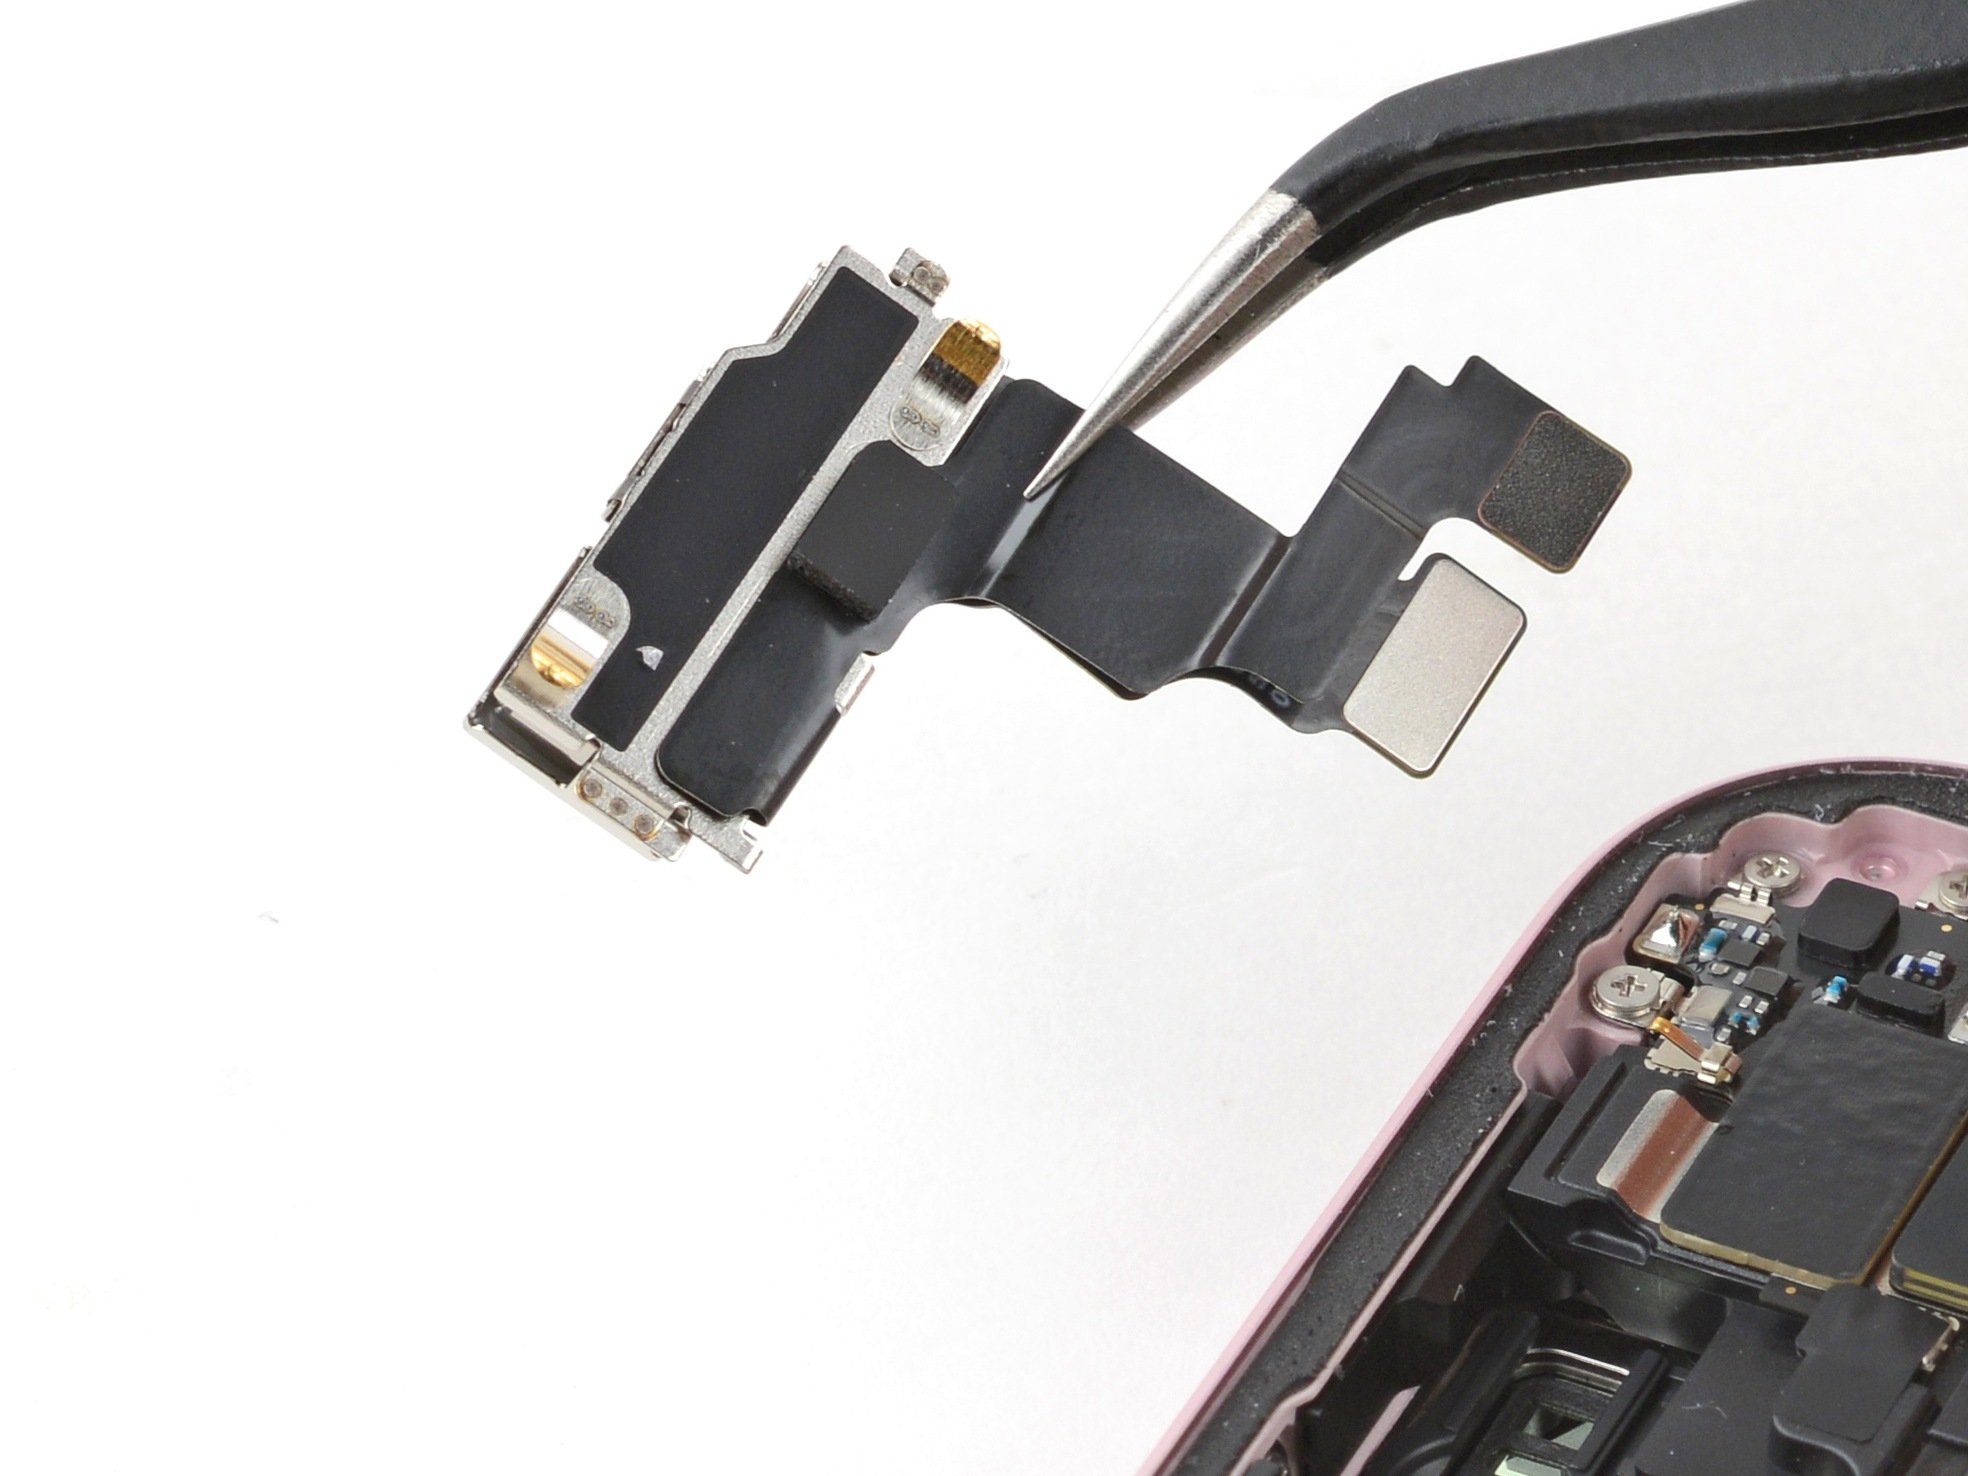
- Gently coax the front camera and sensors out of their snug little home in the frame using tweezers or your fingers, and then set them free by removing them.
Tools Used
Step 50


- Gently use the tip of an opening pick to nudge up and disconnect the earpiece speaker press connector. You're almost there!
Step 51

- Grab your trusty Phillips #000 driver and get ready to tackle those five screws holding the earpiece speaker in place:
- First up, you'll find two screws that are 1.1 mm long, just waiting to be unscrewed.
- Then, there are three more screws that are 1.6 mm long. They're a bit longer, so don't forget about them!
Step 52


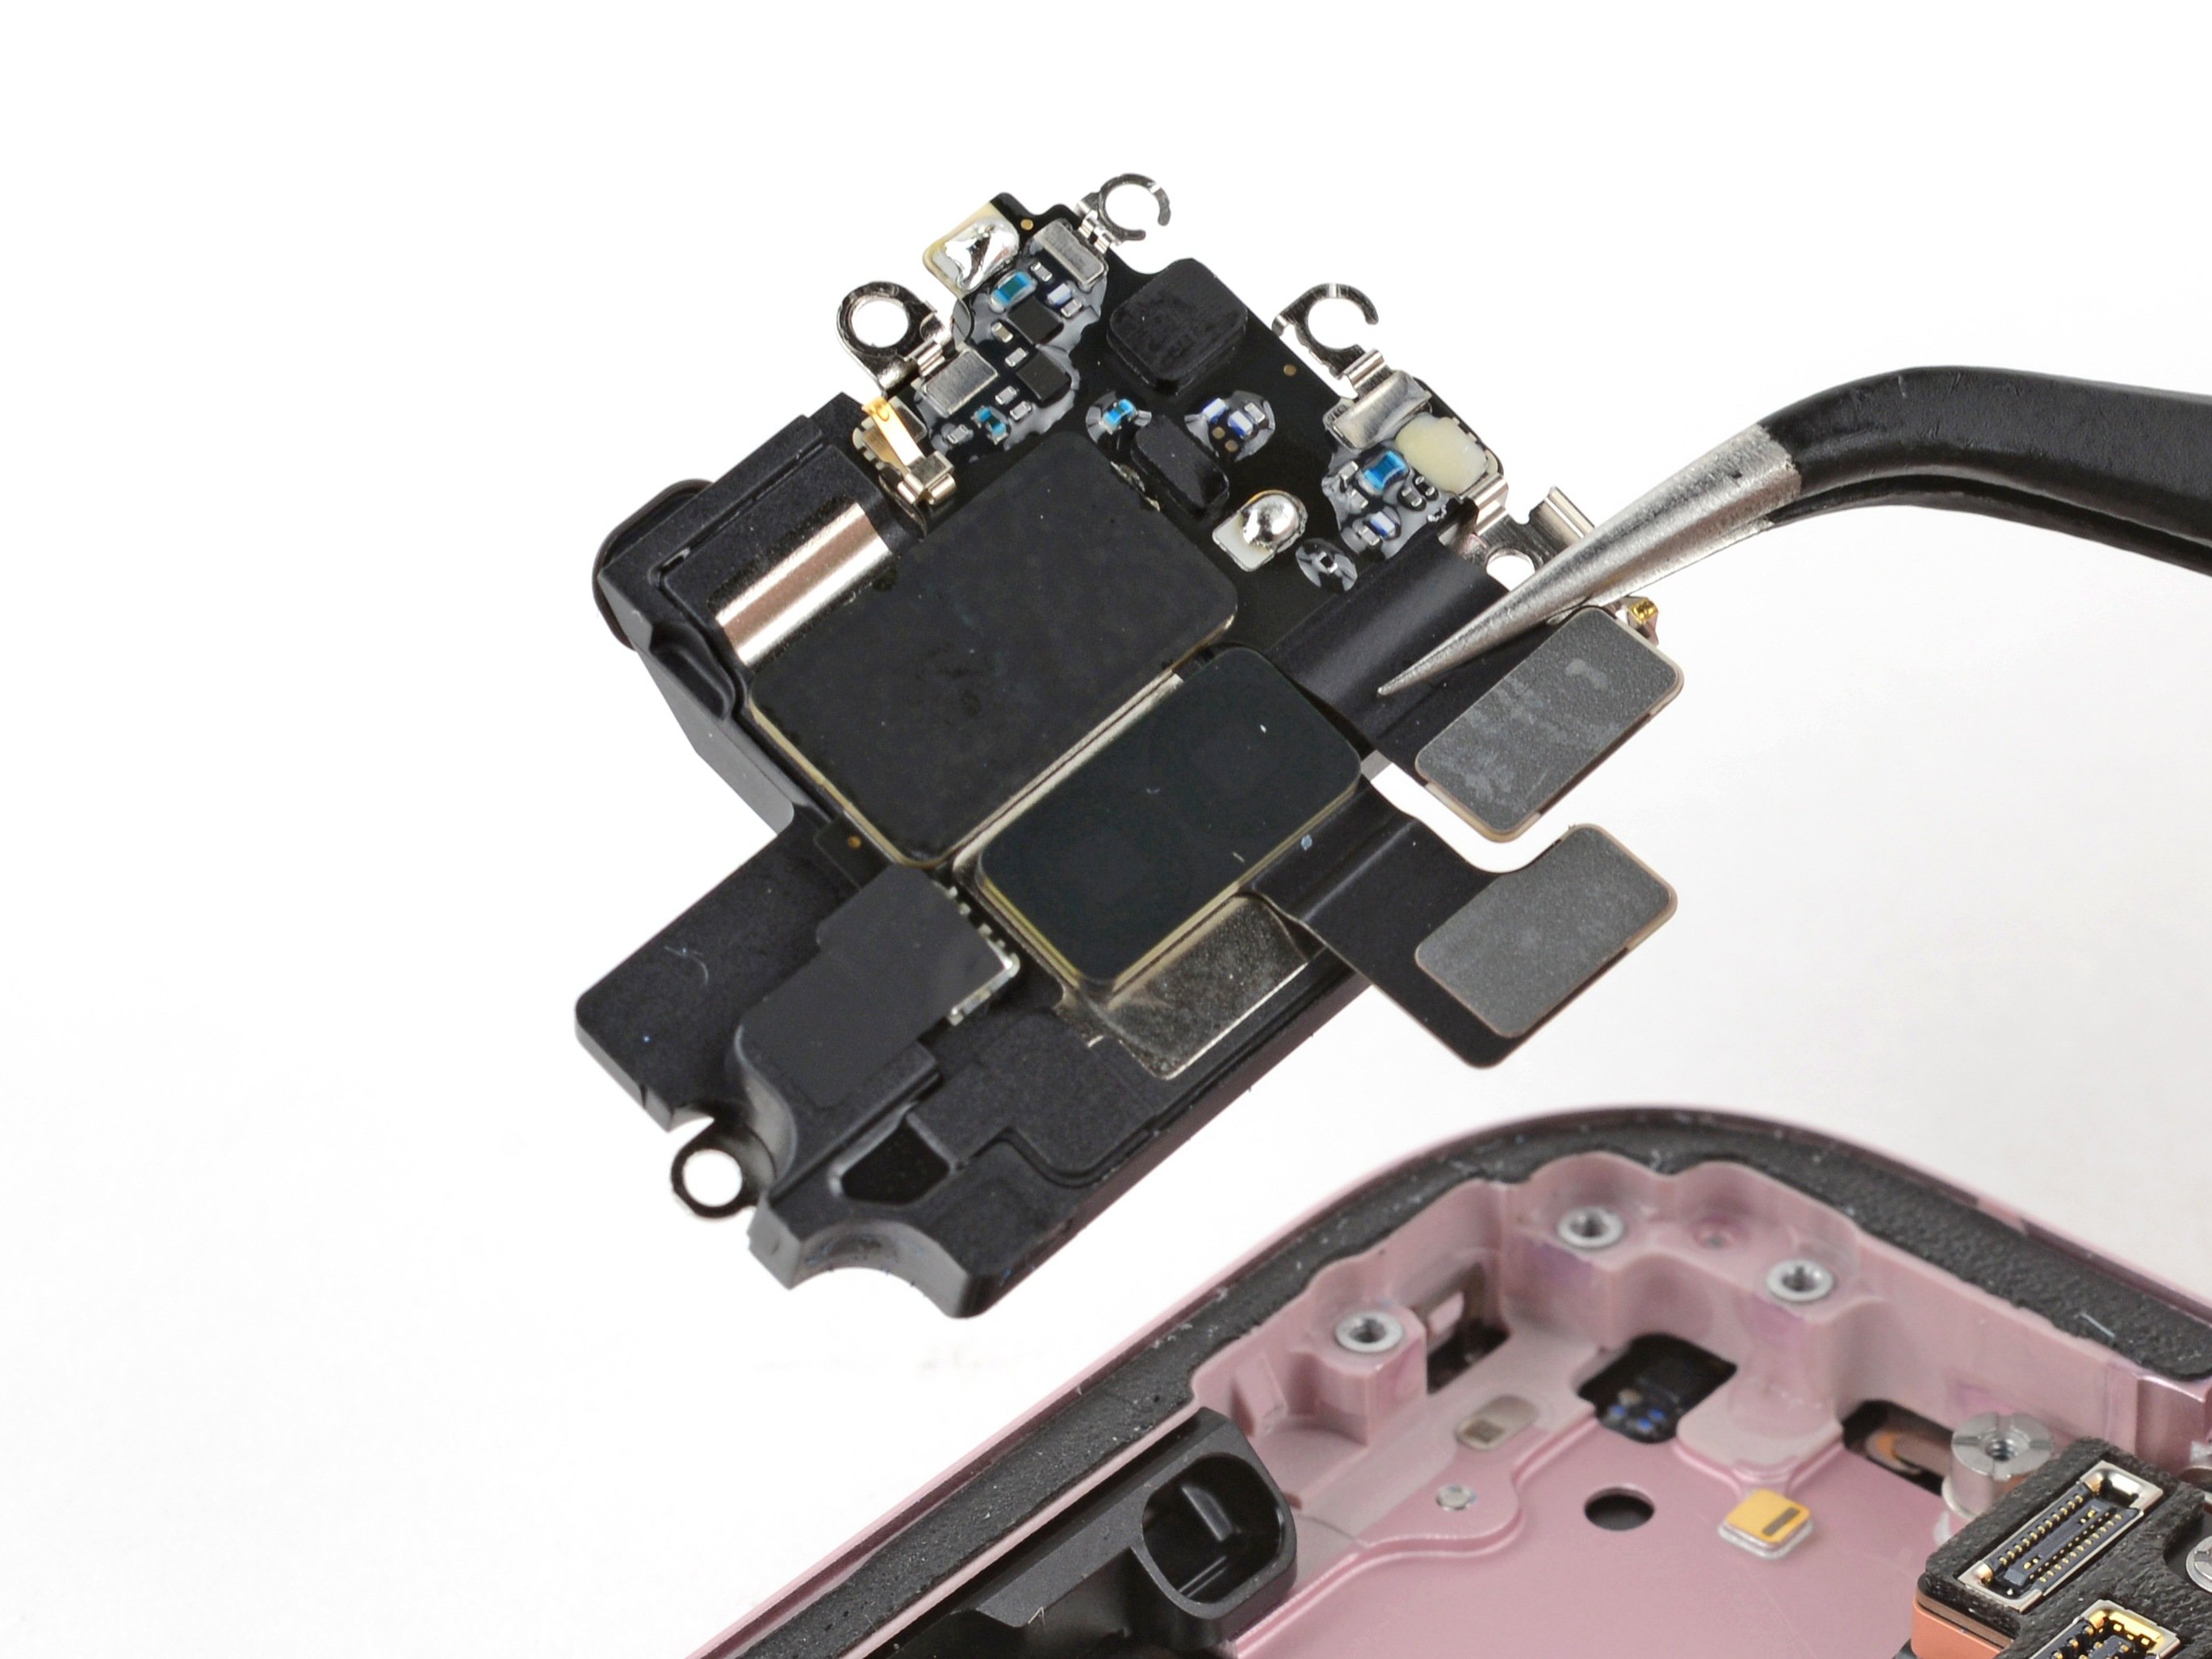
- Grab your tweezers or just use your fingers to gently lift and pull the earpiece speaker away from the top of the phone, freeing the gasket from its frame snug spot.
- Take out the earpiece speaker.
Tools Used
Step 53


Watch out for cable creases and battery dents—your tools don’t need to leave a mark!
A bit of light adhesive keeps the battery cable snugly attached to the logic board. No worries, it's just a friendly little hold keeping everything in place!
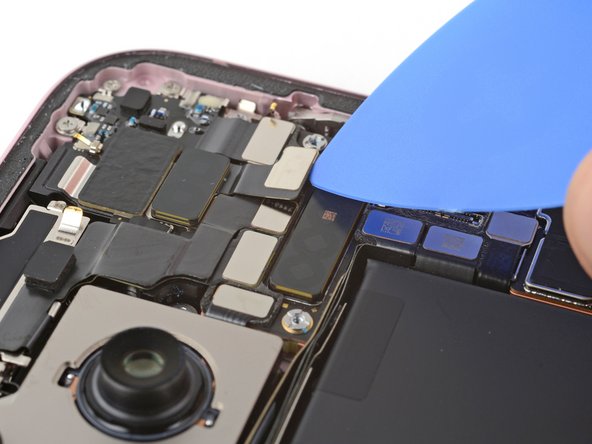
- Gently shimmy an opening pick under the battery cable to loosen it from the logic board.
Step 54


- Grab your opening pick and gently pop up the volume button connector—think of it like opening a stubborn bag of chips, but with a little more finesse.
Step 55


- Unplug the power button connector—just a little gentle wiggle will do the trick!
Step 56


- Pop off those three connectors—two for the rear cameras and one for the antenna. Easy does it!
Step 57


- Unplug the eSIM, Taptic Engine, and charging port connectors—there are three in total, so be sure to get them all!
Step 58


No standoff driver? No problem. You can use a slim flathead driver—just go easy, those screw heads are a little shallow and don't appreciate a rough touch.
- Grab your trusty standoff driver and unscrew the five standoff screws holding down the logic board:
- One screw is 2.9 mm long
- One screw is 3.9 mm long
- Three screws are 3.5 mm long
Step 59


- Ready to put your phone back together? Just follow these steps in reverse, and you'll be good to go!
- Got some e-waste? Be sure to take it to a certified recycler like an R2 or e-Stewards one – it’s good for the planet!
- Things didn’t go quite as planned? No worries! Try some basic troubleshooting, or swing by our Answers community for a hand.