
iPhone 14 Pro Max Battery Replacement
Duration: 45 minutes
Steps: 38 Steps
Heads up! For a smooth and safe teardown, make sure your battery is drained below 25% before you start taking things apart.
Ready to breathe new life into your iPhone 14 Pro Max? This guide will help you swap out a tired or dead battery with ease! iPhone batteries typically hold about 80% of their capacity for around 500 charge cycles, which translates to roughly 18-24 months for most folks. After that, you might find yourself reaching for the charger more often, and iOS might give you a little nudge about performance dips (which means your phone might be feeling a bit sluggish). This guide is tailored for the A2894 (international) model, so if you've got a different iPhone 14 Pro Max version, you might notice a few visual differences, but the steps should still work like a charm. For your safety, make sure to drain your battery below 25% before diving into the disassembly—this helps minimize fire risks if the battery gets a little too adventurous during repairs. And if you've got a swollen battery, be sure to take the right precautions. Quick note: If you're on iOS 17.6 or earlier, you might see a message about the 'genuineness' of your battery after the fix, even when using legit Apple parts, but if everything's working fine, feel free to ignore that. For iOS 18 and newer, remember to calibrate those authentic Apple batteries with Repair Assistant. And don’t forget, you’ll need some replacement adhesive to stick that battery and screen back when you’re reassembling. Your iPhone will be back to its usual self, but it might lose its IP (Ingress Protection) rating along the way!
Step 1


- First things first, let’s give your iPhone a little break—power it off before diving into the disassembly adventure!
- Now, grab your trusty pentalobe P2 screwdriver and carefully remove those two 6.8 mm-long screws at the bottom edge of your iPhone. We're getting closer to the fun part!
Step 2


Be careful not to push your opening pick in too deep, as it could harm your device. Marking your pick will help keep things safe and sound!
Feel free to mark the other corners of the pick with various measurements for extra precision.
Another fun option is to stick a coin to a pick about 3 mm from the tip—who knew DIY could be so creative?
- Grab your opening pick and measure 3 mm from the tip, then mark that spot with a permanent marker—precision is key, but no stress, you’ve got this!
Step 3


Pop on some safety glasses—nobody wants a surprise glass confetti moment.
Got a cracked iPhone screen? No worries! Just grab some tape and cover that glass to keep everything intact and avoid any accidental cuts while you tackle the repair.
And if you're really in a pinch, a little superglue on the suction cup might just do the trick to keep it stuck to the screen!
- Grab some clear packing tape and lay down overlapping strips over the screen of your iPhone until the entire face is nice and covered. It's like giving your phone a cozy blanket!
- If the suction cup is playing hard to get in the next steps, no worries! Just take a sturdy piece of tape (duct tape works great) and fold it into a handle to lift the screen instead. You've got this!
Tools Used


Step 4


Ready to meet the Anti-Clamp? These next three steps show off this handy tool that makes opening your device a breeze. If you’re not using the Anti-Clamp, just hop ahead three steps for another way to get things moving.
Want the full lowdown on using the Anti-Clamp? Check out the guide linked here for all the details.
If your iPhone is channeling a slip-and-slide and the Anti-Clamp can't get a grip, slap on some tape to give it more traction.
- Give that blue handle a gentle tug backwards to let the Anti-Clamp's arms loose.
- Slide the arms over either the left or right side of your iPhone—no need to overthink it.
- Stick the suction cups close to the bottom edge: one on the front, one on the back, like they’re giving your phone a hug.
- Squeeze those cups together to create some suction magic right where you want it.
Step 5


- Slide the blue handle forward to lock those arms in place.
- Give the handle a full 360-degree clockwise twist, or keep turning until the suction cups start to stretch a bit.
- Keep an eye on the suction cups so they stay nicely aligned. If they start to slip out of place, just loosen them a little and realign the arms.
Step 6


Give that knob a gentle twist—no more than a quarter turn each time. Then kick back for a minute before the next turn. Patience is your secret weapon here!
For all the nitty-gritty on how to rock a hair dryer, don't miss this guide.
If the Anti-Clamp isn't giving you the gap you need, just crank up the heat a bit more and give that handle a cheeky quarter turn.
- Prop your iPhone up on something solid, like a hardcover book, to keep it steady and level with the ground. This makes it a breeze to tackle the next steps.
- Grab a hair dryer and warm up the bottom edge of your iPhone. It should feel just a tad too hot to touch — perfect!
- Give it a minute to let the adhesive loosen up and create a tiny opening gap.
- When the Anti-Clamp has made a nice enough gap, slip an opening pick under the screen's plastic bezel.
- Go ahead and skip the next two steps!
Tools Used

Step 7

Keep that hair dryer moving—parking it in one spot too long is a no-go!
If you’re working with a suction handle, these next two steps will help you gently loosen up that screen.
- Warm up the bottom edge of your iPhone with a hair dryer or heat gun for about 90 seconds—just until the screen feels almost too hot to handle.
Tools Used


Step 8


The glue keeping that screen snug is no joke; opening up a gap will require some good old-fashioned effort. If you're struggling to get started, just warm it up a bit more and gently wiggle the screen up and down to loosen that adhesive until you've got enough space to slide in your trusty opening pick.
- Grab a suction handle and stick it to the bottom edge of the screen, just be careful not to land it right on the glass's edge.
- Give that suction cup a solid pull with steady pressure to create a little gap between the screen and the frame. You're doing great!
- Slide an opening pick into that gap beneath the screen's plastic bezel. Easy peasy!
Tools Used
Step 9


- Grab your hair dryer and warm up the right edge of your iPhone (yep, the side with the power button) for about 90 seconds, or until the screen feels just a bit too toasty for your fingers.
Tools Used
Step 10


Keep your pick insertion under 3 mm to avoid messing with the inner parts – a little goes a long way!
- Gently slide that trusty opening pick around the bottom right corner of your iPhone to break free its adhesive grip.
- Keep on sliding up the right edge of the iPhone until you hit the top right corner.
- Leave your pick snugly in the top right corner while you get ready for the next steps.
Step 11

- Fire up your hair dryer and warm up the top edge of your iPhone for about 90 seconds, or until the screen feels a little too toasty to touch. Don’t rush—think gentle spa day for your device.
Tools Used
Step 12


Keep your pick insertion shallow—no more than 3 mm—to avoid messing with those top sensors.
- Slip your pick under the top right corner of the phone. Glide it around the top-right edge and halfway across the top, stopping just before the earpiece speaker cut-out. Keep it smooth and steady!
Step 13


- Grab a hair dryer and gently heat the left edge of your iPhone for about 90 seconds, or until it’s just shy of too hot to handle.
Tools Used
Step 14

Watch out for the delicate cables running along the left side of your iPhone! Avoid inserting your pick here, or you might just give those cables a very unwelcome surprise.
Step 15


Twist it gently and steadily.
If the adhesive is being stubborn, try warming up the left edge a bit more.
- Slide a second opening pick into the bottom left corner of your iPhone.
- Gently twist both picks at the same time until you hear the left edge snap free.
Step 16


If you're short on props to support that screen, your suction handle can step in and lend a hand.
- Turn your iPhone so the right side is facing you.
- Open the iPhone by lifting the screen from the right side, just like opening a book cover.
- Prop the screen up by leaning it against something stable while you work on the phone.
- When putting it back together, place the screen in position, line up the clips along the top edge, and gently press the top edge down before snapping the rest of the screen into place. If it doesn’t click easily, double-check the clips around the screen to make sure none are bent or out of place.
Tools Used
Step 17


Keep a close eye on every screw during this repair and make sure each one goes back to its original spot—your iPhone will thank you for it!
- Grab your trusty Y000 screwdriver and unscrew the eight screws holding the battery connector cover in place. They're not too tight, so don't stress!
- When you're putting things back together, take a moment to power up your iPhone and give all the functions a quick test run before sealing everything up. Just make sure you power it off completely before continuing with the next steps.
- There are six screws, each 1.3mm long, waiting to be unscrewed. They’re small, but they’ve got big responsibility.
- One 1.6mm-long screw is hiding in there, don’t miss it!
- And don't forget the one 1.9mm-long screw. It’s the last piece of the puzzle.
Step 18


- Grab the connector cover with a pair of tweezers, give it a little downward slide, and watch those flex cables clear right up.
- Now, gently remove the connector cover and set it aside. Easy peasy!
Tools Used

Step 19


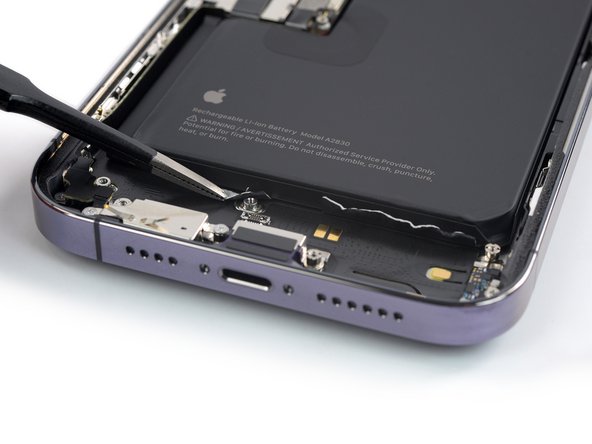
Be gentle with that black silicone seal hugging the board connections! It's like a superhero shield against water and dust, keeping your device safe and sound.
- Grab the pointy end of your spudger and carefully lift the battery connector straight up from its socket to unplug it.
- Gently bend the connector away from the logic board so it stays clear and doesn’t accidentally power up the phone while you work.
Tools Used

Step 20


- Grab your trusty spudger and, with the pointed end, gently pry the first display cable connector straight up from its socket. Easy peasy!
- When it's time to reconnect, simply line up the connectors and press down on one side until you hear that satisfying click. Then, repeat on the other side. Just a heads up—avoid pressing down in the middle! If things get misaligned, those little pins can bend and we definitely don't want that. If you feel stuck, remember, you can always schedule a repair.
Tools Used
Step 21


- Gently use the pointed end of a spudger to lift the second display cable connector straight up and out of its socket. You've got this!
Tools Used
Step 22


- Take off the screen carefully.
- Clean the necessary spots with isopropyl alcohol (90% or higher), then slap on some fresh adhesive where it’s needed.
- When putting everything back together, pause here if you want to swap out the screen adhesives.
Step 23


- Grab your Phillips driver and unscrew the four 1.5 mm-long screws holding down the loudspeaker:
- Three have small heads—like they're trying to keep a low profile.
- One's got a bigger head and clearly wants to stand out from the crowd.
Step 24


- Gently use the flat end of a spudger to lift and loosen the loudspeaker from the bottom right corner of your phone. You've got this!
Tools Used
Step 25


- Grab the loudspeaker with your trusty tweezers—like you're plucking a prize from a claw machine.
- Gently tilt the loudspeaker away from the adhesive-backed strip running to the Taptic Engine. Slow and steady wins the race!
- Lift the loudspeaker out and celebrate your precision skills.
- When it's time to reinstall, start by placing the loudspeaker battery-side first so it lines up perfectly with the adhesive strip. Easy does it!
Tools Used
Step 26


- Grab a spudger and gently lift the Taptic Engine connector straight up from its socket to unplug it—easy does it!
Tools Used
Step 27


Standoff screws are easiest to tackle with a dedicated standoff driver or driver bit. If you’re out of options, a small flathead screwdriver can step in—but take your time and be careful not to let it slip and mess up the nearby parts.
- Grab your Phillips screwdriver and take out the two screws holding down the Taptic Engine.
- Next up, use a standoff screwdriver to remove the 2.9 mm standoff screw keeping the Taptic Engine in place.
- Remove the 1.8 mm screw.
- Finally, unscrew the 2.3 mm screw.
Step 28


- Grab some tweezers (or just use your fingers with style) and lift out the Taptic Engine.
Tools Used
Step 29


If your new part didn’t include the plastic strip on top of the Taptic Engine, go ahead and transfer that strip from your old part to the new one.
- Carefully use your fingers or tweezers to peel off the adhesive strip from the Taptic Engine—take it slow and steady!
Tools Used
Step 30

There are four trusty stretch-release adhesive strips keeping the battery snug in the rear case—two at the bottom edge and two up top.
In the coming steps, you'll gently pull each tab to stretch out the adhesive lurking beneath the battery. These 'command-strip' style adhesives are designed to lose their grip when stretched, making it a breeze to pop out the battery.
If you encounter any stubborn strips that decide to break, no need to stress! They sometimes have a mind of their own. Just keep reading for some handy tips on tackling those tricky broken strips.
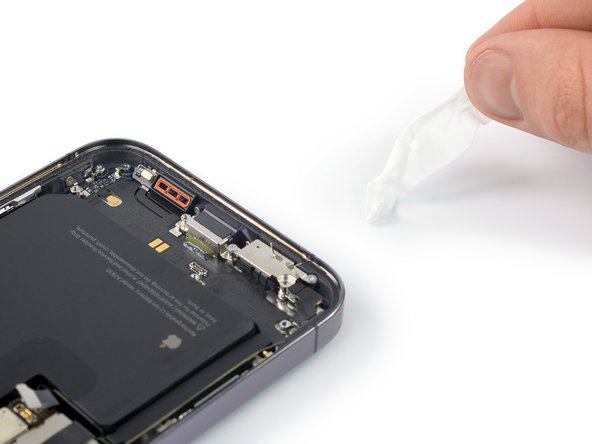
- Each adhesive strip features a black pull-tab at its end, lightly stuck to the battery’s edge for easy peeling.
Step 31

Heads up: Keep sharp tools away from the battery! Poking it could cause leaks or even start a fire, and nobody wants that kind of excitement while repairing.
- Grab your blunt-nosed tweezers and gently pull down those two adhesive tabs at the bottom of the battery—almost like you're unwrapping a present, but stickier.
Tools Used
Step 32


Uh-oh! If any of those adhesive strips decide to play hide and seek under the battery and you just can't find them, no worries! Go ahead and remove the remaining strips, and then follow the fun instructions below.
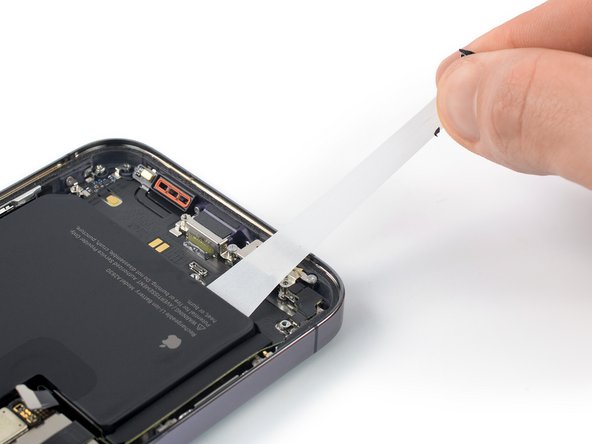
- Grab the first pull-tab with your fingers or wrap it around a spudger and gently pull it away from the battery, aiming toward the bottom of the iPhone.
- If the adhesive strip snaps, don’t panic—try to fish it out using your fingers or some blunt tweezers, then keep pulling carefully. Avoid prying under the battery.
- Pull firmly enough to keep steady tension on the strip, but no need to muscle it. Let the adhesive slowly stretch and release at its own pace.
- Avoid pressing down on the battery. Hold the iPhone securely by its sides to keep things stable.
- Keep the strip flat and wrinkle-free. Pull evenly across the entire strip instead of yanking mostly from the center or one side.
- Pull at a low angle to prevent the strip from catching on the battery’s edge.
Step 33

If that sticky strip under the battery decides to play hide and seek and you can't get it back, just cruise on to the next step.
- Grab the second pull-tab with your fingers (or the center of a spudger if you're feeling fancy) and gently pull it toward the bottom of the iPhone, away from the battery.
- If the adhesive strip decides to break off on you, no worries—use your fingers or a pair of blunt tweezers to retrieve it and keep pulling. Just avoid prying under the battery.
- Repeat the same steps as before: don't press down on the battery, keep the adhesive strip flat and wrinkle-free, and pull at a low angle for the best results.
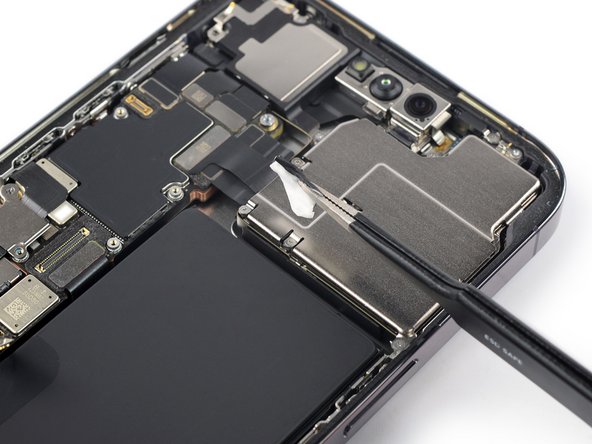
Step 34

- Grab your blunt-nosed tweezers and an opening pick, then carefully lift the last two battery adhesive pull-tabs from the top edge of the battery. Almost there!
Tools Used
Step 35


- Just like before, give a gentle tug on the third tab hiding beneath the battery. Be careful not to let the adhesive get stuck on anything—it’s a bit clingy!
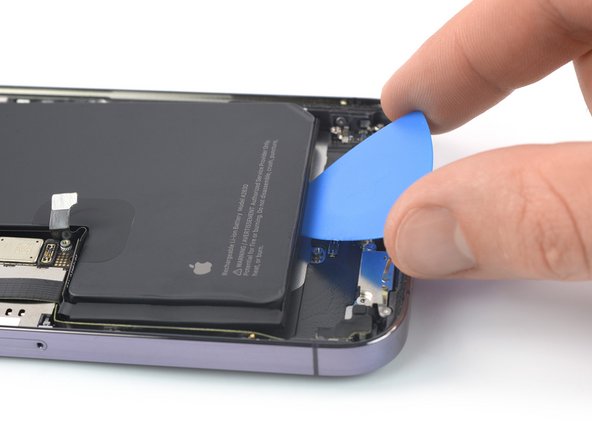
Step 36

Heads up! When pulling out the last adhesive strip, keep a firm grip so the iPhone battery doesn’t go flying off on its own adventure.
- Gently pull on the remaining adhesive tab just like before. Try to avoid getting it stuck on anything else!
- If you've successfully removed all the adhesive strips, you can skip the next step.
- If not, keep going with the next step below. You've got this!
Step 37

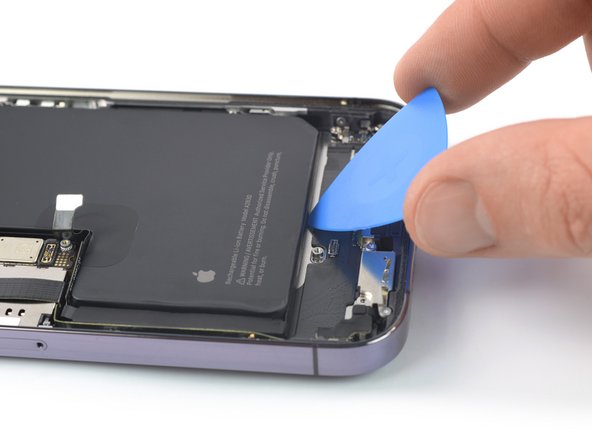
Don't try to muscle that battery out. If it's giving you trouble, drop a little more alcohol to help loosen things up. And please, no poking or squishing the battery with your pry tool – keep it gentle!
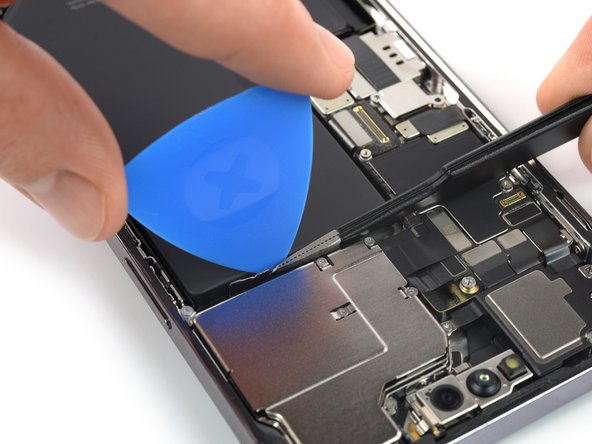
- If the battery is being stubborn, try dripping a few drops of high-strength (90% or more) isopropyl alcohol under the battery edge near the sticky spots that gave up on you.
- Give it about a minute to let the alcohol do its thing and loosen that adhesive grip.
- Then, gently pry the battery up using an opening pick or the flat end of a spudger. Easy does it!
Tools Used
Step 38
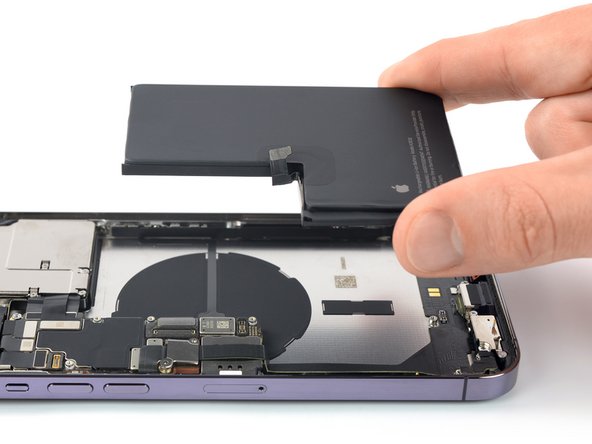

Steer clear of reinstalling a battery that looks damaged or misshapen—it's not just a bad idea, it's a safety no-no!
- If you can, power up your device and give your repair a quick test run before sealing it up with new adhesive.
- To put everything back together, just follow these steps in reverse! Remember to apply fresh adhesive where needed after giving those surfaces a clean with some isopropyl alcohol (90% or higher).
- After your repair, depending on the part you replaced, you might get to fine-tune it using Apple's Repair Assistant, which is available starting with iOS 18. Just update your device, head over to Settings→General→About→Parts & Service History, hit Restart & Finish Repair, and follow the prompts on your screen.
- For the best performance, don’t forget to calibrate your new battery after you wrap up this guide.
- Make sure to dispose of your e-waste responsibly by taking it to an R2 or e-Stewards certified recycler.
- Repair didn’t go quite as you hoped? No worries! Give some basic troubleshooting a shot, or if you're feeling stuck, feel free to ask for help from our Answers community.