
iPhone 14 Plus Battery Replacement
Duration: 45 minutes
Steps: 27 Steps
Quick tip: Drop your battery charge under 25% before you crack open your device. It’s just a smart move for safety!
Follow this guide to swap out a tired or dead battery in your iPhone 14 Plus. iPhone batteries are designed to keep about 80% of their charge capacity for up to 500 charging cycles, which usually means around 18-24 months of typical use. After that, you might find yourself plugging in way more often, and iOS could give you a heads-up that your phone’s performance is taking a hit (translation: things might slow down). This guide is made with the A2886 (international) model in mind. If your iPhone 14 Plus is a different model, things might look a bit different, but the steps should still be on point. For safety, make sure your battery is below 25% before taking your phone apart — this helps lower the fire risk if the battery gets damaged during the repair. If your battery is swollen, be extra careful. Heads up: on iOS 17.6 and earlier, after swapping the battery, your iPhone might warn you about the “genuineness” of the battery, even if it’s an original Apple part. If everything else works fine, you can ignore that message. For iOS 18 and up, use Repair Assistant to calibrate genuine Apple batteries. Don’t forget you’ll need new adhesive to stick the battery and screen back in place. Your device will work as usual, but it probably won’t keep its IP (Ingress Protection) rating after reassembly.
Step 1


- Make sure to power down your iPhone before you start taking it apart.
- Next, take out the two 6.8 mm-long pentalobe P2 screws located along the bottom edge of the iPhone.
Step 2


If you push your opening pick in too deep, it might cause some damage—so let's avoid that! Mark your pick to keep things safe and sound.
Feel free to mark the other corners of the pick with different depths to keep your options open.
Another neat trick: tape a coin about 3 mm from the tip of your pick to serve as a handy depth marker.
- From the tip, measure 3 mm and mark your opening pick with a permanent marker—precision is cool!
Step 3


Put on those safety glasses! They'll keep your peepers safe from any rogue glass pieces that might try to escape during the repair adventure.
Cracked rear glass on your iPhone? Slap some tape over it to keep those shards from going rogue and save your fingers from surprise pokes during the repair.
If the suction cup refuses to cooperate, a dab of superglue can convince it to stick around on the rear glass.
- Cover the entire back glass of the iPhone with overlapping strips of clear packing tape like a pro wrapping a secret gift.
- If the suction cup refuses to stick in the next steps, no worries! Just fold a sturdy tape—think duct tape—into a little handle and gently lift the rear glass that way instead.
Tools Used


Step 4

Keep that hair dryer moving—parking it in one spot too long is asking for trouble!
- Grab a hair dryer or heat gun and warm up the bottom edge of your iPhone for about 90 seconds, or until the back glass feels just a bit too toasty to keep your fingers on.
Tools Used


Step 5


The glue holding the rear glass is seriously stubborn; getting that first little gap open takes some muscle. If it’s being stubborn, heat it up a bit more, then gently rock the glass back and forth to loosen the adhesive until you can slip your opening pick in. Patience and a steady hand are your best friends here!
- Grab a suction handle and place it on the lower edge of that rear glass—just steer clear of the super edge.
- With a steady hand, pull up on the suction cup to make a little wiggle room between the rear glass and the frame.
- Now, slide an opening pick into that tiny gap you've created.
Tools Used

Step 6

- Grab a hair dryer and direct the heat to the left edge of your iPhone for about 90 seconds, or until the rear glass feels just a little too hot to touch. It's all about getting that perfect temperature for the next step.
Tools Used
Step 7


Keep your pick under 3 mm deep—no need to poke around like you're searching for buried treasure! There are delicate parts hiding inside.
- Carefully slide the opening pick around the lower left corner and glide it up the left side of the iPhone, gently cutting through the adhesive that’s keeping the rear glass stuck in place.
Step 8

- Grab your trusty hair dryer and aim it at the right edge of your iPhone (that’s the one with the power button). Give it a warm hug for about 90 seconds, or until that rear glass feels just a tad too hot to handle. You're doing great!
Tools Used
Step 9

Careful now! There's a fragile cable lurking along the right edge of your iPhone. Keep your pick away from here to avoid any accidental cable damage. You've got this!
Step 10


Keep your pick insertion to 3 mm max to avoid giving that charging coil cable a not-so-fun poke!
- Pop your pick back in at the bottom edge of your iPhone, and glide it up the right side to keep peeling away that sticky adhesive. You're on a roll!
Step 11

- Grab your trusty hair dryer and give the top edge of that iPhone a warm hug for about 90 seconds, or until the rear glass is feeling just a tad too hot for your fingertips.
Tools Used
Step 12


- Slide your pick under the top right corner of the phone, then glide it around the corner and halfway along the top edge like a smooth pro.
Step 13


Hold off on separating the rear glass for now—there’s a delicate ribbon cable hanging out with the logic board, and it’s not ready to say goodbye yet.
Keep that pick under 3 mm deep, or the camera array might end up with a smudge or a scratch it totally didn’t ask for.
- Slide your pick under the top-left corner of the phone, then carefully wiggle it along the top-left edge and halfway across the top to loosen things up.
Step 14


Be careful not to strain the short charging coil flex cable.
- Detach the suction handle from the rear glass carefully.
- Gently open your iPhone by tilting the rear glass upward from the left side, almost like flipping the cover of a book.
- Find something to prop the rear glass against so it stays upright while you work. If you don't have anything handy, your suction handle works just fine for the job.
- When it's time to put things back together, align the clips on the top edge of the rear glass and press the top edge gently into place before snapping the rest down. If it doesn't click easily, check the clips around the perimeter to make sure none of them are bent.
- If you don't have a propping tool, your suction handle is a great stand-in to keep the rear glass steady while you're working.
Tools Used
Step 15

Keep each screw in its original spot—your iPhone appreciates precision. Mix them up, and your device might throw a fit.
- Grab your Y000 screwdriver and gently remove the two 1.3 mm screws holding down the battery connector cover. Easy does it!
- When you’re putting everything back together, it’s a smart move to turn on your iPhone now and check that everything’s working as expected before sealing up the display. Once you’ve confirmed, make sure to power off your iPhone completely before moving forward.
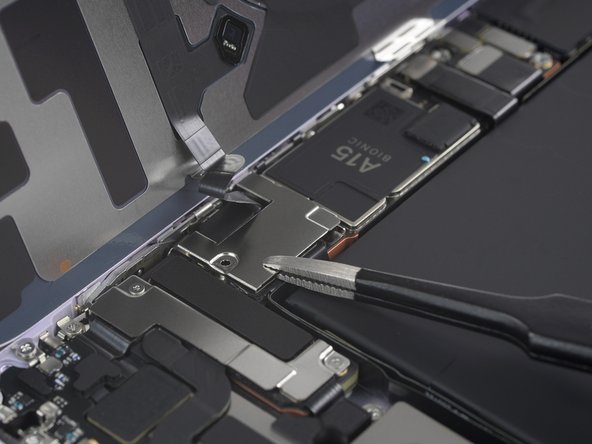
Step 16


- Grab the battery connector cover with some tweezers and slide it upwards (towards the A15 print) to pop open the top hook.
- Lift off the battery connector cover.
Tools Used

Step 17


Be careful not to damage the black silicone seal around this and other connections on the board. It's there to help keep water and dust out, so treat it like a little superhero cape for your device!
- Grab your trusty spudger and use the sharp end to carefully lift the battery cable out of its socket. Just pry it straight up, and it should pop right off!
- Once it's free, gently bend the connector away from the logic board. This little move helps keep it from accidentally touching the socket and powering up your device while you're working your magic.
Tools Used

Step 18

- Grab your Y000 screwdriver and take out the lone 1.0 mm screw that's keeping the charging coil connector cover in place.
Step 19

- Grab your trusty tweezers and gently lift off the charging coil connector cover. Easy does it!
Tools Used
Step 20


- Grab the pointy end of your spudger and gently pry the charging coil cable connector straight up from its socket to disconnect it.
Tools Used
Step 21


- Start by gently taking off the rear glass assembly. It's like unwrapping a present, but way cooler!
- Once you've got that off, grab some isopropyl alcohol (90% or higher) and give the necessary areas a good clean. After that, apply fresh adhesive where it’s needed. Let’s keep things sticky!
- If you're thinking about swapping out the rear glass adhesives, take a breather right here during reassembly. It's totally cool!
Step 22

There are two stretchy adhesive strips holding the battery snugly to the case, and you can find both of them at the top edge of the battery.
In the next steps, you'll gently pull each tab to gradually stretch out the adhesive beneath the battery. These command-strip style adhesives are designed to lose their grip when stretched, making it a breeze to pop the battery out.
If the strips happen to snap, no worries! They can be a bit finicky at times. Just keep reading for some handy tips on dealing with those stubborn broken strips.
- Each adhesive strip comes with a black pull-tab at one end, gently stuck to the battery’s edge, ready for you to grab and go!
Step 23


Heads up: Avoid stabbing the battery with anything sharp! Puncturing it can cause nasty leaks or even a fire—definitely not the kind of spark you want here.
- Grab your blunt-nosed tweezers and carefully lift the two battery adhesive pull-tabs along the top edge of the battery. Easy does it!
Tools Used
Step 24


If one of those sticky strips snaps and disappears under the battery, don’t stress—pull out the remaining strips and keep rolling with the next steps below.
- Grab the first pull-tab with your fingers or wrap it around a spudger and gently pull it towards the top of the iPhone. Take it slow and steady.
- If the adhesive strip breaks off, try to grab it with your fingers or a pair of blunt tweezers. Keep going, but remember: no prying under the battery!
- Pull with just enough force to keep the strip tight, but don't overdo it. Let it stretch out and gently un-stick from under the battery. Patience is key.
- Don’t press down on the battery—just hold the iPhone firmly by its sides to keep things steady.
- Keep the strip nice and flat, no wrinkles! Try pulling evenly across the whole strip, instead of just the middle or one side.
Step 25


If that sticky strip under the battery goes missing in action, no worries—just roll on to the next step.
- Time to grab that second pull-tab! Use your fingers or the center of a spudger and gently tug it away from the battery, heading toward the top of the iPhone.
- If the adhesive strip decides to play hard to get and breaks off, don’t worry! Try to fish it out with your fingers or some blunt tweezers, and keep on pulling—but remember, no prying under the battery!
- Just like with the last strip, keep it cool: don’t press down on the battery, keep the strip nice and flat, and pull at a low angle for the best results.
Step 26


No need to muscle the battery out—gentle wins the race! If it’s being stubborn, drop a little more alcohol to loosen that adhesive. And remember, don’t twist, bend, or poke the battery with your pry tool—it’s a no-go zone!
- Still wrestling with that stubborn battery? Grab some high-proof (90% or higher) isopropyl alcohol and drip a bit under the edge where the adhesive strip snapped.
- Give it about a minute for the alcohol to do its magic and loosen things up.
- Take an opening pick or the flat end of your spudger, and gently lift the battery free—no need to go full Hulk on it.
Tools Used
Step 27


Hey there! Avoid putting in a battery that's been through the wars or looks a little wonky. Your safety is super important, and we don't want any surprises!
- If you can, power on your device and give your repair a quick test before you slap on new adhesive and seal it back up.
- To put everything back together, just follow these steps in reverse. When reassembling, remember to clean the surfaces with isopropyl alcohol (over 90%) and add fresh adhesive where needed.
- Depending on the part you replaced, you might be able to calibrate it using Apple's Repair Assistant starting with iOS 18. Just update your device, go to Settings → General → About → Parts & Service History, tap Restart & Finish Repair, and follow the prompts.
- For best results, don’t forget to calibrate your new battery after finishing this guide.
- When you’re done, make sure to recycle your e-waste responsibly at an R2 or e-Stewards certified facility.
- If things didn’t go as planned, try some basic troubleshooting or feel free to schedule a repair with us for expert help.