
iPhone 14 Battery Replacement
Duration: 45 minutes
Steps: 27 Steps
Before you get started, make sure to drain your battery below 25%. It's a good idea to avoid any surprises while you're diving into the device! Safety first, always.
Ready to give your iPhone 14 a fresh boost? Swap out that tired battery and get back to smooth scrolling and all-day texting. iPhone batteries usually keep 80% of their original charge for about 500 cycles—that’s roughly 18 to 24 months for most folks. After that, your phone might need a charge more often and iOS may gently remind you that things aren’t running at top speed. This guide works for the A2882 (international) model, but if you’ve got another iPhone 14 version, no worries—the steps are basically the same, though things might look a little different. For safety, drain your battery below 25% before opening things up. This makes it way less risky if the battery gets bumped or poked. If your battery is looking a little puffy, take extra care. Heads up: On iOS 17.6 or earlier, you might see a warning about battery authenticity after the swap, even with genuine Apple parts. If your phone’s working fine, you can ignore it. On iOS 18 and above, you’ll want to calibrate new Apple batteries with Repair Assistant. Grab some fresh adhesive for sticking the battery and screen back in place. Your phone will work great, but it’ll probably lose its IP (water and dust resistance) rating.
Step 1


- Before you dive in, make sure to power off your iPhone completely.
- Next, grab your screwdriver and take out the two 6.8 mm-long pentalobe P2 screws located at the bottom edge of the iPhone.
Step 2


Watch out! If you slide that opening pick in too deep, it could cause some unwanted damage to your device. To keep things safe, consider marking your pick beforehand.
Feel free to add some flair by marking the other corners of the pick with unique measurements.
Another fun idea? Tape a coin to your pick about 3 mm from the tip for added precision!
- Grab your opening pick and mark a line 3mm from the tip with a permanent marker. This will help you stay on track and get that precise opening you need!
Step 3


Put on those snazzy safety glasses to keep your peepers safe from any sneaky shards that might try to escape during the repair!
Got a cracked rear glass on your iPhone? Keep those shards in check and protect your fingers by taping over the glass before you start poking around.
If the suction cup just won’t stick, no worries — a little superglue will help it grip the rear glass like a champ.
- Cover the back glass of your iPhone with overlapping strips of clear packing tape—think of it as giving your phone a protective shiny jacket.
- If the suction cup refuses to cooperate in the next steps, just grab some duct tape, fold it into a sturdy handle, and lift the rear glass like you mean it.
Tools Used


Step 4

Keep that hair dryer moving—parking it in one spot too long is a recipe for trouble!
- Crank up your hair dryer or heat gun and warm up the bottom edge of your iPhone for about 90 seconds—or until the rear glass feels just a bit too hot to handle.
Tools Used

Step 5


The adhesive keeping that rear glass snugly in place is pretty tough; creating that first little gap requires some serious muscle. If you're struggling to get things started, add a bit more heat, and gently wiggle the rear glass up and down to loosen the adhesive until you've got just enough of a gap to slide in your trusty opening pick.
- Grab a suction handle and place it on the bottom edge of the rear glass, steering clear of the very outer edge.
- Give that suction cup a good pull with steady pressure to create a tiny space between the rear glass and the case.
- Slide an opening pick into that newly created gap.
Tools Used

Step 6

- Grab your trusty hair dryer and give the left edge of your iPhone a nice warm-up for about 90 seconds. Keep going until the rear glass is just too hot to touch—like, ‘maybe I should give this a second to cool down’ hot.
Tools Used
Step 7


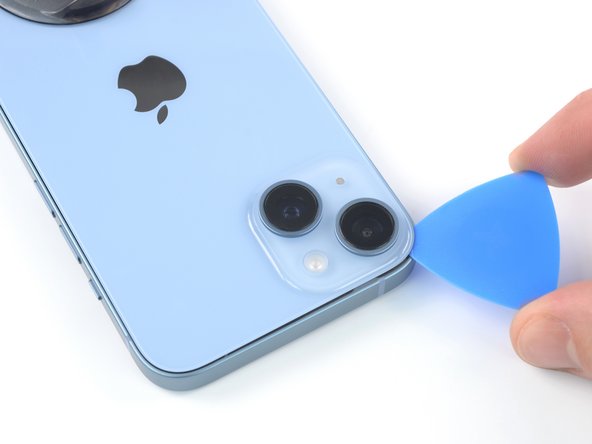
Keep your pick insertion to under 3 mm to avoid any oopsies with the inner parts.
- Gently slide the opening pick along the bottom left corner and work it up the left edge of the iPhone. This will help you cut through the adhesive holding the rear glass in place, making it easier to get things open.
Step 8

Heads up! There’s a sneaky cable running along the right edge by the volume up button. Keep your pick away from this spot, or that cable might not appreciate your DIY enthusiasm.
Step 9

- Grab your hair dryer and gently warm up the right edge of your iPhone—the side with the power button—for about 90 seconds. Aim for the rear glass to get just a bit too hot to comfortably touch. This helps loosen things up for the next step!
Tools Used
Step 10


Be careful not to insert your pick more than 3 mm deep—you don’t want to accidentally damage the charging coil cable.
- Slide your pick back in at the bottom of your iPhone, then cruise up the right edge to keep peeling away that stubborn adhesive.
Step 11

- Grab a trusty hair dryer and give the top edge of your iPhone a gentle blast of warm air for about 90 seconds, or until the rear glass feels just a tad too hot to handle.
Tools Used
Step 12


- Gently slide your pick under the top right edge of the phone. Glide it around the corner and across the top edge until you're halfway there!
Step 13


Hold off on completely detaching the rear glass for now – there's a delicate ribbon cable still hanging on, keeping it connected to the iPhone’s logic board.
Be careful not to push the pick in deeper than 3mm; going any further could mess with the camera array or cause some unwanted damage.
- Gently slide your pick under the top-left corner of the phone. Glide it around the edge and across the top until it's about halfway across. Easy does it.
Step 14


Watch out for that delicate charging coil flex cable! Give it some love and be gentle.
- Gently detach the suction handle from the rear glass.
- Carefully open your iPhone by tilting the rear glass upward from the left side, just like flipping open the cover of a book.
- Find a stable spot to lean the rear glass against while you work on the rest of the phone. It'll make your life a lot easier.
- When you're putting things back together, first position the rear glass, align the clips on the top edge, and gently press the top edge into place. Once that's snug, give the rest of the glass a little press to click it in place. If it doesn’t snap back easily, take a look at the clips around the edges to make sure none of them are bent.
- If you don't have anything nearby to prop up the rear glass, your suction handle can help you out here too!
Tools Used
Step 15


As you work your way through this repair, make life easier for yourself by keeping track of every screw. Putting them back in their original spots helps your iPhone stay happy and healthy!
- Grab your trusty Y000 screwdriver and tackle those two 1.3 mm screws holding the battery connector cover in place. You've got this!
- Before you wrap things up, why not power on your iPhone and give everything a quick test? It's a perfect time to make sure all functions are working like a charm. Just remember to turn your iPhone off completely before diving back into the repair adventure!
Step 16


- Grab the battery connector cover with your trusty tweezers and gently slide it upward, toward the A15 print. This will release the top hook.
- Now, carefully remove the battery connector cover.
Tools Used

Step 17


Take it easy on the black silicone seal around this and other board connections—it's like the phone’s raincoat and dust mask all rolled into one.
- Grab your trusty spudger and use the pointed end to gently lift the battery cable connector straight up from its socket. It’s like giving it a little nudge to say, 'See ya later!'
- Now, give that connector a slight bend away from the logic board. This way, it won't accidentally reconnect and surprise you with some power while you're deep into your repair adventure!
Tools Used

Step 18


- Grab your trusty Y000 screwdriver and gently unscrew the lone 1.0 mm-long screw that's holding down the charging coil connector cover. You're almost there!
Step 19


- Grab a trusty pair of tweezers and gently lift off the cover of the charging coil connector. You've got this!
Tools Used
Step 20


- Grab your spudger and use the pointed end to gently pry the charging coil cable connector straight up from its socket. Take it slow, and it should pop right out.
Tools Used
Step 21


- Take off the rear glass assembly—handle with care, no Hulk moves needed.
- Clean up those sticky zones with a splash of isopropyl alcohol (over 90%), then slap on fresh adhesive wherever it looks lonely.
- Thinking about swapping out the rear glass adhesives? This is your moment to shine during reassembly.
Step 22

Two stretchy adhesive strips hold the battery in place. You'll find both strips accessible from the top edge of the battery.
In the next steps, you'll gently pull each tab to stretch the adhesive underneath the battery. These adhesive strips work kind of like command strips—once they're stretched, they lose their grip, making it easy to lift the battery out.
If the strips snap or break, don’t stress! They don’t always cooperate. Keep reading for some tips to tackle broken strips.
- Each adhesive strip rocks a black pull-tab at the end, gently hanging out at the edge of the battery just waiting to be noticed.
Step 23


Heads up: Avoid poking the battery with sharp tools. A pierced battery can spill hazardous chemicals or even start a fire—definitely not the kind of spark you want!
- Grab a pair of blunt-nosed tweezers and gently lift the two battery adhesive pull-tabs along the top edge of the battery. Be careful and take your time – you’ve got this!
Tools Used
Step 24


If one of those adhesive strips slips away under the battery and you can't grab it, no worries! Just try removing the other one and follow the steps below.
- Pinch the first pull-tab between your fingers (or wrap it around a trusty spudger) and gently tug it up toward the top of your iPhone.
- If the sticky strip snaps, grab it with your fingers or a pair of blunt tweezers and keep pulling—just don’t dig under the battery.
- Give the strip a steady pull—enough to keep it stretching, but don’t go Hulk mode. Slow and steady wins this race.
- Skip pressing down on the battery. Hold your iPhone by its sides like you mean business.
- Keep the strip smooth and flat—no bunching or twisting. Try to pull on the whole thing evenly, not just from the middle or one edge.
Step 25


If the adhesive decides to throw in the towel under the battery and you can't fish it out, just keep on truckin' to the next step.
- Grab that second pull-tab with your fingers or the center of a spudger and gently pull it away from the battery, aiming towards the top of your iPhone.
- If the adhesive strip decides to break off, don't panic! Use your fingers or some blunt tweezers to try and fish it out, then keep on pulling—but remember, no prying under the battery!
- Stick to the same game plan as with the first strip: keep your fingers light on the battery, ensure the strip stays flat and wrinkle-free, and pull at a nice low angle.
Step 26


Don’t try to muscle the battery out. If it’s being stubborn, drop a little more alcohol to soften the glue. And whatever you do, don’t squish or poke the battery with your pry tool!
- If you're still struggling to get the battery out, try adding a few drops of high-concentration (90% or more) isopropyl alcohol along the edge where the adhesive is. This will help loosen it up a bit.
- Give it about a minute to let the alcohol do its magic and weaken that stubborn adhesive.
- Now, gently use an opening pick or the flat end of a spudger to lift the battery. Take it slow, and it should come right up.
Tools Used
Step 27


Avoid putting in a battery that’s seen better days or looks a bit wonky—it's not just a bad idea, it could be a safety issue! Keep things safe and sound.
- Fire up your device and give your repair a quick test before locking everything back down with fresh adhesive.
- Putting things back together? Just reverse the steps, and remember to clean up with some isopropyl alcohol—90% or higher—before sticking on new adhesive.
- If you swapped out a part, you might be able to calibrate it with Apple’s Repair Assistant. Hit up Settings→General→About→Parts & Service History, tap Restart & Finish Repair, and follow the prompts. (iOS 18 required!)
- For batteries, a quick calibration after installation will help keep your device feeling fresh.
- Done with old parts? Drop your e-waste at an R2 or e-Stewards certified recycler. Earth will thank you.
- If things didn’t go as planned, try some basic troubleshooting or check out our Answers community. And if you want some pro backup, you can always schedule a repair with Salvation Repair.