
iPhone 14 Screen Replacement
Duration: 45 minutes
Steps: 29 Steps
Got a cracked iPhone 14 screen or one that's not responding to touch? Maybe it's not even showing anything when you power it on? No worries, this guide will walk you through swapping out that busted display for a brand new one. We’re using the A2882 model for this guide, but don’t sweat it if you’ve got a different iPhone 14 model. Some things might look a little different, but the steps are the same! Keep in mind, after replacing your screen on iOS 17.6 and earlier, things like True Tone and auto brightness will be turned off—even with an Apple original screen. Face ID? It’ll also be disabled unless your iPhone’s running iOS 15.2 or newer. But if you’re on iOS 18 or later, you can calibrate your screen through Apple’s Repair Assistant to get True Tone working again. You’ll need some fresh adhesive to seal that screen back on when you’re done, but after that, your iPhone should be good to go. Just note, it might lose its IP (Ingress Protection) rating, so keep it safe! If you get stuck along the way, feel free to schedule a repair.
Step 1


- First things first, let’s make sure your iPhone is powered down before we dive into the disassembly adventure.
- Next up, grab your trusty pentalobe P2 screwdriver and remove those two 6.8 mm-long screws at the bottom edge of your iPhone. You're doing great!
Step 2


Pushing the opening pick in too deep can cause damage to your device. To avoid this, mark your pick at the right spot before you start.
Feel free to mark other corners of the pick with different measurements for extra precision.
Another neat trick is to tape a coin to the pick, placing it 3 mm from the tip to act as a depth guard.
- Grab your trusty ruler and measure out 3 mm from the tip! Give that opening pick a little love tap with a permanent marker to mark the spot.
Step 3


Pop on those safety glasses! They’re here to keep your eyes safe from any sneaky shards of glass that might try to escape during the repair.
Got a cracked screen on your iPhone? No worries! To keep the glass from shattering further and to avoid any accidental pokes, just tape it up before diving into the repair.
If you're really in a bind, a little superglue on that suction cup can work wonders to keep it stuck to the screen.
- Grab some clear packing tape and lay it down over your iPhone's screen, overlapping the strips until the whole face is covered. It's like a second layer of armor for your phone.
- If the suction cup is being stubborn and refusing to stick, no worries! Just grab a strong piece of tape (duct tape works great) and fold it into a handle. Use that to gently lift the screen instead.
Tools Used


Step 4

Don't let your hair dryer hang out in one spot for too long – keep it moving to avoid overheating.
- Grab your trusty hair dryer or heat gun and give the bottom edge of your iPhone a warm hug for about 90 seconds, or until it's feeling a bit too hot to touch.
Tools Used


Step 5


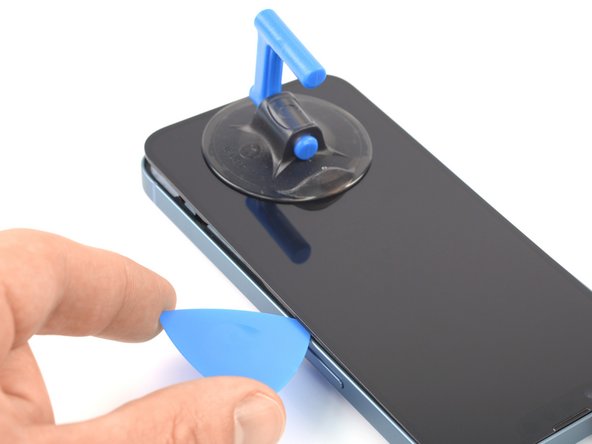
The adhesive holding the screen is pretty stubborn, so getting that first gap open can take some serious muscle. If you're struggling, no worries! Just add a bit more heat and gently rock the screen up and down. This will weaken the adhesive and help you create a gap wide enough to slide in your opening pick. You’ve got this!
- Grab a suction cup and stick it on the bottom edge of your phone, but steer clear of that delicate glass edge!
- With a steady hand, pull up on the suction cup to gently create a little opening between the screen and the frame.
- Now, slide in an opening pick right into that gap beneath the screen's plastic bezel.
Tools Used

Step 6


- Grab your trusty hair dryer and give the right edge of your iPhone a warm hug for about 90 seconds. You want that edge (the one with the power button) to feel just a tad too hot to touch, but not so hot that it burns! You're doing great!
Tools Used
Step 7


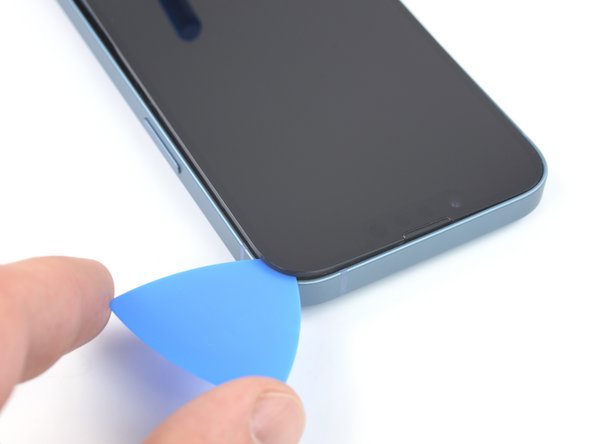
Keep that pick of yours to a maximum of 3 mm—going deeper could mean a surprise visit to the internal components, and we don’t want that!
- Gently slide the opening pick around the bottom right corner of your iPhone to break free its adhesive. You're doing great!
- Keep that pick sliding up along the right edge until you reach the top right corner. Almost there!
- Once you've reached the top right corner, leave the pick in place before moving on. You're on the right track!
Step 8

- Grab your trusty hair dryer and warm up the top edge of your iPhone for about 90 seconds, or until it feels slightly too toasty to handle. You're on the right track!
Tools Used
Step 9


Keep your pick insertion under 3 mm to avoid messing with the top sensors—let's keep it safe and sound!
- Gently slide the opening pick around the top right corner of your iPhone to loosen the adhesive up there.
- Keep the pick snug in the top left corner before moving on to the next step.
Step 10


- Grab a hair dryer and warm up the left edge of your iPhone for about 90 seconds or until it's just a little too hot to comfortably touch. Get that heat going so you can tackle the next step with ease!
Tools Used
Step 11

Hey there! Just a heads up: there are two sensitive cables chilling along the left edge of your iPhone. So, let's keep that pick away from this area to avoid giving those cables an unwanted adventure!
Step 12


Be careful with those cables along the left edge—they're like a vulnerable little flower, just waiting to get damaged if you poke them with a pick. Instead, let's take a different route to gently separate that left adhesive!
Twist it slowly and steadily, no need to rush!
Struggling to get that adhesive to budge? Just warm up the left edge a bit more and try again.
- Pop in a second opening pick at the bottom left corner of your iPhone.
- Gently twist both picks at the same time until the left edge clips let go.
Step 13


If you're lacking a handy surface to prop the screen up on, your suction handle can step in and save the day.
- Time to say goodbye to your suction handle—remove it from the screen!
- Give your iPhone a little twist so the right edge is looking at you.
- Open up your iPhone by swinging the screen up from the right side, just like you would with the cover of a book. Fancy, right?
- Find a little something to lean the screen against, just to keep it propped up while you work your magic on the phone.
- When it's time to put everything back together, lay the screen back in its spot, align those clips along the top edge, and gently press the top edge into place. Snap the rest of the screen down with care! If it doesn't click into place easily, take a peek at those clips around the screen's perimeter—make sure they're not bent or having a bad hair day.
Tools Used
Step 14

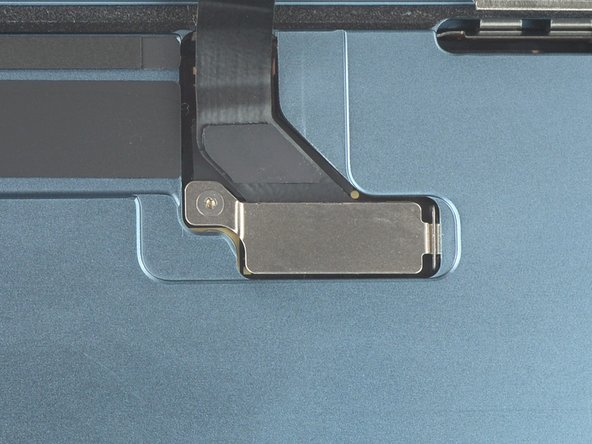
As you tackle this repair, be sure to keep an eye on every screw and return it to its original spot. This way, your iPhone stays happy and healthy, and you avoid any accidental mishaps.
- Grab your Y000 screwdriver and carefully remove the 0.9 mm screw holding down the display connector bracket. It’s like a tiny treasure waiting to be freed!
- Before you put everything back together, why not give your iPhone a quick power-up? Test out the functions to make sure everything's working smoothly. Just make sure to shut it down completely before diving back into the next steps. Better safe than sorry!
Step 15


- Grab the end of the connector bracket near the screw hole using your trusty tweezers.
- Gently lift the bracket just enough to free the latch on the opposite side.
- Carefully take out the display connector bracket.
- When putting it back together, double-check that the bracket snaps into place securely.
Tools Used

Step 16

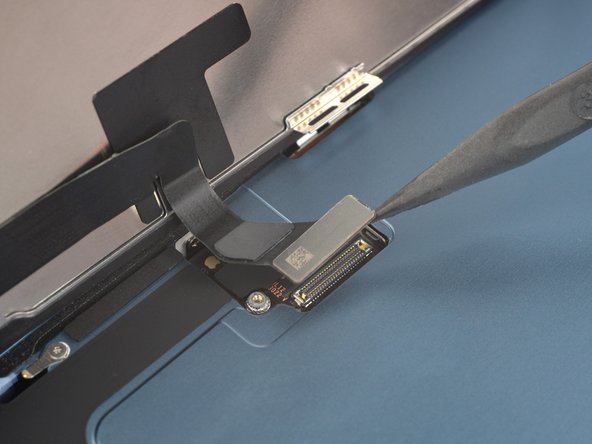
To reattach those connectors, give it a go by aligning them just right, then press down gently on one side until you hear that satisfying click. Once that's done, repeat the process on the other side—easy peasy! Just a quick tip: avoid pressing down in the middle, as misalignments can bend the pins and lead to some serious trouble. You've got this!
- Grab that trusty spudger and use its pointed end to gently lift the display cable right out of its cozy socket. You've got this!
Tools Used

Step 17


- Grab your Y000 screwdriver and carefully unscrew the tiny 0.9 mm screw holding down the front sensor connector bracket. Steady hands win this round!
Step 18


- Grab the end of the connector bracket where the screw hole is, using your tweezers like a pro.
- Give the bracket a gentle lift to pop the latch loose on the opposite side.
- Slide out the front sensor connector bracket. Easy does it.
- When you’re putting things back together, double-check that bracket is latched in place—don’t let it sneak loose!
Tools Used
Step 19

- Take the pointed end of your spudger and gently lift the front sensor cable connector straight up from its socket. Easy does it—just a quick pop and you’re moving right along!
Tools Used
Step 20


- Take off the screen carefully.
- Clean the areas with some high-quality isopropyl alcohol (over 90%) and then put down fresh adhesive exactly where it’s needed.
- When putting everything back together, feel free to pause here if you want to swap out the screen adhesives.
Step 21

Now, let’s get that front sensor assembly moved over to your new screen. If your shiny replacement already has it installed, you’re good to skip ahead!
- Grab a Y000 screwdriver and carefully remove the two 1.4mm screws that are holding the sensor assembly bracket in place.
Step 22


- Gently pry off the front sensor assembly bracket using tweezers or just your fingers—no special moves needed!
Tools Used
Step 23

You can use a hair dryer, heat gun, or hot plate to loosen things up, but keep it cool—too much heat can mess with your screen.
- Warm up an iOpener and gently place it on the top edge of the screen for two minutes. Give it a little time to work its magic.
Tools Used

Step 24


- Slide an opening pick between the ambient light sensor and the spot where it sits in the screen.
- Gently pry upwards with the pick to release the ambient light sensor from its cozy spot on the screen.
Step 25


- Slip an opening pick between the proximity sensor and its slot on the screen.
- Gently pry up with the pick to lift the proximity sensor away from the screen.
Step 26


- Grab some tweezers (or just use your fingers) and gently nudge the proximity sensor cable out of the way—it’s got places to be, and so do you!
Tools Used
Step 27


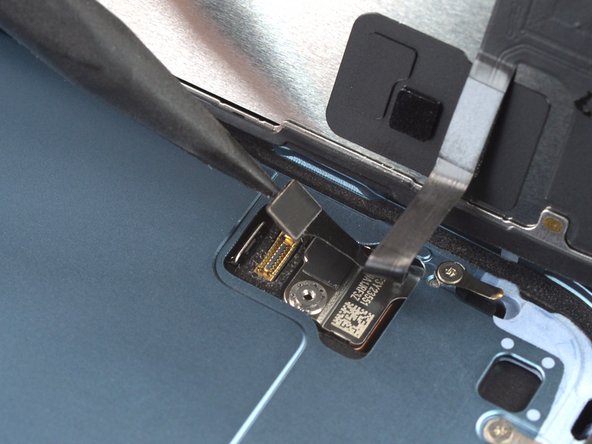
- Gently slip an opening pick under the microphone cable, right next to that little metal rectangle (the microphone).
- Carefully glide the pick all around the microphone’s edge to loosen up its adhesive grip.
Step 28


If the adhesive has cooled off by now, no worries! Just pop a heated iOpener on the assembly for about a minute to warm things back up before moving on.
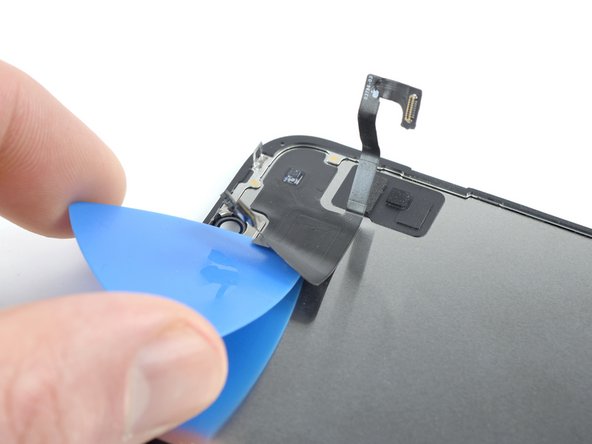
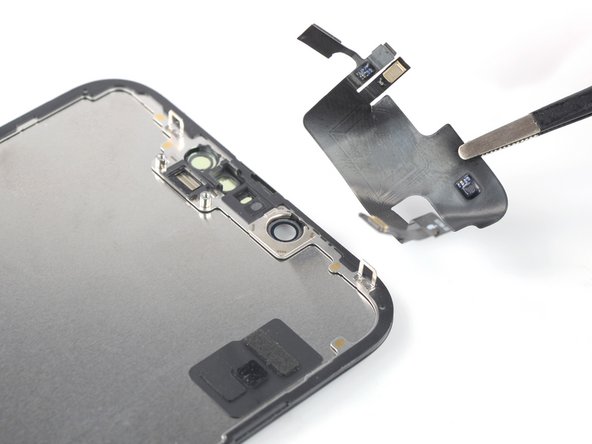
- Gently slide an opening pick under the left edge of the front sensor assembly.
- Carefully work the pick along to pop the assembly away from the frame.
Tools Used
Step 29

- Before you seal everything up, give your device a test run to make sure your repair worked. If it’s looking good, then go ahead and add your adhesive and seal it up tight.
- Reassembly is a breeze! Just work backwards through the steps, and you'll be good to go.
- After the repair, if you replaced a part, you can calibrate it using Apple's Repair Assistant (available from iOS 18). Just update your device, go to Settings → General → About → Parts & Service History, hit Restart & Finish Repair, and follow the prompts on screen.
- To keep that new screen secure, we recommend using a custom-cut double-sided tape. Just stick it to the frame and pop the screen back into place.
- Don’t forget about your e-waste! Find an R2 or e-Stewards certified recycler to dispose of it responsibly.
- Things not going as planned? No worries! You can try some basic troubleshooting, or if you're still stuck, feel free to schedule a repair.


