iPhone 14 Taptic Engine Replacement
Duration: 45 minutes
Steps: 25 Steps
Heads up! Before you start taking your device apart, make sure to drain the battery down below 25% for a safer repair experience.
Get ready to tackle the Taptic Engine replacement on your iPhone 14! This little powerhouse is responsible for all those satisfying vibrations and haptic feedback that make your device feel alive. We're using the A2882 (international) model as our guide, so if you're working with another iPhone 14 version, don't fret—everything should still flow smoothly, even if some visuals look a tad different. But before we dive in, make sure your battery is below 25% to keep things safe! A little precaution goes a long way in avoiding any fiery mishaps if the battery gets a little too adventurous during the repair. And if your battery has that puffy look, take the necessary precautions! When you're putting everything back together, remember to grab some replacement adhesive to stick that screen back on. Your device will be back in action, though it might not have its original IP (Ingress Protection) rating anymore. Ready? Let's get this repair party started!
Step 1


- Make sure to power down your iPhone before you start taking it apart.
- Next, grab your screwdriver and remove the two 6.8 mm-long pentalobe P2 screws located at the bottom edge of the iPhone.
Step 2


Be careful not to push your opening pick too far in, or you could accidentally damage your device. Mark it so you know where to stop—your device will thank you.
Feel free to add markings on the other corners of the pick at different points for extra precision.
Or, if you’re feeling crafty, tape a coin about 3mm from the tip of your pick to make sure you don’t go overboard.
- Grab your opening pick and measure about 3mm from the tip, then mark it with a permanent marker. This little mark will guide you as you start the repair. No stress, just precision!
Step 3


Pop on some safety glasses so your eyes stay safe from any rogue glass that might try to make a break for it during your repair.
Got a cracked rear glass on your iPhone? No worries! Keep things under control and save your hands from any potential glass-y mess by taping over it before diving into the repair.
If you're really stuck, grab a bit of superglue and attach the suction cup to the rear glass. It’ll help keep things in place while you work your magic.
- Place a few strips of clear packing tape on the back glass of your iPhone, overlapping them until the entire surface is covered.
- If the suction cup just won't stick during the next steps, no worries—fold a strong piece of tape (like duct tape) into a handle and use that to gently lift the rear glass instead.
Tools Used


Step 4

Keep your hair dryer moving—don’t let it hang out in one spot too long!
- Grab a hair dryer or heat gun and warm up the bottom edge of your iPhone for about 90 seconds, or until the rear glass gets a little too hot to handle. Be careful, we don't want to burn your fingers!
Tools Used


Step 5


The adhesive keeping the rear glass snug is pretty tough, so creating that first little gap requires a fair bit of effort. If you're struggling to pry it open, try adding a bit more heat, and gently wiggle the rear glass up and down to weaken the adhesive. Keep going until you've got enough space to slide your opening pick in.
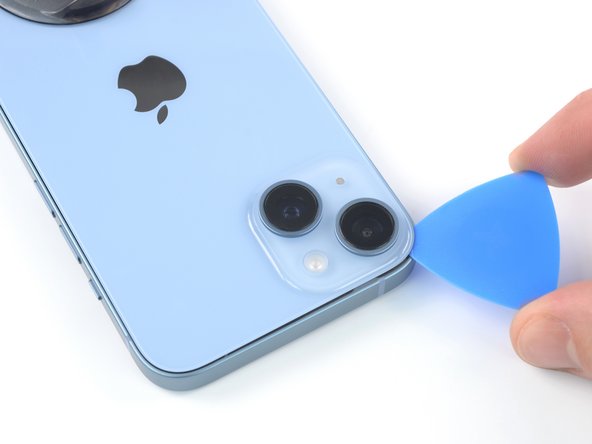
- Place the suction cup gently on the bottom edge of the rear glass, staying clear of the very edge.
- Now, give a firm but steady pull on the suction cup to create a little gap between the rear glass and the phone's case.
- Once you’ve got a slight gap, carefully slide an opening pick into it.
Tools Used

Step 6

- Grab your hair dryer and warm up the left edge of your iPhone for about 90 seconds. Aim for 'just shy of too hot to handle'—that’s your cue to move on!
Tools Used
Step 7


Keep your pick shallow—no deeper than 3 mm—or you might poke something sensitive inside.
- Gently slide the opening pick around the lower left corner, then glide it up the left edge of your iPhone. You’ll be cutting through the sticky adhesive holding the rear glass in place—take your time, and keep it smooth!
Step 8

Heads up! There's a sensitive cable running along the right edge by the volume up button. Avoid poking your pick in there to keep everything safe and sound.
Step 9

- Grab your hair dryer and warm up the right edge of your iPhone—the one with the power button—for about 90 seconds, or until the glass feels almost too warm to hold. This helps loosen things up for the next steps!
Tools Used
Step 10


Keep your pick shallow—no deeper than 3 mm—or you’ll risk giving the charging coil cable a bad day.
- Slide your pick back in at the bottom edge of the iPhone, then gently glide it up along the right side to keep loosening that adhesive. You've got this!
Step 11

- Grab your hair dryer and give the top edge of your iPhone a warm blast for about 90 seconds, or until the rear glass feels almost too hot to handle. This helps loosen things up for the next step!
Tools Used
Step 12


- Take your pick and gently slide it under the top right edge of your phone. Guide it around the corner and cruise halfway along the top edge. Smooth moves, just like butter—go slow and steady!
Step 13


Hey there! Just a friendly reminder: hold off on completely separating that rear glass for now. There's a delicate ribbon cable still connected to the iPhone's logic board, and we want to keep it safe and sound!
Also, when you're using that pick, be careful not to go deeper than 3 mm. We wouldn't want you to accidentally bump into the camera array and cause a ruckus!
- Gently slide your pick under the top-left corner of the phone. Wiggle it around the corner and glide it halfway along the top edge. You're doing great!
Step 14


Watch out for the short charging coil flex cable—it's delicate, so handle it with care!
- Time to let go of your suction handle and set it aside for now—it's done its job for today.
- Now, gently open your iPhone by swinging the rear glass upwards from the left, like you're flipping open the cover of a book. Smooth and steady.
- Propping up the rear glass is a good idea—find a spot to rest it, so it doesn’t tip over while you work your magic on the rest of the phone.
- When you're putting things back together, start by aligning the clips along the top edge of the rear glass. Gently press that top edge into place, and then work your way down, clicking it in carefully. If it resists, check those clips around the perimeter—make sure they're in tip-top shape and not bent out of place.
- No propping surface nearby? No problem—your suction handle can step in and do the job just fine.
Tools Used
Step 15


Keep a close eye on every single screw during this repair and make sure each one goes back exactly where it came from—this little habit is your best bet to keep your iPhone safe and sound.
- Grab your trusty Y000 screwdriver and unscrew the two tiny 1.3mm screws holding down the battery connector cover. It's a small step but every bit counts!
- Before sealing everything up, power on your iPhone and test all the functions to make sure everything’s running smoothly. Once you've confirmed everything's working as it should, power down your device completely before proceeding with the next steps.
Step 16


- Take hold of the battery connector cover with your trusty tweezers and gently slide it upwards, towards the A15 print, to release the top hook.
- Now, carefully remove the battery connector cover.
Tools Used

Step 17


Be careful not to mess up the black silicone seal that hugs this and other board connections. These little guys are your best friends when it comes to keeping out pesky water and dust!
- Take the sharp end of a spudger and gently lift the battery cable connector straight up from its socket to unplug it.
- Carefully bend the connector away from the logic board just a bit to keep it from accidentally reconnecting and powering on your phone while you work.
Tools Used

Step 18


- Grab your Y000 screwdriver and carefully unscrew the single 1.0 mm-long screw that’s holding down the charging coil connector cover. Steady hands win the day!
Step 19


- Grab your trusty tweezers and carefully lift off the charging coil connector cover.
Tools Used
Step 20


- Grab your trusty spudger and use its sharp tip to gently lift the charging coil cable right out of its socket. Just pry it up with a little finesse and you're golden!
Tools Used
Step 21


- Start by carefully removing the rear glass assembly.
- After that, give those surfaces a good clean with isopropyl alcohol (>90%) and apply fresh adhesive where needed.
- If you're thinking about swapping out the rear glass adhesives, take a breather here before moving on with the reassembly.
Step 22

- Grab your Phillips screwdriver and unscrew those three 2.1mm screws holding the Taptic Engine in place. Easy as pie!
Step 23


- Grab your tweezers and gently lift off the Taptic Engine connector bracket with a steady hand.
Tools Used
Step 24


- Grab the pointy end of your spudger and gently pry the Taptic Engine connector straight up to unplug it from its socket.
Tools Used
Step 25


- Take a moment to compare your shiny new replacement part with the original—make sure to transfer any leftover bits and pieces or peel off those adhesive backings before you dive into the installation!
- Now, it's time for the fun part—putting everything back together! Just retrace your steps and follow the instructions in reverse. You've got this!
- Got some e-waste? Don’t let it gather dust—take it to an R2 or e-Stewards certified recycler. It's a great way to keep our planet happy!
- If things didn't go quite as you expected, don't sweat it! A little basic troubleshooting can work wonders, or feel free to reach out to our Answers community for some friendly advice.
-