
iPhone SE 2022 Front Camera And Sensor Cable Replacement
Duration: 45 minutes
Steps: 33 Steps
This guide will show you how to remove or replace the front camera and sensor cable on your iPhone SE 2022. The assembly includes the microphone, front camera, proximity sensor, and ambient light sensor. This guide is based on the A2783 (international) model. Just a heads up—if you don’t replace the adhesive seals during reassembly, your phone will still work fine, but you might lose its water resistance. To get everything sealed back up nicely, make sure you have replacement adhesive ready for reassembly. If things get tricky, you can always schedule a repair.
Step 1


- Make sure to power down your phone before you dive into taking it apart.
- Next, grab your P2 pentalobe screwdriver and remove the two 3.4 mm screws located at the bottom edge of the iPhone.
Step 2


Be careful not to push your opening pick in too deep—it could mess up your device. Mark your pick to keep things safe and sound.
Feel free to mark other corners of the pick with different measurements for extra precision.
Or, get creative and tape a coin to your pick about 3 mm from the tip as a handy depth guide.
- Grab your trusty permanent marker and measure out 3 mm from the tip of that opening pick. Give it a little dot to mark your spot!
Step 3


Put on those safety glasses to keep your peepers safe from any sneaky glass bits that might decide to jump ship during your repair adventure!
Got a cracked screen on your iPhone? No worries! Just slap some tape over that glass to keep it from shattering further and to protect yourself while you work your magic.
And hey, if you're really in a bind, you can always get a little crafty and superglue that suction cup right to the screen.
- Start by layering clear packing tape over your iPhone's screen until it’s fully covered. This is going to help protect the screen and give you a better grip.
- If you’re struggling to get the suction cup to stick in the next steps, just fold a piece of strong tape (like duct tape) into a handle and use that to lift the screen instead. It works like a charm!
Step 4


The next three steps walk you through using the Anti-Clamp, our handy little tool that makes opening your device a breeze. If you’re not using the Anti-Clamp, just skip ahead three steps for an alternative method.
Need a bit more info on how to use the Anti-Clamp? Check out this guide for all the details.
If your iPhone’s surface feels a bit too slippery for the Anti-Clamp to get a good grip, try using some tape to make it stick better.
- Grab the blue handle and pull it back to release the Anti-Clamp's arms.
- Slide those arms onto either the left or right side of your iPhone.
- Place the suction cups close to the bottom edge of the iPhone, just above the home button—one on the front and one on the back.
- Press the cups together to create a good seal and get that suction going.
Step 5


- Give that blue handle a gentle tug forward to secure those arms in place.
- Now, twist that handle a full 360 degrees or until you see those suction cups start to stretch—let's get them working!
- Keep an eye on those suction cups to ensure they're in sync. If they start to drift apart, just loosen them a bit and guide the arms back into alignment.
Step 6


Turn no more than a quarter turn at a time, then take a breather for a minute. Let the Anti-Clamp and a little patience do the heavy lifting!
Feeling crafty? You can also use a hair dryer, heat gun, or hot plate to help out—but be careful with the heat! Too much can mess up your display or internal battery, so take it easy.
If the Anti-Clamp isn't doing its job and you still can't get a good gap, no worries! Just add a little more heat to the area and give the handle a quarter turn to keep things moving.
- Warm up an iOpener and thread it carefully through the arms of the Anti-Clamp.
- Fold the iOpener so it rests snugly along the bottom edge of your iPhone.
- Hold tight for one minute to let the adhesive soften and create a small gap to work with.
- Gently slide an opening pick under the screen’s plastic bezel—steer clear of the screen itself.
- Feel free to skip the next two steps.


Step 7

Got a suction handle in hand? Great! Just follow these next two steps to loosen that rear glass.
You can also use a hair dryer, heat gun, or even a hot plate to get things warmed up, but be cautious! You don’t want to overdo it. The display and battery are pretty sensitive to heat, so keep it cool to avoid damage.
- Grab your iOpener and let it work its magic on the screen for at least two minutes. This will help loosen up the adhesive beneath, making it easier to tackle the next step.
Tools Used

Step 8


If you're having a tough time getting a gap started, just heat up the bottom half of the screen a bit more to loosen that adhesive. Remember to check the iOpener instructions so you don't go overboard with the heat!
- Grab a suction handle and stick it onto the lower section of the front panel, aiming for that sweet spot near the home button.
- Gently pull on the suction handle to lift the front panel a bit, creating just enough space between it and the frame for the next step.
- Slide an opening pick into the newly created gap beneath the screen's plastic bezel.
Tools Used
Step 9


- Gently slide the opening pick to the bottom right corner to cut through the sticky stuff holding the front panel down.
- Now grab a second opening pick and slide it in at the bottom edge of your phone.
- Slide that pick to the bottom left corner, just like the first one, to slice through the rest of the adhesive.
- Leave those picks in place to keep the adhesive from re-sticking while you work.
Step 10


Hey there! Just a friendly reminder: don’t go pulling at the top edge of the display to separate it from the rear case. It’s snugly held in with plastic clips that could snap if you’re not careful. Keep it gentle and steady!
If the adhesive is giving you a hard time and feels tough to cut, it’s probably cooled off. No worries though, just grab your iOpener and give it a couple of minutes to heat things back up!
- Take your trusty opening pick and glide it along the left side of your phone, cutting through that sticky adhesive like a pro.
- When you get close to the top left corner of the display, go ahead and stop—you're almost there!
Tools Used
Step 11


Be careful not to slide your pick in more than 3 mm, or you might accidentally tickle some sensitive internal parts!
- Gently glide the bottom right opening pick along the right edge of your phone to break through that stubborn adhesive.
- Pause just before reaching the top right corner of the display.
Step 12


Keep the display at a gentle angle—no more than 15º. Going beyond that could stretch or damage the ribbon cables connecting the display. Take it easy, and remember, slow and steady wins the repair race.
- Let's get those opening picks out of the way!
- Now, give a gentle tug on the suction handle to lift the bottom edge of that display up.
- Time to say goodbye to the suction handle.
Tools Used
Step 13


- Start by slipping an opening pick under the top left corner of the display, like you're unlocking a treasure chest!
- Then, gently glide the pick around the top left corner and along the top edge of the phone, cutting through the last bit of adhesive like a pro. You're almost there!
Step 14


- Gently slide the display assembly down toward the charging port to pop those clips free from the rear case—smooth and steady wins the race!
Step 15


Hold up! Don’t yank the display completely away just yet—there are still some delicate ribbon cables hooking it up to the logic board that need a gentle touch.
- Open the phone by lifting the display up from the left side, just like flipping the cover of a book.
- Prop the display against something sturdy so it stays put while you tackle the phone.
Step 16

- Unscrew the four Phillips screws holding down the lower display cable bracket:
- Keep a close eye on your screws during this process—each one has its own special spot to return to later. Mixing them up could cause some serious trouble.
- Two screws are 1.2 mm long
- Two screws are 2.8 mm long
Step 17


- Grab your trusty tweezers and gently lift off the lower display cable bracket. You've got this!
Tools Used

Step 18


- Grab your trusty spudger and use its sharp end to gently lift the battery connector straight up from its cozy socket. You've got this!
Tools Used

Step 19


The display and digitizer cables are stacked, with the top one getting dibs on being unplugged first. Always start with the upper cable and let it enjoy its solo moment—never try to disconnect both at once, or you risk turning cable harmony into cable drama.
- Grab your trusty spudger and use the pointed end to gently pry up the bottom two display cables. Be careful as you lift those connectors right out of their sockets.
- When it's time to put them back, just press down on one side of the connector until you hear a satisfying click, then repeat on the other side. Skip pressing the middle, though—it's picky about alignment! If it's off by even a smidge, you could end up with a bent connector, and nobody wants that. Remember, take it slow, and your device will thank you.
Tools Used
Step 20

- Grab your Phillips screwdriver and carefully unscrew the three 1.2 mm-long screws holding down the front sensor assembly bracket. Keep them safe!
Step 21


- Grab your tweezers and gently lift out the front sensor assembly bracket. Easy does it—no need to rush!
Tools Used
Step 22


- Grab your trusty spudger and let’s get to work! Use the pointed end to gently lift the front sensor assembly. Just pry that connector straight up from its socket, and voilà!
Tools Used
Step 23


- Carefully lift and detach the display assembly.
Step 24

- Let's get started by loosening those three screws holding the earpiece speaker bracket in place:
- Two Phillips screws that are 2.6 mm long
- One Phillips screw that's a bit shorter at 1.6 mm
Step 25


- Grab a pair of tweezers and gently remove the earpiece speaker bracket. Just take your time and work carefully—you’ve got this!
Tools Used
Step 26


Be gentle with the front camera cable—tugging on it is a no-go!
- Grab your tweezers and gently lift the front facing camera out of its socket. Swing it to the left like you’re opening a tiny door—now you’ve got a clear path to the earpiece speaker!
Tools Used
Step 27

- Let's get those earpiece speaker screws out of there! First up, grab your trusty Phillips screwdriver and unscrew these two little guys:
- One Phillips screw that's 1.8 mm long
- One Phillips screw that's 2.3 mm long
Step 28


- Grab your trusty tweezers and gently lift out that earpiece speaker like a pro!
Tools Used
Step 29

- Place a warm iOpener on the top edge of the screen for about 2 minutes to help loosen up the adhesive that's holding the front camera and sensor assembly in place. Give it a little time to work its magic!
Tools Used
Step 30


Go ahead and slide your tool all the way under the sensor to pop it out. If you only pry against the cable, the sensor might split from the cable assembly—then you'll need a replacement. But hey, if you're swapping out the whole sensor and cable anyway, no worries!
- Grab your trusty spudger and use its sharp end to gently lift the proximity sensor out of its cozy spot in the front panel. Take it slow, no need to rush!
Tools Used
Step 31


- Grab the spudger and gently work the pointed end into the groove around the ambient light sensor. Carefully pry it out from its spot on the front panel. No rush, just take it slow and steady!
Tools Used
Step 32

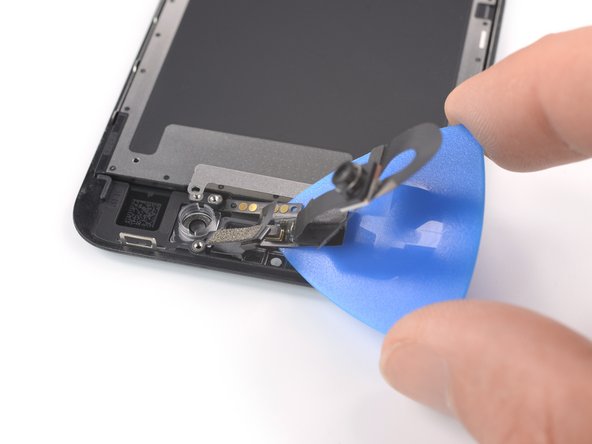

Having a tough time dislodging the cable from the front panel? No worries! Just grab that trusty heated iOpener and give the top edge of the screen another minute of warmth to help melt away that adhesive. You're almost there!
- Gently slide an opening pick under the front camera and sensor cable assembly to carefully detach it from the front panel.
Tools Used
Step 33


- If you can, power up your device and check that your repair worked before sticking everything back together with new adhesive.
- Make sure to compare your new part with the original—sometimes you’ll need to move over leftover bits or peel off adhesive liners before installing.
- To put your device back together, just follow these steps in reverse order.
- Don’t forget to recycle your e-waste responsibly at an R2 or e-Stewards certified center.
- If things didn’t go as expected, try some basic troubleshooting or you can always schedule a repair for extra help.

