Nabi Big Tab HD24 Screen Replacement
Duration: 45 minutes
Steps: 18 Steps
Alright, if your screen is looking a bit like a puzzle with cracks everywhere, let’s take it easy when prying it off. Those pesky shards of glass can be sharp, so watch your fingers! The screen is stuck on with some serious adhesive, so getting it off might take a bit of time—patience is key here. Remember, don’t just yank it off from one corner or side; that could lead to a glass explosion! If you’re feeling stuck at any point, you can always schedule a repair.
Step 1

Place the tablet on the table in front of you, screen facing up, and get ready to start the repair process.
– Find those four little red rubber stops hanging out at the corners!
Step 2

– Gently pry those stickers off with your fingers to expose the screws hiding underneath.
Step 3

– Grab your trusty Phillips #1 screwdriver and let’s get to work! Unscrew that 9.5 mm screw in each of the four corners like a pro.
Tools Used

Step 4
Don’t mix up the vents with the charging or USB ports—look for the icon of a tiny fan or the Nabi logo to spot the right openings.
You’ll find 2 screws on the bottom of the tablet and 1 on each side when looking at it from the front, as if you’re ready to dive into some fun tech action!
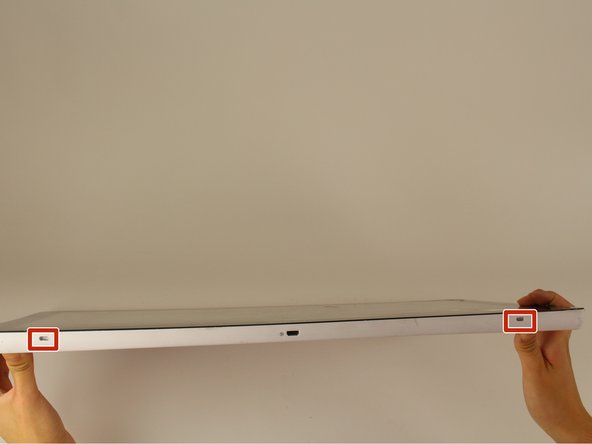
– Turn the tablet over so the screen is facing up and ready to shine.
– Find the 4 tiny openings along the tablet’s sides—like secret passageways waiting to be discovered.
Step 5

– Slide your metal spudger into one of the slots and gently press down until you hear that satisfying pop—nice and easy does it.
– Work your way around the other three slots, popping each one open the same way.
Step 6


Heads up! As you crack open this device, keep an eye out for those sneaky internal cables—they’re connected to both the front and back assemblies. A little caution now saves a whole lot of trouble later!
– Turn the device around so the back is facing you, ready for action.
– Grab your trusty plastic opening tool and gently ease the device open from its hinges.
Step 7

– Find the white port that links the back cover to the main circuit board behind the screen.
– Gently wiggle the plastic connector out in a straight motion—no twisting, just a smooth pull!
Step 8

The aluminum foil tape can be a bit tricky, so handle it gently – it can tear easily if you’re not careful.
Don’t yank on those ribbon cables! There’s a plastic piece holding them in place, glued to the metal display. Give it a little more TLC.
– Gently peel back the aluminum foil tape with your fingers until you can see the ribbon connector hanging out underneath.
Step 9

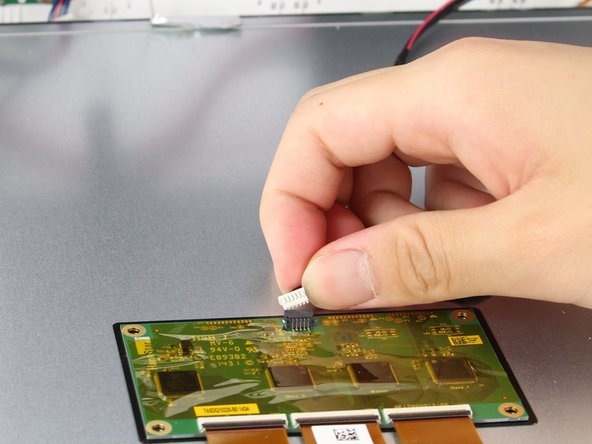
Let the connector hang out—disconnected, but still chilling with the metal display.
– Give those two side switches a firm squeeze and pop that connector free from its cozy little setup. Show it who’s boss—but, you know, gently!
Step 10

– Grab your plastic opening tool and gently slide it under the gray plastic frame that wraps around the ribbon cable.
– Press downward and slowly lift the gray plastic away from the metal display—nice and easy does it!
Step 11

– Let’s get started by locating those two cables that run along both sides of your device, found at the bottom of the screen. Take a peek and get familiar with the layout – it’s the first step towards fixing your device!
Step 12


Hey there! Just a friendly reminder: steer clear of tugging on that red and black cable. It’s a bit wobbly and might just pop off the connector if you’re not careful!
– Grab the white plastic piece firmly on both sides with your fingers, and gently lift it straight up – you got this!
Step 13

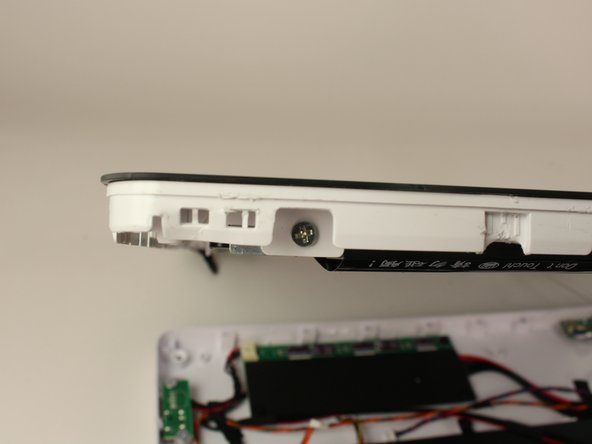
Time to free up that pesky circuit board! You need to move it so you can access the silver screw it’s hiding. Once that’s out of the way, you’re good to go.
– Grab your Phillips #1 screwdriver and loosen up those two black 4.5 mm screws. Once they’re out, lift the circuit board free and set it aside.
Step 14

– Carefully unscrew the six 6.5 mm silver screws nestled at the corners of the display. You’ve got this!
Step 15

Keep that heat moving, folks! Staying on one spot too long might lead to a cracking situation—literally.
Spread that heat evenly around the frame of the screen for the best results, and watch the magic happen!
– Grab your heat gun and gently warm up the edge of the screen you want to open. Nice and toasty makes prying way easier!
Step 16

Handle those iOpeners with care! They may be a bit toasty and have a gel inside that could give your skin a surprise if it escapes the packet.
Position them all around the device so the heat works its magic and loosens up that screen adhesive evenly.
– Now it’s time to get your screen ready. Place several iOpeners along the sides of the screen that you’re not zapping with the heat gun. This will help you get a good grip on the screen and make the rest of the repair a whole lot easier.
Tools Used

Step 17

This part might require a bit of elbow grease and some patience, as the adhesive can still be quite stubborn.
– Grab your trusty jimmy and slide it between the screen and the frame—just like you’re sneaking the last slice of pizza from the box. Gently wiggle it around to loosen up the glass screen. Slow and steady wins the race, so take your time!
Tools Used

Step 18

– Once you’ve got a little gap going between the screen and the frame, slide a pick into the opening to hold things in place.
– Keep working your way around the edge, popping in more picks as you make new gaps. By the end, the screen will be ready to part ways with the frame.
– Gently pry the screen away with the plastic opening tool. Take your time and let the screen come off smoothly.