Lexibook Junior Tablet Headphone Jack Replacement
Duration: 45 minutes
Steps: 11 Steps
Replacing the headphone jacks on the Lexibook Junior Tablet is a bit of a challenge, as it involves soldering two jacks. This guide is on the tougher side, so make sure to check out the battery and motherboard replacement guides before diving in. If you need help, you can always schedule a repair.
Step 1

Don’t forget to power down your device before diving in! It’s a simple step that keeps you safe from any unexpected zaps.
– Flip your device so the screen is facing down. Grab your trusty metal spudger and pop out those tiny rubber dots at each corner—screws will be peeking out at you now.
– Take that same spudger and gently lift the long, skinny rubber strip on the back. Surprise! More screws hiding underneath.
Tools Used


Step 2

– Let’s get started! Use a Phillips #00 screwdriver to remove the four 6.8mm screws from the corners of your device. Easy peasy!
– Next, use the same trusty screwdriver to remove the three screws hidden behind the rubber rectangle. Don’t worry, they won’t come out of the device, so no need to worry about losing them.
– Now it’s time to get a little gentle. Use a plastic opening tool to carefully pry open the back panel of your tablet. Take your time and work your way around the edges until it pops open.
Tools Used

Step 3

Be careful not to damage the battery or metal plate during this step – a nylon spudger is your best friend here. Take your time, work slowly and patiently, and you’ll be golden!
– Take your nylon spudger and carefully slide it under the battery to pop it out. You’ve got this!
Tools Used
Step 4

Need tips on soldering? Check out the Soldering Guide for some handy pointers and tricks.
– Grab your trusty soldering iron and carefully heat up those connections to detach the battery from the motherboard. Take your time, and make sure everything comes off smoothly. No rush here!
Tools Used

Step 5


– Grab your trusty plastic opening tool and gently nudge those two little black and white switches in the direction of the ribbon wires. You’ve got this!
– Now, with a delicate touch, ease the ribbon wire out of the switch to set it free. Nice and slow!
Step 6

– Gently push the larger black and white strip leading to the ribbon wire upwards using your plastic opening tool. No rush, just a steady hand!
– Carefully pull the ribbon wire out of the switch, taking your time to avoid any unnecessary tension.
Step 7
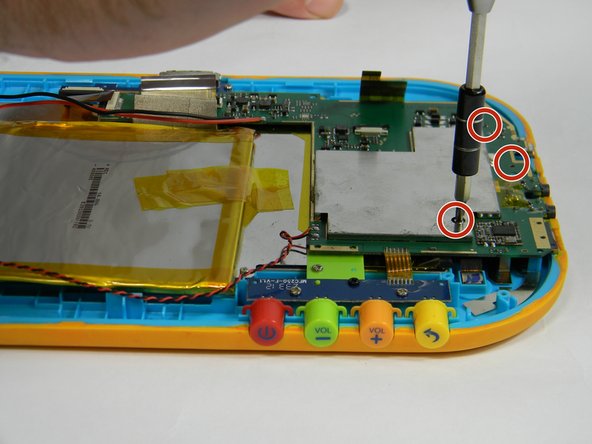

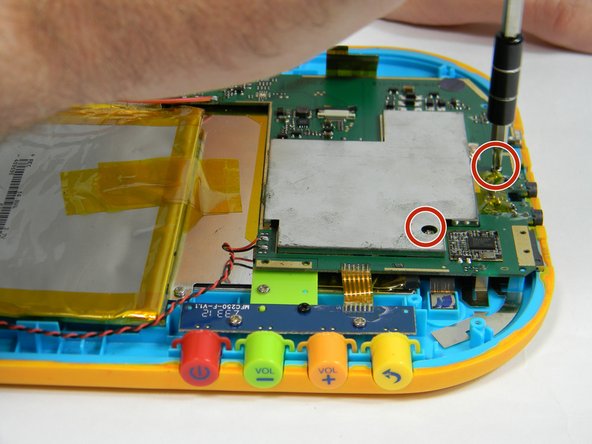
– Grab your trusty ph00 Phillips head screwdriver and let’s get to work! Carefully remove the five 4 mm screws that are hanging out around the edge of the motherboard. You’ve got this!
Step 8
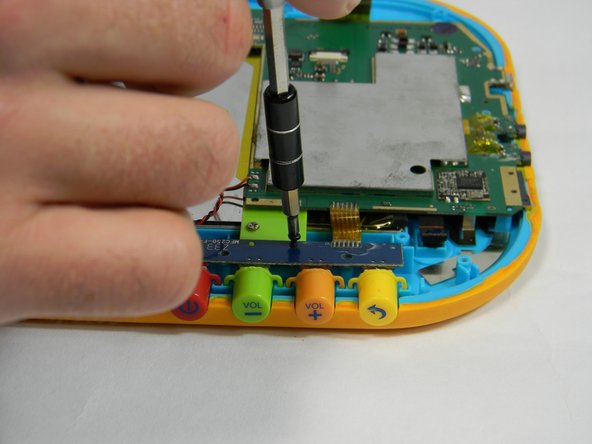

– Take off the button board by carefully unscrewing those two 4 mm screws and that one 6.5 mm screw. You’ve got this!
Step 9

Need to brush up on your soldering skills? No worries—it’s easier than you think! A steady hand, a bit of patience, and the right technique will get you there in no time.
– Gently unsolder the wires that run from the motherboard to the speaker.
Step 10

– Gently peel back the yellow film covering the headphone jack. It’s just a little protective layer, so no pressure needed!
Step 11

If you’re looking to master the art of soldering, swing by the Soldering Guide at Salvation Repair for some handy tips!
– Time to put everything back together! Just retrace your steps and follow these instructions in reverse. If you hit a snag, don’t worry—just reach out and you can always schedule a repair for a helping hand.
–
