iPhone 11 Pro Max Teardown
Duration: 45 minutes
Steps: 20 Steps
There’s been a lot of buzz about the iPhone 11 Pro Max, and we’re here to clear things up. Curious about the RAM? Wondering how that bilateral charging works? Or how Apple managed to extend the battery life? Stick with us as we tear down this intriguing device and answer all those questions. By the way, if you want the scoop on the regular 6.1” iPhone 11, we’ve got that covered too. Don’t forget to check out our YouTube channel, follow us on Instagram, Twitter, or Facebook, and subscribe to our newsletter for more detailed teardown content.
Step 1


- There’s plenty of buzz about this device, but let’s focus on the six essentials we're about to break down:
- A13 Bionic chip with third-generation Neural Engine—brains and brawn in one package.
- 6.5” Super Retina XDR OLED display (2688 × 1242, 458 ppi) with True Tone and HDR. Sorry, no 3D Touch this time.
- Triple 12 MP rear cameras: ultra-wide, wide, and telephoto lenses, plus a 12 MP selfie cam with TrueDepth FaceID hardware—say cheese.
- Starts with 64 GB storage, but you can get 256 GB or 512 GB if you like living large.
- Supports gigabit LTE, Wi-Fi 6, Bluetooth 5.0, and NFC for all your speedy connectivity needs.
- IP68 rating, so it can handle more than just a splash. Dive in (but maybe don’t take it swimming).
Step 2


Could this be tied to the buzz about dual wireless charging?
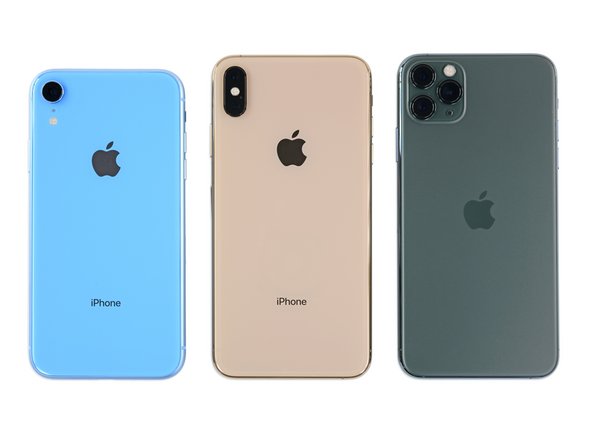
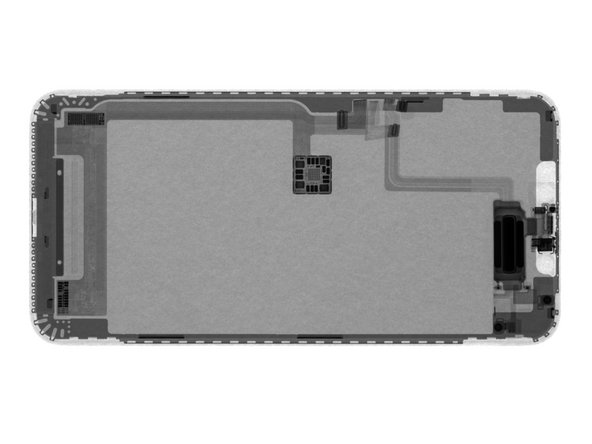
- Let’s kick things off with a little X-ray vision, thanks to our pals wielding some powerful imaging magic. We get a sneak peek at what’s hiding inside.
- Feast your eyes on the lineup: from left to right, we’ve got the iPhone XR, XS Max, and the 11 Pro Max.
- Here’s what jumps out at us right away:
- The battery in the 11 Pro Max is sporting the familiar single-cell style from last year’s XS, but it’s making its debut in a Max-sized phone.
- Apple’s logic board is looking slimmer than ever—looks like they trimmed it down to make room for that massive triple-camera setup.
- And check this out: there’s a mysterious new board lurking just under the battery. Intrigue levels rising!
Step 3


That camera "bump" is starting to feel more like a whole "mesa" now... time to give it some attention!
- The latest iPhone sports a little extra bulk around the middle and some serious muscle near the cameras.
- And check it out—this one comes in Boba Midnight green, straight from Apple's color lab.
- Before you crack open this green beast, spot the newly-centered Apple logo and a fresh model number hiding in the SIM tray: A2161.
- The camera bump on this iPhone has sloped edges, making it blend into the back a bit more smoothly.
Step 4


Even though it's touted as Apple's 'most water-resistant iPhone ever', the adhesive around the display still feels a lot like last year's models. The pentalobe-based gasketing is also making a nostalgic return.
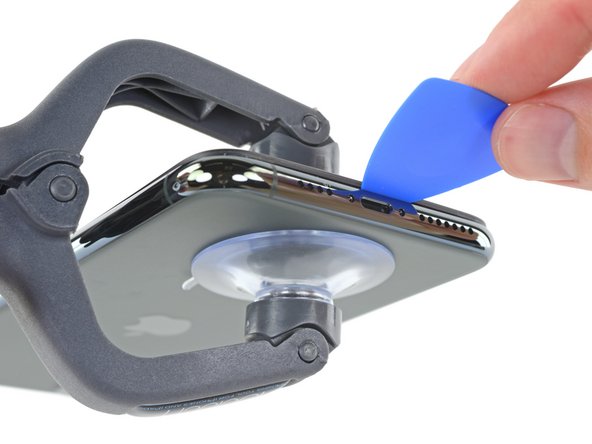
- Got a shiny new iPhone? No problem! We're sticking to our trusty opening routine—but with a little twist this time!
- First up, we grab the P2 driver from the new iPhone-specific Marlin toolkit to tackle those pesky pentalobe screws.
- Next, we'll bring in the iSclack and an opening pick to make our way around the display—let's get ready for that lift-off!
Tools Used

Step 5


There are a few possible reasons why this extra cable might be hanging around, and one of the coolest is definitely bilateral charging!
- Let's crack open this Professional Maximum iPhone and check out its beastly L-shaped battery—wait, two battery connectors? Now that's something new!
- Here's what some quick tests showed us:
- The phone keeps running even if the charging-port-end cable is unplugged (plugging it back in gave us a quick temperature warning, though).
- With that lower cable unplugged, the phone charges through the Lightning port, but wireless charging takes a break.
- Unplug the 'main' cable that hooks up directly to the logic board, and the phone powers down as expected and won’t start up again, even if the other cable is still connected.
Step 6


- Smartphone manufacturers have been pouring their hearts into software enhancements to elevate image quality, but this year, Apple really rolled up its sleeves to revamp the camera hardware.
- The crown jewel of this upgrade is the shiny new ultra-wide angle sensor and lens, but don't overlook the fact that the standard wide-angle and telephoto lenses are also enjoying some sweet boosts in their ISO range and shutter speed. Even the front-facing camera is strutting its stuff with a little resolution upgrade!
- And here's a fun twist: the FaceID sensor array is getting some snazzy improvements too! The front-facing camera has jumped from 7 MP to a sparkling 12 MP, and those pesky cables are no longer stuck under the battery, making removal a breeze!
- For all the nitty-gritty details on the cameras, give Halide's write-up a peek.
Step 7


- Look at those 'eyes'! We've got three of them, plus a flash and a microphone hole—talk about a feature-packed setup!
- Now, let’s dive a bit deeper. The cameras are cozied up together, each sporting its own independent cable. How neat is that?
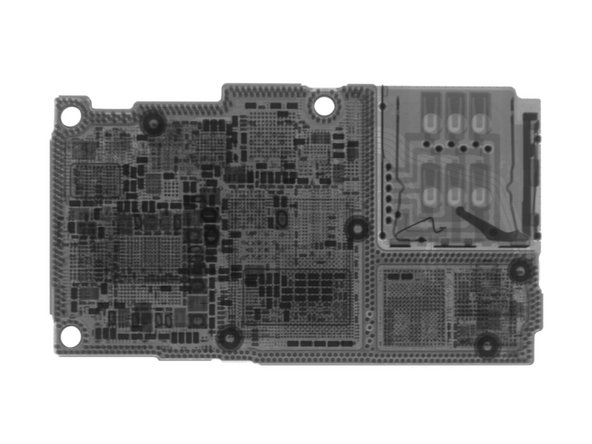
- The X-rays don’t reveal too many secrets—the dark bars hint at OIS, and those little spots look like last year's components, so we probably won’t find any dedicated RAM chips here.
- But hold on, we’re not stopping here! We're going to take an even closer look—stay tuned for more exciting discoveries!
Step 8


- The iPhone Marlin driver set is here to help us tackle those final standoffs holding down the uniquely square logic board.
- Seeing double? No need to fret! The iPhone 11 Pro Max board shares the same construction as its sibling, the iPhone 11 Pro!
- From a distinctly Idaho shape in the iPhone XS to a more Colorado vibe in the iPhone 11 Pro Max, this new board is impressively compact!
- Could it really be the same board? We'll keep you in the loop...
Step 9


- Same dual-layer setup and separation routine, just with a fresh new look.
- With plenty of focused heat and a gentle nudge, the top board slips right off the interconnect board.
- Here’s a peek at the famous A13 processor along with a bunch of other tiny silicon components packed tightly on these little boards.
Step 10


- Let's get our chip detective hats on and dive into the fun! Here's what we've spotted so far:
- Apple APL1W85 A13 Bionic SoC, paired with SK Hynix H9HKNNNCRMMVDR-NEH LPDDR4X (looks like 4 GB, but SK Hynix might need to update their decoder soon)
- Apple APL1092 343S00355 PMIC
- Cirrus Logic 338S00509 audio codec
- Unmarked USI module— Update: turns out this is where Apple's shiny new U1 ultra-wideband chip is hiding! You can read all about it in our blog post.
- Avago 8100 Mid/High band PAMiD
- Skyworks 78221-17 low-band PAMiD
- STMicrolectronics STB601A0N power management IC
Step 11


- So many chips—it's almost a party on this board! Let's check out the RF board:
- Apple/USI 339S00648 handles WiFi and Bluetooth duties
- Intel X927YD2Q (probably XMM7660) modem keeps you connected
- Intel 5765 P10 A15 08B13 H1925 transceiver does the talking
- Skyworks 78223-17 power amplifier boosts your signal
- 81013 - Qorvo Envelope Tracking keeps things efficient
- Skyworks 13797-19 DRx manages reception
- Intel 6840 P10 409 H1924 baseband PMIC powers the radio chips
Step 12


While it might not have the glamorous charm of the liquid cooling systems found in some Android devices, this setup is definitely sufficient to keep the super-efficient A13 nice and cool. Plus, it won’t cause any disruption to the signals buzzing to and from the RF board it’s snugly attached to.
- Up on top, we've got some fun finds:
- Peeling back the layers, we reveal a stack of graphite sheets chilling behind the RF board, all about keeping things cool.
- Apple brags that these iPhone Pros have the slickest thermal setup yet, using graphite layers to siphon heat off the logic board and send it straight to the rear case.
- Toshiba TSB 4226VE9461CHNA1 1927—your 64 GB flash storage is hanging out here.
- YY NEC 9M9 (most likely your trusty accelerometer/gyroscope combo)
Step 13


This straightforward process feels more like working on an iPhone 6 than tackling any of the newer models.
- Now, let's take a look at the battery. Good news! It's actually pretty repair-friendly once we get past the small hurdle of the Taptic Engine.
- The Taptic Engine? No worries, just get that out of the way and we’re almost there. A couple of sturdy, wide adhesive strips are all that’s holding the battery in place.
- Once those adhesive strips are peeled away, the battery will lift right out—easy does it!
Step 14


We were a bit skeptical when Apple hinted that the A13 chip and PMU were solely responsible for that impressive extra five hours of battery life. Turns out, adding a bit more thickness to the phone does wonders for battery performance. Who would've thought?
- Apple’s gone big this year—the iPhone 11 Pro Max battery packs a hefty 3969 mAh at 3.79 V, making up 15.04 Wh of juice. That’s 2.96 Wh more than the XS Max and just 1.52 Wh shy of the Galaxy Note 10+ 5G battery. Power hungry? We’ve got you covered.
- How’s it all squeezed in? This battery is 4.6 mm thick, fills up 23.8 cm³, and tips the scales at 59.6 g. Compared to the XS Max, it’s 0.7 mm chunkier, has 4.2 cm³ more room to stretch out, and weighs 13 g extra. Big phone, big battery.
- That clever single-cell, L-shaped battery design you saw last year in the iPhone XS? It’s back, tackling the tricky business of internal corners and thermal expansion. Battery engineers really don’t mess around.
Step 15


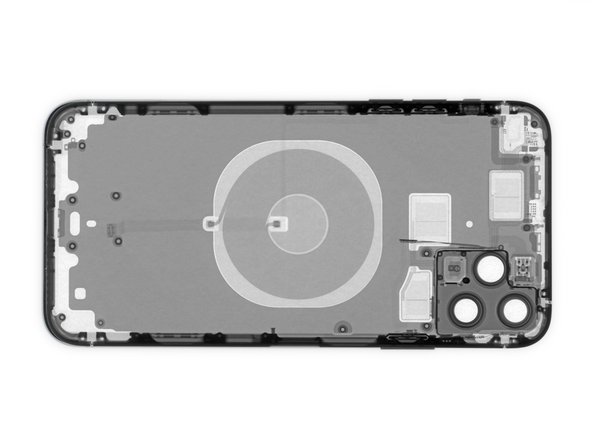
Hey there! Apple just dropped a new support document today, sharing that the iPhone 11 Pro has some shiny new hardware designed to keep an eye on and optimize battery performance. So, it seems like this is all part of the plan, even if it looks a bit like some fancy bilateral charging gear!
- Take a look at that mystery board we spotted in the X-ray just below the battery—it's playing a key role (at least in part) as the connector between the battery, wireless charging coil, and Taptic Engine.
- For the first time ever in an iPhone, we’ve got a secondary battery connector sitting right next to the wireless charging coil. We’re scratching our heads on what Apple was going for here.
- Out pops what looks like a new barometric sensor, complete with an ingress-proofing O-ring to keep things tight and sealed.
- All the parts around this part of the phone are glued to the frame with what seems to be a stickier, goopier adhesive compared to the foamy stuff we saw last year. Our best guess? It’s probably to make the phone more waterproof.
Step 16


- Time to pop open that intriguing interconnect board and check out some of the cool chips hanging out inside:
- STMicroelectronics STPMB0 929AGK HQHQ96 153915
- Apple 338S00411 audio amplifiers
- TI 97A8R78 SN261140 A0N0T
Step 17

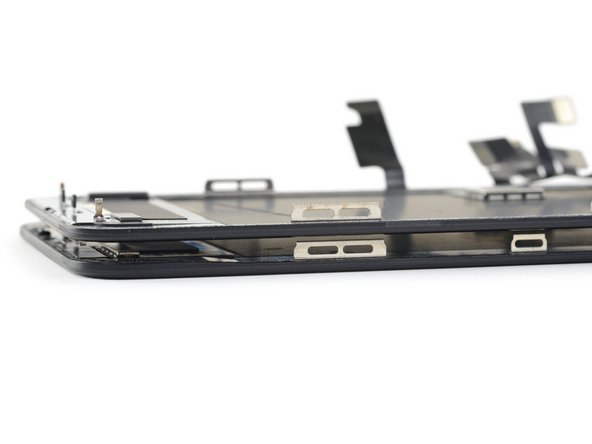
- The XS Max display was flawless—except for the price tag that could make your wallet cry—so it’s no shock that this year’s "XDR" display looks pretty much the same at first glance.
- A neat little upgrade is that all three flex cables now hang out together in one spot—meaning fewer surprise traps when you crack open the phone for repairs.
- We thought losing the 3D Touch layer would make a bigger difference, but this display is only about a quarter millimeter thinner than the last one. That, plus the phone’s slight overall thickening, helps explain the boost in battery life.
- There’s also a sneaky little chip tucked under a shield: the Samsung S2D0S23 display power management IC.
- But heads up—this "XDR" display doesn’t come with a $999 stand, so it’s basically not usable on its own.
Step 18


Nope. That AD5844CDA0 chip is most likely handling image stabilization — probably where the little gremlins keep the picture steady.
- Getting the Lightning connector assembly out can feel like wrestling with a wild animal! It's attached to the new interconnect board, and it puts up quite a fight. A chaotic mix of screws and glues keeps it firmly in place, so be ready for a bit of a challenge if either of these components decides to act up.
- We’re taking one last look for that elusive second RAM chip by checking out each camera module. Aside from some shiny unshielded sensors, our search seems fruitless—hold up, is that it we see??
Step 19


- Looks like we've got three extra thermal pads hanging out on the back case! But wait, there's more...
- A little peek with the X-ray magic reveals that each pad is perched on a neat cut through the steel case lining. Why would they do that, you ask? Well, it's all about that sweet RF pass-through.
- And guess what? Each pad is hooked up with a flex cable, connecting to a fancy antenna bus. Talk about teamwork!
- We're not saying we have all the answers here, but it sure looks like we're catching our first glimpse of some ultra wideband antenna goodness!
Step 20

- We're diving in deep with this teardown, and here’s what we found!
- Hang tight—we’ve got more teardowns coming your way soon!
- A larger battery? Yup, that’s thanks to a 0.4 mm body bump and saving 0.25 mm from 3D Touch.
- Two battery cables that might’ve been part of Apple’s rumored bilateral charging feature—though they could just help improve battery life too.
- A pretty inconclusive ‘4 GB confirmed’ statement, since we couldn’t find any dedicated camera RAM.
- Oh, and some RF antennas (we think), which should make the U1 chip even better at finding things.