
iPhone 11 Pro Rear-Facing Cameras Replacement
Duration: 45 minutes
Steps: 32 Steps
Follow this guide to swap out the rear cameras on your iPhone 11 Pro. All three camera modules come as one unit, making the replacement straightforward and smooth.
Step 1


Before you get started, make sure your iPhone battery is under 25%. Lithium-ion batteries love drama—if they're full and get poked, they can put on quite a show with fire or even an explosion. So, keep it chill and keep it low!
Cracking open your iPhone’s screen breaks its waterproof vibe. If you’ve got new seals, now’s their time to shine. If not, keep your phone high and dry after reassembly, because water and electronics don’t mix.
- Turn off your iPhone before you start taking it apart—safety first!
- Unscrew the two 6.7 mm pentalobe screws located at the bottom edge of your iPhone.
Step 2


Be careful not to insert the opening pick too deeply, as it can cause harm to your device. To avoid any mishaps, take a moment to mark your pick for safe use.
Feel free to mark the other corners of your pick with various measurements for added precision.
As a clever alternative, you can stick a coin to a pick about 3 mm from the tip to guide your way.
- Grab your trusty opening pick and measure out a cool 3 mm from the tip. Give it a little mark with a permanent marker to let it know where to go!
Step 3


Pop on some safety glasses to keep your eyes safe from any rogue glass bits that might break free during the repair.
Got a cracked screen on your iPhone? No worries! Let’s keep that glass from breaking even more and save your fingers from any sharp surprises — just grab some tape and cover it up before you dive in.
If you're in a pinch, you could always give superglue a shot to stick that suction cup right to the screen. Just a little trick to help you out!
- Cover the iPhone’s screen with overlapping strips of clear packing tape until the entire front is fully wrapped.
- If the suction cup refuses to stick in the next steps, no worries—grab a strong tape like duct tape, fold it into a handy little handle, and use that to lift the screen instead.
Step 4


In the next three steps, we're going to show you the Anti-Clamp, our nifty tool designed to make opening your device a breeze. If you decide to go a different route and skip the Anti-Clamp, just hop down three steps for an alternative method.
Need the scoop on using the Anti-Clamp? Check out this handy guide.
If you're finding your iPhone's surface a bit too slick for the Anti-Clamp to grip, a little tape can work wonders to give it a better hold.
- Give that blue handle a gentle tug back to free the Anti-Clamp's arms.
- Slide those arms right over the left or right edge of your iPhone—easy peasy!
- Get those suction cups ready by placing them near the bottom of your iPhone—one on the front, and one on the back.
- Squeeze those cups together to create a solid grip on the area you want to work on.
Step 5


- Slide that blue handle forward to lock those arms in place—like a pro!
- Give the handle a full spin clockwise (360 degrees) or keep turning until the cups start to stretch. You got this!
- Keep an eye on those suction cups—they should stay lined up. If they start to wander off, just loosen things a bit and realign. Easy fix!
Step 6


Take it easy and turn just a quarter of the way at a time. Give it a minute between each turn and let the Anti-Clamp work its magic. You've got this!
Feel free to grab a hair dryer, heat gun, or hot plate for this step, but remember—too much heat can be a bad buddy for your display and internal battery, so be gentle!
If the Anti-Clamp isn't doing its magic and the gap is still shy, give it a little more heat and turn the handle a quarter turn for good measure.
- Warm up an iOpener and thread it through the arms of the Anti-Clamp.
- Fold the iOpener so it rests along the bottom edge of the iPhone.
- Hang tight for one minute to let the adhesive loosen and create a gap to work with.
- Gently slide an opening pick into the gap between the screen and plastic bezel—avoid prying the screen itself.
- Skip the next three steps.
Tools Used

Step 7

Warming up the bottom edge of your iPhone loosens the adhesive holding the screen in place, making it way easier to pop open.
- Grab a hairdryer, heat gun, or whip up an iOpener and gently warm the lower edge of your iPhone for about a minute. This will help soften the adhesive lurking beneath.
Tools Used
Step 8


- Grab a single suction handle and stick it to the bottom edge of your phone. Just make sure to steer clear of the curved glass area—no one likes a slip-up!
Tools Used

Step 9


The adhesive keeping the display stuck on is seriously tough — breaking that first gap takes some muscle. If you're struggling to get it open, try heating it up a bit more, then gently rock the screen back and forth to loosen the glue until you can slide your tool in.
- Grab the suction cup and pull up with steady, confident pressure to gently create a small gap between the front panel and the rear case.
- Slide an opening pick into the gap beneath the screen and the plastic bezel—make sure to avoid prying directly on the screen itself.
Step 10


Keep your pick insertion under 3 mm to avoid messing with the delicate bits inside.
- Take your opening pick for a spin, gliding it up the left edge and around the lower left corner of your iPhone to break through the sticky adhesive holding the screen in place. Keep it smooth and steady!
Step 11

Heads up! There's a sneaky cable running along the right edge of your iPhone. Keep your pick away from this area to avoid any accidental cable drama.
Step 12


Keep your pick shallow—no deeper than 3 mm—to avoid a surprise meeting with the display cables.
- Slide your pick back in at the bottom edge of the iPhone, then glide it up along the right side to keep loosening that sticky adhesive.
Step 13


The top edge of the display is held in place with a combo of glue and clips, making it both secure and a little tricky to tackle.
- Carefully nudge the right side of the display down a bit, heading toward the Lightning port.
- Slide your pick into the upper-right corner of the phone.
Step 14


Keep your pick insertion under 3 mm to avoid messing up the front panel sensor array. Easy does it!
- Keep pulling the display down toward the Lightning port just enough to create a gap big enough for your pick to slide in.
- Slide the pick over to the top left corner and carefully slice through any leftover adhesive holding the display in place.
Step 15

- Grab the tiny nub on the suction cup and give it a gentle pull to pop it off the front panel.
Step 16


Hold up—don't yank the display off just yet! There are some delicate ribbon cables still hanging in there, keeping it connected to the iPhone’s brain.
- Open up the iPhone by swinging the display up from the left side, just like flipping open the back cover of a book.
- Prop the display up against something sturdy to keep it steady while you work your magic on the phone.
- When putting it back together, set the display in place, line up the clips along the top edge, then gently press the top edge down before snapping the rest of the display in. If it doesn’t click in smoothly, double-check the clips around the edges to make sure none are bent or out of place.
Step 17

As you tackle this repair, keep an eye on each screw and remember where it belongs. It's like a game of hide and seek, but let's not lose any screws along the way—your iPhone will thank you for it!
- Take out the two 1.3 mm Y000 screws holding down the battery cover bracket.
- When putting things back together, it's a perfect moment to power on your iPhone and make sure everything works before snapping the display back into place. Remember to power it down fully before continuing your repair journey.
Step 18

- Take out the bracket and set it aside—like a pro making room for the next move.
Step 19


Careful now! Try to keep the black silicone seal around this and other board connections intact. These little guys are your device’s water and dust bodyguards, so let’s not mess with them.
- Gently pop the battery connector off its spot on the logic board using a spudger or your clean fingernail. Give it a little nudge—no need to wrestle.
- Lean the connector away from the logic board just enough so it won’t sneak back and power up your device mid-repair. Safety first, superhero!
Tools Used

Step 20


- Grab your Y000 driver and carefully unscrew the six tiny 1.3 mm screws holding down the logic board cover bracket. Keep track of those little guys!
Step 21

- Take out the bracket—easy does it!
Step 22

- Grab a spudger or your trusty fingernail to gently disconnect the OLED panel cable connector. You've got this!
- When it's time to re-attach, make sure to align those connectors just right! Press down on one side until you hear that satisfying click, then do the same on the other side. Remember, no need to press down in the middle—wrong moves could lead to bent pins and a sad device. If you're feeling uncertain, just take a breath and keep it steady!
Tools Used
Step 23


- Gently pry open the front sensor assembly cable connector using a spudger or your trusty fingernail.
- Next up, disconnect the digitizer cable connector with the same tools – spudger or fingernail, your choice!
- If your screen is feeling a bit shy and not responding to touch after your repair, simply disconnect the battery. Then, reconnect that connector, listening for a satisfying click. Make sure there's no dust or debris hanging out in the socket!
Tools Used
Step 24

- Take off the display assembly—kind of like opening the lid of a treasure chest, but with more screws.
- If you're feeling extra thorough during reassembly, this is a perfect moment to refresh the waterproof adhesive around the edges of the screen for that snug fit.
Step 25


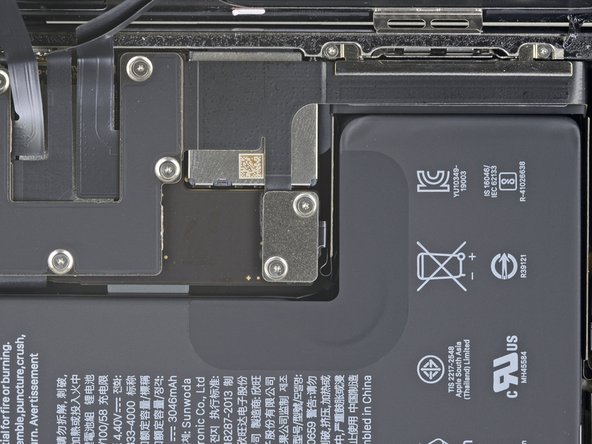
- Grab your Y000 driver and unscrew the two tiny 1.5 mm screws hanging out on the left side of the rear camera cover. Let’s get those out of the way!
Step 26


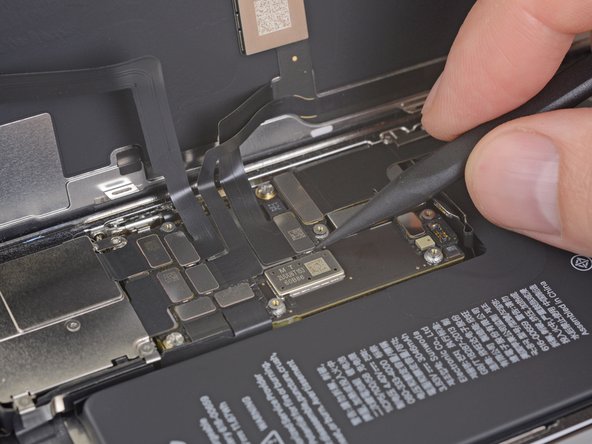
- First up, let's get that Face ID flex cable bracket out of the way. It's time for some serious cable management! When you're putting everything back together, make sure to pop that bracket back in to keep those flex cables cozy and separate from the battery. Remember, no sneaking it between the flex cables and the logic board or camera area—let's keep things tidy!
Step 27


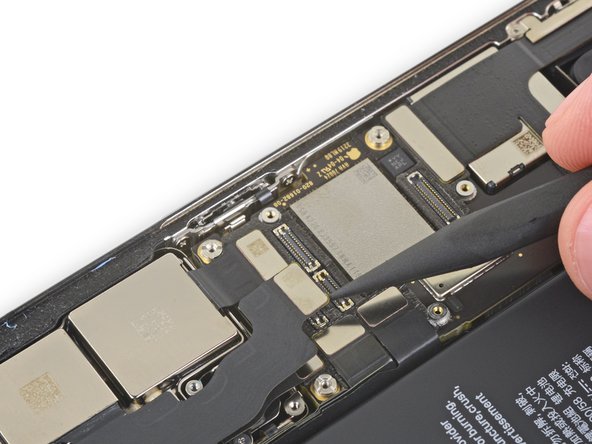
- Grab your trusty Y000 driver and unscrew the two tiny 1.2 mm screws holding down that rear camera cover. Steady hands, you got this!
Step 28


Make sure those tabs are snug as a bug; if they're not, the cover won't sit pretty!
- Gently pop off the camera cover starting from the side nearest the battery—like opening a tiny treasure chest.
- To put the cover back on, flip the script: lower the outer edge first so those two little tabs find their groove in the bracket. Then, swing the cover shut. Easy does it!
Step 29


- Grab a spudger or your fingernail and gently pry the first two camera cable connectors straight up to disconnect them from their sockets.
Tools Used
Step 30


- Grab your spudger and work your magic on the third camera. Its connector is hanging out just beneath the cable you tackled in the last step.
Tools Used
Step 31


The camera assembly isn’t glued down, but it’s snugly pressed into place, holding tight without any sticky business.
- Slide your spudger tip under the left side of the camera assembly—like you’re sneaking a slice of pizza.
- Lift gently and coax those cameras out of the iPhone with a smooth little lever motion.
Tools Used
Step 32

- Give your shiny new replacement part a good comparison with the original—you might need to swap over some parts or peel off those sticky backings before making it all fit nicely.
- Putting your device back together? Just retrace your steps like a pro, in reverse order!
- Got some e-waste? Make sure to drop it off at an R2 or e-Stewards certified recycler—let's keep our planet happy!
- Things didn't go as smoothly as you'd hoped? No worries! Try some basic troubleshooting, or if you're feeling stuck, you can always schedule a repair for a helping hand!


