
iPhone XR LCD and Digitizer Replacement
Duration: 45 minutes
Steps: 48 Steps
Heads up! The earpiece speaker and sensor combo glued to the back of your iPhone’s display is specially matched to your device right from the factory.
If you’re swapping out a broken screen and your new display already has that handy thin metal LCD shield plate attached, you’re in luck—follow this shorter guide for a smoother repair. But if that shield plate is missing, no worries—keep reading! This guide will walk you through replacing your screen while keeping your original LCD shield plate intact. The earpiece speaker and sensor assembly stuck to the back of the display is uniquely paired to your iPhone at the factory, so you’ll need to move it from your old screen to the new one when replacing the display. This assembly includes the flood illuminator, which is crucial for Face ID to work. If it gets damaged or swapped out, Face ID will stop working, so handle these parts with extra care. If it does get damaged, only Apple can fix Face ID functionality. Also, heads up: True Tone will be disabled after a screen replacement, even if you’re using an official Apple screen.
Step 1


Heads up! Make sure your iPhone battery is under 25% before you dive in. Lithium-ion batteries can be a bit dramatic if punctured—think sparks or a mini firework show. Let's keep things chill and safe.
Opening up your iPhone can break those nifty waterproof seals, so be sure to have some replacements handy before diving into this step! If you put it back together without swapping them out, just keep it away from any liquid adventures.
- First things first, let's power down your iPhone before we dive into the exciting world of disassembly!
- Next up, grab your trusty screwdriver and remove those two 6.7 mm-long pentalobe screws located at the bottom edge of your iPhone. You've got this!
- Oh, and just a quick heads up—there's a black rubber gasket nestled right beneath the head of each pentalobe screw. To keep your device safe from dust and liquid, give those gaskets a once-over. If they look a bit worn out, consider swapping out the screws during reassembly for extra protection.
Step 2


If your pick goes in too deep, it could cause some damage. Take a moment to mark your pick to avoid any accidents.
You can also label the other corners with different measurements to keep things neat and precise.
Alternatively, stick a coin to your pick about 3mm from the tip with some tape. That way, you'll have a handy guide.
- Grab your opening pick and measure 3 mm from the tip, then make a mark with a permanent marker. You've got this!
Step 3


Pop on those safety glasses to keep your eyes safe from any glass that might decide to make a quick exit during the repair. Better safe than sorry!
This step helps trap any sneaky glass shards and keeps everything sturdy while you pry and lift the screen.
- Cracked iPhone screen? Let's keep those shards in check and save your fingers from surprise pokes—cover the glass with packing tape.
- Layer strips of packing tape so they overlap, covering the whole front of your iPhone.
- If the display is too shattered for a suction cup to hold on, grab some strong tape (duct tape works wonders), fold it into a makeshift handle, and lift the screen with your new DIY grip.
Step 4


Pop on some safety glasses to keep your eyes safe from any rogue glass bits that might fly around during the repair.
Got a cracked screen on your iPhone? No worries! Just tape over that glass to keep it from getting worse and to stay safe while you tackle the repair.
If things really aren't going your way, don't hesitate to superglue that suction cup right on the screen. Sometimes you just have to get creative!
- Cover the iPhone's screen with overlapping strips of clear packing tape until the entire front is sealed up nice and neat.
- If the suction cup refuses to stick in the next steps, no worries! Grab a sturdy piece of tape like duct tape, fold it into a little handle, and use that to gently lift the screen instead.
Step 5


The next three steps show off the Anti-Clamp—a handy tool designed to make opening your device a breeze. Not using the Anti-Clamp? Jump ahead three steps for another way to get the job done.
Need the full rundown on the Anti-Clamp? Check out this guide for all the tricks.
If your iPhone feels more like a slip-n-slide than a phone, slap on some tape to give the Anti-Clamp a better grip.
- Give that blue handle a gentle tug backwards to release the Anti-Clamp’s arms.
- Slide the arms over the left or right edge of your iPhone—whichever side feels lucky.
- Get those suction cups hanging out near the bottom edge: one chilling on the front, one lounging on the back.
- Squeeze the cups together to create some serious suction right where you want it.
Step 6


- Give that blue handle a little nudge forward to secure those arms in place.
- Now, twist that handle clockwise a full 360 degrees or until you see the cups start to stretch – you've got this!
- Keep an eye on those suction cups to ensure they're aligned. If they start to dance out of line, just loosen them a tad and reposition the arms for a perfect fit.
Step 7


Take it easy and don’t twist more than a quarter turn at once—patience is key! Give it a minute between each turn and let the Anti-Clamp do its magic.
You can also try warming things up with a hair dryer, heat gun, or hot plate—but be careful, because too much heat might damage the screen or battery.
If the Anti-Clamp isn’t opening a big enough gap, just warm the area a bit more and give the handle a quarter turn.
- Warm up an iOpener and thread it through the arms of the Anti-Clamp.
- Fold the iOpener so it rests along the bottom edge of the iPhone.
- Give it about a minute to let the adhesive soften and create a little gap.
- Slide an opening pick under the screen and the plastic bezel—avoid prying directly under the screen itself.
- Skip the next three steps.
Tools Used

Step 8

Warming up the bottom edge of your iPhone loosens the adhesive that holds the display in place, so you'll have an easier time popping it open.
- Grab a hairdryer or heat gun, or whip up an iOpener, and give the lower edge of your iPhone a warm hug for about a minute. This will help soften that pesky adhesive lurking underneath, making your repair journey a breeze!
Tools Used
Step 9


- Grab your suction handle and place it on the bottom edge of the phone, making sure to dodge that sneaky curved glass section.
Tools Used

Step 10


The glue holding the display down is seriously tough—you’ll need to put some muscle into it to get that first gap started. If it’s not budging, try using more heat and gently wiggle the screen up and down to loosen up the adhesive. Once you’ve got a gap, you’re golden—just slide your tool in and keep going.
- Give that suction cup a firm, steady pull—think of it like coaxing open a stubborn pickle jar. You're aiming for a small gap between the front panel and the back shell.
- Slide an opening pick under the screen, but keep it riding along the plastic bezel, not the screen. Be gentle—no need to arm-wrestle your device.
Step 11


Keep your pick to a maximum of 3 mm, or you might just tickle some fragile components inside!
- Gently glide the opening pick around the lower left corner and then slide it up the left edge of the iPhone, carefully cutting through the adhesive that’s keeping the display stuck in place.
Step 12

Watch out for the tiny cables hanging out on the right side of your iPhone—keep your pick clear of those marked areas, or you might end up with more than you bargained for.
Step 13


Keep your pick shallow—no deeper than 3 mm—or you might give those display cables an unexpected makeover!
- Slide your pick back in at the bottom edge of your iPhone and glide up the right side—keep that adhesive separation going strong.
Step 14


Take it easy with the clips—they’re delicate and can snap if you get too rough. Slow and steady wins the race!
Keep your pick insertion under 3 mm to avoid messing up the front panel sensor array.
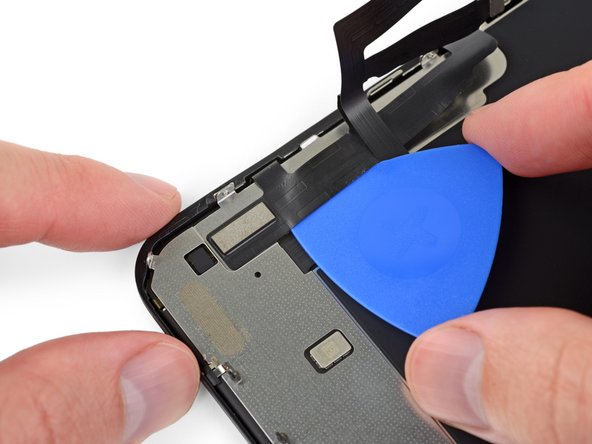
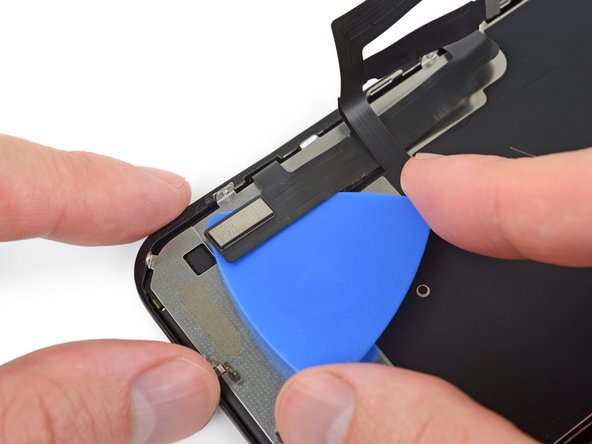
At the top edge, the display is held down by both sticky glue and some stubborn clips.
- Take your opening pick for a little adventure around the top corner of the display, nudging or wiggling it gently down toward the Lightning port.
- Swing that pick over to the other corner and slice through any leftover adhesive that's still hanging on.
Step 15

- Give that little nub on the suction cup a gentle tug to detach it from the front panel. You've got this!
Step 16


Hold your horses on fully separating the display! There are still some delicate ribbon cables connecting it to the iPhone's logic board, so let’s be gentle and cautious.
- Open your iPhone by gently swinging the display up from the left side, just like flipping the back cover of a book.
- Prop the display up against something sturdy to keep it steady while you work your magic on the phone.
- When putting it back together, place the display in position, line up the clips along the top edge, and press down carefully on the top edge before snapping the rest into place. If it doesn’t click smoothly, double-check the clips around the edges to make sure none are bent or out of line.
Step 17


As you dive into this repair adventure, be sure to keep a close eye on every screw and return each one to its original spot. This way, your iPhone will stay safe and sound, just how it likes it!
- Take out the three 1.2 mm Y000 screws holding down the battery connector cover bracket. Tiny screws, mighty mission!
- Lift off the bracket like a pro. A little gentle persuasion does the trick.
- When you’re putting things back together, now’s a great moment to power up your iPhone and see if everything’s working right—before you seal up the display. Just remember, shut it down completely before you get back to business.
Step 18


Be careful not to mess up the black silicone seal around this and other board connections. These little guys are the unsung heroes keeping water and dust out, so treat them like VIPs!
- Grab your trusty spudger and carefully lift the battery connector straight up from its cozy socket.
- Gently nudge the connector away from the logic board a bit to keep it from accidentally reconnecting and powering up your phone while you work your magic.
Tools Used

Step 19


- Unscrew those two 1.2 mm Y000 screws holding down the display connector bracket—don’t let them boss you around!
- Lift off the bracket like you’re revealing the next plot twist.
Step 20

- Grab your trusty spudger and gently pry up to disconnect the digitizer cable. Easy does it!
- To re-attach, line up the connectors and press down gently on one side until you hear that satisfying 'click.' Then, repeat on the other side—avoid pressing in the middle. A misaligned connector could bend the pins, and that's a no-go.
- If your screen is being stubborn and not responding to touch, disconnect the battery, then carefully re-seat the connector. Make sure it clicks into place and that there’s no dust or gunk messing with the socket.
Tools Used
Step 21


- Gently pry up the display cable connector using the tip of a spudger to disconnect it safely.
Tools Used
Step 22
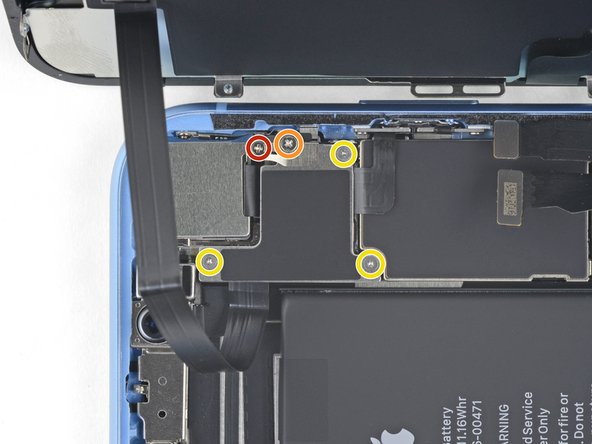

Heads up: there’s a tiny bracket clipped onto the edge, held in place with a small clip. That little guy loves to make a run for it, so keep an eye out when you remove the larger bracket!
- Unscrew the five tiny fasteners holding down the logic board connector bracket. Keep your cool—each one is a different size:
- Lift off the bracket and set it aside like the pro you are.
- One Phillips #000 screw (1.3 mm)
- One Phillips #000 screw (1.5 mm)
- Three Y000 screws (1.2 mm each)
Step 23
The shield consists of two sections, and the smaller one is quite fragile. If it breaks, your phone's NFC will be out of commission. Check out the comments below for some tips on keeping it safe and sound!
Step 24


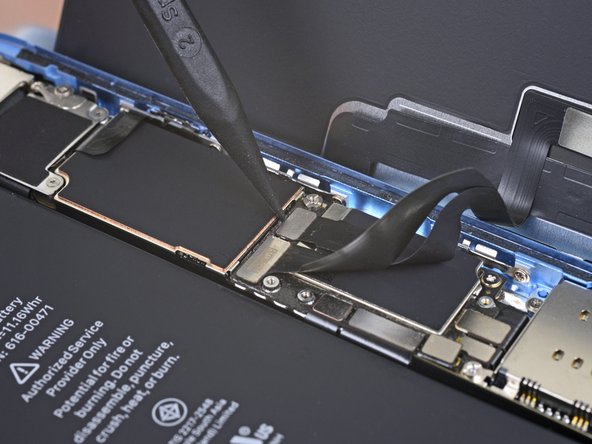
- Grab your spudger and gently pop the front sensor assembly connector out of its socket—just a little leverage, and you’re good to go!
Tools Used
Step 25

- Carefully take off the display assembly. You've got this!
- If you're thinking about swapping out that waterproof adhesive around the display edges during reassembly, now’s your moment to pause and make it happen!
Step 26

- Time to tackle those four screws holding the speaker/sensor assembly to the back of the display:
- Two Phillips screws, 1.6 mm each—like a matching pair of tiny twins.
- One Phillips screw, 2.3 mm—this one’s a little beefier.
- One Y000 screw, 1.2 mm—small but mighty, rocking that Y-shaped groove.
Step 27


The speaker is connected by a super slim flex cable. Handle it with care to avoid putting too much stress on it or causing any damage.
- Grab your tweezers and carefully flip the speaker assembly over—downwards and away from the top edge of the display. Take it slow and steady, like you're flipping pancakes on a lazy Sunday.
Tools Used

Step 28

- Grab a hairdryer, heat gun, or a heated iOpener and warm up the top front of your display for about a minute. This helps loosen up the sticky stuff that's holding the sensors in place, making them way easier to work with.
Tools Used
Step 29


- Gently slide the flat edge of your trusty spudger under the flex cable located just below the microphone. Careful now!
- Give it a little twist to help separate the microphone, but remember to be gentle so you don't put too much strain on that flex cable.
- If it's still being stubborn, use the tip of the spudger to help finish separating the microphone from its snug spot in the front panel. If it's still playing hard to get, a little extra heat might do the trick!
Tools Used
Step 30


Lift the speaker out of the way for easier access, but go gentle—the flex cable is super thin and doesn’t want to be tugged.
- Start from the left and shimmy an opening pick under the flex cable, sliding it right under the proximity sensor and flood illuminator module.
- Give it a gentle wiggle and lift to pop the module out of its spot in the front panel—not too wild, just enough to set it free.
Step 31


- Grab your tweezers and gently slide the little bracket straight up to pop it off the ambient light sensor.
Tools Used
Step 32


The sensor is still connected to the sensor assembly by a super delicate flex cable. Handle it with care to avoid any twists or breaks. You've got this!
If the sensor doesn’t come loose after a few seconds, give it a little more heat and try again. You’ve got this!
- Grab your trusty tweezers and give the ambient light sensor a gentle wiggle to loosen it up, then carefully lift it out of its cozy little notch in the display.
Tools Used
Step 33


- If you’ve managed to pull out the entire ambient light sensor (see the first photo), you’re good to head to the next step.
- If that sneaky white diffuser strip decided to stay behind, chill—it happens. Look at the second photo. You’ll want to gently pry it out from the top edge with a thin blade or pry tool. A bit of heat beforehand makes things way easier.
- When you’re putting everything back together, pop the diffuser into the display first, and make sure it’s facing the right way (front side’s in the first image, back side’s in the third—don’t mix ‘em up!).
- Now, set the ambient light sensor on top of the diffuser. Hold it steady while you screw in the earpiece/sensor assembly. Once those screws are locked in, the sensor’s not going anywhere and will work like a charm.
Step 34


- Let's kick things off by gently removing the earpiece speaker and front sensor assembly.
- As you put everything back together, take a moment to ensure that the black plastic module, which houses these components, is in the right spot:
- Make sure there’s no adhesive getting in the way of these important little parts.
- Keep an eye on the proximity sensor.
- Don't forget about the flood illuminator!
Step 35


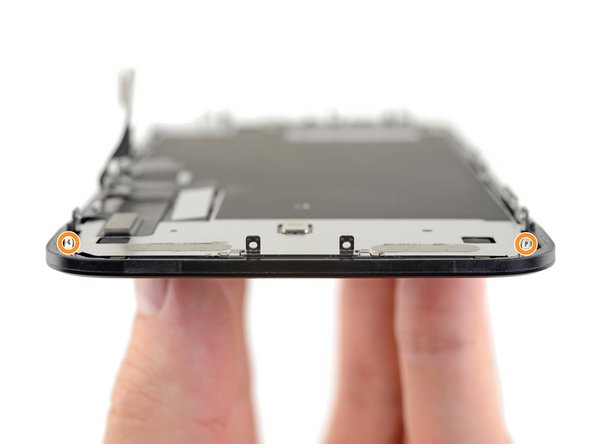
Hold your driver firmly against the screw and turn with confidence. If the screw’s being stubborn, use your spudger to support it from behind—this lets you apply extra pressure without bending the shield. Keep it steady!
- Grab your trusty Y000 driver and let's tackle those 1.1 mm screws holding the LCD shield in place:
- Start with three screws located on the side closest to the display cables.
- Then, move on to the two additional screws on the opposite side.
Tools Used
Step 36

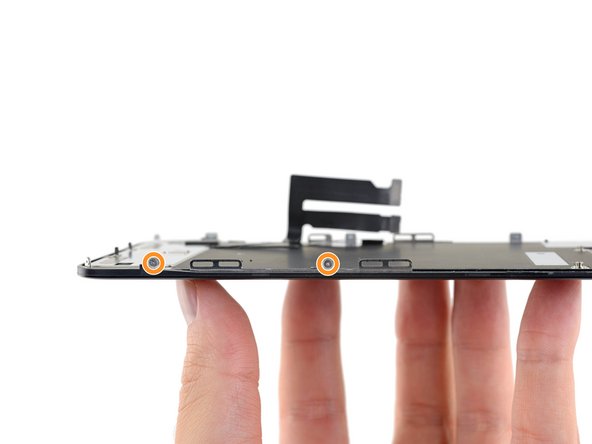
- Take out the last few 1.1 mm Y000 screws holding the LCD shield in place:
- Two screws chilling near the camera openings
- Two screws hanging out at the bottom corners
Step 37


- Warm up the back of the display with an iOpener, hair dryer, or heat gun for a few seconds—just enough to make the adhesive holding the display cables to the LCD shield less stubborn.
Tools Used
Step 38


- Slide an opening pick between the LCD shield and the display cables—like you’re sneaking into a secret club.
- Glide the pick down toward the bottom edge to start gently prying the cables apart.
- Pause when you hit the end of the first cable—no need to go overboard!
Step 39

- Slide your opening pick back in, but this time tuck it right between those two cables.
- Gently glide the pick down to the bottom edge of the display to carefully tease the cables apart.
Step 40


- Hold each cable at its sharp 90° bend and gently separate them from each other.
Step 41


- Gently peel the entire digitizer cable away from the LCD shield and give it a little fold to the side. Nice and easy, you're doing great!
Step 42


- Slide an opening pick beneath the top edge of the LCD shield and give it a gentle twist to pop it away from the display. You've got this!
Step 43


- Hold the LCD shield by its top edge and gently tilt it upward just a bit.
- With your trusty spudger, carefully press on the lower section of the display cable, nudging it through the opening in the LCD shield.
Tools Used
Step 44


- Gently lift the top edge of the LCD shield a little higher, and guide the remainder of the display cable through the opening in the shield. Keep it smooth and steady!
Step 45


- Lift the LCD shield at a steeper angle until you can spot the rest of the display cable still attached to the back.
- Slip a spudger between the LCD shield and the display cable, then gently pry them apart until they're fully separated.
Tools Used
Step 46
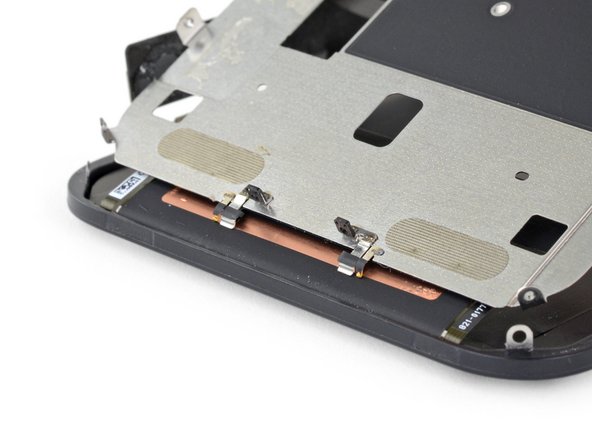

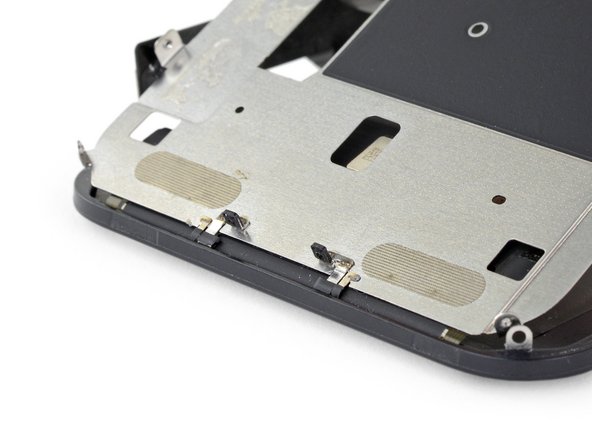
- As you gently lift the LCD shield, keep an eye out for those sneaky metal prongs at the bottom edge.
- When it's time to put everything back together, make sure those prongs, also known as EMI fingers, are snugly fitted into the LCD frame just like in the picture. You've got this!
Step 47

- Take off the LCD shield—just a gentle lift, no wrestling required!
Step 48

- Put your device back together by reversing these steps—like rewinding a DIY highlight reel.
- Give those old parts a second life by dropping them off at an R2 or e-Stewards certified recycler.
- If things didn't go quite as planned, try a little troubleshooting, or swing by our Answers forum for some extra tips. And if you’re still stuck, you can always schedule a repair with us.


