
iPhone XR Rear-Facing Camera Replacement
Duration: 45 minutes
Steps: 29 Steps
Ready to swap out your iPhone XR’s rear camera? This guide walks you through the process. For maximum workspace, we’ll show you how to fully disconnect and lift out the display—but if you’re feeling confident, you can leave the display cables attached as long as you support the screen and don’t pinch or tug those delicate connectors. Take your time, keep things steady, and you’ll have your camera switched out in no time.
Step 1


Heads up! Before you start, make sure your iPhone battery is below 25% charge. A fully charged lithium-ion battery can be a bit spicy if punctured—better to play it safe and keep things cool.
Opening up your iPhone? Keep in mind, this will mess with its waterproof seals. Be sure to have replacements on hand before you get too far, or just be extra careful with liquids if you skip the seal swap when putting it back together.
- First things first, power down your iPhone before diving in. Safety first, right?
- Grab your trusty screwdriver and remove those two 6.7 mm-long pentalobe screws at the bottom edge of your iPhone. They won’t bite!
- Now, check out the black rubber gasket just below the head of each pentalobe screw. These little guys are your first line of defense against dust and liquid. If they’re looking a bit worn out, consider swapping them out during reassembly for that extra layer of protection.
Step 2


Be careful not to push that opening pick in too far, or you might give your device a little love tap it doesn't need! A little marking on your pick will help keep things safe and sound.
Feel free to spice things up by marking the other corners of the pick with varying measurements!
Or, if you're feeling crafty, stick a coin to the pick about 3 mm from the tip. It's a quick and clever hack!
- Take your trusty ruler and measure out 3 mm from the tip, then grab a permanent marker and make a little dot on the opening pick. You're doing great!
Step 3


Pop on those safety glasses before you dive in! You’ll thank yourself later when no rogue glass pieces make a surprise appearance.
If your iPhone screen is cracked, keep the shards in check and avoid any ouch moments by taping over the glass before you start the repair.
If the suction cup won’t stick, try giving it a little superglue boost to get it to cling onto the screen.
- Stick some clear packing tape all over your iPhone's screen like you're making a protective layer of awesomeness—just make sure to cover the whole face!
- If the suction cup isn't cooperating in the next steps, grab a sturdy piece of tape (duct tape works great) and fold it into a handle to lift that screen with style!
Step 4


The next three steps showcase the Anti-Clamp, a nifty tool we've crafted to make opening your device a breeze. If you're not using the Anti-Clamp, feel free to skip ahead three steps for an alternate method.
For detailed tips on using the Anti-Clamp, check out this guide.
If your iPhone's surface is feeling a bit too slick for the Anti-Clamp to grip, a little tape can do wonders to boost traction.
- Give that blue handle a gentle tug backward to release the Anti-Clamp's arms—you're doing great!
- Slide those arms right over the left or right edge of your iPhone like you're giving it a little hug.
- Place the suction cups close to the bottom edge of your iPhone—one on the front and the other on the back. It's like a team effort!
- Squeeze those cups together to create some serious suction magic in the area you want to tackle.
Step 5


- Grab the blue handle and pull it forward to lock the arms in place.
- Now, twist the handle clockwise 360 degrees, or keep turning until you see the cups start to stretch out.
- Double-check that the suction cups stay lined up. If they slip, no worries—just loosen them a bit, realign, and tighten those arms again.
Step 6


Give the Anti-Clamp just a quarter turn at a time, then chill for a minute before going again. Patience pays off—let the tool work its magic for you!
A hair dryer, heat gun, or hot plate can step in here if needed—but keep it chill with the heat, because too much can mess with your screen or battery.
If the Anti-Clamp isn’t making enough space, hit the spot with a bit more heat and give the handle a quarter twist. Easy does it!
- Heat up your iOpener and slide it through the arms of the Anti-Clamp like you're threading a needle.
- Fold the iOpener so it sits right on the bottom edge of your iPhone, making sure it's cozy there.
- Give it a minute to let the adhesive loosen up and create a small gap — patience is key!
- Now, grab an opening pick and slide it gently between the screen and the plastic bezel. Keep away from the screen itself to avoid any mishaps.
- You can skip the next three steps — no need to sweat them!
Tools Used

Step 7

Warming up the lower edge of your iPhone can work wonders! It helps to loosen up that stubborn adhesive holding your display in place, making the opening process a breeze.
- Grab a hairdryer or heat gun, or whip up an iOpener, and gently warm up the lower edge of your iPhone for about a minute. This will help to melt the adhesive underneath like butter, making it easier for you to get in there and do your thing!
Tools Used
Step 8


- Stick your suction handle onto the bottom edge of your phone—just make sure you skip the curved part of the glass. No need to wrestle with tricky corners!
Tools Used

Step 9


The adhesive keeping your display snug as a bug is super strong, so getting that first gap open takes some serious elbow grease! If you're struggling to make it happen, don't sweat it—just heat things up a bit more and gently wiggle the screen up and down. That should help loosen the adhesive until you've got just enough room to slide your tool in there. You've got this!
- Gently pull up on the suction cup with steady, even pressure to create a tiny gap between the front panel and rear case. Don’t rush it!
- Carefully slide an opening pick under the screen and the plastic bezel—avoid poking the screen itself!
Step 10


Be careful not to insert your pick deeper than 3 mm. Going too far might cause some unintended damage to the delicate internal parts.
- Take your opening pick and glide it smoothly along the lower left corner, then cruise up the left edge of your iPhone—cutting through that stubborn adhesive that’s holding the display down. Keep it steady and don’t rush, you’ve got this!
Step 11

Heads up! There's a bunch of delicate cables along the right edge of your iPhone. Avoid inserting your pick at the marked spots, or you might accidentally damage these cables. Be careful!
Step 12


Keep your pick insertion to under 3 mm to avoid nicking those delicate display cables — better safe than sorry!
- Slide your trusty pick back in at the bottom edge of the iPhone and give it a little nudge up the right side to keep breaking that adhesive apart. You got this!
Step 13


Handle with care—apply just the right amount of pressure, or those clips might snap like a twig. Patience is key!
Keep that pick within 3mm—any deeper and you could accidentally mess with the front panel's sensor array. A little finesse goes a long way.
The top edge of the display is held in place with a combination of super sticky glue and trusty clips. Let's tackle this together!
- Gently slide that opening pick around the top corner of your display, while giving it a little tug or wiggle downward toward the Lightning port. You're doing great!
- Now, slide that pick over to the opposite corner and cut through any leftover adhesive clinging to your display. Almost there!
Step 14

- Give that little nub on the suction cup a gentle tug to pop it off the front panel. You've got this!
Step 15


Hold off on pulling the display all the way off just yet—there are still some delicate ribbon cables hooking it up to the iPhone’s logic board.
- Flip open your iPhone by swinging the screen up from the left, just like cracking open a hardcover book—minus the plot twist.
- Prop the display up against something sturdy so it stays put while you work your magic.
- When putting it all back together, rest the display in place, line up those clips along the top edge, and gently press the top in first before snapping down the rest. If it doesn’t snap in smoothly, double-check the clips around the edge to make sure none of them are bent or out of shape.
Step 16


Keep a close eye on every single screw during this repair—each one has a special spot it belongs to, and mixing them up could spell trouble for your iPhone.
- Take out the three 1.2 mm Y000 screws holding down the battery connector cover bracket. These guys are tiny, so keep them safe!
- Lift off the bracket and set it aside like the VIP it is.
- When putting things back together, this is your moment to power up your iPhone and do a quick check to make sure everything's working. Once you’ve confirmed, power it down again before sealing up the display—no surprises, just smooth sailing!
Step 17


Be gentle with the black silicone seal that hugs this and other board connections. These little guardians are here to keep water and dust at bay, so treat them with care!
- Gently use the spudger tip to lift the battery connector straight out of its socket. Take it slow, we don't want any accidents here.
- Once it's lifted, give the connector a tiny bend away from the logic board. This little move will stop it from accidentally reconnecting and powering up the phone while you're working your magic.
Tools Used

Step 18


- Zip out those two 1.2 mm Y000 screws holding the display connector bracket.
- Lift the bracket off like you’re revealing a secret compartment.
Step 19

- Gently use the tip of a spudger to lift and unplug the digitizer cable.
- When reconnecting press-fit connectors like this one, line up one side carefully and press down until you hear a click, then do the same on the other side. Avoid pressing the middle to prevent bending pins and causing damage.
- If your screen isn’t responding to touch after the repair, try disconnecting the battery and reseating this connector, making sure it clicks fully into place and the socket is clean and clear of dust.
Tools Used
Step 20


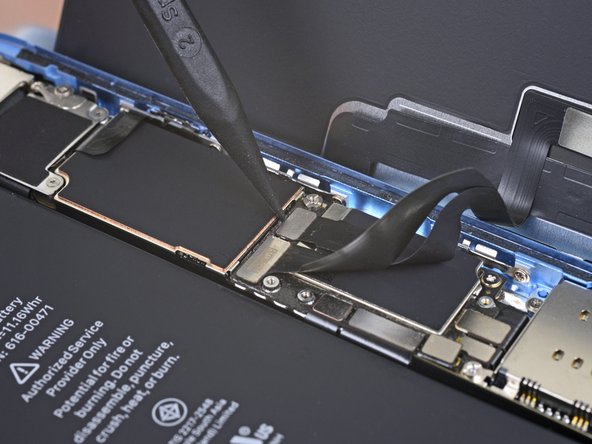
- Grab your spudger and gently pop off the display cable connector—nice and easy does it!
Tools Used
Step 21
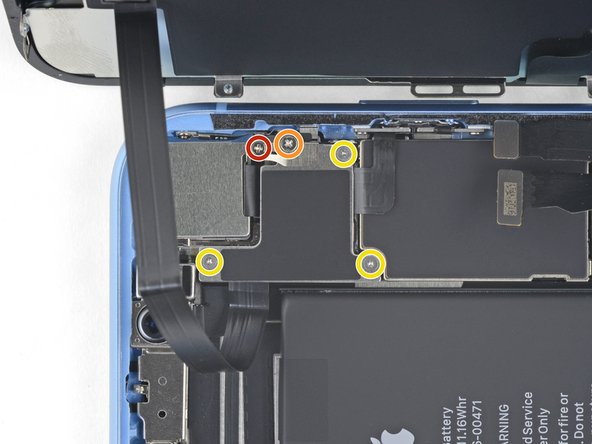

Watch out for that tiny bracket on the edge! It's held in place by a little clip, and it can easily jump ship from the larger bracket if you're not careful. Keep an eye on it so it doesn't go missing on you!
- Unscrew the five little guardians holding the logic board connector bracket to the back shell:
- Lift off the bracket like a champ.
- You’ll find one 1.3 mm Phillips #000 screw
- One 1.5 mm Phillips #000 screw
- And a trio of 1.2 mm Y000 screws
Step 22
Heads up: the shield has two parts, and that small one is super easy to accidentally wreck. Busting it means your phone's NFC won’t work. Check out the tips below for clever ways to dodge any mishaps.
Step 23


- Gently use the spudger's tip to lift the front sensor assembly connector out of its socket.
Tools Used
Step 24

- Take out the display assembly.
- When putting it back together, this is a great stopping point if you want to swap out the waterproof adhesive around the display edges.
Step 25

In a pinch, a small flathead screwdriver can save the day! Just be careful not to let it slip and cause any damage to nearby parts.
To tackle standoff screws, grab an iPhone standoff bit and driver handle—these little guys love the right tool!
- Let's start by taking out the two screws holding the rear camera cover in place:
- One 1.6 mm Phillips screw
- One 2.4 mm standoff screw
Step 26

- Gently pop the camera cover straight up and off to reveal what’s underneath.
Step 27


- Gently use an opening tool or your fingernail to lift the camera cable connector straight up from its socket to disconnect it.
Step 28


- Slide the tip of a spudger into the top left corner of the camera, right between the camera module and the iPhone’s frame.
- Carefully pry upwards to pop the camera free from the iPhone.
Tools Used
Step 29

- Put your device back together by simply reversing the steps above.
- Dispose of your e-waste responsibly by taking it to an R2 or e-Stewards certified recycler.
- If things didn’t go quite as planned, swing by our Answers community for some extra troubleshooting help, or if you’re stuck, you can always schedule a repair.


