Lexibook Junior Tablet Camera Replacement
Duration: 45 minutes
Steps: 11 Steps
Get ready to breathe new life into your device with this intermediate repair guide from Salvation Repair! You won’t need any soldering skills, but be prepared to swap out the motherboard and battery. Don’t worry, we’ve got you covered with this step-by-step guide. If you need help along the way, you can always schedule a repair.
Step 1

Power your device down before you get started—no one wants a zappy surprise!
– Flip your device over so the screen is face down. Grab your trusty metal spudger and gently pop off the small rubber circles from each of the four corners. You’ll reveal the screws hiding underneath, ready to be tackled.
– Next, use the spudger to pry up the long, skinny rubber strip on the back of your device. This will uncover even more screws waiting to be dealt with.
Tools Used


Step 2

– Grab your trusty Phillips #00 screwdriver and remove the four 6.8mm screws from each corner of your device. Don’t lose them, they’re important!
– With the same screwdriver, go ahead and take out the three screws hiding behind the rubber rectangle. These guys won’t come out completely, but they’ll need a little turn to let you move on.
– Now, take your plastic opening tool and gently work your way around the back panel. A little patience here will get the job done, and soon you’ll have the back open!
Tools Used

Step 3

Take your time with this step! Be extra careful not to damage the battery or metal plate—your trusty nylon spudger is your best friend here. Patience pays off, so go slow and steady for the best results. You’ve got this!
– Grab your nylon spudger and slide it gently under the battery—just a little prying action to lift it out, easy does it!
Tools Used
Step 4

Need a hand with soldering? Check out Salvation Repair’s Soldering Guide for some handy tips!
– Grab your trusty soldering iron and carefully detach that battery from the motherboard. You’ve got this!
Tools Used

Step 5


– Grab your trusty plastic opening tool and nudge those two small black-and-white switches outward—yep, toward the ribbon wires. Be gentle, no need for heroics!
– Now, take it slow and slide the ribbon wire right out of the switch. You got this!
Step 6

– Gently nudge the larger black and white strip that leads to the ribbon wire upward with your trusty plastic opening tool.
– Carefully coax the ribbon wire out of the switch.
Step 7
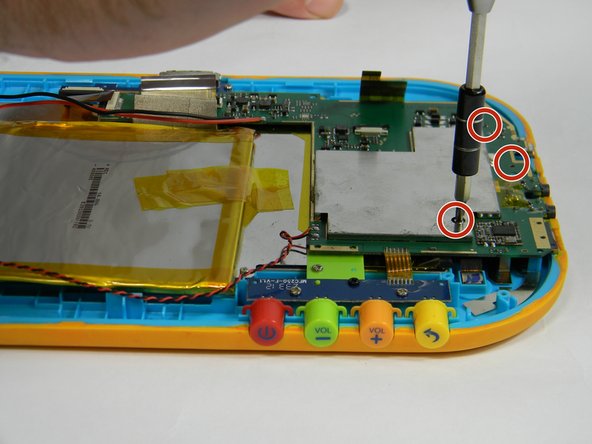

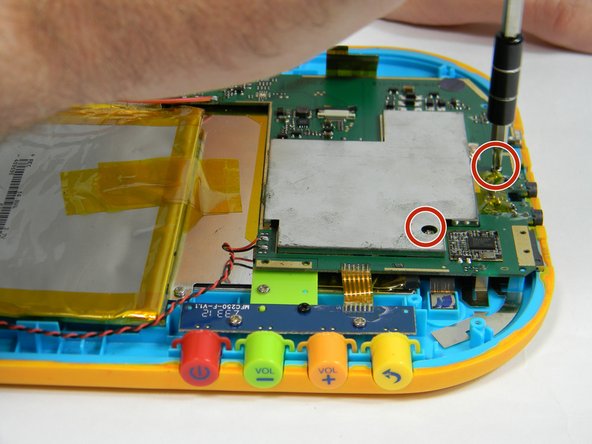
– Grab your trusty PH00-sized Phillips head screwdriver and unscrew the five 4 mm screws that are scattered around the motherboard. Keep them safe, you’ll need them soon!
Step 8
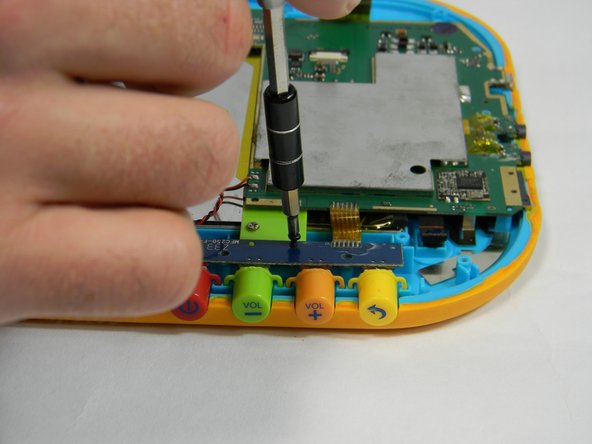

– Say goodbye to that button board! Just unscrew those two 4 mm screws and one 6.5 mm screw, and it’s all yours. You’ve got this!
Step 9

Need to solder like a pro? No sweat! Grab your soldering iron and dive in. A steady hand and a little patience go a long way in making solid, reliable connections. Remember—practice makes perfect!
– Carefully desolder the wire connections linking the motherboard to the speaker.
Step 10

Removing this black and white clip is a breeze – it works just like the large clip on the motherboard, so you’ve got this!
– Grab your trusty plastic opening tool and gently nudge the black and white clip that’s keeping the ribbon wire snug for the camera. You’ve got this!
Step 11

– To wrap things up, simply reverse the steps you followed to take your device apart. Easy peasy!
– If you need help or have any questions, you can always schedule a repair with the experts at Salvation Repair.
