
iPhone X Bluetooth Antenna Replacement
Duration: 45 minutes
Steps: 68 Steps
Get ready to dive into the world of Bluetooth antennas! This guide will walk you through the steps to swap out that old antenna and get your device back to its wireless glory. Let’s make those connections strong again!
Step 1


- Grab a SIM card ejector tool or even a paperclip, and gently slide it into the small hole on the SIM tray near the edge of your iPhone. It's like unlocking a little secret compartment.
- Apply a bit of pressure to pop the tray out. No need to Hulk-smash it—just a firm press and you'll be good to go!
Tools Used

Step 2


The SIM card is likely to slide right out of the tray with minimal effort.
- Pop out that SIM card tray from your iPhone like you mean it! It's a quick flick of the wrist.
- When you're putting the SIM card back in, make sure it's facing the right way—it’s not a game of Tetris!
- Don't forget about that thin rubber gasket snugly around the SIM tray. It's like a superhero cape for your phone, keeping water and dust at bay. If it's looking worse for wear or missing altogether, swap it out or replace the whole SIM tray to keep your iPhone safe and sound.
Step 3

Heads up! Before diving in, make sure your iPhone battery is below 25%. A fully charged lithium-ion battery can get a little spicy—like, catch fire or explode spicy—if poked the wrong way.
Popping open your iPhone’s display will break the waterproof seals. Make sure you have replacement seals on hand before going any further, or be extra careful to keep liquids away if you’re putting it back together without swapping the seals.
- Start by powering off your iPhone—it's always a good idea to play it safe.
- Grab your screwdriver and remove the two 6.9 mm-long pentalobe screws at the bottom of the iPhone. Keep them safe—you’ll need them later!
- If the screws look a bit worn out or damaged, no worries! Just swap them for some fresh ones.
Step 4


Pushing your opening pick in too deep can cause damage—mark your pick to keep things safe and sound.
Feel free to add marks on the other corners of your pick for different depths.
Or, stick a coin on your pick about 3 mm from the tip to act as a handy depth guide.
- Grab your opening pick and measure 3 mm from the tip. Mark that spot with a permanent marker to keep things nice and neat.
Step 5


Pop on some safety glasses—nobody wants a surprise glass confetti moment while you're working on your device!
Got a cracked screen on your iPhone? No worries! Just put some tape over the glass to keep things together and avoid any mishaps while you tackle the repair.
If you're really in a bind, a little superglue on the suction cup can help it stick to the screen. Just make sure to be careful!
- Layer strips of clear packing tape across your iPhone screen—make sure every inch is covered like you're wrapping a snack for later.
- If the suction cup refuses to cooperate, grab some duct tape, fold it into a sturdy handle, and gently lift the screen with your DIY tape grip.
Step 6


Ready to meet the Anti-Clamp? The next three steps showcase this handy tool, designed to make opening your device way less of a struggle. Not using the Anti-Clamp? Jump ahead by three steps for an alternative approach.
Want the full rundown on working with the Anti-Clamp? Check out our guide for all the details.
If your iPhone’s surface is too slick for the Anti-Clamp to grip, slap on some tape to give it extra traction.
- Pull the blue handle back to release the Anti-Clamp's arms.
- Slide the arms onto either the left or right edge of your iPhone.
- Place the suction cups near the bottom edge of the iPhone—one on the front and one on the back.
- Press the cups together to create a strong grip on the area.
Step 7


- Slide the blue handle forward to lock those arms in place.
- Rotate the handle clockwise a full 360 degrees—or until you see the cups start to stretch a bit.
- Keep the suction cups lined up like best buddies. If they start to drift apart, just loosen them a little, realign the arms, and you’re good to go.
Step 8


Take it easy! Twist no more than a quarter turn at a time, and give it a minute to chill between turns. Let the Anti-Clamp and a little patience do their magic for you.
Feeling a bit chilly? You can turn up the warmth with a hair dryer, heat gun, or hot plate—but remember, too much heat can harm your display and internal battery, so keep it cozy and proceed with caution!
If the Anti-Clamp isn’t doing its magic and creating enough space, just add a little more heat to the area and give that handle a quarter turn. You've got this!
- Warm up your iOpener and slip it between the arms of the Anti-Clamp—like threading a needle, but way less stressful.
- Bend the iOpener so it cozies up to the bottom edge of your iPhone.
- Hang tight for a minute to let the magic happen—this gives the adhesive a chance to loosen up and show you a nice little gap.
- Slide an opening pick underneath the screen and the plastic bezel (not the actual screen—let’s keep things chill).
- Go ahead and skip the next three steps. You’re cruising right along!
Tools Used

Step 9

Keep the heat in check! Too much heat from a hairdryer or heat gun could end up frying your screen, and we don’t want that. Stay cool and steady.
Warming up the bottom edge of your iPhone gives that stubborn glue a chance to loosen its grip, making it way easier to pop the display open.
- Grab a hairdryer, heat gun, or an iOpener and gently warm up the lower edge of your iPhone for about a minute to loosen the adhesive underneath.
Tools Used
Step 10


- If you're rocking a single suction handle, stick it to the bottom edge of your phone, but steer clear of that curved glass section!
Tools Used

Step 11


The watertight adhesive that keeps the screen snugly in place is pretty tough; making that first gap requires a bit of muscle. If you're struggling to get it open, crank up the heat a bit and gently wiggle the screen up and down to loosen that adhesive until you can slide your tool in there. You've got this!
- Gently pull up on the suction cup with steady pressure to give yourself a small gap between the screen and the frame.
- Carefully slide an opening pick into that gap, making sure to stay under the screen’s plastic bezel, not the screen itself.
Step 12


Keep your pick insertion under 3 mm to avoid any oopsies with the delicate internals.
- Gently slide the opening pick around the lower left corner and work your way up the left edge of the iPhone, carefully cutting through the adhesive that's keeping the display in place. Take your time and be gentle—you’ve got this!
Step 13

Heads up! The right edge of your iPhone is home to some super delicate cables. Skip inserting your pick here—those cables aren’t fans of surprises.
Step 14


Keep your pick to a max of 3 mm—going deeper might just tick off those delicate display cables.
- Slide your pick back into the lower edge of the iPhone, and gently glide it up the right side to keep peeling away that pesky adhesive.
Step 15


Take it easy with the clips—they're fragile! A little patience goes a long way.
Don't go deeper than 3mm with your pick, or you might accidentally mess with the front panel sensor array. Keep it light!
The top edge of the display is held in place with a combination of glue and clips, creating a snug fit.
- Carefully slide the opening pick around the top corner of the display, while gently pulling or wiggling the display downward toward the Lightning port.
- Next, move the pick to the opposite corner and slice through any leftover adhesive holding the display in place.
Step 16

- Grab the tiny tab on the suction cup and give it a gentle pull to pop it off the front panel.
Step 17


Hold your horses before fully separating the display! There are some delicate ribbon cables still linking it to the iPhone's logic board. Let's be gentle here.
As shown in the picture, ensure the frame comes off with the display and doesn't get stuck in the device. We want a smooth exit!
- Flip open your iPhone by swinging the screen up from the left side, just like cracking open a book.
- Prop the display against something sturdy so it stays put while you work your magic.
- When you're putting it all back together, lay the screen in place, line up the clips along the top, and gently press the top edge in before clicking the rest into position. If it refuses to snap in smoothly, check the clips around the edge to make sure none are bent or out of shape.
Step 18

During this repair, make sure to keep an eye on every screw and return it to its original spot to keep your iPhone safe and sound.
- Time to get to work! First up, let's tackle those five Y000 screws holding the logic board connector bracket in place. Here's the lineup of screws you'll be removing:
- Three tiny 1.1 mm screws
- One slightly bigger 3.1 mm screw
- And one even bigger 3.7 mm screw
Step 19

The bracket might be sticking around with a bit of adhesive. Give it a gentle lift with steady hands—it’ll come loose with a little patience.
- Pop off the bracket with a smile! You're doing great! And hey, before you put everything back together, why not power up your iPhone and give all those functions a little test drive? Just remember to turn it off completely before you dive back into the repair magic!
Step 20


Be careful not to mess up the black silicone seal around this and other board connectors. These little guys are the unsung heroes that keep water and dust from crashing the party inside your device.
- Grab a spudger or your trusty clean fingernail and gently nudge that battery connector up from its cozy home on the logic board.
- Once it's up, give the connector a little bend away from the logic board. This way, it won't accidentally reconnect and power up your device while you're working your magic.
Tools Used

Step 21


- Gently pry up the front panel sensor assembly connector using a spudger tip or your fingernail to unplug it.
Tools Used
Step 22


- Grab your trusty spudger or just your fingernail to gently unplug that OLED panel cable connector. You've got this!
- When it's time to reattach, simply align those connectors like a pro! Start by pressing down on one side until you hear that satisfying click, then do the same on the other side. Remember, no pressing down in the middle! If things get misaligned, those tiny pins can bend and that's a no-go. Keep it neat and tidy!
Tools Used
Step 23


- Pop up the digitizer cable connector using the pointy end of your spudger.
- Getting this connector back in can be a bit of a puzzle since it's tucked away. Take it easy, line it up, and gently press it down with your finger—try one side, then the other. You'll feel a satisfying click when it's set.
- If your screen seems to be having a touch tantrum after reassembly, unplug the battery and give this connector another go. Make sure it clicks in nicely and there's no dust or debris lurking in the socket.
Tools Used
Step 24


The front panel sensor assembly flex cable is gently stuck in place.
- Gently peel up the cable—think of it like removing a sticker from your favorite notebook—just until the adhesive lets go.
Step 25

- Take off the display assembly—nice and easy!
- If you want to refresh the waterproof adhesive along the edges, now's your moment before putting everything back together.
Step 26


Watch out for those three rows of grounding pads near the bottom of the iPhone. They're pretty sensitive, so give them some space and keep your hands clear.
- Take out the seven screws holding down the bracket under the Taptic Engine and speaker:
- Two Y000 1.9 mm screws
- One Y000 1.2 mm screw
- One Y000 1.6 mm screw
- One Phillips 2.4 mm screw
- One Phillips 1.7 mm screw
- One Phillips 1.5 mm screw
Step 27


- Gently lift the bracket from the side closest to the battery. No need to fully detach it, as it's still hanging on by a tiny flex cable.
Step 28


- Gently hold the bracket aside and grab your spudger to carefully lift up and disconnect the flex cable hiding underneath. Nice and easy—you're doing great!
Tools Used
Step 29

- Take off the bracket.
Step 30


- Grab your trusty Y000 screwdriver and take out the 2.1 mm screw that's holding down the speaker connector cover. One screw down, you're on a roll!
Step 31

- Gently lift off the speaker connector cover.
Step 32


- Gently use the spudger's tip to lift and detach the speaker connector. You've got this!
Tools Used
Step 33


When popping off the speaker, be extra careful not to snag the flex cable you just disconnected. If it gets in the way, gently move it aside so the speaker can slide out without a hitch.
- Slide a spudger carefully under the top edge of the speaker near the edge of the iPhone’s case.
- Gently lift the top edge of the speaker to free it from its spot.
- When putting the speaker back, double-check the flex cable’s position to ensure it isn’t getting pinched under the speaker.
Tools Used
Step 34


- Grab the speaker by its sides and give it a little wiggle to break the adhesive that's holding it tight to the bottom of your iPhone.
- Now, gently pull the speaker away from the bottom edge until you hear that satisfying pop of the adhesive letting go.
Step 35


- Take out the speaker with care.
Step 36


To keep your fingers safe from the sticky stuff, make sure to hold the gasket only by the outer edges of the liner.
- The speaker’s gasket is a one-way ticket—once it’s off, it’s not making a comeback. Get ready to swap in a fresh one during reassembly.
- Grab your tweezers and remove every bit of the old gasket from both the frame and the speaker. No stragglers allowed.
- Take a microfiber cloth and a splash of isopropyl alcohol to clear away any sticky leftovers from the frame and the speaker. Make it spotless.
- Before sticking on the new gasket, check its vibe—the big cutout lines up with the speaker grille mesh at the bottom.
- Peel off the bigger, clear liner from the gasket, then use tweezers to set it perfectly into place on the bottom of the speaker.
- Press the gasket down firmly with your fingers or a spudger so it’s locked in with the adhesive. No lifting corners.
- Peel off the last liner, position the speaker where it belongs, and double-check that the speaker connector isn’t hiding underneath. Almost there!

Step 37


- Take out the 2.3 mm Phillips screw holding down the Taptic Engine—easy does it!
Step 38


- Grab your trusty spudger and gently pop the Taptic Engine flex cable up from its socket like you're lifting a lid off a pot. Easy does it!
Tools Used
Step 39

- Say goodbye to the Taptic Engine! It's time to gently lift it out and make way for your next repair adventure.
Step 40

The battery of the iPhone X is held snugly in place by four strips of stretch-release adhesive—one at the top and three at the bottom. Let's tackle this together!
- Each adhesive strip has a nifty black pull-tab on one end, gently stuck to the edge of the battery. Just give it a gentle pull and watch it do its thing!
Step 41


Avoid poking the battery with sharp tools, folks! A battery that's been punctured could spill some nasty stuff or even catch fire. Let's keep things safe and sound!
Each tab has a little loop in the middle—if you're having trouble getting a good grip on it, just slide a tool through that loop to make things easier!
- Gently peel away the first battery adhesive tab from the bottom edge of the battery. You've got this!
Step 42


Be careful not to mess up the speaker cable connector just below the center adhesive tab. We want everything to stay in tip-top shape!
- Now, let’s get those last two adhesive tabs off the bottom edge of the battery! Go ahead and repeat the previous step, and you’ll be one step closer to a battery that’s ready to rock and roll!
Step 43


No worries if the strips decide to be a bit dramatic and break! They don’t always play nice. Just hang tight and check out some extra steps to help you tackle those pesky broken strips.
In these next steps, you'll gently pull each tab to slowly stretch the adhesive holding the battery down. This clever stretch-release adhesive loses its grip as it stretches, coming right out in your hand so you can easily lift the battery free.
- Let’s set you up for a smooth ride:
- If one of the strips snaps off under the battery and you can’t fish it out, don’t sweat it—just move on to the next strip and use the tips below.
- No need to squish the battery—grip your iPhone by the sides like you’re holding a burger.
- Keep those strips stretched out nice and flat as you pull, like you’re tugging a ribbon.
- Go slow and steady—give each strip a good 15-30 seconds to stretch and do its thing.
- Keep your pull low and close to the table so the strip doesn’t catch on the battery’s bottom edge.
Step 44


If any of the adhesive strips decide to play hide and seek under the battery and you can’t fish them out, just go ahead and remove the leftover strips, then keep following the steps below like a pro!
The strip is surprisingly stretchy—keep pulling and if you run out of room, just grab closer to the battery and keep going.
If the adhesive tabs snap, don’t sweat it. Use your fingers or a pair of blunt tweezers to catch and pull the rest of the sticky strip.
- Take one of those outer battery adhesive tabs and gently pull it away from the battery, guiding it toward the bottom of the iPhone.
- Keep a steady pull going, applying constant tension on the strip until it slides right out from between the battery and the rear case.
Tools Used
Step 45


- Do the same thing for the strip on the other side—save the middle strip for the grand finale.
Step 46


- Gently lift the center strip, and make sure to steer clear of the speaker flex cable—you don’t want it getting in the way of your repair groove!
Step 47


Be careful with the last pull tab, as it's super close to the Face ID hardware. If you accidentally damage it, Face ID repairs can only be handled by Apple. So, take your time and proceed with caution!
- Carefully peel back the pull tab on the last adhesive strip along the top edge of the upper battery cell to get it ready for the next step.
Step 48


The battery pull tab might snap back and launch the battery when it detaches from the iPhone, so keep a hand gently resting over the battery to keep it in place—but don’t press down directly on the battery, as too much pressure could cause the adhesive strip to tear beneath it.
Avoid prying the battery out with force. If the adhesive is being stubborn, drop a little more alcohol to loosen it up. Never bend or poke the battery with your pry tool—it’s not a stress test.
Watch out for the ribbon cables and the wireless charging coil right under the battery; they’re delicate and don’t like to be messed with.
If the sticky stuff under your battery snaps and you can’t fish it out, try dripping a little high-strength (over 90%) isopropyl alcohol under the battery edge where the strip broke. That’ll help loosen things up.
If you want to try a different trick to free the battery from its cozy spot, head to the next step.
- Time to say goodbye to that last sticky strip! Pull it out and toss it away.
- If you've managed to remove all four of those pesky adhesive strips, you're in the clear and can skip ahead to the next step.
- Now, hang tight for about a minute while the alcohol solution does its magic and loosens up that adhesive. Once that's done, grab the flat end of your trusty spudger and gently nudge the battery up and out.
Tools Used
Step 49


If you're using pry tools to lift the battery, take it slow—there are some delicate ribbon cables and the wireless charging coil just chilling under there. No sudden moves!
Warm up the back of your iPhone until it’s almost too hot to touch (think fresh pizza, not lava). Don’t get carried away with the heat, or you could end up with a surprise battery bonfire.
- If any adhesive strips snapped and the battery is still glued to the back, grab an iOpener or a hair dryer and warm up the rear case right behind the battery.
- Turn the iPhone face up again and slip a sturdy string (like dental floss or thin guitar string) underneath the battery.
- Gently saw the string back and forth along the battery’s length to loosen that stubborn adhesive. It might take a bit of patience since the glue is pretty tough, but keep at it and the battery will come free. Just be careful not to bend or damage the battery.
- Wrap the string ends around a cloth or wear gloves to keep your fingers safe while you work.
Tools Used
Step 50

- Grab the battery from the lower edge and lift it out of your iPhone—easy does it!
- Spot any leftover alcohol solution? Gently wipe it away, or just let it chill and air dry before popping in your shiny new battery.
- Slide the Taptic Engine and speaker back into place before the new battery goes in. They’ll help keep everything lined up perfectly.
- Before you stick in the replacement battery, plug its connector into the logic board socket for a quick test fit. This way, your battery lands exactly where it should.
- No adhesive on your new battery? No worries—check out Salvation Repair’s guide for fresh adhesive strips.
- Once you’ve put it all back together, do a force restart. It’s a quick trick that knocks out weird glitches and makes troubleshooting a breeze.
- Stick down the battery, unplug it, and keep reassembling your device. You’re nearly done!
Step 51


- Grab your trusty spudger and gently pry away the three front camera cables:
- The dot projector (it’s the little guy with some serious tech inside).
- The front camera (the one that makes you look good in selfies).
- The infrared camera (so it can see you even when the lights are off).
Tools Used
Step 52


The camera cables are gently stuck to the midframe, so give them a little nudge to free them up.
- Grab your spudger and gently slide the tip between the IR camera cable and the case, starting at the connector. This will help you separate the cable from the case smoothly.
- Do the same for the front camera cable. A little patience goes a long way here.
Tools Used
Step 53

- Warm things up a bit to make that sticky adhesive on the front camera assembly loosen its grip.
Step 54


- Carefully lift out the front camera assembly to keep things moving smoothly.
Step 55

- It's time to unplug some connections! Let's get started by disconnecting these cables:
- The WiFi Antenna connector.
- The Wide-Angle Camera connector.
- The Power Button / Flash / Microphone connector.
- The Telephoto Camera connector.
- The Dock Flex connector.
- The Button / Wireless Charging connector.
- The Cellular Antenna connector.
Step 56


- Unplug that WiFi Antenna cable connector like a pro!
Step 57

- Gently pop off the Wide-Angle Camera cable connector—like unplugging a tiny, high-tech seatbelt.
Step 58


- Unplug the cable connector for the Power Button, Flash, and Microphone—let’s give those parts a little breather!
Step 59


- Gently detach the Telephoto Camera cable connector. Nice and easy, just a little tug and you're good to go!
Step 60


- Gently unplug the Dock Flex cable connector.
- Carefully bend the cable straight up at a 90-degree angle to make room for the logic board removal.
Step 61


- Unplug the Button / Wireless Charging cable connector like you're giving it a little vacation!
Step 62


- Unplug that Cellular Antenna cable connector like a pro!
- Gently nudge the cable to the side, giving it a little room to breathe.
Step 63


Pop that metal grounding tab back in just like it was before—same direction, same spot. Little details like this keep your device happy!
- Before we dive in, let's make sure the SIM card tray is out of the way! The logic board won't budge with it in place, so if you missed that step, now's the time to pop it out.
- Next up, grab your trusty Phillips screwdriver and remove those two mounting screws. We’re almost there!
- Now, let's tackle that 2.0 mm Phillips grounding screw. It’s a small but important part, so don't overlook it!
- Time to say goodbye to the grounding tab. Just gently remove it and keep going!
- You’ll need to unscrew one 2.7 mm Phillips screw next. Just a little twist and it’ll be free!
- Lastly, let’s get that 2.1 mm Phillips screw out of the way. Almost done!
Step 64

- When you pop out the SIM card, a sneaky little pin slides out from the frame and gives the eject lever a nudge in the SIM card carrier. Make sure to push that pin back into the frame, so it doesn’t get in the way when you’re taking out the logic board.
Step 65


- Grab your fine tip tweezers and give that SIM card eject lever a gentle slide toward the edge of the case.
- Once you’re done, the lever should be out of the way—the pin won’t be blocking the logic board anymore, making things smooth for the next step.
Tools Used
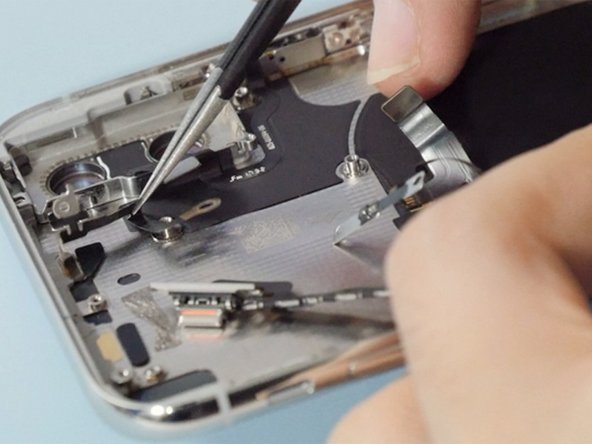
Step 66


- The logic board assembly sits on two posts that poke through the lower board and latch onto the upper board. To get it out, lift it straight up evenly so it slips right off the stand-offs, no sideways wiggle needed.
Step 67
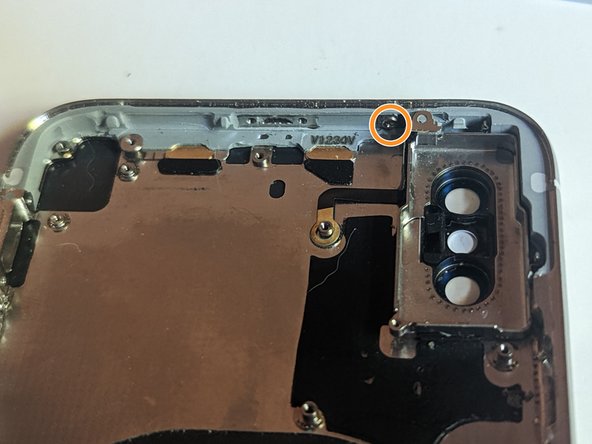

- Unscrew the 2.3 mm Phillips screw holding the antenna onto the rear camera frame. Keep that screw safe!
- Next, take out the 1.5 mm Phillips screw securing the antenna to the case. Almost there!
Step 68
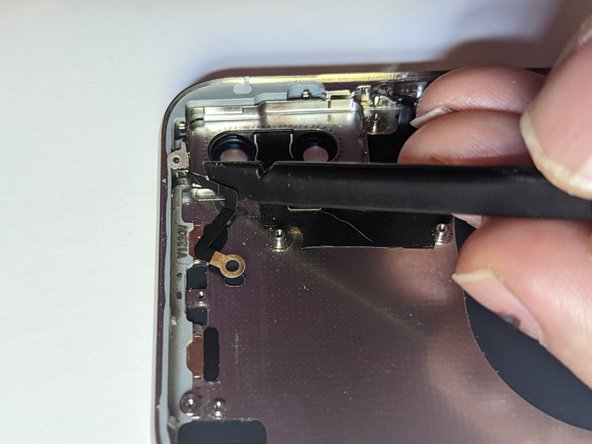

- Ready to put everything back together? Just reverse the steps above and you'll be all set. If things get tricky or you want a pro to handle it, feel free to schedule a repair!
