iPhone 8 Plus Front Camera and Sensor Cable Replacement
Duration: 45 minutes
Steps: 37 Steps
Ready to give your iPhone 8 Plus a little TLC? This guide will walk you through replacing that pesky front camera. But hold on—this isn't just any camera! It's part of a snazzy assembly that includes a microphone and those nifty proximity/ambient light sensors, all bundled together for a seamless swap. Let’s dive in and get that front camera shining bright again!
Step 1
Heads up! Lower your iPhone’s battery to under 25% before starting. If a lithium-ion battery gets punctured while charged, it can turn into a fiery little drama—literally. Stay safe and keep that charge low!
Popping open your iPhone's display will break its waterproof seals. Make sure you’ve got replacement seals handy before moving forward, or be extra careful to keep liquids away if you’re putting it back together without swapping the seals.
- Shut down your iPhone before you get hands-on—no one likes surprises.
- Unscrew those two 3.5 mm pentalobe screws hanging out by the bottom edge of your iPhone. They're small but mighty!
Step 2
Be careful not to push your opening pick too deep, as it could harm your device. Use this step as a guide to mark your pick and keep everything safe and sound.
Feel free to label the other corners of the pick with various measurements for extra precision.
Another fun tip is to attach a coin to your pick about 3 mm from the tip using tape.
- Grab your opening pick and measure out 3 mm from the tip. Hit that spot with a permanent marker so you know exactly where to stop. Precision is the name of the game!
Step 3
Pop on some safety glasses to keep those surprise glass shards from saying hello to your eyes while you work your magic.
Got a cracked iPhone screen? No worries! To keep the shards in check and avoid any accidental pokes, just grab some tape and cover that glass up. Safety first, right?
And if you're in a real pinch, you can always superglue that suction cup right to the screen. Just a little creativity goes a long way!
- Grab some clear packing tape and lay down overlapping strips over your iPhone's screen until it’s fully covered. You’re basically creating a protective shield!
- If the suction cup isn’t playing nice in the next steps, no worries! Just fold a sturdy piece of tape (like duct tape) into a handy handle and use that to lift the screen instead. You've got this!
Step 4
The next few steps show off the Anti-Clamp – a handy tool we designed to make opening things a breeze. If you’re not using the Anti-Clamp, no worries! Just skip ahead three steps for a different method.
Want a detailed walkthrough on using the Anti-Clamp? Check out our full guide right here.
If your iPhone's surface is being a little too slippery for the Anti-Clamp to grip, just use some tape to add extra traction and you're good to go!
- Give that blue handle a gentle tug backward to free the Anti-Clamp's arms.
- Slide those arms over the left or right edge of your iPhone like a pro.
- Place the suction cups right above the home button on the bottom edge of your iPhone—one on the front and the other on the back.
- Squeeze those cups together to create a solid grip on your chosen spot!
Step 5
- Slide the blue handle forward to lock those arms in place.
- Rotate the handle clockwise a full circle or until the suction cups begin to stretch out.
- Keep an eye on the suction cups to make sure they stay perfectly lined up. If they start to drift, just loosen them a bit and realign the arms.
Step 6
Take it easy! Only twist a quarter turn at a time and chill for a minute between each turn. Let the Anti-Clamp do its thing and enjoy the process!
Feel free to reach for a hair dryer, heat gun, or hot plate—but keep in mind that too much heat can mess with your screen and battery, so take it easy!
If the Anti-Clamp isn’t making enough space, give it another blast of heat and twist that handle a quarter turn.
- Warm up that iOpener and slide it through the arms of the Anti-Clamp like a pro!
- Bend the iOpener so it rests on the bottom edge of your iPhone, giving it a cozy spot.
- Hold tight for a minute—this will let the adhesive relax and create a lovely little gap.
- Once the Anti-Clamp has done its magic and there's a nice space, gently slide an opening pick under the screen.
- Feel free to skip the next three steps; you've got this!
Tools Used
Step 7
The next three steps will guide you through prying the screen apart using a suction cup.
Warming up the bottom edge of your iPhone will loosen the adhesive holding the display in place, making it easier to pop open.
- Grab a hairdryer or whip up an iOpener, and gently warm the lower edge of your iPhone for around 90 seconds. This will help melt that pesky adhesive hiding underneath, making things a whole lot easier for you!
Tools Used
Step 8
Make sure the suction cup stays clear of the home button—that spot’s a no-go zone if you want a good seal between the suction cup and the front glass.
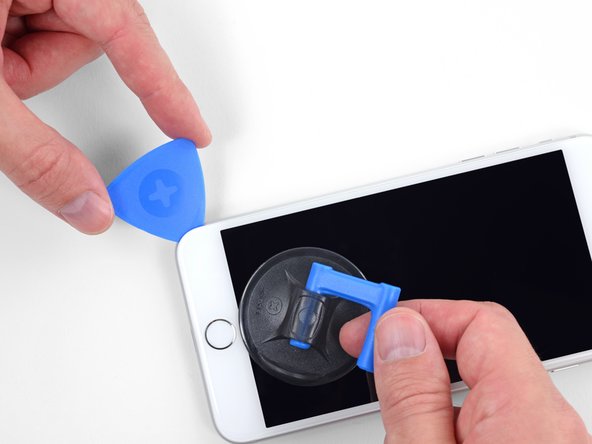
- Stick that suction cup right above the home button, lower half of the front panel. Time to get things moving!
Step 9
The adhesive keeping your display secure is pretty tough, so getting that first gap open will take some muscle. If it's giving you trouble, try applying a little more heat and gently rocking the screen up and down. This should loosen the adhesive enough to get your tool in there and make the magic happen.
- Gently pull up on the suction cup with steady, even pressure to open up just a tiny gap between the front panel and the rear case.
- Slide an opening pick or a thin pry tool carefully a few millimeters into that gap you’ve just created.
Step 10
- Glide your pick around the corner, cruising up the left side of the phone toward the volume buttons and silent switch to loosen that stubborn adhesive holding the display.
- Pause when you reach the top left corner—don't go any further just yet.
Step 11
Watch out! There's a delicate cable running along the right edge of your iPhone. Don't try to insert your pick here—you could accidentally damage it.
Step 12
Keep your pick insertion to under 3 mm to avoid messing up those delicate display cables—handle with care!
- Gently slide your tool into the lower right corner of the iPhone, then glide it around the corner and up the right side to break that adhesive loose. You've got this!
Step 13
Keep the display tilt under 15º to avoid stretching or snapping those delicate ribbon cables – they’re not fans of yoga!
- Lift up on the suction cup slowly and carefully—let’s get that display moving without any drama.
Step 14
- Gently pull on the small nub of the suction cup to lift it off the front panel. It's like peeling off a sticker—smooth and satisfying!
Step 15
- Gently slide an opening pick under the display at the top edge of the phone to break free the last bits of sticky adhesive holding it down.
Step 16
- Gently nudge the display assembly downward, away from the phone's top edge, to release those sneaky clips that are keeping it snug against the rear case.
Step 17
Hold your horses on fully separating the display! There are some delicate ribbon cables still linking it to the iPhone's logic board, and we want to keep those safe and sound.
- Start by gently lifting the display from the left side, just like opening a book. No rush, take it slow!
- Once it's open, rest the display against something to keep it propped up. That way, you can work hands-free without worrying about it falling.
Step 18
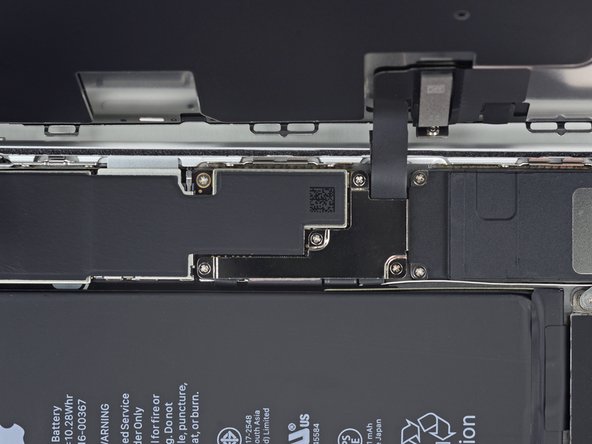
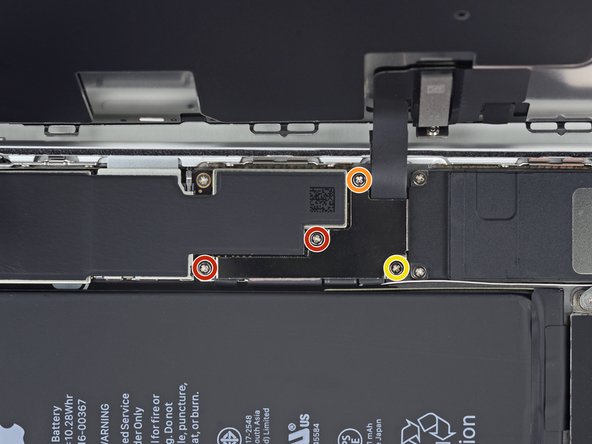
- Start by unscrewing four Phillips (JIS) screws holding the lower display cable bracket in place on the logic board. Here’s a quick rundown of what you'll need to remove:
- While you're at it, make sure to keep track of those screws! They’re all unique, and putting them back in the wrong spot could lead to some permanent damage. Trust us, it’s worth the effort to stay organized.
- Two 1.3 mm screws
- One 1.4 mm screw
- One 2.7 mm screw
Step 19
- Time to detach the lower display cable bracket. Take your time, but be sure to get it out of the way so we can get to the good stuff next!
Step 20
- Grab a spudger and gently use its pointed end to lift the battery connector out of its cozy little home on the logic board.
- Now, give that connector cable a slight upward bend to keep it from accidentally reconnecting and surprising you with some power during your repair adventure.
Tools Used
Step 21
- Grab your trusty spudger or use a fingernail to gently lift the big bottom display connector from its socket. Just wiggle it up carefully, no need to rush!
- When you're ready to snap that connector back into place, press down on one side until you hear a satisfying click. Then repeat the process on the other side. Avoid pressing the middle though; even a little misalignment can bend it, which could cause some serious damage.
Tools Used
Step 22
- Unplug the second lower display cable connector right behind the one you just took off. Keep it steady!
Step 23
- Take out the two tri-point Y000 screws holding down the bracket over the front panel sensor assembly connector:
- One 1.0 mm screw
- One 1.2 mm screw
Step 24
- Pop off the bracket that's hiding the front panel sensor assembly connector. You've got this!
Step 25
- Gently use the tip of a spudger—or even just your fingernail—to pop the front panel sensor assembly connector out of its socket. Take it slow, it’s easier than it looks!
Tools Used
Step 26
- Gently detach the display assembly. Take your time, no rush!
- If you're thinking of swapping out the adhesive around the display edges, now's the perfect moment. Pause and make that change if needed before putting everything back together.
Step 27
- Let's get that earpiece speaker bracket off! Unscrew these five little guys holding it in place:
- Two 1.8 mm screws
- One 2.3 mm screw
- One 2.4 mm screw
- One 2.8 mm screw
Step 28
- Take off the bracket covering the earpiece speaker—you're almost there!
Step 29
- Carefully use the flat end of a spudger to pop the front-facing camera out of its slot.
- Gently nudge the camera ribbon cable to the side so you can easily access the earpiece speaker hiding underneath.
Tools Used
Step 30
- Lift out the earpiece speaker—nice and easy, no rush.
Step 31
- Carefully bend the camera and its ribbon cable down towards the bottom of the iPhone. This will give you a clear view and access to the components hiding beneath.
Step 32
Heads up: these sensors are pretty delicate! For a smoother removal, keep adding heat as needed, or try a couple drops of isopropyl alcohol to loosen things up before you lift them out. Take it slow and steady, and you'll be good to go!
- Grab a hairdryer, heat gun, or an iOpener, and gently warm up the top front of the display for about a minute to loosen up that adhesive holding the sensors in place.
Tools Used
Step 33
- Gently slide a spudger under the ambient light sensor flex cable and carefully lift the sensor out of its spot.
Tools Used
Step 34
- Gently slide the tip of your spudger under the proximity sensor flex cable and give it a little lift to pop the sensor out of its cozy home. Nice and easy!
Tools Used
Step 35
Warm up the top of the display with an iOpener or a hair dryer to loosen up the adhesive holding that flex cable in place. A little heat goes a long way!
- Carefully slide the sharp edge of your opening tool underneath the flex cable of the camera assembly, right opposite the front-facing camera.
- Gently lift to separate the flex cable from the display's back, taking care not to damage anything in the process.
Tools Used
Step 36
- Gently slide the spudger under the same spot of the flex cable you worked on earlier.
- Keep working your way down the flex cable, carefully easing the spudger under the gold earpiece speaker contacts to finish the job.
Tools Used
Step 37
- Line up your new part with the original one—sometimes you'll need to move over a few bits or peel off adhesive layers before fitting it in.
- Put your device back together by reversing the steps above.
- Got e-waste? Drop it off at an R2 or e-Stewards certified recycler to keep things green.
- If things didn’t go as planned, swing by our Answers community for some troubleshooting tips, or if you’re stuck, you can always schedule a repair with us.


