
iPad Wi-Fi LCD Replacement
Duration: 45 minutes
Steps: 19 Steps
Get ready to give your iPad a shiny new look by swapping out that LCD! Follow this guide to bring your device back to life with a fresh display. Let's dive in and make it happen!
Step 1


Pop on those safety glasses to keep your peepers safe, and be super gentle with that LCD screen – we want it to stay intact and shining!
Taping up the glass keeps those pesky shards under wraps and makes prying the display way less dramatic.
- If your display glass is cracked, let's keep things safe and sound! Grab some tape and cover that glass to avoid any further breakage and protect yourself during the repair.
- Take some clear packing tape and lay down overlapping strips on the iPad's display until it's completely covered. It's like giving it a stylish new outfit!
- Now, as you continue with the guide, just do your best! Once the glass starts to crack, it might keep at it, and that's okay. You might need to get a metal prying tool to gently scoop out the glass. Remember, if things get tricky, you can always schedule a repair!
Step 2


You're about to carefully pry the iPad's display assembly away from its aluminum body. Take your time and follow each step closely to keep the display and those delicate clips safe and sound.
Oops! If a few clips decide to go their own way, don’t stress—you can grab replacements right here.
- The display assembly is held in place by 14 metal clips, as shown on the left. When prying in the next steps, try to carefully work around these clips without cutting through them with your opening tool.
Step 3


- Slide a metal spudger in between the top edge of the display assembly and the rear panel assembly.
- Gently twist the spudger away from you to pop those tabs loose along the top edge of the display.
- Pop in a second metal spudger between the display assembly and rear panel to keep the tabs from snapping back.
Tools Used

Step 4


Go slow and steady with your prying—if it starts to push back, pause and try a different angle.
- Grab your trusty spudger and shimmy it along the right edge of your iPad—it’s like giving your device a gentle wake-up call.
- Heads up: The front panel is attached to the aluminum back with metal clips on the top, bottom, and left. The right side is hanging on with plastic tabs that tuck into little pockets in the backplate.
- Once you’ve freed the clips, lift the left side of the front panel and slide it left to slip those tabs out of their cozy aluminum spots.
Step 5

Hold your horses on trying to take off the display just yet! It's snugly connected to the rear panel assembly.
- Gently lift the display assembly from the rear panel by its bottom edge, like you're unveiling a surprise!
Step 6

- Alright, let's get down to business! In the next few steps, we’ll be disconnecting the three cables that link the display assembly to the logic board. These cables are for some pretty important components:
- Digitizer
- Ambient Light Sensor
- Display Data Cable
Step 7


Make sure you’re lifting the little retaining flap, not the whole socket — gentle does it!
- Grab your trusty plastic opening tool and gently nudge those little retaining flaps up, freeing the digitizer ribbon cables from their snug homes on the logic board.
- Now, with a steady hand, pull the digitizer ribbon cables straight out of their sockets. Easy peasy!
Step 8

- Grab your trusty plastic opening tool and gently pop the ambient light sensor connector out of its socket—just a little lift upwards does the trick!
Step 9


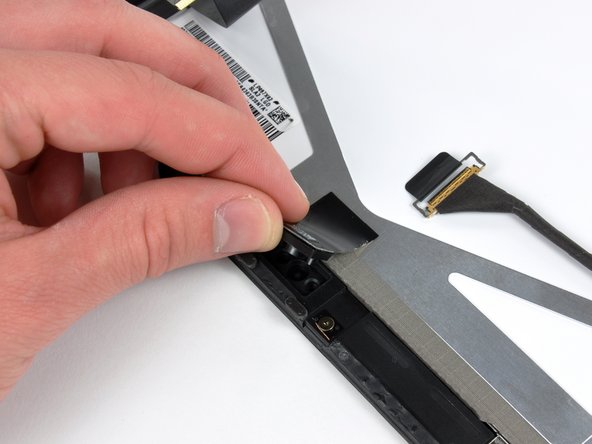
Gently slide the connector straight out, keeping it flush with the logic board surface.
- Let's get that display data cable off the main board! Just flip up the metal retainer using the black plastic pull tab, and you'll be golden.
- Now, gently pull the cable connector away from its socket. Easy peasy!
Step 10

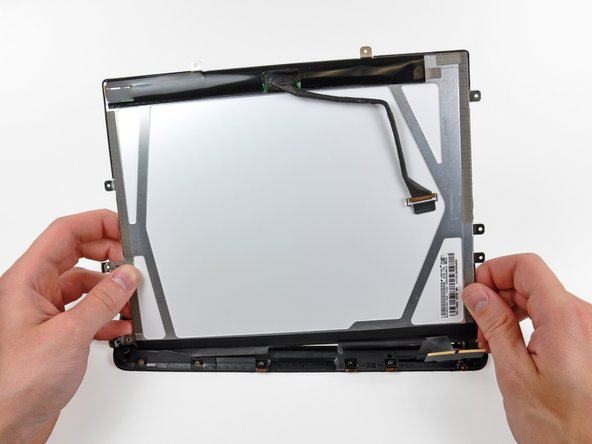
- Gently pop the display assembly away from the rear panel assembly to separate the two parts.
Step 11


Heads up! Try not to bend the ambient light sensor below its top part— the sticky section is a bit delicate and might peel off if you're not careful.
No need to mess with the ambient light sensor if you're keeping the same LCD—just leave it cozy right where it is!
- Gently slide the edge of a plastic opening tool under the ambient light sensor board to loosen it from the sticky adhesive holding it to the display frame.
- Once you have enough wiggle room, carefully lift the ambient light sensor away from the LCD.
- If needed, attach the plastic view window to your new ambient light sensor before putting it in place.
Step 12

- Gently hold onto the digitizer cable and peel back the tape that’s keeping it attached to the display frame. Slow and steady wins the race—no need to rush!
Step 13


- First things first, let's tackle those three T5 Torx screws that are keeping the clips and LCD brackets snugly in place near the home button switch. Unscrew them with care!
- Now, gently peel away the display clip along with its trusty tape from the black plastic display frame. Take your time; we want to keep everything intact!
- If you're in the business of swapping out the LCD, don't forget to transfer those little pieces of EMI tape and their clips to your shiny new LCD. They’re essential for a smooth operation!
Step 14

- Unscrew the last few T5 Torx screws that are keeping the LCD snugly attached to the black plastic display frame. You're almost there!
Step 15


Careful with the LCD—it’s glass, not rubber! Avoid bending it too much to keep things smooth and shatter-free.
- Slip the tip of your trusty plastic opening tool under one of the little 'ears' connected to the steel LCD frame.
- Give the tool a gentle twist to start lifting the LCD off the sticky adhesive that's holding it onto the front glass panel.
Step 16

- Go ahead and use the same prying technique from the previous step to gently lift the display along the three sides that don’t have the digitizer cable. Stay patient and keep it smooth!
Step 17

- Gently lift the LCD from its loose end and carefully pop it out of the display frame.
- Slowly peel back the adhesive holding the longer side of the LCD to the frame, then lift the LCD away.
Step 18

- If it's still hanging out with the front panel, gently peel off the strip of EMI tape near the ambient light sensor socket.
- If you need to, move that tape over to your shiny new LCD.
- If it's stuck to the LCD and you're keeping your old one, just skip this part. But if you're swapping out the LCD too, make sure to give that strip of EMI tape a new home on your new LCD.
Step 19

- To put your device back together, just follow these steps in reverse — you’ve got this! If things get tricky, remember you can always schedule a repair for a hand.


