iPad 3G LCD Replacement
Duration: 45 minutes
Steps: 24 Steps
Follow this guide to swap out a burnt LCD or backlight with ease.
Step 1
Pop on some safety glasses to keep your eyes out of harm’s way, and take it easy around the LCD screen—it’s more fragile than it looks!
This helps keep those pesky glass shards from going rogue and ensures the display stays sturdy when you're prying and lifting it up.
- Cracked display glass? No worries! Let's keep those shards in place and protect your hands by taping up the glass.
- Cover the entire front of your iPad with overlapping strips of clear packing tape—think of it like a safety shield.
- Follow the guide as best as you can, but heads up: Once the glass is cracked, it might keep breaking as you work. If you need to, gently scoop out loose pieces with a metal prying tool.
Step 2
The iPad in these photos might look a bit different from yours, but don’t worry, the steps are exactly the same.
- Slide a metal spudger into the gap between the right side of the display assembly and the rear panel assembly.
- Gently pivot the spudger away from you to pop open the tabs at the top edge of the display.
Tools Used
Step 3
- Slide a second metal spudger gently between the top of the display and the back panel to keep those pesky tabs from snapping back.
- Carefully wiggle the display assembly away from the rear panel, giving it a little nudge to free it up.
Tools Used
Step 4
Heads up! As you get close to the top edge of the iPad, take care—there’s a digitizer ribbon cable tucked right near the rear panel edge that’s super easy to nick if you’re not careful.
- Keep on prying that display assembly away from the rear panel, starting at the bottom and working your way up along the left edges of the iPad. You've got this!
Step 5
Be gentle when lifting the display assembly — there’s a delicate antenna cable hanging on with barely any slack, so don’t pull it like you’re trying to win a tug-of-war!
- Gently lift the display assembly from the rear panel, starting at the bottom edge. You’ve got this!
Step 6
- Gently use the flat end of a spudger to lift the antenna connector near the bottom of the iPad off its socket on the communications board.
Step 7
- Alright, let's get to work! In the next few steps, we'll be detaching three cables that connect the display assembly to the logic board. These cables are responsible for some key features, including:
- Digitizer
- Ambient Light Sensor
- Display Data Cable
Step 8
Make sure you're lifting the little flap, not the whole socket—easy to mix up, so keep an eye on that!
- Grab an iPod opening tool and use the edge to gently lift up the retaining flaps that are keeping the digitizer ribbon cables in place on the logic board.
- Now, carefully pull the digitizer ribbon cables straight out of their sockets. Easy does it!
Step 9
- Grab your trusty iPod opening tool and gently nudge the ambient light sensor connector upwards to ease it out of its socket. You've got this!
Step 10
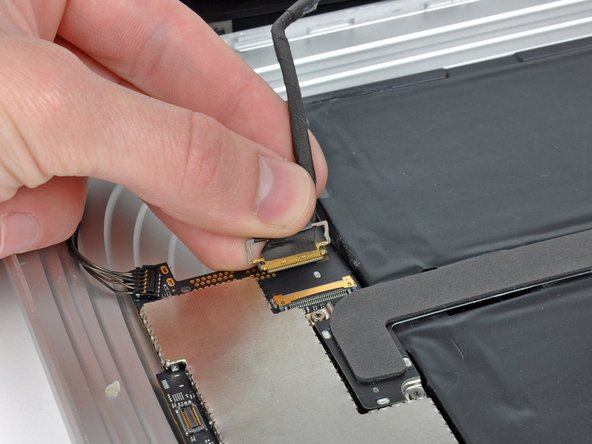
Gently pull the connector straight out, parallel to the logic board. Easy does it!
- Gently lift up the metal retainer using the black plastic pull tab to free the display data cable from the main board. You're doing great!
- Now, simply pull the cable connector away from its socket. Easy peasy!
Step 11
- Gently separate the display assembly from the rear panel—like peeling the lid off a fresh jar, but with a lot more tech involved!
Step 12
If you need to, gently remove the foam tape covering the ambient light sensor. No stress, you've got this!
- No need to fully peel off that foam tape on the antenna. Just give it a little love and leave it be!
Step 13
Before you dive into the installation, make sure to attach the plastic view window to your new ambient light sensor if needed. It’s a small step, but it’ll save you some hassle down the road!
- Gently wedge the edge of an iPod opening tool under the ambient light sensor board to loosen it from the sticky adhesive holding it to the display frame.
- Once you have enough wiggle room, carefully lift the ambient light sensor away from the LCD.
Step 14
If there's a strip of foam tape hanging out along the long edge of the display assembly by the digitizer cable, go ahead and peel it off. It’s just there to keep things cozy, but we don’t need it now.
Step 15
- Keep your grip on the digitizer cable, then gently peel back that sneaky piece of tape holding the cable to the display frame. Slow and steady wins the race!
Step 16
- Grab your trusty iPod opening tool and give that antenna a gentle nudge! Carefully peel it away from the adhesive that's holding it snugly to the top edge of the display. You've got this!
Step 17
- Unscrew the three T5 Torx screws holding down the clips and LCD brackets wrapped in EMI tape near the home button switch.
- Gently lift the display clip and its taped attachment away from the black plastic frame of the display—take it slow to avoid any surprises.
- If you're swapping out the LCD, make sure to move these EMI tape pieces and their clips over to the new screen to keep everything snug and secure.
Step 18
- Take out the last T5 Torx screws holding the LCD onto the black plastic display frame. Almost there!
Step 19
- Peel off that little strip of tape holding the antenna lead to the LCD. You've got this!
Step 20
Keep in mind, the LCD is glass—so no ninja-level bending moves, please!
- Slide the edge of an iPod opening tool under one of the little tabs attached to the steel LCD frame.
- Gently twist the tool to lift the LCD away from the sticky adhesive holding it to the front glass panel.
Step 21
- Now, repeat the process from the previous step to carefully lift the display around the three sides opposite the digitizer cable side. Take it slow and steady, making sure you’ve got a good grip before lifting.
Step 22
- Gently lift the LCD from its free end and take it out of the display frame.
- Slowly peel off the adhesive holding the long side of the LCD to the display frame, then remove the LCD completely.
Step 23
- If the EMI tape strip is still hanging out near the ambient light sensor socket on the front panel, go ahead and gently peel it off.
- Thinking about a fresh start with a new LCD? Make sure you give that EMI tape a new home on it.
- If your trusty LCD is sticking around and the tape is already attached, skip this part and keep cruising. If you’re swapping in a new LCD, just transfer the tape over and you’re good to go!
Step 24
- If those clips and EMI tape at the bottom of the LCD are still looking sharp, go ahead and move them over to your shiny new LCD. Treat them gently—they’re already pros at this job!


