
Apple Pencil Teardown
Duration: 45 minutes
Steps: 13 Steps
Ever since the iPad first showed up, Apple has insisted it's designed to be used without a stylus. So when the iPad Pro arrived with a $99 stylus accessory, we couldn’t help but take a closer look. What’s the deal with the Apple Pencil? We've heard it’s packed with cool features, but we’re more curious about what’s inside that sleek white tube. Let’s dive in and see what makes it tick! If you need help along the way, you can always schedule a repair.
Step 1


- Apple’s keeping things under wraps about the finer details, but here's the lowdown on what we do know:
- Bluetooth 4.1
- Scans at twice the speed of your usual finger swipes
- Battery life? Up to 12 hours—plenty of juice to last through the day
- Dimensions: 175 mm (L) x 8.9 mm (D)
- Charges via a Lightning connector
Step 2


Plus, popping it open and pulling out the battery is a breeze.
And hey, it even comes with an eraser!
- Let's dive into the world of styluses! We'll take a moment to compare a few cool options out there.
- First up: the Microsoft Surface Pen, which is a stylish companion for your Surface Pro 4.
- Next, we have the original 'iPad Pencil' by 53. It's designed to work wonders with their Paper app and shares many features with the latest Apple Pencil.
Step 3


- Apple has generously included a spare tip and a handy Lightning-to-Lightning adapter (a last-minute addition) to save you from the hassle of charging your Pencil directly from your iPad. Pretty thoughtful, right?
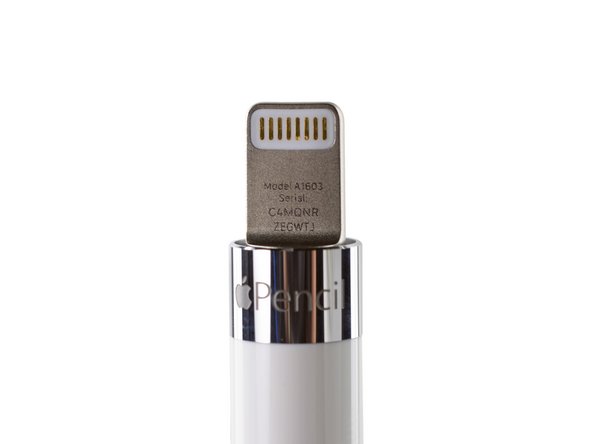
- The Lightning Connector cap clicks into place with magnets, but let's be honest, it’s probably going to disappear before the month is out.
- Pop off the cap, and you'll spot a fresh, never-before-seen model number: A1603. Say hello to the new Pencil!
Step 4


This is probably linked to one of the two little emitters in the tip that help the iPad Pro figure out the Pencil's angle and orientation in relation to the display, making it possible to adjust the pen stroke just right.
- Let's dive into the Pencil! Start by giving the nib a few quick twists, and off it comes without a fuss.
- Once you're in, take a gander at the tiny metal piece nestled snugly at the tip—it's there to help the Pencil get as close to the screen as possible.
- On the iPad Pro, the digitizer is quite the clever little gadget, figuring out the distance from each emitter to the screen and calculating the Pencil's angle like a pro!
Step 5


Author's note: Isn't it wild that they chose to call this the Pencil—and not the Pen or Stylus—and then forgot to add an eraser? What a quirky choice!
- Let's take a closer look at the eraser Lightning Connector by gently warming things up with our trusty iOpener.
- Even after warming up the situation with our iOpener, that Lightning Connector assembly still seems a bit stubborn! A quick tug does the trick and frees it from the Pencil's embrace.
- But oops... it looks like we might have snagged a flex cable in the process...
- Honestly, we have a feeling this teardown won't be one of those simple ones where everything just snaps back together seamlessly.
Tools Used

Step 6


And we haven't managed to poke a hole in the battery...yet! Looks like our skills are finally coming through for us.
- After carefully examining the top and bottom sections and not spotting any obvious entry points, we decided to take a bold step and bring out the big tools.
- Slicing through the plastic shell of the Bic Apple Pencil uncovers its ink cartridge and metal casing.
Step 7


Good news — we've got just the right tools for this job. No need to mess around with files!
- Alright, that was quite the task! After cleaning up the plastic dust and grabbing a quick burrito break, let's take a moment to admire our handiwork: the Pencil, now without its case.
- A quick peek inside the metal cylinder shows a tiny tri-point screw, just like the ones used in Apple Watches.
- Right below that tiny screw, you'll notice some small contacts—these are likely for Apple's internal testing purposes.
Step 8


Just a quick note: Microsoft's Surface Pen is powered by a replaceable AAAA battery. These little powerhouses typically pack a punch with ratings from 0.4 to 0.9 Wh. Keep that in mind as you dive into your repair adventure!
- A little more cutting and prying, and after a quick chat about laser cutters, we finally break through a second layer—this one made of metal.
- And look what we’ve uncovered! The antenna and battery assembly are now in sight. No graphite to be found at the core of this Pencil.
- This little powerhouse is a 3.82 V, 0.329 Wh lithium-ion battery, packing just 5% of the charge of an iPhone 6s battery.
Step 9


This nifty little board is cleverly folded in half to make the most of the tight space. How smart is that?
- Now that we've removed the metal enclosure, let's pop off that antenna, showcasing the iconic Apple black and gold colors!
- We also get a closer look at the ribbon cable we just sliced through... It connects between the Lightning port and the battery, possibly hosting those battery charging ICs we suspect.
- We've spotted more chips at the opposite end, so it's time to say goodbye to the battery and dive into the exciting parts—like the tiny logic board!
Step 10

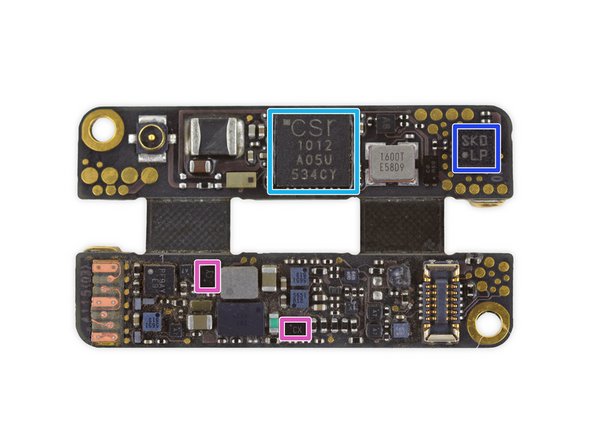
- Is this a logic board for tiny tech? Almost! Weighing just 1.0 gram, it’s the smallest one we've come across. Now that the tough part is done, let’s check out what makes the Pencil so clever:
- STMicroelectronics STML151UCY6 Ultra-low-power 32-bit RISC ARM-based Cortex-M3 MCU
- STMicroelectronics STMLS05 5-channel PMOS load switches
- STMicroelectronics STM32L052T8 32-Bit ARM Cortex-M0+ Microcontroller with 64 Kb flash
- Maxim Integrated MAX11290 24-bit delta-sigma A/D converter (probably)
- Cambridge Silicon Radio (Qualcomm) CSR1012A05 Bluetooth smart IC
- Bosch Sensortec BMA282 accelerometer
- Maxim Integrated MAX44284 high precision current-sense amplifier
Step 11


- Now, let's revisit that metal casing to carefully pluck out the pen nib and uncover its magical sensor.
- As we peel back one of the tiniest boards we've encountered, we stumble upon a trio of matching ticks. Yep, three on the end of the pen assembly and three on that little board.
- It's quite likely that this chip holds the key to unlocking the secrets of how this gadget works...
- If we had a crystal ball, we'd guess these components are responsible for sensing pressure by monitoring the movement between these two pieces.
- The chip reads 8529043 343S00008-A1—probably a custom STMicroelectronics controller specifically for the nib.
Step 12


Lucky for us, the Pencil was still in one piece when this was documented, so you can admire the connector snugly soldered to its little ribbon cable. It's quite the sight (at least until you find yourself in need of a repair!).
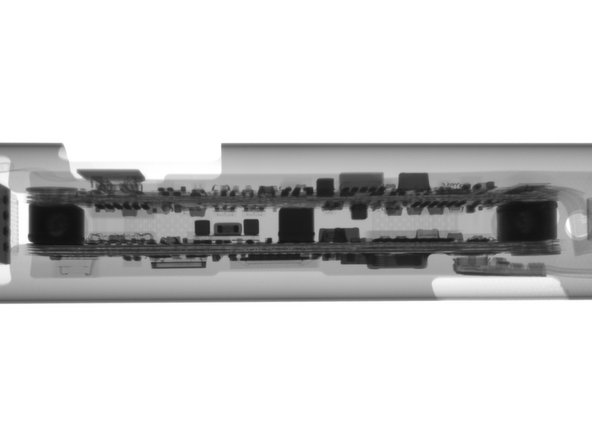
- Diving deeper into the tip might not be the best idea, but no worries! We’ve got a clear view with some awesome X-ray imaging magic.
- Just for fun, we also took a peek at that tiny folded logic board, plus the Lightning Connector and cap.
- Check out that little spring-loaded tip, and the two hidden emitters snug inside the shaft!
Step 13


- Apple Pencil Repairability 1 out of 10 (10 is easiest to repair):
- If your pen nib or cap gets worn out (or goes on a little adventure and gets lost), don't worry! You can easily replace them.
- Now, let's be real—the pencil is not designed for a spa day. Opening it up for repairs? That's a tricky business that could end up destroying your beloved device.
- The layers of plastic and metal holding everything together are like a super fortress; getting them apart without causing a ruckus is nearly impossible.
- And that battery? It's good for about 12 hours of fun, but swapping it out is a no-go, which means the device has a bit of a limited party life.