
Kindle 3 Screen Replacement
Duration: 45 minutes
Steps: 8 Steps
Ready to give your Kindle 3 a makeover? This guide will help you swap out that cracked, scratched, or underperforming display (screen) with a shiny new one. Let's get started on this fun repair journey together!
Step 1


Just below the buttons on the left side, there's a delicate ribbon cable that connects to the screen assembly. Be careful with your pry tool around here—it could easily get snagged. (Check out the third photo to see where the tool is pointing.) Wherever you begin, steer clear of this spot!
And remember, don't try to pry directly on the page-turning buttons. They’re a little sensitive!
If you're struggling to find that first little gap to pry open, try sliding the flat edge of your pry tool along the seam between the front and back plates until it sneaks into a gap. Another trick is to gently flex the device and wiggle a tool into one of the lower corners, which usually have plenty of empty space behind them instead of delicate parts.
Turning the device over, a good spot to start is on the right side just below the page turn buttons. (Check out the green arrow in the board photo, which is rotated 90 degrees counter-clockwise.) Slide your tool between the lower button and the hinge cover slot. If you don’t see a slot there, you might be on the wrong side!
- Flip the device over and gently wedge a pry tool between the two halves of the case.
- Carefully run the pry tool along the case edge to pop loose all 18 clips. Don’t go too deep with your tool—there’s sensitive stuff near the edges you don’t want to mess with. FYI, the clip above the power button is a bit of a heavyweight compared to the others.
- Lift off the back cover. The last two clips near the center are pretty stubborn, but since they all face the same way, don’t just yank upwards. Instead, slide the cover slightly toward the top of the device to free them.
- When putting the back cover back on, start by sliding the bottom edge into place, then press up the sides and along the top until you hear all those clips click back in.
Step 2

- Remove the two 4 mm Phillips screws holding the battery connector in place.
- Keep those screws safe! They're tiny and can easily get lost, plus there are sensitive parts nearby that could cause a short circuit if they get in the wrong spot.
Step 3


- Start by gently lifting the battery out of its housing, beginning from the end where the screws are holding it in place.
- Be cautious of the oddly shaped silver washers hiding under the battery connector (check out the second photo for a closer look). They’re essential for the electrical contacts to line up correctly when you tighten the screws again.
- When you're putting the battery back in, make sure those washers are back in place. Hold the battery at an angle (as shown in the first photo) and slide the bottom retaining tabs into their slots. Once it’s in, rotate the battery into position and secure the connector with the screws.
Step 4

- Unscrew those six shiny Phillips screws from the indicated spots and let's get this repair party started!
Step 5

- Gently lift the display connector straight up from its socket on the motherboard to unplug it. You're doing great!
Step 6

- Let's tackle this together! First up, grab your trusty Phillips screwdriver and remove those eleven smaller, gray screws from the specified locations. You've got this!
Step 7

- With a gentle touch, grab the top edge and slide the whole motherboard and midframe assembly gracefully away from the bottom edge of the Kindle. Take your time and remove it with care, like you're unveiling a surprise gift!
Step 8

- Carefully remove the cracked screen from its housing. Take it slow and steady!
- The old adhesive should work just fine for sticking the new screen in place.
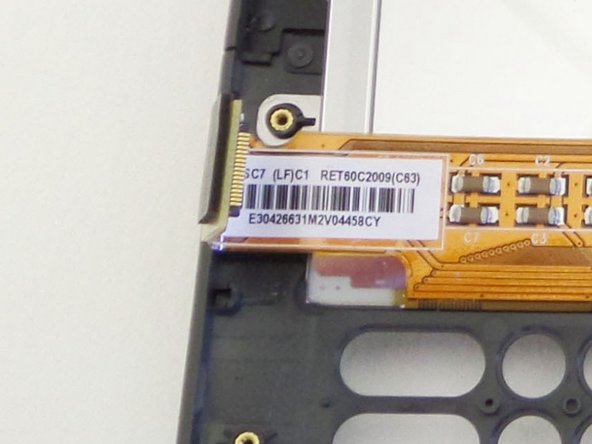
- This model actually has a couple of screen versions: TED060SCE(LF)T1-0I and ED060SC7(LF)C1. Peek at the sticker on your current screen to ensure the replacement is a match.
- Now, gently press the new screen from the edges toward the center. Go easy on the frame—it’s delicate!