Lenovo Horizon 2s Motherboard Replacement
Duration: 45 minutes
Steps: 19 Steps
Get ready to breathe new life into your two-in-one tablet by replacing that faulty motherboard. This step-by-step guide will walk you through removing the rear casing and carefully taking out all the internal components. Don’t worry, we’ve got you covered – just follow along and you’ll be up and running in no time. If you need help, you can always schedule a repair.
Step 1


– Turn your device over so the back is facing up—let’s give it a little love!
– Using that trusty plastic opening tool, gently pry away the plastic piece shown in the picture. Just keep at it until it’s free from the case. You’ve got this!
Step 2


– Gently use your fingers to peel off the rubber boot from the right side of the rear case. Take it slow, it’s just a little rubber boot, but you’ll want to be careful not to tear it.
– Grab your Phillips #1 head and unscrew the tiny screw hiding just beneath the rubber boot. It’s got your back—just make sure to keep it safe!
Step 3

– Grab that trusty plastic opening tool and gently nudge the display screen forward. Keep pushing until it pops free from the rear casing like a surprise party!
Step 4

– Grab your trusty plastic opening tool and gently work your way around the edges of the screen. Keep at it until the whole screen pops off from the rear casing like a pro!
Step 5


– Before you go all in and separate that screen from the back of your device, take a moment to gently disconnect those two wires on either side. Trust us, it’ll make sliding the rear casing off so much easier!
Step 6

– Gently and patiently use your fingers to disconnect the wire from the motherboard as shown here. Take your time, you’ve got this!
Step 7


– Grab your trusty Philips screwdriver with a number 1 head and let’s get to work! Gently unscrew those six M2-6mm screws highlighted in the picture. You’ve got this!
Step 8

– Gently lift the battery out of its cozy spot in the rear casing.
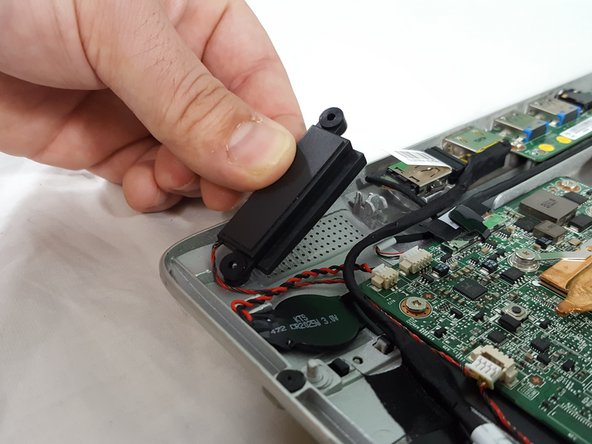
Step 9

– First, find those snazzy black and red wires that are all tangled up, connecting the two petite black speakers to the motherboard, just like in the picture. You’ve got this!
– Now, gently disconnect that wire from the motherboard by giving it a careful tug. Easy peasy!
Step 10


– Start by finding the speakers along the bottom of your device.
– The speakers are held in place by two little knobs on each side. Gently lift the speakers off to free them from the tablet.
Step 11

– Now, let’s find that sneaky tape holding those speaker wires snugly in their little grooves. You’re doing great!
– Gently peel off the tape as shown, and ta-da! Your speakers are now free from the tablet. Excellent job!
Step 12

– Grab your Philips head screwdriver with the number 1 bit and get ready for some action! Gently unscrew the four M2-6mm screws highlighted in the picture. You’ve got this!
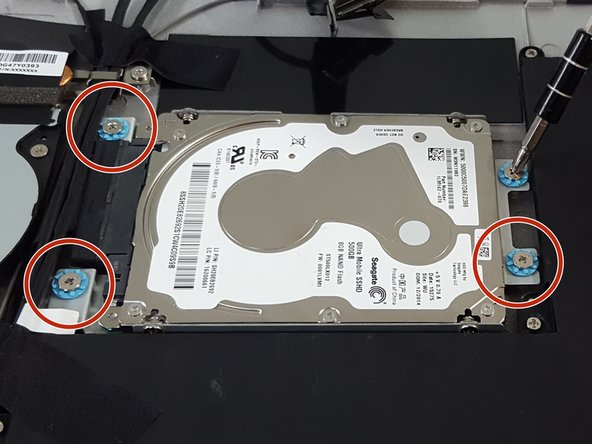
Step 13

– Gently lift the hard drive that’s still hanging on for dear life to the boot from the rear casing.
Step 14


– Alright, you’re making great progress! Now that the hard-drive is detached from the rear casing, it’s time to free it from its boot. Grab your trusty Philips screwdriver with the number one head and carefully unscrew the four M2-6mm screws that are circled in the picture. Take your time and make sure they’re completely removed before moving on to the next step.
Step 15

– Now that those pesky screws are out of the way, give yourself a little cheer! It’s time to gently lift the hard drive from its cozy metal home. You’ve got this!
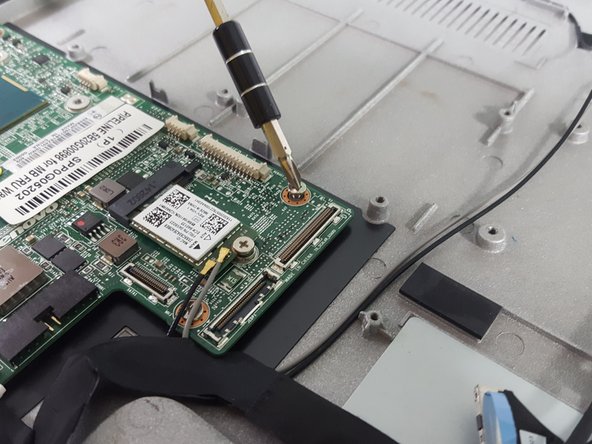
Step 16


– Grab your trusty Phillips #1 screwdriver and gently unscrew that M2-6mm screw that’s keeping our network card cozy on the motherboard.
– Next up, slide that network card out like it’s making a smooth getaway.
– Now, let’s delicately detach the wires from the network card, applying just a light touch. No need for a wrestling match here!
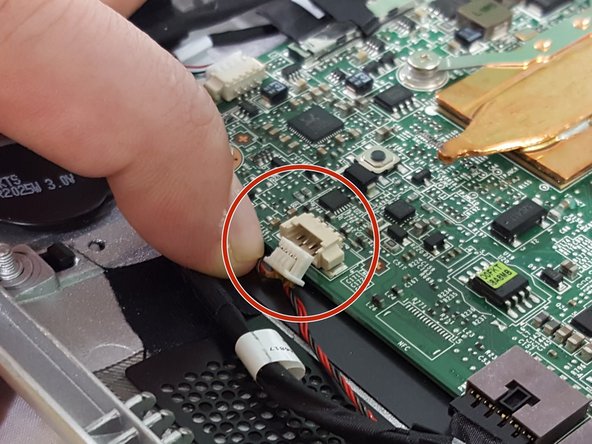
Step 17
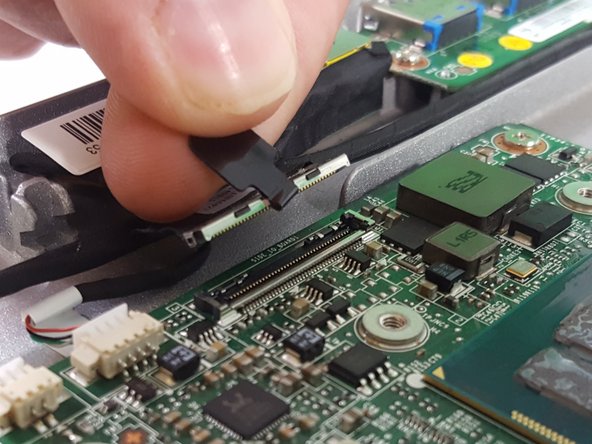

– Carefully disconnect all the highlighted plugs from the motherboard and set them aside.
– Gently apply light pressure to remove the plugs, being mindful not to damage any connections.
– Some plugs feature tabs, as you can see in the picture; give these tabs a gentle tug to release the plugs.
Step 18

– Grab your trusty Phillips #1 head and let’s get into it! Unscrew those M2-6mm screws that are holding the motherboard snug in its case. You’ve got this!
Step 19

Keep your fingers to the edges of the motherboard as much as possible; those tiny circuits can be a bit delicate!
– To get your device back in working order, just reverse the steps you followed to get here. Easy peasy! If you need help or want some extra guidance, you can always schedule a repair.
–