Google Pixel C Speaker Replacement
Duration: 45 minutes
Steps: 9 Steps
Get ready to bring your audio back to life! This guide will walk you through replacing your speakers if they’re faulty, broken, or sounding a bit fuzzy. Follow these steps and you’ll be jamming out to your favorite tunes in no time.
Step 1

Don’t go overboard with the heat on the screen! Too much can cause some serious trouble for the other components hiding inside your tablet.
Before you start tearing things apart, make sure your device is totally powered down – it’s time to get started with your repair!
– Grab your heat gun and get ready to make magic happen! Heat up the adhesive holding the screen to the device by gently moving the heat gun along the edges.
– Keep the heat gun gliding around the screen’s edges for about a minute or until you feel that satisfying moment when the screen is ready to lift off.
Tools Used

Step 2


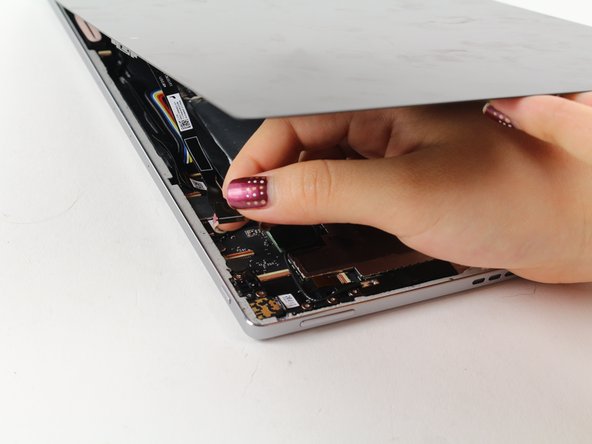
Take it easy when lifting that screen! It’s still hanging on for dear life with a cable for the front-facing camera and the wide display data cable. Don’t want to yank it off and cause a ruckus!
– Grab a suction cup and give that screen a little lift while you gently work around the edges with a trusty plastic spudger.
– If you’re feeling adventurous, a metal spudger can help pry the screen up, just be careful not to leave any scratches behind.
– When it’s time to reattach the screen, make sure to use some adhesive so it sticks around for the long haul!
Step 3

– Carefully lift the tiny flap with your fingernail or a spudger to free those camera cables. Once that’s done, gently wiggle the ribbon cable out like you’re coaxing a shy kitten. Easy peasy!
Step 4


This device is a little battery-shy, so don’t be surprised if the insides look a tad different from what you’re used to!
– Use the same technique to gently remove that shiny gold cable. You’ve got this!
– When it’s time to put those cables back together, grab some tweezers to help you slide the cable in smoothly before you lock it down with the flap. Easy peasy!
Step 5

The longer speaker is held in place by a mix of two different screw types, while the shorter one sticks with a pair of the same screw type. Keep those tools handy, and let’s tackle this together!
– Let’s get started by finding those slim black speakers located on the right and left sides of your tablet.
Step 6

– Grab your trusty Phillips #000 screwdriver and let’s get to work! First up, carefully unscrew those three 4.2mm screws.
– Now, stick with the same screwdriver to tackle that 2.5mm screw too. You got this!
Tools Used

Step 7


The third cable zips along the top edge of your device, held in place by some sticky adhesive magic.
– Find those two shiny circular metal caps attached to the short speaker by a tiny cable and carefully wiggle them out of your device. Nice and easy!
– Next, seek out the third cable cap that connects to the longer speaker, and give it a gentle detach. You’re doing great!
Step 8

– Gently nudge both speakers away from the device’s edges—easy does it!
Step 9


– Find those lively red and black twisted wires hanging out there!
– Grab your trusty spudger and gently slide it under the cable, giving it a little nudge to pop it free from its cozy attachment. This will completely detach the speaker from your device. You’ve got this!

