Upgrading the Lenovo ThinkPad T520 Display
Duration: 45 minutes
Steps: 11 Steps
Time to give your Thinkpad T520 a shiny new look with a dazzling 1080p LCD upgrade! Lenovo offers a high color gamut display for $250, but guess what? You can snag the same fantastic 1080p panel online for under $100! It’s a piece of cake to install by yourself, so roll up those sleeves and get ready to transform your screen. And if it feels like a tough task, no worries! You can always schedule a repair for some expert help!
Step 1

This could cancel your warranty!
– The original Lenovo model strutting its stuff is the AUO B156HW01 V.4. It’s a sleek 15.6″ matte display with a glorious 1080p resolution and impressive viewing angles that are better than your average joe!
– According to the experts at notebookcheck.net and anandtech.com, this display is a top contender among laptop screens in the market—definitely a winner!
– With a contrast ratio soaring above 500, this beauty can showcase over 95% of the colors in the AdobeRGB spectrum. And let’s not forget, 1080p is a major upgrade over the basic 1366×768 display, giving you plenty of room to work and play.
– Big shoutout to notebookcheck.net for the handy viewing angle image!
Step 2

The V.4 display we’re upgrading to is a top-notch drop-in replacement—it’s the same high-quality display Lenovo uses! This version features a matte finish with a ‘42% haze’ anti-reflective coating, perfect for reducing glare and keeping your view crystal clear.
– The V.4 display has a bit more shine compared to the standard T520 screen. The B156HW01 V.4 on the left bounces light in a sharper, more focused way, while the stock display (LG LP156WH4) spreads the light around more diffusely.
– This panel comes from AU Optronics, a major Taiwanese company that’s pretty big in the TFT LCD world. Lenovo uses AUO displays, but if you’re on the DIY upgrade or repair path, you can find these panels sold by LCD resellers too.
Step 3


– Here’s a peek at how my shiny new display showed up from laptopscreen.com! It took a little journey all the way from Burnaby, British Columbia, and guess what? It made it to me in just three days! Talk about speedy service!
Step 4
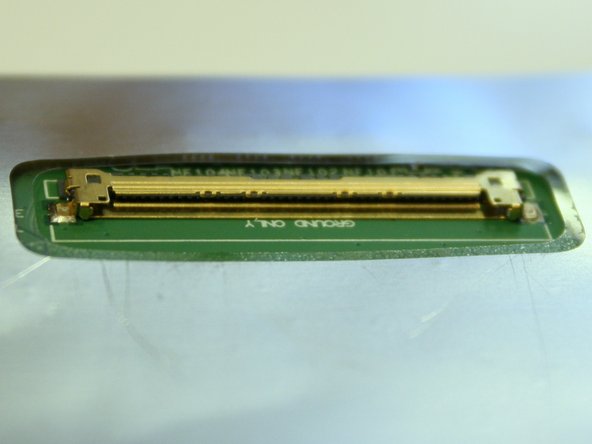

– The display uses the same 40-pin connector as the T520 and many other laptops, which is pretty cool. This connector provides power for the LED backlighting and sends a crisp 1080p video signal to the screen.
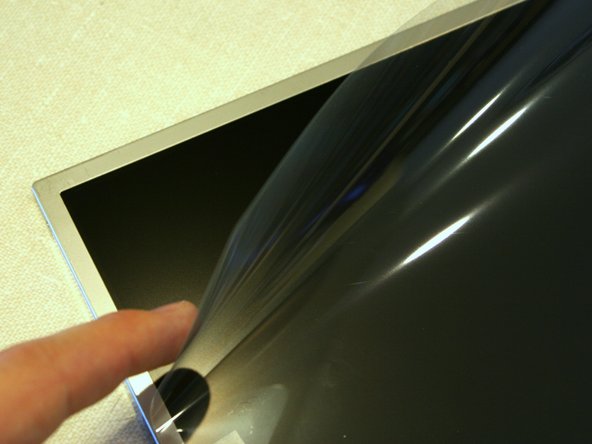
– A protective sheet is taped to the front of the display – leave it on until we’re almost done installing it in the laptop, it’s like a force field for your new screen!
Step 5


The star of the show! Any T520 model is perfect for this upgrade. Even the simplest setups can enjoy a stunning display. Plus, the ThinkPad T510, W510, T520, W520, T530, and W530 are all ready to rock with this upgrade!
– First things first! Let’s get those three covers off the bottom of the bezel and uncover the screws hiding underneath. An exacto knife does the trick just perfectly!
– Three adhesive covers.
– Three 6mm Phillips screws.
Step 6


– Begin at the lower part of the screen and gently pop those plastic clips holding down the bezel by pushing in from the sides and prying up with your trusty spudger. You’ve got this!
Tools Used

Step 7


Watch out for the cable connected to the magnetic lid close sensor. You might need to carefully unstick it from the frame or give it a little tug to make sure it reaches far enough. Take it slow and steady!
– There are four screws securing the back of the display assembly to the metal frame—time to evict them.
– Gently pivot the hinges upward just enough to pop out the four screws along the sides of the display frame.
– Grab your trusty Phillips screwdriver and remove the four 6mm screws.
– Now do the same for the four 3mm Phillips screws.
Step 8


– Now that the old LCD is just hanging by its cable, gently tilt the display so it can rest comfortably on the laptop keyboard.
– Carefully peel back the tape that’s keeping the connector in place, but watch out for that cable – we don’t want any unplanned snags!
– Time to say goodbye to the old display! Place it in a safe spot; it might just be a treasure for someone looking to fix a cracked screen without breaking the bank. If you decide to sell it online, the upgrade screen’s shipping package is perfect for that.
Step 9


– Gently place that shiny new 1080p LCD onto the keyboard and connect the display connector. A trusty spudger can be a lifesaver here for nudging the corners of the connector, keeping that cable safe from harm!
– Double-check that those round clips are snug as a bug before you secure the connector with tape. Extra tape never hurt anyone, so feel free to add some more if it makes you feel better.
– Tiny little round clips, they pack a punch!
Step 10


– Flip the LCD back over onto the metal frame, pop the battery back in, and give it a whirl.
– If everything checks out, take the battery out again, screw everything into place, peel off the protective sheet from the display, and snap the bezel back on.
Step 11


Hey, this display is a bit of a superstar – it’s more capable than your average LCD, so if the settings are off, it’s gonna be pretty noticeable!
– Be aware that this screen might have a warmer color tone compared to the usual consumer displays. It’s designed for professional graphics work, so it shows colors the way they would appear when printed or viewed under incandescent lighting.
– If you’re working with graphics, a digital colorimeter is your best friend for adjusting color accuracy. It creates an ICC profile that tells your programs exactly how to show colors correctly.
– For a more casual viewing experience, like browsing images or using office apps, Windows offers a handy Display Color Calibration tool that lets you tweak the display’s color balance. If you’d prefer, you can also use the Intel IGP software for color adjustments. Just right-click on your desktop and choose Graphics Properties…
– Want to experiment with color profiles other people have made? No problem! While every panel is a little different, you might find a profile that works great for your screen. I found that the first ICC profile from Sager does the trick for me.