Dell XPS 13 Teardown
Duration: 45 minutes
Steps: 24 Steps
Dell bends the rules of physics with a compact creation—squeezing a 13.3″ HD display into a laptop size that makes an 11″ screen look roomy. Intrigued? So are we. Welcome to our dissection of the early 2015 Dell XPS 13; let’s see what’s under the hood! Want real-time peeks at more teardowns? Stick with us on Instagram, Twitter, or Facebook!
Step 1


The quirky placement of the camera might be all about slimming down those top and side bezels. Sure, it could lead to a keyboard photobombing your selfies or some less-than-flattering angles, but hey, it’s all part of the design charm!
– Here’s the scoop on Dell’s compact XPS 13:
– It’s rocking a 13.3-inch ‘UltraSharp QHD+ infinity touch display’ with a sharp 3200 x 1800 resolution.
– Packed with 8 GB of speedy Dual Channel DDR3L-RS 1600 MHz RAM, built right onboard.
– Features a reliable 128 GB SSD for storage.
– And, a sneaky little webcam hiding in the lower display bezel.
Step 2


Guess what? We’ll be throwing a few nods to the MacBook Air—it’s kind of like comparing apples to, well, more apples.
Instead of clunky bezels, Dell opted for slimmer edges and shrunk the case width to emphasize portability, showcase that sleek ‘infinite’ display, and keep the full-size keyboard you love.
– Dell has worked some magic, squeezing a 13.3-inch laptop into an 11-inch body. Impressive, right?
– While Apple uses its extra space to make the MacBook Air look sleek and ultra-thin, the XPS goes all-in on being a compact powerhouse.
– And since it’s the internals that really make the difference, we’re eager to dive into what’s under the hood.
Step 3


…plus, there’s even a clearly marked screw to guide you! Dell earns serious points here for openly offering the full service manual for the XPS 13. And let’s be honest, little extras like hints about which screw belongs where? Always a win.
– The bottom of this laptop keeps it low-key—no glaring warnings or model details in sight. But hey, what’s the mystery behind door number XPS?
– Underneath a quirky magnetized, ‘spring-loaded’ little flap, you’ll find the FCC and Service Tag info lurking there, just waiting to be discovered.
– No shortcuts here! Let’s grab a couple of trusty spudgers and see just how smoothly we can crack this laptop open ourselves.
Tools Used

Step 4


Using two different drivers just to crack this thing open might leave you scratching your head—but hey, at least we’re working with screws here! That’s way better than battling gummy adhesive or dealing with break-prone clips.
– Grabbing the driver that the handy label suggested, we pull out a T5 and tackle the case screws with confidence.
– Wait—looks like we’ve got clips to deal with too, and these ones mean business. Wrestling with the case, we’re starting to wonder if Dell went all-in: screws, clips, and maybe even some sneaky glue?
– At last, the tough lower case gives way. Turns out it was just some serious clip action holding us back. Definitely one of those ‘easy once you know the trick’ kind of openings!
Step 5

It’s just like the original, but with super handy labels on every part and connection—now that’s a design choice you won’t catch on an Apple gadget!
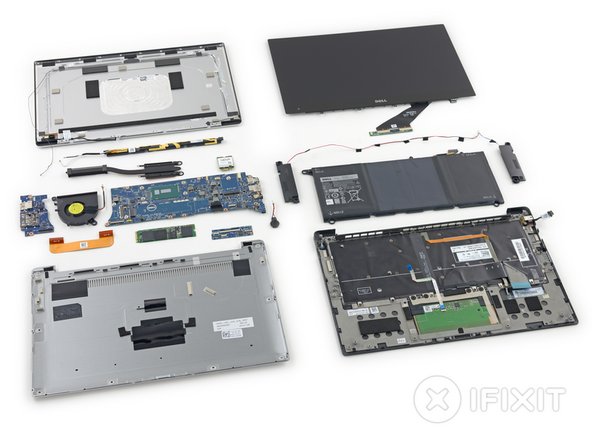
– Check out the sleek aluminum lower case—it’s smooth like a jazz tune. That battery? Definitely flat and paneled, ready for action. And take a peek at the upper logic system board—it’s got a single fan doing the hard work of keeping cool, separating the main board from the smaller I/O board.
– First impressions? It kind of reminds you of a prototype MacBook Air. Sure, it’s not as polished as the current-gen models, but you can’t deny those strikingly similar vibes.
– Does this ring a bell or what?
Step 6


At least those handy labels give us a clue about which screws belong where.
– Popping off the battery connector isn’t as simple as it looks—this little guy needs a bit of finesse and some precise spudger action to tease it out of the socket. Stay cool, you’ve got this!
– Once that’s free, you’ll notice the speaker wires are playing hard to get—they’re taped to the battery in about six spots. Carefully detach them to let the battery roam free. (Seriously though, this could have been so much worse!)
– Oh, and just a heads-up—those same wires are pinned under the battery screws. So, replacing the speaker means taking the battery out too. Looks like there’s a slight layering drama going on with the XPS!
Tools Used
Step 7


Battery life experiences run the gamut, so don’t be surprised if yours has a mind of its own.
– The Dell XPS 13 is powered by a battery that’s a real champ! It sports a four-cell, 7.4 V, 52 Wh battery that can keep you going for ‘up to 11 hours of fun!’
– Just for a little friendly competition: Apple’s Early 2014 MacBook Air boasts 12 hours of web browsing or enjoying movies on its 54 Wh battery.
– Now, keep in mind, that 11 hours of web browsing is with ‘system brightness set to 150 nits (40%) and wireless on’—but your mileage may vary depending on how you roll with your device.
Step 8


The speakers hang out on squishy, vibration-dampening rubber grommets. Nice and cushy.
Swapping out a single speaker? You’ll need to solder and splice those cables or crimp on a new connector. Take your time—precision is key!
– Once the battery is out, the speakers are ready to jump ship as well!
– These two speakers are inseparable pals—they stick together like they’re wired for life.
– On the bright side, you’ve got yourself some nifty nunchucks to keep things light-hearted.
Step 9


This is a classic design for SATA 3 SSDs, making upgrades or replacements as simple as pie.
– This XPS sports a sleek and swappable 128 GB Samsung PM851 SSD with an M.2 form factor. Sweet, right?
– Oh, but that’s not all—this SSD has an understated underside. It’s not flashy, but it’s got the goods!
– Inside the SSD, you’ll find: 2 x Samsung 431 K9CHGY8S5M-CCK0 64 GB TLC NAND flash,
– Samsung 428 K4P2G324ED -FGC2 512 MB LPDDR2 DRAM,
– And a Samsung S4LN045X01-8030 MDX controller holding it all together like the conductor of your data symphony.
Step 10


– Grab those tweezers and let’s tackle that pesky wireless card grounding bracket with ease!
– Once we lift it up, we uncover a Broadcom DW1560 Wi-Fi/Bluetooth 4.0 LE card, boasting:
– A Broadcom BCM4352KML 5G WiFi 2-stream 802.11ac transceiver that’s ready to keep you connected.
– A Broadcom BCM20702 single-chip Bluetooth 4.0 solution with BLE support to keep the tunes flowing.
– And don’t forget the Skyworks SE5516 dual-band 802.11a/b/g/n/ac WLAN front-end module, making sure your wireless experience is top-notch!
Tools Used

Step 11


Lately, we’ve seen a cool shift towards tinier heat sinks as Intel levels up their processors’ thermal efficiency game. The Core i5-5200U in the XPS 13 rocks a 15-watt thermal design power, keeping things sleek and efficient.
– Alright, let’s get to the good stuff – it’s time to take a look at the heat sink. It’s got a familiar vibe, kind of like the one on the Early 2014 MacBook Air.
– Oh, and there’s a nice little bonus – some well-aged thermal paste. Lovely, right?
Step 12


At least we have some resilient, re-stickable fabric tape to work with!
– The XPS 13 is a symphony of tape, cables, and labeled connectors—it’s like a little labyrinth with everything secured tightly in place. But hey, we’ve got this!
– There’s even a small, labeled coin cell battery sitting there to keep the real-time clock ticking along. Fingers crossed it behaves when we piece everything back together and fire it up!
– First up, to explore further, we need to untangle the XPS’s quirky display cable. Let’s gently free it from its cozy setup.
– Oh, and one fun twist—this cable isn’t just chilling; it’s also powering the SD card reader on the I/O board. Who knew, right? Let’s carefully unwrap it from around the fan and keep moving forward.
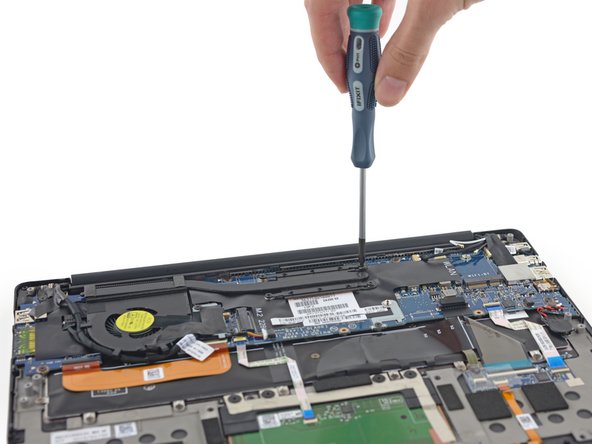
Step 13

With a bit more guidance, it’s likely you can skip the hassle of removing the entire board and just pop up a corner instead. Luckily, there are some awesome resources available online to help you tackle this repair. If you get stuck, don’t worry – we’ve got you covered!
– Just a heads up: once we opened up the XPS, we found ourselves leaning on Dell’s service manual for a bit of guidance—hey, who doesn’t love some good repair notes?
– When we reached the part about removing the system board to get to the fan, we were a mix of puzzled, amused, and eventually a bit frustrated.
Step 14

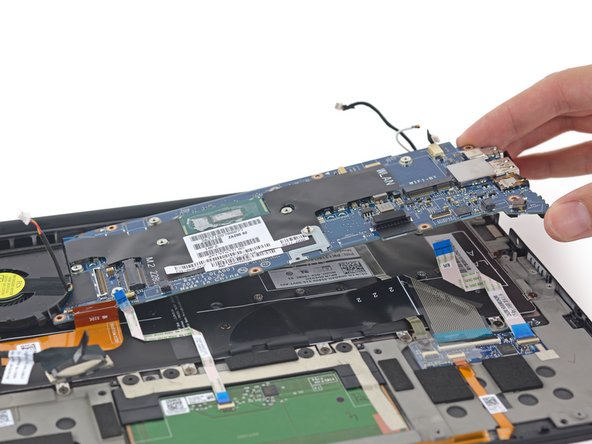
– Now that the motherboard is out, let’s take a peek at the hardware packed into this XPS:
– 5th Gen Intel Core i5-5200U processor (boosting up to 2.70 GHz) with Intel HD Graphics 5500 – this chip’s got the power to handle most tasks with ease.
– Winbond 25Q64FVS10 64 M-bit serial flash memory – storing the essential data and keeping things smooth.
– Microchip Technologies MCP23017 16-bit input/output port expander with interrupt output – helping manage your device’s inputs and outputs efficiently.
– Texas Instruments CSD97374Q4M high-frequency synchronous buck NexFET power stage – handling the power distribution like a pro.
– Texas Instruments CSD87330Q3D synchronous buck NexFET power block – optimizing power to keep everything running smoothly.
– Texas Instruments TPS51624 4.5 V to 28 V, 1/2-phase step-down driverless controller – providing steady power regulation for your device.
– ANPEC APW8813/A DDR2 and DDR3 power solution synchronous buck controller with 1.5 A LDO – ensuring your memory gets the right power, no hiccups.
Step 15

Heads up: Like the MacBook Air and Retina models, the RAM in the XPS 13 is soldered directly onto the motherboard, which means no upgrades down the line. So, when choosing your new laptop, make sure to pick the specs you’ll be happy with… for good.
– More chips, please!
– Elpida/Micron J8416E6MB-GNL-F 8 GB (8 x 1 GB) DDR3L-RS 1600 MHz dual-channel RAM
– Realtek ALC3263 audio codec
– SMSC MEC5085 low power embedded flash
– Texas Instruments SN74CBT3257C 4-bit 1-of-2 FET multiplexer/demultiplexer, 5 V bus switch
– ON Semiconductor NCP4545 controlled load switch
Step 16


We weren’t exactly thrilled about having to go this far just to get the fan out, especially since it doesn’t seem to have the same vibration-dampening features as its speaker counterparts.
– The XPS 13’s main fan is quite the character.
– It’s just a fan, but it operates at 5 volts and 0.5 amps, delivering a cool 2.5 watts of centrifugal cooling power that’s more thrilling than it sounds!
– Without those handy rubber mounting grommets, you might find it starts to make some noise later on. And trust us, nobody wants that kind of chatter!
Step 17


– Well, that was a bit of a wild ride, wasn’t it? We’ve got a screw in our tape, and it’s time to tackle this disassembly with some flair! Let’s get to it and free the I/O board, where we’ll uncover some hidden gems:
– Realtek RTS5249 card reader controller
– Texas Instruments TPS2544 USB charging port controller and power switch
– Parade PS8713B single port USB 3.0 repeater/redriver
Step 18


– Let’s wrap up the last few exciting pieces: an LED indicator cable and a quirky interconnect board!
– Living on this interconnect board, we’re in charge of the keyboard, keyboard backlight, front LEDs, and dual mics.
– * Just a quick reminder: we still have the trackpad, keyboard, and the DC-in port hanging around.
– ** It’s all up to the author’s discretion on this one.
– SMSC (Microchip) ECE1117 multi-function BC-Link/SMBus companion device.
Step 19
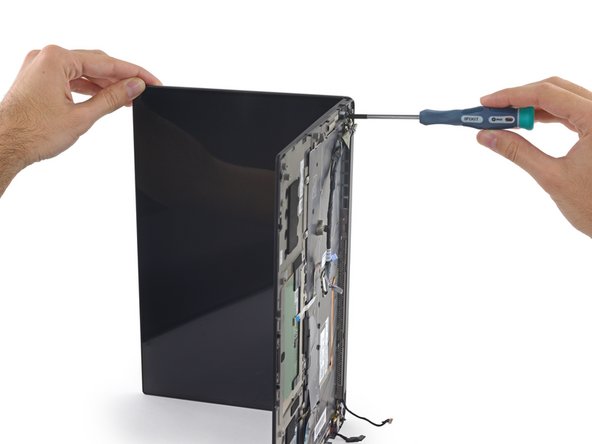


– Alright, let’s dive into the exciting stuff! Check out this ultra high-def, infinity-edged touch screen display that Dell is eager to show off.
– Wait a minute, did we just stumble upon a MacBook display? Talk about déjà vu!
– Removing the clutch cover is a breeze, just like on a MacBook Pro, and it uncovers a plastic frame filled with antennas.
Step 20


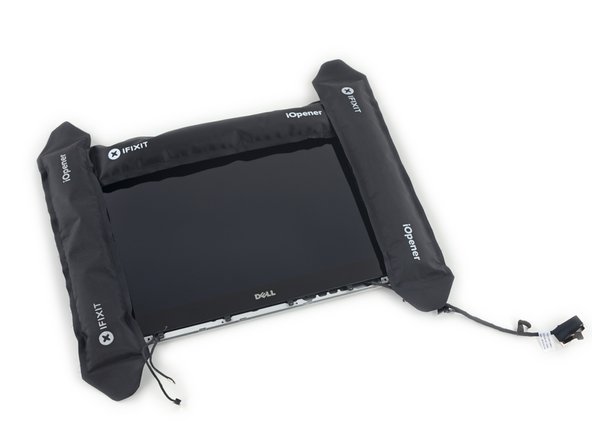
An infinity pool looks like it has no edge, creating the illusion of endless water. Kind of like that, an infinity display seems to have… glue that never ends?
– Let’s get started! We’ve got some experience with removing glass, so we know where to begin.
– Step 1: Time to heat things up! Use plenty of heat with your iOpeners – the more, the merrier. Repeat as needed for the best results.
– Step 2: Gently pry in multiple spots. Opening Picks are your best friends for this step.
– Step 3: Now it’s time to carefully work your way around the edges. Be patient and take your time.
– Step 4: Keep in mind that the edges you heated earlier aren’t where the adhesive is. The adhesive is actually under the LCD panel, so let’s adjust our approach.
– Step 4b: Apply some heat to the back and pry slowly. Take your time, and it’ll come apart nicely. If you’re feeling stuck, remember that you can always schedule a repair if needed.
Tools Used

Step 21

– Alright, here we go! Not a ton of adhesive this time, but it’s got some serious grip. Take it easy—peel it off slow and steady with some heat on standby. That glass is thin, so handle with care.
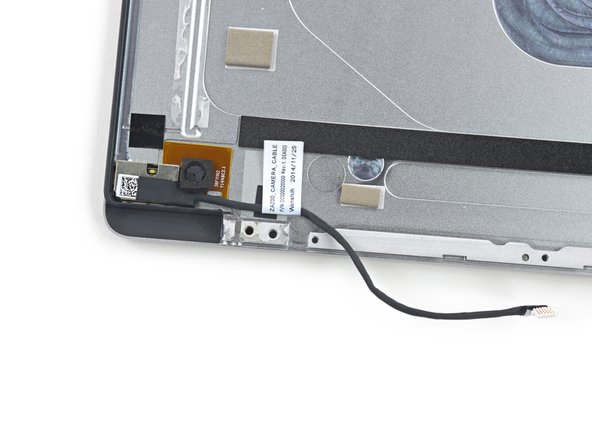
– Now that the display is completely free from the top case, say hello to the tiny but mighty selfie cam. Pretty neat, huh?
Step 22
– After carefully opening up the device, we discover a curious black thread snaking along the inside of the top case.
– While the service manual doesn’t mention it, we’re pretty sure we’ve just uncovered a clever trick to remove the LCD—without the hassle or the struggle.
– This thread is cleverly tucked away in a channel beneath the display adhesive—gently pulling along the side should slice right through and liberate the panel, just like slicing clay off a block.
– We can’t guarantee this will work without taking apart another XPS 13, but everything seems to indicate we’ve stumbled upon a delightful repair surprise.
Step 23


– Whoa, check out that Sharp display assembly—impressive stuff!
– Since we opted for the touchscreen model, we had to locate the digitizer control. Found it! It’s an Elan Microelectronics eKTH3915SUS.
– The display driver board is chilling under some foil tape at the bottom of the panel.
– Spotted the Novatek NT71394MB8 display driver IC—what a neat little chip!
Step 24

– The Dell XPS 13 gets a thumbs-up with a solid score of 7 out of 10 on our repairability chart—10 being the easiest to repair.
– Good news: Dell offers free service manuals online. Way to go, Dell!
– Once you tackle the bottom cover, you’ll find the components are straightforward to replace. It’s a repair-friendly setup overall.
– Even better—screws and connectors are clearly marked, making putting it back together a breeze.
– Adhesive levels are manageable; apart from the display assembly, you won’t need to wrestle with any heat tools.
– The design could use tweaks for better layering, but the modular approach ensures replacing parts won’t break the bank.
– One heads-up though: the RAM’s soldered in there tight, so no upgrading once the laptop starts feeling sluggish. Plan ahead!
Success!
