Lenovo ThinkPad X1 Extreme Keyboard Replacement
Duration: 45 minutes
Steps: 13 Steps
Ready to bring your keyboard back to life? Whether it’s a stubborn coffee spill or years of accumulated crumbs, sometimes your keyboard just needs a little TLC to get those keys clicking again. Follow these steps to swap out your faulty or gunked-up keyboard and make your device feel brand new!
Step 1


Alright champ, before you dive in, make sure to power down and unplug your device to keep things safe and smooth!
These screws might get a bit loose, but they’ll stick around with the cover. No need to fully take them out; just let them hang tight!
– Flip the laptop over so that it’s bottom-side up with the trackpad chilling closest to you.
– Take your Phillips #00 screwdriver and loosen up those seven captive screws—like a pro!
– Grab a trusty blue opening pick, wedge it into the gap between the bottom panel and chassis, and pop off the single clip on each side. Easy does it!
– Lift off the back cover gently—voila, you’re in!
Tools Used

Step 2


– Grab those tweezers and gently lift off the plastic cover shielding the connector—it’ll come off like magic!
– Get your trusty spudger or use your fingernail to lift that battery straight up from the motherboard. Take it slow and steady—it’ll pop out just right!
Tools Used

Step 3

– Carefully pop the battery out of its cozy little home in the frame and take it out of the device.
Step 4


– Grab that trusty Phillips #00 screwdriver and let’s tackle those five 4 mm screws hiding beneath the charging port.
– Next, let’s take out the two 3 mm screws with the same Phillips #00 screwdriver – they won’t know what hit them!
– Now, it’s time to unscrew the two 5 mm screws that are keeping the silver plate snug on the charging port, located up in the top-right corner.
– With those screws out of the way, gently lift off the silver plate resting on top of the charging port.
Tools Used
Step 5


– Unplug all those ribbon wires from the motherboard! It’s easier than it sounds.
– To disconnect the ribbon wires, just flip up the tiny black tab where they connect and gently pull the ribbon out. You’ve got this!
Step 6


– Unplug that black connector hanging out at the top right corner of the motherboard. It’s time to let it go!
– Take your trusty SIM eject tool and poke it into the tiny hole at the top. A little nudge should do the trick to pop that clip open.
– While keeping that gentle pressure on, give a little tug on the wire connected to it to pull it free. You’ve got this!
Step 7

– Carefully pop the motherboard out of the computer, like a pro.
Step 8

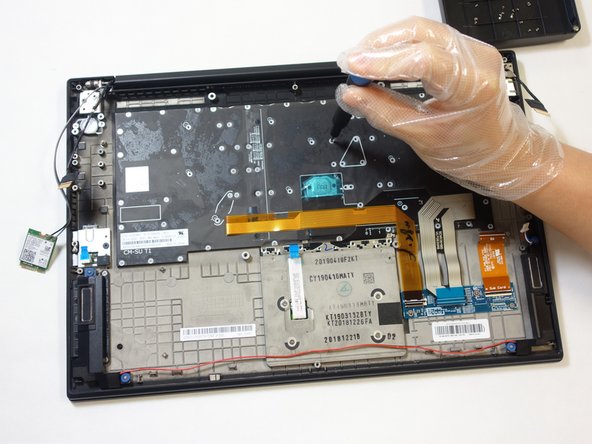
– Grab your fingernail or a nylon spudger, and carefully lift up those small locking flaps on the two ZIF connectors. Once they’re popped open, gently wiggle the ribbon cables free from their ports. Easy does it!
Step 9

– Grab your trusty Phillips #00 screwdriver and pop out those four 6 mm screws holding the trackpad snug in place.
Tools Used
Step 10

– Take your opening tool and with a gentle wiggle, lift those touchpad buttons up and off—ta-da! You’ll reveal two screws waiting for your attention.
Step 11

– Grab your trusty Phillips #00 screwdriver and give those two 4 mm captive screws under the touchpad buttons a little twist to loosen them up. Remember, these screws are a bit shy and won’t completely come out, so just give them a gentle nudge!
Tools Used
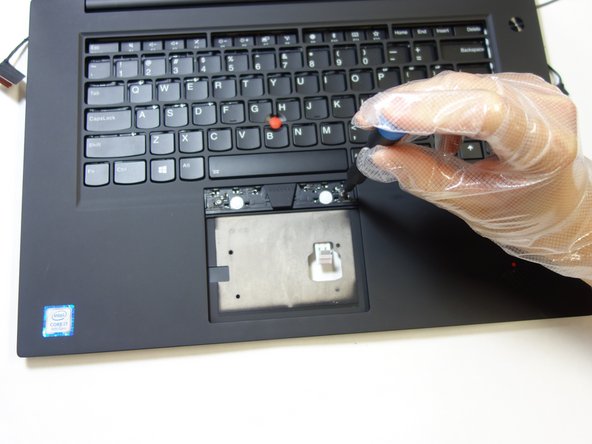
Step 12

The screws are hanging out in their designated spots, marked by the white circles on the keyboard.
– Grab your trusty Phillips #00 screwdriver and unscrew all eighty 6 mm screws from the back of the keyboard. Take your time, and keep those screws safe—there’s no such thing as too organized!
Tools Used
Step 13

– Alright, it’s time to put everything back together! Just work your way through the steps in reverse, and your device will be good to go.
– If you get stuck or want some extra hands, don’t hesitate to schedule a repair!