Microsoft Surface Pro 5 Screen Replacement
Duration: 45 minutes
Steps: 27 Steps
Heads-up: There’s a fair chance the delicate display panel could crack under pressure during this step. Take your time and handle it gently!
Ready to tackle a screen replacement on your Microsoft Surface Pro 5? Let’s do this! Just a heads-up, the display panel is super delicate and can crack easily, so keep your cool and take your time. Warm things up with plenty of heat and be extra gentle when prying—you’ve got this!
Step 1

Before you start, make sure to power down your Surface completely – we don’t want any unexpected surprises!
If you need a little extra heat, a hair dryer, heat gun, or hot plate can be your new BFF. Just be careful not to get too hot and heavy – your Surface’s screen and battery are sensitive to heat, so let’s keep things cool.
Keep your cool, but warm up the Surface! You might have to reheat and reapply the iOpener a few times to get it just right. Stick to the iOpener instructions so nothing gets too hot to handle.
– Got a cracked screen? No worries! Keep the shards in check and protect yourself while you tackle that repair by slapping some tape over the glass. Just lay down some overlapping strips of clear packing tape all over the display until it’s fully covered. And hey, don’t forget to wear safety glasses to keep those peepers safe!
– Now, grab an iOpener and give it a warm-up on the right edge of your Surface’s screen for about two minutes. You’re doing great!
Tools Used

Step 2


– Take a moment to check out the adhesive layout before diving in:
– These areas are purely adhesive, so feel free to cut without worry.
– Be cautious around the display board and flex cables—those are close to the edge. Gently cut and avoid pushing the pick too far under the display.
– There are delicate antenna cables hiding under this part of the screen. Follow the steps carefully to avoid damage. The adhesive here is also the thickest, so go slow!
Step 3


Be gentle with that opening pick—don’t slide it in past the edge of the black bezel along the screen’s side. Going too far might mess up the LCD, and trust me, nobody wants that!
– Take your opening pick, slip it into the speaker opening on the screen, and glide it under the glass like a pro. Just a heads-up—be gentle around the speaker grille! That little guy’s delicate and tears easily, so no pressing the pick into it.
Step 4


– Swing the pick down toward the bottom of the Surface and ease it under the lower edge of the speaker cutout. You’ve got this!
Step 5


If your pick isn’t gliding easily, pause for a moment and give the area a bit more heat. Forcing it too hard could lead to cracked glass—and nobody wants that! Take your time and keep it cool.
– Glide the pick smoothly along the right edge of the Surface, cutting through that stubborn adhesive beneath the screen.
– Keep the pick snugly in the right edge to block the adhesive from bonding back together.
Step 6

You can bring the heat with a hair dryer, heat gun, or hot plate—just play it cool! Too much heat can mess up your Surface’s screen or battery, so keep things warm, not scorching.
Keep your cool, but warm up the Surface! You might have to reheat and reapply the iOpener a few times to get it just right. Stick to the iOpener instructions so nothing gets too hot to handle.
– Warm up your iOpener and then let it do its magic on the bottom edge of the Surface’s screen for about two minutes. Easy does it!
Tools Used
Step 7


Be careful not to push the opening pick any further than the black bezel around the screen. Pushing it too deep could cause damage to the LCD. Keep it cool and controlled—your device will thank you!
– Grab a fresh opening pick and pop it into the bottom-right corner. Glide it smoothly around the corner and head for the bottom edge.
– Run the pick along the bottom edge of the Surface, slicing through that sticky adhesive like a pro.
– Park the pick in the bottom edge for now—this will keep the adhesive from sticking itself back together.
Step 8

Feeling the heat? A hair dryer, heat gun, or hot plate can kick things up a notch, but play it cool—overheating the Surface could make your screen and battery go on strike!
Keep your cool, but warm up the Surface! You might have to reheat and reapply the iOpener a few times to get it just right. Stick to the iOpener instructions so nothing gets too hot to handle.
– Warm up that iOpener again, then give the left side of your Surface’s screen a cozy two-minute heat treatment. You got this!
Tools Used
Step 9


Be super careful when cutting under the lower 2.5 inches (65 mm) of the left edge – don’t insert the opening pick more than 1/8 inches (3 mm) here. The display cables are hiding near this part of the bezel and can get damaged easily. Once you’re past the display cable area, don’t push the pick past the bezel. Take your time and you’ll be golden! If you need help, schedule a repair
– Pop a fresh opening pick into the bottom left corner and gently glide it around the corner toward the left edge.
– Continue sliding the pick along the left edge of your device to slice through that sticky screen adhesive.
– Leave the pick in place along the edge to stop the adhesive from sealing itself back up. You’re doing great!
Step 10

Feeling the heat? A hair dryer, heat gun, or hot plate can kick things up a notch, but play it cool—overheating the Surface could make your screen and battery go on strike!
This edge has some thick, stubborn adhesive, so you might need to warm it up a few times with the iOpener before it’s ready to cooperate. Stick to the iOpener instructions to keep things safe and breezy—no overheating drama here.
– Time to get this repair started! Reheat the iOpener and apply it to the top edge of the Surface’s screen for two minutes. This will help loosen things up and make the repair process smoother.
Tools Used
Step 11


The top 6 inches (15 cm) of the case is home to the left and right antennas, snugly tucked between the case and the screen bezel. Take it nice and easy on the next steps to keep those antennas safe and sound.
– Swing around that left corner with your opening pick and glide it smoothly along the top edge of the Surface. Pause when your pick is hanging out 2.75 inches (70 mm) away from the left edge. Keep it steady!
Step 12


Keep that pick cruising parallel to the screen the whole way, so it doesn’t snag on the antennas. And hey, go easy—don’t push the pick against the case.
– Gently slide the tip of your pick under the display where you last paused your cutting adventure. Just a friendly reminder: keep it shallow—no deeper than the bezel’s edge!
– Now, let’s roll! Carefully pivot the pick to the right, pressing its long edge into the screen adhesive hiding beneath the bezel. As you roll along, you’ll be slicing through that sticky stuff like a pro. Just remember, no sliding along the edge of the Surface—keep it classy!
– Keep the momentum going! Insert the tip of your pick right where you just made your cut and continue rolling to the right along the top edge of the Surface. Do this until your pick is 2.5 inches (64 mm) away from the right edge of the Surface. You’re doing great!
Step 13


– After snipping the adhesive over the antennas (a handy 8.5 inches, or 22 cm, away from the left side), glide your pick smoothly along the top edge, rounding the top right corner like a pro to cut through the leftover sticky stuff.
Step 14


Hold up! Don’t yank that screen just yet. It’s still tethered to the motherboard by a couple of cables.
– Gently ease the screen assembly away from the Surface case—take your time! If it puts up a fight, hit pause and double-check that all the adhesive is loosened.
– Grab your opening pick and slice through any leftover sticky spots like a pro.
– Heads up—the flash lens might pop out of the Surface case. Make sure to keep tabs on it and tuck it back into its spot during reassembly.
Step 15


– Gently lift the top of the screen assembly away from the case, while carefully bringing the bottom closer to the motherboard display connectors. It’s like giving the screen a little wiggle room!
– Now, gently lower the screen back onto the case, with the connectors facing up. Be mindful not to put any unnecessary stress on those display cables—they’re more fragile than they look!
Step 16


Be gentle with the shield—it’s got a job to do when putting everything back together!
– Grab your trusty opening pick and gently shimmy it under one edge of the EMI shield that’s hugging the display board—go slow and steady, no rush!
– Work your way around the shield, hitting different spots and prying carefully until it gives up and pops off.
Step 17

– Slide that EMI shield off the display board like a pro and set it aside. You’re doing great!
Step 18


– Grab your trusty spudger and gently pop the display interconnect cable straight up and out of its snug little socket on the board. Easy does it—you’ve got this!
Tools Used

Step 19


Be gentle with the shield—keeping it intact will make reassembly way smoother!
– Grab a pair of pointy tweezers and gently sneak one tip into the edge gap of the EMI shield that’s hiding the digitizer connector.
– Work those tweezers like a pro and carefully nudge the EMI shield away from the display—just don’t bend it out of shape!
– Keep doing your thing, prying around different spots on the shield until it finally pops free. Once it’s loose, go ahead and take it off.
Tools Used

Step 20

– Gently peel off the rest of the shield covering the digitizer connector and take it out with care.
Step 21

– Gently nudge the digitizer connector with the spudger’s tip, lifting it straight up and out of its cozy socket on the screen. You’ve got this!
Tools Used
Step 22

– Carefully take off the screen assembly from the Surface—go slow, you’re doing great!
– When putting it all back together, pause here to follow the guide for swapping out the screen adhesive. Keep it steady and stick with it!
Step 23


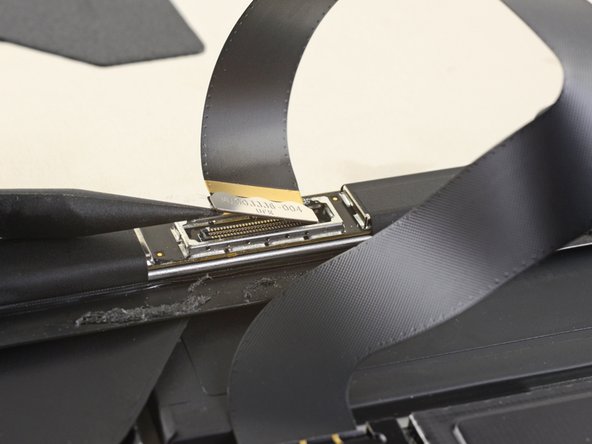
– Grab a spudger and gently lift up those tiny locking flaps on the display cable ZIF connectors. You’ve got this!
Tools Used
Step 24


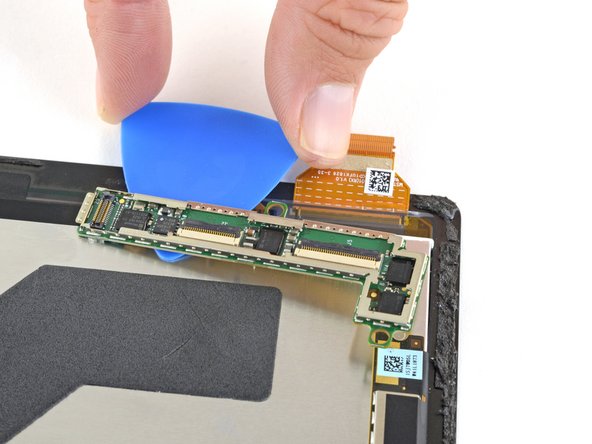
– Grab those tweezers and gently coax the display cables straight out of their snug little sockets on the display board. Take your time, no rush—it’s all about that steady hand!
Tools Used
Step 25


– Let’s get this screen separated! Carefully slide an opening pick under the display board to gently break the adhesive bond holding it in place on the back of the screen.
Step 26

– Pop that display board out of there—nice and easy.
– When it’s time to put it back, grab some sturdy double-sided tape or a precut adhesive card to hold the display board in place. Don’t forget to scrub away any old adhesive before slapping on the new stuff.
– For a perfect fit, connect both display connectors first, then secure the board to the display. Trust us, it’ll save you some head-scratching later.
Step 27

– Check out your new part in comparison to the old one—you might need to move some components or peel off adhesive backing before popping it into place.
– Putting your gadget back together? Just roll these steps in reverse!
– Got electronic leftovers? Drop ’em off with an R2 or e-Stewards certified recycler to keep things eco-friendly.
– Feeling stuck? No worries! Try a little troubleshooting magic or lean on our Answers community for extra help.
– Still having trouble? No sweat! You can always schedule a repair and let the pros handle it.