Magic Mouse Teardown
Duration: 45 minutes
Steps: 12 Steps
We’re wondering what’s so magical about Apple’s Magic Mouse… so we’re going to look inside to find out! Want up-to-the-minute updates? Follow @ifixit on twitter. Wired and iFixit are hosting a Sony Teardown contest. Take apart anything made by Sony, take photos, and use our editor to post a teardown. You could win a PS3 or PSP Go!
Step 1


– Step right up and get ready for a teardown adventure with Salvation Repair!
– Tonight’s star is none other than the Magic Mouse from Cupertino, California—Apple’s first mouse featuring Multi-Touch technology.
– Take a moment to appreciate the sleek design of the Magic Mouse before we dive into the step-by-step teardown.
Step 2

– Alright Magic Mouse, no need to be shy—let’s give the audience the full rundown on what makes you so cool.
– The Magic Mouse has a sleek aluminum base and a smooth multitouch surface, giving it a polished, button-free look.
– Unlike its older sibling, the Mighty Mouse, the Magic Mouse is all about gestures to make your experience smoother and more intuitive.
– Scroll in any direction with just a finger, or swipe through web pages with two fingers—thanks to momentum scrolling, where the speed matches your swipe.
– Oh Magic Mouse… you truly live up to your name!
Step 3


Hey folks, just a heads up—what you’re about to see involves some cool, professional-level maneuvers. Please, don’t try this at home unless you’re a pro or working with one. Stay safe and, if you ever feel stuck, don’t hesitate to schedule a repair.
– Alright, let’s kick things off with a bit of a show—who’s ready to help us out? Yep, you, Magic Mouse! Come on up and join the fun.
– Now that we’ve got our volunteer, it’s time to start disassembling the Magic Mouse. Don’t worry, we’ll walk through each step carefully.
– The batteries are just your regular Energizer alkalines—nothing fancy. Maybe Steve prefers plain old batteries instead of Apple-branded ones, or perhaps he’s been busy with other gadgets like tablets. Whatever the case, we’ve got this covered.
Step 4


To hit next quarter’s sales goals, Apple would need to move around 164 million Magic Mice. (Though, fun fact, they do have other products too.) At that pace, it’d take about nine years for every person on the planet to own one.
– Wow, at $69, the Magic Mouse isn’t exactly a bargain. You might expect a mouse at this price to work some magic, but let’s see what it takes to get this little device back in action.
Step 5


– Time to get inside and discover the secret amulet that powers up the Magic Mouse. Of course, there’s a hefty amount of magical adhesive standing in our way.
– We used a Plastic Opening Tool to gently work the mouse out of its shell.
Step 6


– Getting components apart can sometimes be a battle, but with a bit of patience and the right technique, you’ll conquer it. While adhesives and stubborn parts might resist at first, gentle prying and careful maneuvering will do the trick. When it comes to weighing the materials, you’ll notice that the mouse’s weight isn’t just from the plastic and batteries—there’s not much aluminum involved, just around 10 grams compared to 37 grams of plastic and 47 grams of batteries. If you need help along the way, you can always schedule a repair.
Step 7
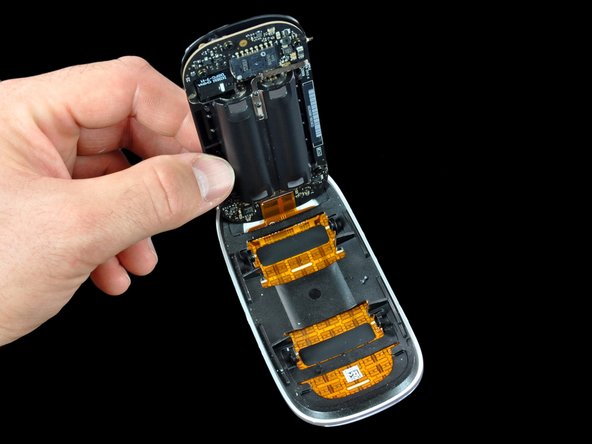


– Kick things off by opening up the sarsaparilla — wait, I mean, open the Saskatchewan! Or maybe it’s septuagenarian? No, saddle soap! Whatever it is, just get started and open it up. Once that’s done, you’ll see how straightforward it is to get in there.
– This is where the magic begins—think of those orange capacitive touch sensors as your secret superpower. They’re the first hint of the tech wizardry inside.
– Inside, the top of the mouse connects to the main board and power with a single, wide ribbon cable. Carefully detach this connector to free the top shell, and you’re well on your way.
Step 8

– Check out the mouse’s translucent top—it’s got that cool, see-through vibe. Wouldn’t it be wild if Apple made a mouse that actually lit up?
Step 9


– Once you’ve popped off the black plastic frame, you’ll get a clear view of those sensors we’ve been waiting to see.
– From the Apple logo upwards, the whole surface of the mouse is packed with capacitive touch sensors, so keep your eyes peeled!
Step 10


Did you know? A mouse’s brain weighs about 0.4 grams, but the Magic Mouse’s brain tips the scales at 9 grams. That means the Magic Mouse is 22.5 times ‘smarter’ than your average mouse! Who would’ve thought?
– This is the main control center—handle with care!
Step 11

– Here’s the Broadcom BCM2042A4KFBGH chip, the secret sauce that lets your Magic Mouse chat seamlessly with its host. It’s a BCM2042 ‘Advanced Wireless Keyboard/Mouse Bluetooth Chip,’ designed to keep things wireless and smooth. Broadcom explains that by packing all those tiny components into the BCM2042, manufacturers can cut costs and get close to the price point of good old wired mice and keyboards. Looks like Apple might have missed that memo, but no worries — with this chip out of the way, you’re one step closer to a fully functional device. If you need assistance, you can always schedule a repair.
Step 12

– Well, the Magic Mouse didn’t make it. Another mouse sacrificed in the name of science. We didn’t cause any damage, but putting it back together is going to be tricky. Update: We managed to get it back together and it still works!
– Next up, we’re diving into the iMac that came with our Magic Mouse. Stay tuned for more updates, and if you need a hand, don’t hesitate to schedule a repair.
Success!